| On this page |
Overview 
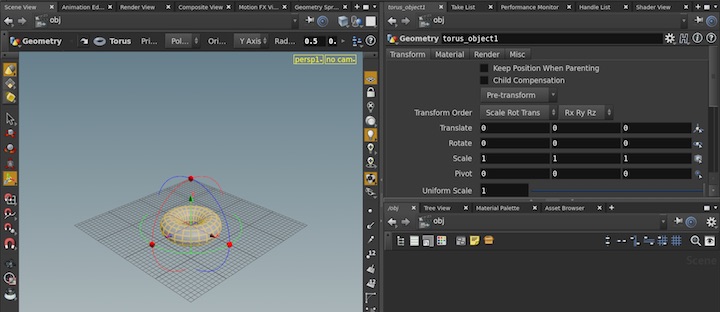
Houdini’s interface is divided into rectanglar panes, with each pane containing at least one editor or view tab. You can add more tabs, just like browser tabs, where each tab contains a different pane type, or similar pane types viewing different data.
-
You can add, remove, resize, and reconfigure the panes. You can switch to alternative layouts, and create and save your own custom layouts.
-
You can have multiple pane tabs of the same type. For example, you can have one network pane following the selection, and another network pane that always shows the same network.
-
Panes can exist in floating windows on top of the main window.
Desktops 
Houdini ships with different desktops suited to different tasks. A desktop is a preset pane layout, set of shelf tabs, and default radial menu designed for specific tasks, such as modeling or shader building. Houdini ships with several pre-made desktops, and you can also save and use your own custom desktops.
You can work with desktops using the ![]() desktops list pop-up menu at the top of the main window.
desktops list pop-up menu at the top of the main window.
Mac
On Mac, Houdini has a Desktops menu in the main menus instead of a pop-up in the main window.
| To... | Do this |
|---|---|
|
Switch to a different pane layout |
Open the Desktop list menu and choose the desktop to switch to. |
|
Open the Desktop list menu and choose Save current desktop as. |
|
|
Save any changes you've made to the current desktop |
Open the Desktop list menu and choose Save current desktop. |
|
Revert to the last saved version of the current layout |
Open the Desktop list menu and choose Reload current desktop. |
|
Delete, rename, and manage saved desktops |
Open the Desktop list menu and choose Desktop manager to open the desktop manager window. |
|
Start with a completely blank configuration |
Open the Desktop list menu and choose New desktop. The new desktop starts with a single viewer pane and blank shelf. You will have to re-add the shelf tabs you want to be available in the new desktop. See how to use the shelf. |
Pane management 
| To... | Do this |
|---|---|
|
Resize panes |
Drag the divider between the panes. |
|
Collapse the panes on one side of a divider |
Click one of the arrows near the center of the divider. You can click the arrow again to expand the panes again. |
|
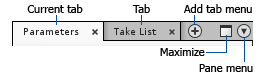
Maximize a pane |
Click the |
|
Create a new tab |
Click the |
|
Save and restore different pane layouts |
See pane layouts below. |
Setting up a new pane layout 
These are some useful controls for large-scale editing of the pane layout.
Tip
If you mess up the pane layout, you can reset to the last saved version of the layout by opening the Desktop list pop-up and choosing Reload current desktop.
| To... | Do this |
|---|---|
|
Split a pane into two new panes |
Click the |
|
Delete a pane and all its tabs |
Click the |
|
Swap the panes on either side of a divider |
Click the center of the divider. |
|
Switch a vertical divider to horizontal or horizontal to vertical |
Alt-click the center of the divider. |
Floating panes 
You can open a new window that floats above the main window that can hold its own set of panes and tabs. This is especially useful when you have multiple monitors. You can keep a second window full of useful panes on a separate monitor from the main window.
Tip
You can drag and drop pane tabs between panels and between a panel and the main Houdini window.
| To... | Do this |
|---|---|
|
Create a new panel window |
Choose Window ▸ New floating panel. |
|
Set up a panel to appear only when a certain desktop is active |
Open the Tip Any floating panels that are open when you save the desktop are “attached” to the desktop, so they are only visible when that desktop is active. |
Floating panel menu 
All panes in a panel have an extra Floating Panel submenu in the ![]() pane menu, containing the following items:
pane menu, containing the following items:
Tip
When you choose a Move X to this panel item (for example, Move main menu to this panel), the item changes to Reset X to desktop (e.g. Reset menu menu to desktop). Choosing the item again resets the user interface element back to its default place in the main Houdini window.
Attach this Panel to Desktop
When this option is on, the panel only appears when the current desktop (pane configuration) is open. See how to use desktops above.
Fullscreen Panel
When this option is on, the panel fills the screen without any window border. This is useful for a floating panel on a secondary monitor in a multi-monitor setup.
Move Main Menu to this Panel
Moves the main menu from the main Houdini window to the top of this panel.
This item is only available on Windows and Linux. See also ![]() > Pane interface ▸ Move main menu here, which puts the main menu at the top of an individual pane rather than across the top of all panes in a panel.
> Pane interface ▸ Move main menu here, which puts the main menu at the top of an individual pane rather than across the top of all panes in a panel.
Move Shelf to this Panel
Moves the shelf from the main Houdini window to the top of this panel.
After you use this command to move the shelf, it changes to Reset shelf to desktop. Choose this item to return the main menu to its default position in the main Houdini window.
Move playbar to this Panel
Moves the playbar to the bottom of this panel instead of along the bottom of the entire main window.
Move Status Bar to this Panel
Moves the status bar to the bottom of this panel instead of along the bottom of the entire main window. Only available on Windows and Linux.
Pane location and pinning tabs 
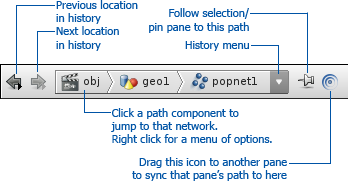
Viewer and editor panes show the path of the at the top of the pane.
-
Click any of the components of the path to jump to that network level.
-
Right click the path for a menu of options.
-
Click the menu button at the right end, or click the arrows at the left end to navigate through the history of locations.
-
Press ⌃ Ctrl + L to hand-edit the location if you know the exact path you want to go to.
Pinning 
By default, all panes are unpinned, meaning they follow the current selection. For example:
-
When you dive into a Geometry container in the network editor, the 3D view also switches to the show the geometry network inside.
-
When you select a node in the network editor, the parameter editor switches to show the parameters for the selected node.
You can pin individual panes to their current network/node. For example, you can pin a parameter editor tab to always show the same node instead of following the selection, or pin a network editor tab
Click the ![]() Pin button at the top of a pane tab to pin the tab to its current network/node. When the button is
Pin button at the top of a pane tab to pin the tab to its current network/node. When the button is ![]() pushed in, the tab will not follow the selection.
pushed in, the tab will not follow the selection.
Tip
When you create new tabs of certain types, such as new network editor tabs, Houdini automatically creates them pinned, since it assumes you only need one pane automatically following the selection.
Advanced: tab linking 
Note
Tab linking can be complicated and unintuitive. Longtime Houdini users may have workflows that rely on linking, but new users can probably ignore it and just use pinning and unpinning.
The default unpinned tabs follow each others' selection because they are linked. Linking is kind of like watching a channel: all the default tabs are watching the channel called Last Selected Node, so when the selected node changes, the linked tabs switch to that network. You can choose to tune some tabs into a different channel (for example, channel 1 or channel 2), so that those tabs will change networks together, and ignore changes to the locations of tabs that are watching other channels.
To set a tab’s channel, right click the ![]() Pin button at the top of the tab, then choose a channel for the tab to follow.
Pin button at the top of the tab, then choose a channel for the tab to follow.
-
“No link” means the tab is pinned, so it won’t change in response to what happens in other tabs. The pin icon changes to the
 pinned icon.
 -
“Last Selected Node” means the tab is unpinned, so it will follow the selected node. The pin icon changes to the
 unpinned icon.
 -
Choosing a channel number means all tabs on that channel will change networks together. The pin icon changes to show the channel number instead of an icon.
Tips and tricks 
-
You can have Houdini color code panes by the type of network they're viewing. This might be useful to help keep track of when you're viewing an object, geometry, or dynamics network.
Choose Edit ▸ Preferences ▸ General User Interface and turn on Color pane headers with network contexts.
-
Right click an existing tab to change its pane type.
-
Drag the
 sync icon from one pane onto another to switch that pane to the first pane’s location.
 -
You can switch tabs in the pane under the mouse using hotkeys:
⌃ Ctrl + PgDn
Next tab
⌃ Ctrl + PgUp
Previous tab
Pane menu 
Click the ![]() pane menu icon in the top right corner of a pane to open a menu of pane management items.
pane menu icon in the top right corner of a pane to open a menu of pane management items.
Set Pane Tab Type
This submenu lists each pane type. Choosing an item switches the contents of the current tab to that type.
This menu also includes any python panels you have set up to appear in the pane type list.
Scene View
Switch the current pane tab to a scene viewer.
Network Editor
Switch the current pane tab to a network editor.
Parameters
Switch the current pane tab to a parameter editor.
Tree View
Switch the current pane tab to a tree View of the networks in the scene.
Take List
Switch the current pane tab to a take list.
Textport
Switch the current pane tab to textport.
Python Shell
Switch the current pane tab to python shell.
Animation Editor
Switch the current pane tab to an animation editor.
Channel List
Switch the current pane tab to a channel list.
Motion FX View
Switch the current pane tab to a Motion FX (CHOP) viewer.
Render Scheduler
Switch the current pane tab to a Render Scheduler.
Composite View
Switch the current pane tab to a compositing (COP) viewer.
Material Palette
Switch the current pane tab to a Material Palette.
Render View
Switch the current pane tab to a render (IPR) view.
Light Linker
Switch the current pane tab to a light linker.
Bundle List
Switch the current pane tab to a bundle list.
Geometry Spreadsheet
Switch the current pane tab to a geometry spreadsheet.
Handle List
Switch the current pane tab to handle list.
Parameter Spreadsheet
Switch the current pane tab to a parameter spreadsheet.
Data Tree
Switch the current pane tab to a data tree, a scriptable tree/spreadsheet view.
Context View
Switch the current pane tab to a vontext viewer that automatically changes type based on the currently selected node.
Performance Monitor
Switch the current pane tab to a performance monitor.
Help Browser
Switch the current pane tab to an embedded help browser.
Orbolt Asset Browser
Switch the current pane tab to an Orbolt asset browser.
Python Panel
Switch the current pane tab to a Python Panel, a scriptable custom pane UI.
Previous Tab
Switches to the previous tab in the pane. If the first tab is active, this wraps around and switches to the last tab.
Next Tab
Switches to the next tab in the pane. If the last tab is active, this wraps around and switches to the first tab.
Tear Off Pane Tab
Removes the current tab from the pane and puts it in a floating window.
Tear Off Pane Tab Copy
Copies the current tab into a floating window.
Close Pane Tab
Removes the current tab from the pane.
Undo Close Tab
Restores the last pane tab closed in the current pane.
Maximize Pane
Toggle the current pane between filling the entire layout and its normal size/position.
This is the same as clicking the ![]() maximize icon.
maximize icon.
Maximize Horizontally/Vertically
Toggle the current pane between filling the entire row/column and its normal size/position.
Close Pane (All Tabs)
Remove the current pane from the layout, along with any tabs in the pane.
Split Left/Right
Split the current pane into two new panes on the left and right.
Split Top/Bottom
Split the current pane into two new panes on the top and bottom.
Pane Interface
This submenu contains UI settings for the pane.
Tip
If you choose Move shelf here or Move playbar here, the item will change to reset the shelf/playbar to their default positions.
Move Shelf Here
Move the shelf from the top of the main window into this pane.
To return the shelf to its default position, choose Desktop ▸ Reset shelf to top.
Move Playbar Here
Move the playbar from the bottom of the main window into this pane.
To return the playbar to its default position, choose Desktop ▸ Reset playbar to bottom.