| On this page |
Overview 
Radial menus pop up when you press or hold a hotkey. You can assign commonly used items to the menu. You can also assign sub-menus to certain positions, creating a hierarchy of radial menus. This gives you access to a large number of tools at your fingertips as you work in the viewer.
Radial menus appear at the mouse pointer, feature large hit targets, and put all options equidistant from the pointer, requiring less mouse movement. Using the radial menu trains you on the “directions” to get to a tool, so you can eventually get to the tool quickly without reading labels.
Houdini comes with default radial menus you can use to work in the 3D viewer. You can also create your own radial menus in the Radial Menu Editor and assign a radial menu to a hotkey in the 3D viewer or the network editor.
Currently radial menus are supported in the 3D viewer and the Network editor.
Using radial menus 
Default menus 
Houdini comes with several pre-defined radial menus.
You can access pre-made radial menus in the 3D viewer using the following keys:
Key |
Menu type |
|---|---|
X |
Snapping controls |
C |
The “Current” menu. You can choose the menu on this key using the |
V |
View controls |
You can access a pre-made radial menu in the network editor using the following key:
Key |
Menu type |
|---|---|
N |
Navigation controls |
You can assign radial menus to other hotkeys in the hotkey editor.
The “current” menu 
By default, the C key in the 3D viewer shows the “current” radial menu.
-
To set the current menu on the C key, click the
 Radial switching menu at the top of the main interface.
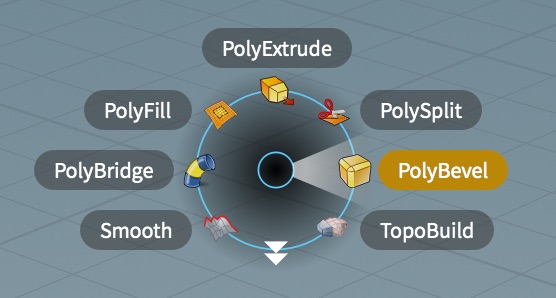
There are specialized pre-built menus for curve modeling, polygonal modeling, UV Editing, and other workflows.
-
Houdini usually has a separate “current” menu with each desktop.
For example, if you switch to the Modeling desktop, the C key will show a menu with modeling tools. The generic Build desktop has a menu with lots of generally useful tools.
-
Normally when you switch desktops, Houdini switches the C key to the custom radial menu associated with that desktop. You can “pin” the current radial menu so it doesn’t change with the desktop by opening the Radial switching menu and turning on Pin current menu at the bottom.
Managing radial menus 
| To... | Do this |
|---|---|
|
|
|
|
Tip To quickly open the “current” menu in the editor, open the |
Editing a radial menu 
| To... | Do this |
|---|---|
|
|
|
|
If you want the menu item to be an on/off toggle, click the Check on/off tab and enter a Python expression that returns For example, if you have a global boolean variable in the session module called # When the user invokes this menu item, # flip the toggle state hou.session.mytoggle = not hou.session.mytoggle …and set the Check on/off tab to: hou.session.mytoggle is True or just hou.session.mytoggle See scripting Houdini with Python for more on Python scripting. |
|
|
|
|
Generating a radial menu with a script 
Scripted menus/submenus let you write a Python script that generates the contents of the menu “on-the-fly” at the moment the user opens the menu. This lets you create a radial menu that dynamically changes with the current conditions.
-
The script can access a
dictobject calledkwargs. Currently the dictionary has one item:-
kwargs["pane"]a hou.PaneTab object representing the pane in which the user opened the radial menu.The 3D scene viewer is a hou.SceneViewer object. The viewer pane is divided into one or more viewports. You can get the current viewport using hou.SceneViewer.curViewport.
-
-
The script generates a JSON-like structure representing the menu to display (see below).
-
The script can also automatically access the
radialmenumodule. The script callsradialmenu.setRadialMenu()with the menu data to set it as the menu contents. -
Alternatively, instead of building a menu structure, you can call
setRadialMenu()with the name of an existing radial menu to show that menu’s contents. This lets you choose dynamically whether to show an existing menu. For example:if someCondition: radialmenu.setRadialMenu("cloth") else: radialmenu.setRadialMenu("polymodel")
-
The basic menu structure is a dictionary, where the keys indicate the radial direction, and the values are dictionaries describing the item or submenu in that direction.
def openAnimationEditor(**kwargs):
    desk = hou.ui.curDesktop()
    desk.createFloatingPaneTab(hou.paneTabType.ChannelEditor)


def openParmEditor(**kwargs):
    desk = hou.ui.curDesktop()
    desk.createFloatingPaneTab(hou.paneTabType.Parm)


def makeSubMenu(**kwargs):
    menu = {
        "se": {"type": "script_action",
               "script": "hou.ui.displayMessage('Hi!')"}
    }
    radialmenu.setRadialMenu(menu)


menu = {
    "n": {
        "type": "script_action",
        "label": "Animation Editor",
        "script": openAnimationEditor,
    },
    "s": {
        "type": "script_action",
        "label": "Parameters",
        "script": openParmEditor,
    },
    "e": {
        "type": "link",
        "label": "Cloth",
        "name": "cloth",
    }
    "se": {
        "type": "script_submenu",
        "label": "Go To",
        "script": makeSubMenu,
    }
}

radialmenu.setRadialMenu(menu)
(The above example is meant to demonstrate the dictionary structure, but since the point of a scripted menu is to change the contents based on some conditions, you would usually build up the dictionary in the script, rather than as a literal dictionary as shown above. See the example below.)
-
The location keys can be specified in different ways:
-
As a number from 0 to 7, where 0 is the top (north) item, and the numbers increase clockwise.
-
As a string
n,ne,e,se,s,sw,w, ornw. -
As a string
north,northeast,east,southeast,south,southwest,west, ornorthwest.
-
-
Each item dictionary contains the following keys:
typeThe
typecan bescript_action,script_submenu, orlink. See below.labelThe human-readable label for the item/submenu, displayed in the radial menu.
icon(optional)The name or file path of an icon to display next to this item in the radial menu.
shortcut(optional)Specifies a key that triggers this item when the radial menu is visible.
-
A
script_actiontype item runs a script when the user chooses the item in the radial menu. It has the following extra keys:scriptA callable function, or a string containing Python code, to run when the user chooses this item in the menu.
Currently the script is called with one keyword argument (
pane, thehou.PaneTabobject). You probably want to write your function to accept**kwargs(any additional keyword arguments) to the function won’t break if we add more keyword arguments later.checkIf this key is present, the item can be toggled on or off.
This should be a callable function. The function should return
Trueif the item is currently checked, orFalseif it is not checked. This controls whether the item is displayed as “on” or “off” in the radial menu.For a clear user interface, the
scriptchanges the state, so choosing the menu item toggles it on or off. -
A
script_submenutype item generates a scripted submenu when the user chooses it in the radial menu. It has the following extra key:scriptA callable function, or a string containing Python code. It generates the contents of the scripted submenu.
Currently the script is called with one keyword argument (
pane, thehou.PaneTabobject). You probably want to write your function to accept**kwargs(any additional keyword arguments) to the function won’t break if we add more keyword arguments later. -
A
linktype item shows an existing radial menu as a submenu when the user chooses it in the radial menu. It has the following extra key:nameA string containing the internal name of the menu to show when this is chosen.
Tip
If you don’t specify a
labelkey in alinkitem, it will use the linked menu’s label. If you do specify alabelkey, that label will be displayed instead.
Scripted menu example 
Tips and notes 
-
You can use radial menu shortcuts to assign scripts to hotkey sequences.
For example, you could create a radial menu
-
If you have fewer than eight items on a menu, the “hit area” of the items next to the “gaps” get bigger to fill in. This means in menus with fewer items, the items are easier to hit.
-
You can script showing a menu in the Viewer pane using hou.SceneViewer.displayRadialMenu. Note that the menu will open under the mouse pointer.