| On this page |
Asset Definition 
The houdiniAsset node stores the asset name and the path of the HDA file. The asset name and the HDA path together act as a reference to the asset definition. Since the definition is not saved within the node or the Maya scene, the HDA file needs to be accessible whenever the Maya scene is opened.
Instead of explicitly specifying the HDA path, you can use Houdini’s path search mechanism for HDA files. This means Houdini Engine can also search for HDA files according to environment variables like HOUDINI_PATH and HOUDINI_OTLSCAN_PATH. This makes the HDA path optional, as long as the asset name can be found via the path search mechanism.
Assets Options 
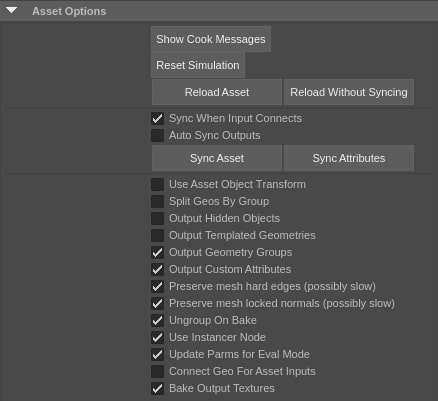
Setting |
Description |
|---|---|
Show Cook Messages |
Shows the cook messages from all the nodes within the asset |
Reset Simulation |
Resets the simulation cache of all the DOP networks within the asset |
Reload Asset |
Reloads the asset definition of this asset. This is useful when making changes to the asset from another Houdini session while the Maya session is running |
Reload Asset Without Syncing |
Reloads the asset definition of this asset without rebuilding either the parm attributes or the output node. This is faster than the regular reload when you know that the inputs and outputs have remained the same, and preserves any modifications make downstream from the asset |
Sync When Input Connects |
Perform a sync when Maya geometry is connected to the asset’s input. This is useful because connecting a Maya geometry often means the asset’s output will change somehow |
Auto Sync Outputs |
This is an experimental option Automatically performs a sync when necessary. However, this could lead to the scene being modified unexpectedly, which could lead to instability and crashes in Maya |
Sync Asset |
Deletes all the Maya shape nodes, and re-creates all the Maya shape nodes that are needed to represent what the asset is outputting at that moment Deletes and recreates the attributes for the asset’s parameters. (see Sync Attributes for more details) |
Reset Simulation |
Resets the simulation cache of all the DOP networks within the asset |
Sync Atttributes |
Deletes and recreates the attributes for the asset’s parameters. If the asset’s parameter interface remains the same, attribute values and input connections will be restored. If however, the parameters for the asset have changed (because a new definition has been loaded from disk, or if the asset type has changed the ) it may not be possible to restore all the attribute values. Note that we look at folders as well as attribute names when matching attributes to parameters, if the folder names or hierarchy have changed, attributes may not match up with parameters even if the attribute names still match |
Geos By Group |
Normally, all the primitives of the same type are outputted together, and appear as one shape node in Maya. This option makes it possible to split the primitives of the same primitive type by Houdini groups. So primitives that belong to different groups will appear as separate shape nodes in Maya For example, if half of a grid is in one group, and the other half is in another group, the entire grid will be outputted into one mesh node by default. However, if this option is enabled, one half of the grid will be one mesh node, and the other half will be another mesh node |
Use Instancer Node |
When outputting geometry instances, the default behavior is to use Maya’s particle instancer to efficiently instance the geometries. However, Maya also supports instancing nodes by parent hierarchy. If this option is off, the geometry instances will be outputted as parent hierarchy. For outputting large number of instances, it’s much more efficient to use particle instancer |
Output Hidden Objects |
Outputs hidden objects from the asset |
Output Templated Geometries |
Outputs templated geometries from the asset |
Output Geometry Groups |
Outputs component sets for geometry groups |
Output Custom Attributes |
Outputs dynamic attributes for custom attributes in the asset |
Preserve Mesh Hard Edges |
Add attributes to flag hard edges on inputs, and set edge hardness for the corresponding outputs. No longer slow as of maya 2018 |
Mesh Locked Normals |
Add attributes to flag locked normals on inputs, and set normals for the corresponding outputs. No longer slow as of maya 2018 |
Ungroup On Bake |
Discard the top level group node when baking an asset |
Update Parms for Eval Mode |
When evaluating in DG mode parm animation is always evaluated as expected during playback. When the Evaluation Mode is serial or parallel, because of the way our attributes are structured, we only know that some parms has been dirtied, not which specific ones. We are forced to update all the parms if any animation is detected Updating all the parms can impact playback speed if there are a lot of parms, and the asset cook itself is fast. Turning off this option lets you disable the parm animation update for serial and parallel mode when you don’t need it. Note that animated input geometry will still update in serial or parallel mode if this option is off |
Connect Geo For Asset Inputs |
Normally, when you use the Attribute Editor to connect another asset as an input to an asset, the first output of the asset is directly connected. If you select a mesh that is the direct output of an asset, the corresponding output from the asset is directly connected. The original output geo from the asset still exists, but it’s a dead end, and not part of the history chain. This option allows you to maintain an editable copy of the geometry that can be manipulated after downstream assets have been added |
Output Templated Geometries |
Outputs templated geometries from the asset |
Output Textures |
If the asset has materials with procedural textures, the Maya plugin will render the texture, bake it out to a file and use that file in a file texture. This can significantly impact the plugin’s performance, especially if the texture needs to be recomputed often. Turning off Bake Output Textures will disable the rebaking of the texture files. The file texture nodes will persist with the correct file names during the maya session, however if the scene is reopened with the texture baking still turned off, you will need to turn it on again and sync the asset to see the texture in Maya again. We recommend that in Maya’s Display Preferences you set the |
Preserve Houdini Scale |
Each unit in Houdini is 1 meter, while in Maya each internal unit is interpreted as 1 centimeter. If this option is enabled, geometry coming from Maya into Houdini will be scaled by a factor of .01, and geometry going from Houdini to Maya will be scaled by a factor of 100. This preserves the scale of the asset between both applications. If this is disabled, assets from Maya will come into Houdini 100× larger, and assets from Houdini will come into Maya 100× smaller than their intended scale, which was the behavior prior to 18.0, and is still the default for backward compatibility. If this option is set the corresponding options on upstream |