| On this page |
The plug-in supports using various types of Maya geometries as inputs to Houdini assets. When Maya geometries are connected as inputs, changes made to the Maya geometries will be automatically pushed to the Houdini asset, causing the Houdini asset to be evaluated.
The supported Maya geometry types for input are:
There are two ways for to input geometries into Houdini assets: operator path parameters, and node inputs. These two ways are also how Houdini users would typically input geometries into Houdini assets.
In the plug-in, there is no difference in functionality between the two ways of inputting geometry. They support the same types of geometry, and have the same features. The interface for setting the input in the Attribute Editor are also the same.
Operator Path parameters 

Operator Path parameters are asset parameters that accepts an operator path to a Houdini node. For inputting geometries, the Op Filter needs to be set to Any Object or Any SOP. When Maya geometries are assigned to an operator path parameter, appropriate Houdini nodes that represent the input geometry will be created, and the path of the Houdini node will then be set to the parameter. The asset can then use the operator path normally to access the input geometry.
Although the parameter can be created manually, the more common and simple to create an Object Merge SOP, and promote the object parameter to the asset level. The input geometry is then accessible from the output of the Object Merge SOP.
Inside Maya’s Attribute Editor, Operator Path parameters would appear mixed in with other asset parameters, because Operator Path parameters are just another type of parameters.
Operator Path parameters can be used for both Object-type assets and SOP-type assets to input geometry. However, for SOP-type assets, it is more common to use node connections directly.
Node Inputs 

By design, SOPs have node connectors for passing geometries. This means SOP-type assets can have node connectors for inputting geometries. The node connectors of an asset can be configured by changing the Minimum Inputs and Maximum Inputs in the Operator Type Properties dialog.
In Maya’s Attribute Editor, node inputs would appear at the very top under the Inputs section.
Multiple and mixed geometry types 
It is possible to input any number of Maya geometries into a single asset input. It is also possible to mixed different types of geometries in an input. For example, it is possible to connect a mesh, curve, and particle from Maya into a single input of an Houdini asset. Each input geometry is inputted separately, and all the input geometries are then joined together on the Houdini side using a Merge SOP. The Merge SOP is then connected to the asset as a single input.
If a group that contains multiple child objects is selected to use as input, the child objects will be expanded, and inputted as separate geometries. The group/transform hierarchy of the objects are not preserved.
Node Options 
While the names of the maya input geometries are displayed on the asset node, the input geometry is actually connected by way of the houdiniInputGeometryNode (and sometimes the houdiniInputCurve, houdiniInputTransform and houdiniInputMerge nodes). These nodes will appear in related Attribute Editor tabs when the asset node is selected.

The input nodes used to be so uninteresting that we didn’t even have Attribute Editor templates for them, but that has changed over time. There are now a number of options on the houdiniInputGeometry node. Most are only relevent for mesh inputs. Some are set automatically, otherwise the defaults are usually appropriate: so for the most part you’ll never need to look at these options. But in case you do:
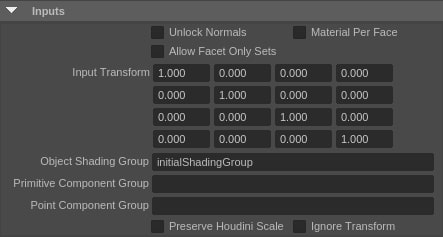
The houdiniInputCurve and houdiniInputTransform nodes now also have the Preserve Houdini Scale option.
Setting |
Description |
|---|---|
Unlock Normals |
For mesh inputs, to avoid sending custom normals to Houdini in the first place, turn on |
Material Per Face |
If this option is set, attach shading group information as a primitive attribute when sending the mesh to Houdini, even if the input geo does not have shader assignment per face. When we assign materials to the output mesh , we do shader-per-face material assignment if the |
Allow Facet-Only Sets |
Facet-Only sets are one of a class of sets that Maya uses interally in some of its tools. Most of the time, you probably don’t want to see these sets in houdini since they represent some Maya tool’s current internal state, and not persistent membership information. However, since it is possible to create these sets from the command line, you can turn on this option if you're using custom facet-only sets and wish to propogate the set membership |
Object Shading Group |
The object level shading group of the input mesh. We now have a script job that watches for changes to shader assignment on meshes feeding in to assets, then the shading group can be updated and passed through to the output geo. You should never need to set this manually |
Primitive Component Group |
If you want to use a non-default group for face selection input, specify the name here. Otherwise a primitive group called inputPrimitiveComponent will be created for maya face selection |
Point Component Group |
If you want to use a non-default group for maye vertex selection input, specify the name here. Otherwise a point group called inputPointComponent will be created for maya vertex selection. |
Preserve Houdini Scale |
Each unit in Houdini is 1 meter, while in Maya each internal unit is interpreted as 1 centimeter. If this option is enabled, geometry coming from Maya into Houdini will be scaled by a factor of .01. This option is automatically set when the corresponding option is set on the houdiniAsset node, so the user should not need to set this manually. This option is off by default for backward compatibility with pre-18.0 behavior |
Ignore Transform |
When active, the incoming transformation will be ignored. This mimics the function of the Object Merges SOP’s Transform parm being set to None |