| On this page |
In an ideal world, code would be self-explanatory, and in a mostly ideal world, the remaining parts would be appropriately commented. While we'd like to believe that this is mostly true for the Maya plugin, this section may help the interested user get past some of the non-intuituive bits. Here’s the usual illustration of what the houdini plugin looks like in the DG
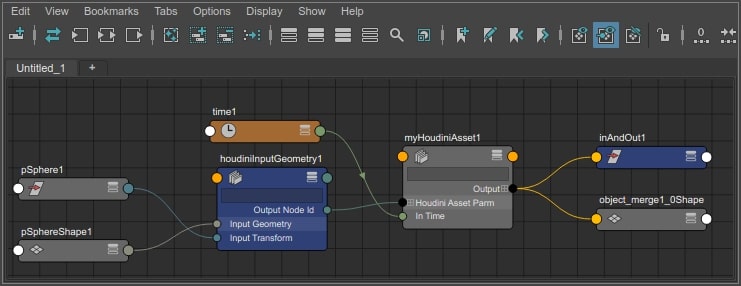
The thing to note (this time), is that the plugin naming is houdini-centric. So houdiniInputParameters are being input from Maya into Houdini. The Output attributes are being output from Houdini into Maya. This naming convention is followed throughout the code. Input classes and methods are for input into houdini, and Output for output from houdini. Get methods get parameter values and set attributes. Set methods get attributes and set parameter values.
The other thing to note is the asymmetry of the node architecture. Input geometry is translated and transferred to Engine by individual input nodes, output Maya data for all the maya output geometry is computed by the asset node. There are advantages and disadvantages. This allows us to:
-
connect multiple maya shapes to an assets input
-
chain assets together directly
-
share a single input among multiple assets
But the main interface that the user sees is the asset node in the Attribute Editor. This means that:
-
controls that affect how geometry is input live on the inputGeometry nodes, and are not obvious to the user
-
the interface for connecting inputs is embedded in the attribute editor. The user sees a list of upstream node names and a button, but the actual input attributes are nodeId’s with upstream connections. This can be confusing.
-
controls that affect both the input and the output have to be duplicated on all the nodes, or split into input and output versions. (e.g.
preserveScaleis on both, but the asset node has apreserveMeshLockedNormalsoption for output while the input geometry has an unlockNormals option to not send normal to houdini in the first place)
There’s also the asymmetry of the attributes on the asset node itself. We add dynamic attributes for the parameters - given that an asset can have arbitrary parms with an arbitrary organization into folders, there wasn’t really any other option. All the parm attributes are added as compound children of the houdiniAssetParm attribute. An asset’s inputs have their own non-dynamic Input multi attribute, but if you've exported an Object reference to hda’s parms, it comes in with the rest of the parm attributes.
Outputs are not dynamic, but we have multis of complex compound attributes, as we attempt to encompass all the possible output geometries. In fact ourattribute structure seems to be more complex than anything that autodesk tests internally, and as a result Maya breaks fron time to time. As anyone trying to use 2018.4 or 2019.0 would have noticed. The real issue is that we have nested outputObjects/outputGeos/outputParts attributes, and each outputPart has enough child attributes to describe all the possible output geos. Could we have flattened the output hierarchy by omitting the Geo (or even the Object)level of nesting? Or split up the Parts compound by having separate output nodes each part geo type? And would we have reduced the risk of encountering Maya bugs if we had done so? Not sure if we could tell, even in hindsight, without actually trying it. These are still options we might conside if we encounter intractable Maya regressions in the future.
Plugin 
-
plugin.C
This handles the usual plugin stuff - loading/unloading the plugin, and registering/unregistering nodes and commands. It also handles the engine side of loading the plugin:
-
manages the engine session (HARS process)
-
manages the optionvars (because most of those refer to session and environment)
-
manages time unit related stuff for interacting with engine
When the plugin is loaded, we create a HARS session if auto-start is on, or connect to an existing HARS server via the specified pipe or socket. When unloading the plugin we close the session and kill the server if needed. We no longer support in-process sessions as of hourini 17.0, however the in-process session code is still present in the present in the plugin. Note that loading pthe plugin starts the engine session, but a license is only pullted when an asset loaded or a node is creates
Nodes and Commands 
The maya nodes:
-
input and merge nodes: get geometry data into the hda
-
assetNode: bring in parm values and animation, cook the hda and convert the output geometry into maya data
The maya plugin commands:
-
access the engine session state, load asset definitions
-
create the asset node and add the attributes in Maya that correspond to the asset’s parms
-
create output nodes in Maya based on the data in the output attributes
The maya mel code:
-
creates input nodes and connects them to the asset node
-
(and all the other UI of course, but that shouldn’t be surprising)
Input Nodes 
Maya has a main houdini asset node, and feeding into the asset node are a number of different conversion nodes for bringing maya geometry into houdini. The input maya nodes create an Input geometry object in engine, and output a houdini nodeId. The AssetNode will use the nodeId to make connections to the asset’s inputs on the engine side.
We have a class for each of the input node types.
-
houdiniInputGeometry(InputGeometryNode.C) handles Mesh Particle and single curve inputs -
houdiniInputCurve(InputCurveNode.C) - multiple input curvces -
houdiniInputTransform(InputTransformNode.C) - multiple transforms converted to particles with transform attributes (UI currently only supports locators, but any transform will work -
inputMergeNode(InputMergeNode.C) - create a merge node in houdini and connect the inputs on the engine side
Each input node owns an Input object that does the actual work of creating the corresponding houdini geometry node. The input objects also have compute () methods, so you need to keep track of whether you're looking at the derived maya classes, or the our own utility objects. The input object hierarchy looks like:
-
Input.C-
InputCurve.C(single curve input - deprecated) -
InputMesh.C -
InputParticle.C
-
Asset Node 
-
houdiniAsset(AssetNode.C)- maya node stuff, defining attributes -
Asset.C- The assetNode owns an Asset object, which managest the interface between maya and engine, create output data from houdini objects. It too has a compute() method, to subtly hint that that’s what gets done in the node compute.
The rest of this section will probably only be interesting if you've started looking at the code and wondering how the pieces fit together. (And even then, it might not be interesting)
Node Methods 
If you take a look, about two thirds of AssetNode.C consists of building the output attributes. The Output attributes are intended to encompass all the possible output geometries so there’s rather a lot of them
Houdini Asset in the Nodes doc for a complete list.
And then we override all the usual node methods where appropriate. Here are the ones where moderately interesting houdini related stuff happens, or moderately squirrly maya things.
-
make sure asset nodes are created/deleted server side
-
nodeAdded(),nodeRemoved(),postConstructor(),createAsset(),destroyAsset()
-
-
setting up the asset when loading scene
-
figuring out when to update parms and when to sync
-
setSependentsDirty()- set parm values server side, force sync in some special cases (as well as the dirty propagation) -
setInternalValue() The parm attributes and the asset name/path are internalSet. The name and path are actually stored internally on the node, the parms are just there to pass the data to houdini. There is some overlap with setDependents Dirty. Never sure if one or both will be called cause of EM/DG mode differences. In some cases we may end up with extra parm updates, but at least we don’t miss any.
-
preEvaluation() Dirtying for the Evaluation Manager - unfortunately the EM only looks at compound parents, so we can only dirty our parms at the top level, sice they're all created under houdiniAssetParms
-
-
conversion between parm values and attribute values
-
setParmValues() - get attributes and set the parms (wrapper for parm iterators in Asset.c)
-
getParmValues() - set attributes from parm values (wrapper for parm iterators in Asset.c)
-
evaluation manager stuff
-
-
compute() update parms and do Asset::compute() - where all the exciting stuff happens
-
shouldSave() needed to get around maya optimization bugs for storing multis of numeric values where some values are default - force save of node ids on inputs
-
connectionBroken() needed to around maya bug where disconnect behavior doesn’t seem to work for elements of multi compounds
Asset/Houdini Interface 
The most interesting thing about Asset.C is the compute, but it really does all the maya data/houdini data interface
The attribute/parm in terface is based on the parm iterator Util::WalkParmOperation. We create a number of parameter iterators to copy data back and forth. Attribute creation is handled in the syncAttributes command - more about that later
-
AttrOperation-
GetMultiparmLengthOperation -
GetAttrOperation -
SetMultiparmLengthOperatio -
SetAttrOperation
Copying strings is the slowest part of the client-server interface, so we cache all the parn names the first time we access the asset.
-
The asset node also handles the connection of the input geo nodes to the asset inputs server side
Computing the Outputs 
We have a hierarchy of OutputObjects that do the actual building of the maya output data. We walk the houdini output object nodes, build these OutputObjects, and then walk the OutputObjects and get them to do the actual work:
-
OutputObject.C-
OutputGeometryObject.C-
OutputGeometry.C -
OutputGeometryPart.C -
FluidGridConvert.C
-
-
OutputInstancerObject.C
-
-
OutputMaterial.C
Asset::compute:
-
does the cook
-
updates the node list with what we hope are the output/display nodes
-
Sop asset - just the node id
-
Object Asset - may need to getComposedChildList
-
-
Creates OutputObject(s) for the nodes. (i.e. the OutputObject class instantiates an object of one of its child classes - OutputGeometryObject or OutputInstancerObject)
-
these
OutputObjectswill be used build the actual output data
-
-
computes the asset transform
-
(only interesting for object asset with a subnet)
-
-
computeInstancerObjects()-
walks the all outputObjects and for each OutputInstancerObjects to compute their output data
-
-
computeGeometryObjects()-
walks the all outputObjects and gets the OutputGeometryObjects to compute their output data
-
-
computeMaterial()-
this one is kind of backwards (I need to look at the code some more to remember a few details)
-
counts on the sync having populated the output material paths of materials that are actually assigned to output geo (this is the part I'm not sure about - I will explore that code again)
-
creates OutputMaterial objects for the existing number of outputs and iterates over them
-
if it thinks the material has changed or the cook count has fallen behind …
-
search the asset’s VOP/SHOP nodes for one that matches the material path
-
if it finds the matching one, extract all the material info and update the data, also bakes output textures (which can be very slow, so we try to reuse the existing texture files if the must bake option is off)
-
-
If the output data is already connected to output shapes, it will get picked up on the next draw or other evaluate It it’s not connected to any outputs yet, the next sync will create output shapes for any data that’s been output
Commands 
There are two main plugin commands
-
EngineCommand.C: commands for interacting with the engine session (query session, save hip file) -
AssetCommand.C: commands for interacting with a paricular asset (load hda, update maya nodes and attrs from asses)
Each command has multiple flags, which are implemented by creating the corresponding subcommand object object and using it to perform doIt(), undoIt(), etc. Yes, we're naming out methods to match the Maya methods again, which hopefully clarifies mopre than it obfuscates. See
Plugin Commands for all the command options.
SubCommands 
-
SubCommand.C - parent class for all the subcommand objects
The engine subcommands are simple, and all live in EngineCommand.C. The asset subcommands are complicated, and have additional class hierarchies and files of their own
-
AssetSubCommandLoadAsset.C- delete and reload the asset definition -
AssetSubCommandSync.C- rebuild the attributes based on parm state, or cook and rebuild the output geometry nodes based on output-
SyncOutputInstance.C -
SyncOutputMaterial.C -
SyncOutputObject.C-
SyncOutputGeometryPart.C
-
-
SyncAttribute.C
-
Sync 
Sync also creates helper objects to do the seperate sync operations
-
preSyncCallBack(user defined, cache any custom mods to parms or outputs) -
if syncing attrs, creates a syncAttibutes object and executes it
-
sync outputs
-
finds and deletes all nodes beneath the asset node
-
deletes all output material connections
-
delete all self-connections (e.g. if it’s syncing cause you turned off use
AssetObjectTransform) -
walk the
outputObjectsplug elements, create a SyncOutputObject and execute it-
syncOutputMaterialonly for the first object that has the material assigned
-
-
walk the outputInstancers plug elements, create a SyncOutputInstance and execute it
-
Utility 
More utility methods can be found in:
-
util.C-
parm name and node name conversion to valid maya names
-
progress bar handling/status checking
-
parm iterators
-
convenience methds for DG operations
-
error handling
-
-
AssetNodeOptions.C- node specific options have their one NodeOptions class, but only the asset node currently makes use of this
Mel Commands and UI 
These ought to be self-explanatory, but there are a few things to look out for
-
global proc names don’t match the script file name, so there’s a whole lot of sourcing going on
-
shelves will need to be rebuild when new version of houdini is installed that’s why we have the update shelf comamnds. The tools shelf embeds the tool location in the shelf items so it needs to be updated to refer to the new tools location. We delete and replace the shelves so you get the default maya confirm box. And we need to explicitly replace the deleted shelf, or Maya still rememebers the previously deleted shelf and just updates it. Yeah, that code is ugly. We apologize for the inconveniece, but we don’t really feel guilty.
-
We cheat and use the Maya new feature highlighting to highlight the new houdini plugin features for the new Houdini release