| On this page |
The Houdini Asset itself is encapsulated in the houdiniAsset node. Geometry inputs have their own wrapper nodes that convert maya geometry to houdini geometry and create corresponding nulls the engine side. Multiple maya shapes can be connected into an input by going though a houdiniInputMerge node
The plugin nodes used by the houdiniEngine plugin for Maya are:
The houdiniAsset node outputs both the information needed for Sync to create the output maya geometry shapes, and the maya geometry data to connect to those nodes once they are created.
houdiniAsset 
The houdiniAsset has three kinds of attributes:
-
static definition and option attributes
-
parameters
-
outputs
All parameter related attributes are parented under the compound houdiniAttrParm parameter. See Maya Paramters for more information. For more information about asset option and definition attributes, see Maya Assets.
While most of the parameters are directly exposed as attributes, Attribute Editor geometry inputs are special. The string field for the input is a space delimited list of the minimal unique dag paths of input geometry shapes. This list can be edited directly, or the Set to Selection button can be used builds this list from the current selection list. Whichever way you chose to specify the inputs the actual relationship with the inputs is represented by and computed by the upstream input network - the AE fields are for input and visual feedback, there are no corresponding attributes on the node.
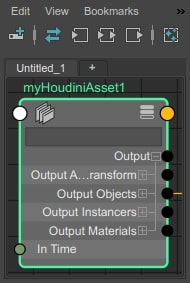
That brings us to the output attributes. All of the output attributes are parented under the compound attribute output This include both attributes with descriptive information for what output nodes and attributes to create at Sync time, and attributes with live data to connect from the houdini asset to the output geometry. Ideally, the user does not need to manage these connections, and Syncing the asset will keep them up to date, however there are times when autoSyncOutputs can lose a connection. Some of the non-connectable outputs can also provide useful information when debugging the asset’s behavior in Maya.
Command |
Function |
Description |
|---|---|---|
|
Connect |
for an object asset, its world transform TRS |
|
Connect |
for each of the asset’s output instancers |
|
Connect |
instancers transform TRS |
|
Sync |
attribute containing name |
|
attribute for instance matching |
|
|
Sync |
object to instance |
|
Connect |
named per-instance data to drive the particle instancer |
|
all the output geometries from the asset |
|
|
Connect |
object transform TRS |
|
Connect |
houdini object id, for connecting to other assets |
|
Connect |
connect to fluids playFromCache to indicate data is available |
|
Sync |
is the output instanced? |
|
Sync |
is the output visible? |
|
Sync |
name for output transform and shape |
|
geos for this object |
|
|
Sync |
name for output xform and shape |
|
Sync |
is this geo templated? |
|
Sync |
is this geo a display object? |
|
parts of geos to be output as separate shapes, e.g. for split geos by group |
|
|
Sync |
name for output shape |
|
Sync |
is this a mesh? i.e. does the output have primitives and vertices |
|
Sync |
is this part a particle? i.e. does the output have only points |
|
Sync |
is this part an instancer? i.e. is the output a packed prim |
|
| |
|
|
Sync |
current colour set, passed through from maya |
|
Sync |
current UV set, passed through from maya |
|
Connect |
mesh geometry Data |
|
| |
|
|
Connect |
pass though from input time connection |
|
Connect |
particle positions only |
|
Connect |
all per-particle attributes |
|
Connect |
curve data for each curve in this part |
|
Sync |
Bezier or Nurbs |
|
output fluid |
|
|
Sync |
name of the fluid grid being output |
|
Connect |
fluid grid data (connects as cache data) |
|
Connect |
grid resolution, use autoresize if this is time dependent |
|
Connect |
fluid transform (TRS) |
|
output particle instancer |
|
|
Connect |
all the named per-instance attributes |
|
Sync |
ids of objects to instance |
|
Connect |
instancer transform (TRS) |
|
mapping for groups to material nodes |
|
|
includes attributes with information about how to reconstruct maya mesh material assignment and other mesh properties as well as purely user-defined attributes from the asset |
|
|
Sync |
attribute name |
|
Sync |
detail, point or primitive |
|
Sync |
data type |
|
Sync |
attribute tuple size |
|
Connect |
eneric attr for attribute data |
|
Multi | |
|
|
Sync |
group name |
|
Sync |
component type |
|
Sync |
component id array |
|
new materials exported from the asset |
|
|
Sync |
material to connect |
|
Sync |
material to create |
|
Sync |
match material to node |
|
Connect |
ambient colour |
|
Connect |
diffuse color |
|
Connect |
specular color |
|
Connect |
alpha |
|
Connect |
file texture path |
houdiniInputGeometry 
The houdiniInputGeometry node converts a single maya mesh or nParticle system into houdini geo.
There are 2 input attributes:
-
inputGeometry (generic)
-
inputTransform (matrix)
one output:
-
outputNodeId (houdini node id)
and some additional attributes for better control over meshes:
-
unlockNormals (do not pass custom normals in to the asset)
-
materialPerFace (set the shading group per face - used if geometry will be merged)
-
objectShadingGroup (used to track object shader assignment chages)
-
allowFacetSet (create groups for facetOnly sets if enabled - normally this type of set is ignored since it used internally by maya tools which could lead to conflicts)
The geometry and the world transform are connected separately. On the engine side, an input null is created for the geometry. The input does not need to be an actual mesh shape - almost all the information we use is from the mesh data, so you could connect the output mesh from a mesh history node directly.
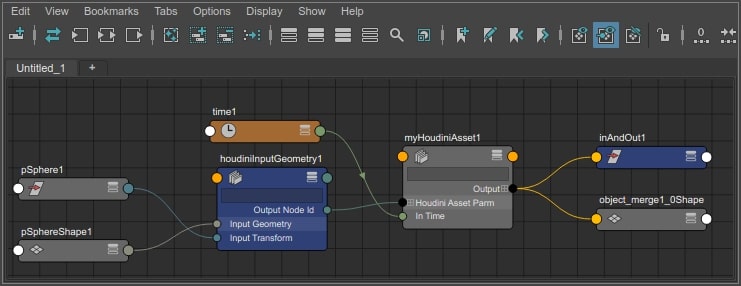
The inputGeometry node is also used to connect several different geometry types. Since the inputGeometry attribute is generic, we rely on the type of the connected data to determine what kind of input object to create:
-
meshData: mesh
-
vectorArrayData: particle
-
curveData: curve (for backward compatability only)
For particle inputs, we expect the actual particleNode to be connected, on the positions attribute. We follow that connection back and extract particle data from the upstream node directly in order to build the input object.

houdiniInputTransform 
The inputTransform node is used to input Maya locators. When you select a locator, and do SetToSelection, it connects the locator’s xform’s worldMatrix to the inputTransform node, and creates proxy particle geometry to represent the transform of the locator. While the Attribute Editor UI only accepts locators, you can connect any transform’s worldMatrix through an inputTransform.
houdiniInputCurve 
The curve input node is similar to the geometry input node but does not include a transform connection. Multiple curves can be connected to one inputCurve node.

The curve input node can also be used to connect the curves from a maya hair hair system. When you select an nHair system with output curves, adding the hairSystems connects all the follicles outCurve attributes to the houdiniInputCurve. This is another case where a particular maya node type is not required for the input, only the specified data type.
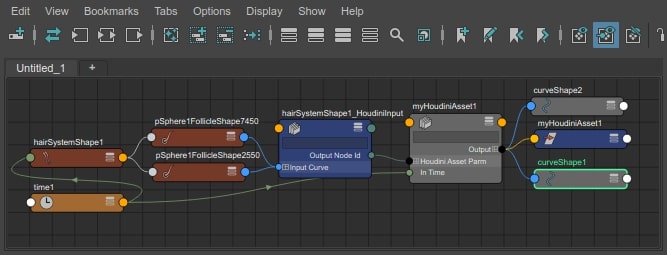
houdiniInputMerge 
If you select multiple maya objects to connect to a single input, we create one of the other 3 houdiniInput nodes for each object, and connect them all to a houdiniInputMerge node. This creates an ObjectMerge Sop on the engine side, to merge the input geos.

Output Nodes 
Syncing a houdiniAsset cooks the asset, and creates output maya geometry based on the cook results and asset options. Output dag objects are parented under the asset node itself, with the appropriate history, shading and transform connections where required. Output materials are connected on the outputMaterials attribute. Depending on the structure of your asset, empty output transforms may sometimes be created. Here’s the output from a simple fluid sim.
