| On this page |
This method works with polygons, primitives, nurbs, and metaballs.
Create a scene 
-
Create a grid by clicking the
 Grid tool on the Create shelf tab.
 -
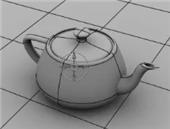
Create a teapot by clicking the
 Platonic Solids tool on the shelf and changing the Solid Type to
 Utah Teapot. -
Click the Environment Light on the Lights and Cameras shelf tab to add soft lighting.
-
On the Material Pallette select a shader and drag it onto the grid and teapot.
For this example we will use the Clay material.
Render the scene 
-
Create a camera by Ctrl-clicking the camera on the Lights and Cameras shelf tab.
-
Create a
 mantra render node by clicking Render ▸ Create Render Node ▸ Mantra in the Houdini menu.
 -
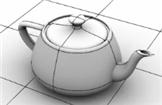
Render your image.
The following is what your default rendered image will look like.
-
Improve the quality of your render by navigating to the Light tab on the environment light, by clicking the Area Light Options subtab and increasing the Area Samples parameter to
256. -
Render the image again.
The following is what your new rendered image will look like.
-
Save the image and close MPlay.
Render the scene with wireframes 
-
Turn off the display of any objects you don’t want visible, such as the environment light.
Note
To turn off the display of the light handles, press ⎋ Esc.
-
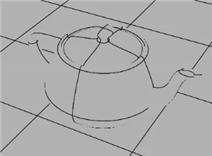
Click the Shading mode button at the right side of the viewer toolbar and choose
 Hidden Line Invisible.
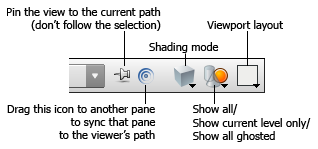
-
 the
the  Flipbook icon and choose Flipbook with New Settings.
 -
On the Output tab, change the Frame Range/Inc to:
1, 1, 1since it is a still image. -
On the Effects tab, enable the Depth of Field and increase the Quality to something much higher, such as
16. -
On the Size tab, set the Resolution to the same as the Resolution on the View tab of your camera. In this example it is
640x480.You can also turn on Crop Out View Mask Overlay.
-
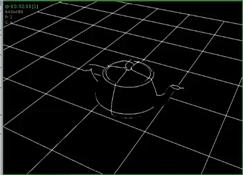
Press Accept and render your image.
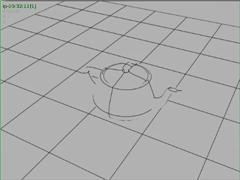
This render will also produce a nice looking alpha channel.
-
Save the image again and close MPlay.
Composite the two renders 
-
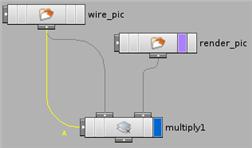
Switch the view to Composite View and switch to the
 img network.
 -
Dive into the
Compositing network and create a  File node using the Tab menu.
 -
Change the File from
default.picto your wire render. -
Create another
File node using the Tab menu and change the File from default.picto your original render. -
Insert a Multiply node and connect the two file nodes to the inputs.
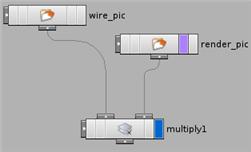
This will make the entire image darker because you are multiplying the entire color channel.
-
Connect the wire file to the mask input, which will use the alpha channel from the wire file.