| On this page |
|
Overview 
In Houdini, you build a material (a combination of surface and displacement shaders that controls the rendered look of objects) using VOPs. Houdini’s shader-building workflow is based around connecting VOPs to build up shader programs.
You can write shaders in textual code using VEX, however building shaders using a VOP network is easier and more fun.
Houdini has many useful shading VOPs available for building shaders.
The high-level Principled Shader in the Shaders category in the ⇥ Tab menu contains everything you need to recreate 99% of the looks you might need.
There are also VOPs that package up the basic functionality of the high-level node. For example, the Principled Shader Core contains the basic functionality of the Principled Shader, leaving out “convenience” functionality (such as pre-built texture UI). You can use these as a way to put your own custom UI on the uber-shader functionality, or use an uber-shader as a layer in a layered material.
There are nodes that generate more basic BSDFs you can use to build up custom shaders without having to do a lot of work.
VOP networks also have many low-level VOPs that give you all the capabilities of a programming language, for example doing math or generating noise, to do whatever you want in your shader networks. These are often useful for programmatically generating the inputs to high-level shaders.
See understanding shader outputs below for more information about how materials work in Houdini.
Masterclass 
Before you build your own material 

Building your own material can be fun, can help you understand how shading works in mantra, and might be necessary if you need a weird or non-realistic effect.
However, in almost every case, the Principled Shader is able to recreate any realistic look you need. You should explore its many features and controls before you decide you need to build your own shader. Check the material palette for pre-made materials using the Principled Shader.
Material VOP networks 
Houdini has a default network to create/work with materials at /mat. You can get to this network in the network editor menus by choosing Go ▸ Materials.
You can also manually create a Material Network subnet inside any other network. This lets you package materials up inside digital assets. For example, a character asset can include the character’s materials inside the asset’s network.

Within the material network, you can put down any shading VOP and connect them together to build shader networks from scratch. You can have multiple shader trees and high-level shader nodes mixed together in the Material network
You can turn on the Material flag on a node to have that node appear in the Material Catalog and in material choosers.
You can drag almost any VOP onto an object in the 3D Scene View or the Render View to assign it as a material to that object. This is incredibly useful for trying things out at the /mat level, and for visualizing the output of a shader network at intermediate stages when debugging.
When you assign a VOP other than a Material Builder, behind the scenes Houdini builds a temporary shader around the node and its upstream, and tries to intelligently guess which output to use for shading. For example, if it has a layer output, Houdini will use that. If, say, it’s a low-level VOP that only has a floating point output, Houdini will treat that as a greyscale color.
Note
You can only assign VOPs from inside a Material Network (such as /mat). You can’t assign VOPs from other network types, including from inside a Material Builder.

Building shader trees at the /mat level is great for prototyping and trying things out. However, when you're going to use material seriously, it’s a good idea to put the material network inside a Material Builder node.
If you already have a “loose” shader tree, you can select the nodes and collapse them into a Material Builder node using Edit ▸ Collapse Selected into Material in the network editor. Or, you can start with a Material Builder node, dive inside, and design its network.
Having your shader inside a Material Builder has several advantages:
-
You can create a custom interface by promoting parameters and inputs onto the builder node.
-
You turn builder nodes into digital assets for re-use.
-
It helps keeps
/matclean.
If you want to layer your custom material, you can make the Material Builder output a layer
-
In the material builder’s network, use a Layer Pack node to build a
ShaderLayerstruct from whatever components your shader generates (for example, a BSDF). -
Add a Parameter node. On the Parameter node, set the name and label to describe the output (for example,
layer). Set the Type to “Struct” and then set the sub-type to “ShaderLayer”. Set Export to “When input is connected”. -
Connect the output of the Layer Pack node to the Parameter node’s input.
The parent Material Builder node now has a layer output.
Generating outputs 
Basic custom shaders will often involve using VOP nodes to compute some aspect of the material, such as the base material. Then you can connect that color to a higher-level node such as the Principled Shader Core (or another node that generates a BSDF) to automatically get physical properties such as controls for roughness and reflectivity and generate a BSDF.
In general, materials should generate the surface color in the form of a BSDF (F) output.
However, different rendering engines require different outputs at the end of the material network:
-
PBR (physically based rendering) requires a BSDF (
F) output. -
Traditional raytracing requires that you compute the lighting contributions in the shader and produce the final surface color (
Cf) output.
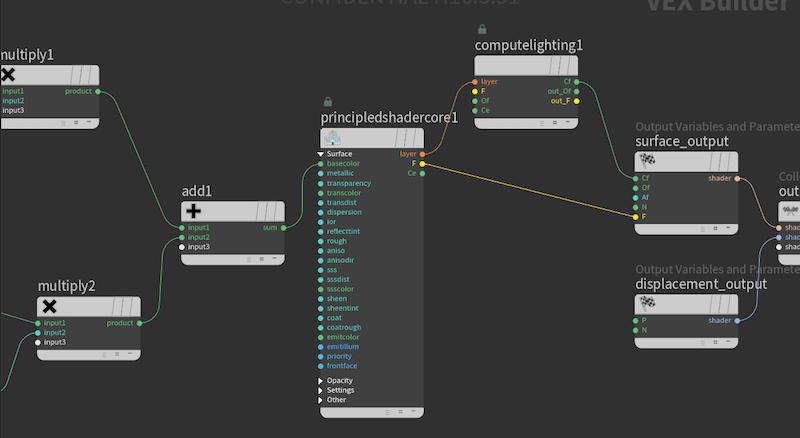
You can easily create a shader that works with both rendering engines by generating F, and also inserting a Compute Lighting VOP that takes the F (or layer) output and uses it to compute a final surface color. Then connect both the original F and Compute Lighting’s Cf to the output node:

Note
Each render engine will only “cook” the shading outputs it needs. So when you render using PBR, the Compute Lighting node will not waste time cooking.
Converting a Material Builder to a digital asset 
Material Builder networks are easy to set up and flexible without the extra work of managing digital asset versions. However, with a plain material network, copying the network to create a variation duplicates the network inside, increasing the compilation time and requiring more memory.
If you convert a Material Builder network to a digital asset, you can create instances of the new material and edit each instance’s parameters to create variations. The underlying network will not be duplicated between instances, as it is with copies of material networks.
You can also share material assets between artists/studios and use Houdini’s asset management features to version and maintain them.
| To... | Do this |
|---|---|
|
Convert a Material Shader Builder into a digital asset |
Right-click the Material Builder node and choose Create digital asset. Fill in the information on where to store the asset and click Accept. See creating a digital asset for how to fill out the fields. Once you have converted a network to a digital asset, you can create nodes of the new type in a material network (such as |
How to add a layer output to your custom material 
You can combine materials to create a new blended look (see layering materials for more information). If you want your custom material to be layered, you currently need to manually add a layer output to the material node.
-
In the material network, generate a layer struct.
The node generating your BRDF may have a
layeroutput already, or you can create a layer struct from parts such as anFoutput using a Layer Pack VOP. -
Create two
Parameter VOPs.
-
On both nodes, set the Name to the same value:
layer. -
On both nodes: set Type to “Struct”, turn on Use own export context, and set Export to “Always”.
-
On one node, set Export in context to
surface. On the other node, set Export in context todisplace.
-
-
Connect the
layeroutput to the inputs of the two Parameter nodes.
The two parameter VOPs will combine into a single layer output on the parent material. The two exports with the same name do not conflict because, with Use own export context on, each export only “activates” when generating code for the corresponding shading context (surface or displace). The “downstream” VOPs will choose the appropriate layer information based on the shader type. This is necessary because to work around Mantra’s architecture, Houdini actually compiles materials into separate shaders.
Adding displacement 
There are two methods for adding displacement to a material:
-
The Principled Shader material has inputs for displacement (either
disp, a floating point displacement along the surface normal, orvistp, a 3D displacement vector). You can create nodes that calculate displacement values (for example, theCavities VOP) and wire them into the material’s displacement input. Note that on the Principled Shader, you need to turn on the Use input displacement parameter on the node’s Displacement tab.
This is also very useful for prototyping a displacement shader at the
/matlevel. Just put down a Principled Shader material node in/mat, assign it to geometry, and turn on Use input displacement. Then you can start wiring nodes into the displacement input to see their effect on the surface in the render view.Note
If you're building a “loose” network at the
/matlevel, when Houdini generates a material from the network, it will look through the connected nodes for a Displacement Bounds property, and add it to the material if found. This is the only property given this special treatment. This allows layering of materials with displacement. -
Inside a Material Builder network, you can create nodes that calculate displacement values (for example, the
Cavities VOP) and wire them into the displacement Output node’s
Ninput (a 3D displacement vector).Tip
If you have a floating point distance you want to displace along the surface normal, multiply it by the normal (
N) output from the displacement globals node to get a displacement vector.
Assigning render properties as part of the material 
There are two three ways to set rendering properties in your scene:
-
Add the property as a spare parameter on a node, such as on an object, a camera, or a material node.
-
Assign the property in a material style sheet.
-
Assign the property as part of the material network using a Properties VOP.
Adding a render property to the Material Builder node makes it part of the material’s interface. If you assign the properties inside the material network, the parameters don’t become part of the material’s interface unless you promote them. Basically, use a Properties VOP for things the end user of the material shouldn’t need to change.
| To... | Do this |
|---|---|
|
Add a render property to a material |
Now assigning the material to an object also applies the render properties to the object. |
Note
Remember the inheritance order of properties at different levels. For example, you might try to add the Render Polygons as Subdivision property to a material to make every object with the material become subdivided. However, by default every Gometry object node already has a Render Polygons as Subdivision property on it, which overrides the value from the material. To make the object pick up the value from the material, you'd first need to delete it from the object.
Understanding shader outputs 
In olden times, Mantra accepted different shaders for a surface, including surface color and displacement (as well as types that are mostly obsolete at this point, such as fog shaders). Then to make it more convenient to assign a look to a surface without having to worry about multiple shaders, we introduced materials, which let you include the node chains of multiple shader types in the same network.
Materials can encapsulate a surface shader, a displacement shader, and render properties. The node chains representing the surface and displacement shaders feed into Output nodes (parameters on the Output node control what kind of shader its inputs create). Then a
Collect VOP combines the shader outputs of the Output nodes into a material. This design makes it easy to combine a shaded look (surface color, shinyness, and so on) with an optional displacement look (for example, pock-marked) in a single material. The “shader” wires output by the Output nodes don’t represent VEX data like other wires in a VOP network. Instead, they represent metadata about how the shader contributes to the final material.
(In a Material Builder subnet or Material Builder-based asset, the Output VOPs and Collect VOP are at the end of the network. For a “loose” material at the /mat level Houdini adds the ending nodes automatically for you if they don’t exist when Houdini translates the node chain into a material.)
The Collect VOP makes it easy for Houdini to trace the nodes it needs to compiled (any nodes it can trace backwards along wires into the Collect VOP). It also makes it possible for you to switch shader implementations programatically by inserting a Switch VOP between the Output nodes of different implementations and the Collect node (although this is rarely needed).
So we have two entities: shaders (programs for calculating surface color or displacement), and materials (a container for color, displacement, and property shaders). But users want to mix materials to blend and overlay separate looks together. In theory, we could have used shaders as the mixing ingredients, but it would be too costly to evaluate each mixed shader separately and combine their computed color values. Instead, we want to mix BRDFs, which is cheap, and only evaluate lighting once, which is expensive. We could mix at the level of materials, but materials contain are quite heavyweight for what mixing involves. Dealing with the extra information slows things down. So, we added a third entity, the layer struct, which contains the mixable information for surface shading and displacement.
A layer packages a BRDF and other data to represent a mixable surface shader. That mixable representation still needs to go through a Compute Lighting stage (represented by the Output node) to become the final result used for shading. (Remember, it’s the Output node that represents the true and final shader that Mantra uses for rendering.) It’s optional for material nodes to have a layer output to allow mixing. The pre-made materials included with Houdini should all have a layer output. (You can also add a layer output to your own materials to make them mixable.) You can then layer the materials by feeding their layout outputs into the Layer Mix VOP. (See layering materials for more information.)
(This area of Houdini is being improved as each new version of Houdini is released. Future versions of Houdini will probably have a more straightforward workflow centered around layers, without legacy issues complicating it.)
Tips and notes 
-
You can add a
Global Variables VOP (at the
/matlevel or inside a collapsed Material Builder) if you need access to a global variable such as the current position or normal. -
Older versions of Houdini had a separate network type called SHOPs. Materials were assigned at the SHOP level and built using VOP networks inside. As of Houdini 16 this dichotomy no longer exists, and now all shading work is done in VOP networks.
The current workflow evolved from this previous system, and needed to work with mantra, rather than the shading system and the renderer being completely written from scratch. Because of this there are a few rough edges. For example, inside a Material Builder (and behind the scenes when you assign any other VOP) Houdini adds nodes to break out the components of the layer struct, because mantra expects a shader to output certain global variables and doesn’t know how to handle a layer struct.