| On this page |
This workflow is a continuation of the of the Muscle setup. It covers the steps to generate the tissue layers and configure them for simulation.
When to use Fascia or tissue 
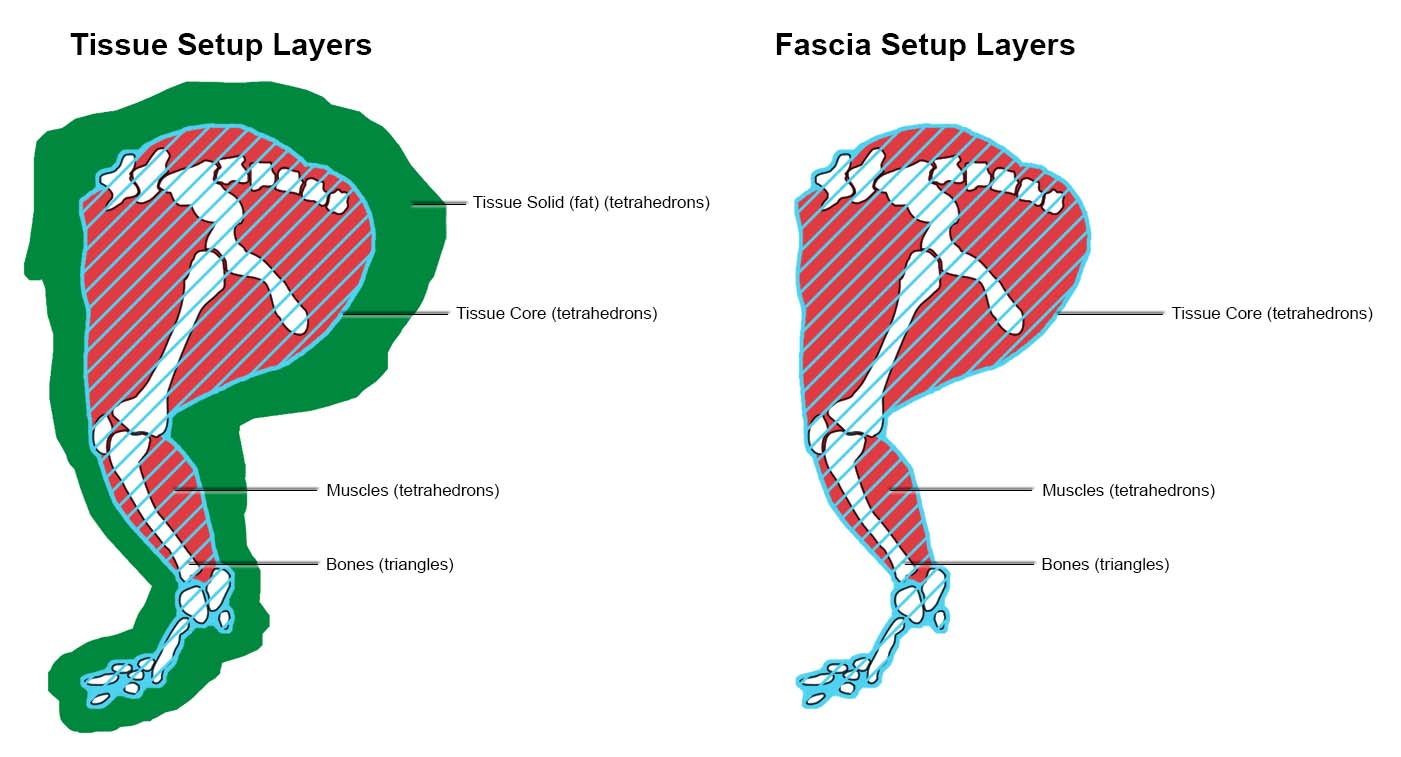
Fascia simulations include only the core layer, a tetrahedral volume shrinkwrapped around the muscles and bones. This setup does not generate an outer fat layer, making it faster to simulate and simpler to configure. Fascia is intended for early development such as validating muscle behavior, debugging collisions, or quickly testing simulation setups.
Tissue simulations contain both the core layer and shell layer (fat). This double layer structure allows the system to simulate soft tissue with high degree of anatomical accuracy. Tissue is designed for final quality simulations where realistic volume, jiggling, and motion lag are essential.
See Understanding how simulating geometry works for more information.
Fascia and tissue setup workflow 
There are two Starter recipes to get your muscle and tissue simulation up and running quickly. It’s recommended to plug your assets into these recipes rather than start from scratch.
This example and workflow uses the Otis Muscle and Tissue Simulation recipe as a template. The recipe is available through the SOP tab menu in Character FX → Muscles → Otis Muscle and Tissue Simulation.
-
The

 Tissue Solidify Otis SOP node prepares anatomical geometry for soft tissue simulation by generating a tetrahedralized volume from an exterior surface mesh, optionally using interior muscle and bone geometry for structural context. The result is a layered soft-tissue representation made of two tetrahedral components: the Tissue Shell (fat layer) and the Tissue Core (deeper soft-tissue or fascia).
 -
Use the Exterior Remesh parameters to remesh the outer surface prior to tetrahedralization. Use the visualization states tab to preview your triangle density before proceeding.
-
For fascia setups, it’s recommended as a starting point for the outer surface mesh resolution to be similar to your muscle geometry resolution. For speed, you may lower the resolution as long as there are enough points for tissue to muscle constraints to be created.
-
For tissue setups, use a higher resolution to ensure you get a better tetrahedralization quality.
-
-
The Inner Surface parameters adjusts the interior surface that is generated by shrink-wrapping the muscles and bones.
-
The Blur and Blur Mask parameters are useful to flatten out regions such as tentacles, ears, or loose appendages that could be a problem during the generation process. Apply a blur mask first to flatten out these regions.
-
Higher Shrinkwrap Iterations values may be helpful for characters with thick fat.
-
Adjust the Slope Angle Limit to avoid the shrink-wrap surface from creeping into gaps between muscles and bones. The ideal shrink wrap should touch the muscles and bones closely but avoid wedging into every small crevace. Over constraining may limit muscle flexibility. A low Slope Angle Limit is especially important for sliding tissue simulations to avoid unwanted lumps in the tissue.
-
-
-
The

 Tissue Properties Otis SOP node activates and assigns the physical properties and constraint attributes that govern the behavior of the tissue’s simulation.
-
The Core Layer parameters control how the tissue core behaves independently from the outer shell layer, giving finer control over internal rigidity and deformation response.
-
The Shell Layer parameters define the physical properties of the tissue shell layer, which represents the material between muscles/bones and the skin, which is mostly fat.
Note
For fascia setups, the Shell Layer parameters have no effect because these parameters are only used in the tissue setup.
-
The Tissue to Muscle parameters define how the core tissue attaches to nearby muscle geometry via soft constraints.
-
The Tissue to Bone parameters define how the core tissue attaches to bone geometry, similar to muscle attachments but typically stiffer and more rigid.
-
The Shell to Core parameters are only relevant when your tissue layers are separated (Separated Shell and Core mode in
Tissue Solidify Otis SOP). This allows the Shell layer to slide over the Core layer. -
The Shrinkage parameters control the rest scale (shrinkage or expansion) of the shell and core geometry layers, affecting their resting size relative to the original geometry.
-
Shrinkage is useful to emphasize muscle bulging which can create a tight skin feel. Overuse of these parameters may result in the character penetrating geometry.
-
Tip
When working with the Shell Rest Scale and Core Rest Scale parameters, there are additional steps to ensure your attributes are passed to the Otis solver.
-
Set your Shell or Core Rest Scale below or above 1.
-
In the Otis Configure Muscle and Tissue SOP, set the Rest Blend to 0 for frame 1.
-
Over a few frames, set the Rest Blend to 1.
-
This gradual blending prevent sudden constraint snapping or break collision.
-
-
In the Otis Solver SOP, turn on Rest Shape, in the Target tab.
-
Fascia-specific setups 
This setup information is specific for the fascia setup.
In the Tissue Solidify Otis SOP:
-
In the Remesh parameters tab, use an outer surface mesh resolution to be similar to your muscle geometry resolution.
-
For Method, use Fascia mode.
In the Tissue Properties SOP:
-
The Shell Layer and Shell to Core settings are ignored in the fascia setup.
Tissue-specific setups 
This setup information is specific for the tissue setup.
In the Tissue Solidify Otis SOP:
-
In the Remesh parameters tab, use a higher resolution to ensure you get a better tetrahedralization quality.
-
For Method, use Fused Shell and Core if you don’t need tissue sliding, or Separated Shell and Core (Sliding) for sliding tissues.
In the Tissue Properties SOP:
-
If you are transitioning from the fascia setup, ensure that you set your parameters in the Shell Layer tab.
-
If you have used the Separated Shell and Core (Sliding) method in the Tissue Solidify Otis SOP, make sure to set up the sliding constraints in the Shell to Core tab.
Next steps 
The final steps of the workflow are the final preparation in the ![]()
![]() Otis Configure Muscle and Tissue SOP node before simulation. Which are then input into
Otis Configure Muscle and Tissue SOP node before simulation. Which are then input into ![]()
![]() Otis Solver SOP node for the simulation.
Otis Solver SOP node for the simulation.
See Otis configure and simulation workflow for the next steps in the workflow.
| See also |