| On this page |
The muscle property assignments interface provides a structured way to assign properties and values to different muscles that determine how they behave during simulation. The interface is used in both ![]() Muscle Properties SOP and
Muscle Properties SOP and ![]() Muscle Constraint Properties Vellum SOP.
Muscle Constraint Properties Vellum SOP.
Property Assignment multi parameter tabs 
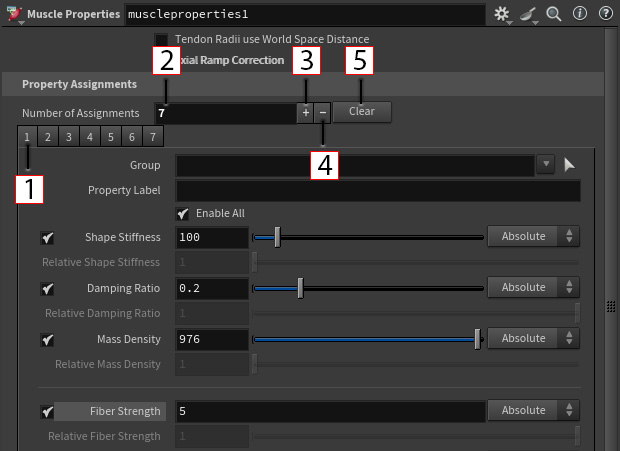
1 - Currently selected multi parameter tab.
2 - Adds or removes multi parameter tabs from the end of the list. Increasing the number adds tabs and decreasing the number deletes tabs.
3 - Adds a new multi parameter tab to the end of the list.
4 - Removes the multi parameter tab from the end of the list.
5 - Deletes all the current multi parameter tabs.
To view the Instance menu, ![]() on a multi parameter tab:
on a multi parameter tab:
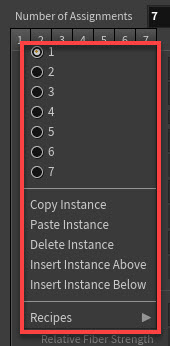
Numbers - Actively view the selected multi parameter tab.
Copy Instance - Copy all the selected multi parameter tab settings.
Paste Instance - Paste the copied instance multi parameter’s tab settings to this tab.
Delete Instance - Delete selected multi parameter tab.
Insert Instance Above - Creates a new multi parameter tab in a layer above the currently selected tab.
Insert Instance Below - Creates a new multi parameter tab in a layer below the currently selected tab.
Recipes - Your saved recipes - you can use this to save and apply presets to individual multi parameter tab instances.
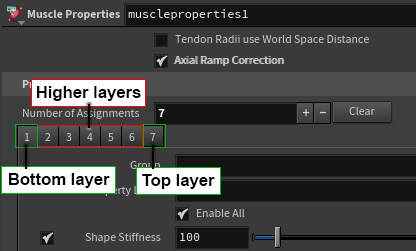
The Layer Stack System 
The layer stack system follows design similar to image editing software layers:
-
The first tab is the bottom layer
-
The second tab is the next layer
-
The highest-numbered tab is the top layer
Properties are applied from the bottom layer upward, with higher layers overriding settings from lower layers. This design stops you from having to create multiple nodes to tweak hundreds of muscles.
This layer stack system allows for incremental refinement without disrupting your entire setup. For example, you can set general settings for all muscles, then override specific properties for arm muscles, and further refine individual muscles like the biceps.
Each parameter corresponds to an attribute. Even if a parameter is turned off, its corresponding attribute still exists on the muscles. You can check this using the Geometry Spreadsheet window.
To avoid mismatches between different Houdini versions, it’s recommended to toggle on all parameters in the first tab.
Some properties have different default attribute values compared to their default parameter values. For this reason, it’s recommended to toggle on all parameters in the first tab to ensure that the attribute values match the displayed parameter values:
First tab (bottom layer) - your general settings for all your muscles. This will be your base layer to capture all parameters and all muscles. Additional tabs (higher layers) - overrides (absolute) or multiplies (relative) any values set by a layer below it. Only turn on the parameters you want to override. Use the Group parameter to specify which muscle(s) to apply these overrides to. Last tab (top layer) - has the final input for any property value toggled on in that tab
How-to 
| To... | Do this |
|---|---|
|
Create a general settings layer |
|
|
Create additional layers for specific muscle groups |
|
General tips 
-
Make sure any specific muscle group tabs are after the general settings tab. The general settings tab will override specific settings if they're higher in the layer stack.
-
It’s recommended to manually select the muscles to set the group rather than relying on predefined groups or string patterns. This results in more consistent behavior and will work for all muscle properties parameters.
-
Select Enter on a selected muscle to jump to the highest tab where that muscle is specified. If it doesn’t go to a tab, you know that it’s only set in the general settings tab.
-
Use the Geometry Spreadsheet window to verify your final attributes. This is useful when you work with multiple tabs and set values with absolute and relative for specific muscle groups while still having a general settings value.
-
You can temporarily turn off a tab by de-selecting the Enable All checkbox. This can be useful instead of deleting the tab to see the difference.
-
The interface highlights muscles different to show which ones have override properties.
-
Override muscles appear in white and red.
-
Muscles with only general settings appear in black and blue.
-
Understanding absolute vs. relative setting 
Each parameter has an Absolute or Relative version of the setting.
When a parameter is Absolute, its value is explicit and it functions as an override. For example, if on multi parameter tab 1 Shape Stiffness = 100 and then on multi parameter on tab 2 Shape Stiffness = 50, then the shape stiffness property value the muscle solver will use is solidshapestiffness = 50.
When a parameter is Relative, it is a multiplier of the parameter’s default value (if only the Relative versions for a parameter are used across all Property Assignment multi parameter tabs) or a multiplier of an Absolute value from a previous tab. For example, if on multi parameter tab 1 Shape Stiffness = 100 and then on multi parameter tab 2 Relative Shape Stiffness = 2, then the shape stiffness property value the muscle solver will use is solidshapestiffness = 200.