| On this page |
There are several Otis muscle and tissue recipes available through the tab menu. These are similar to shelf tools that put down networks of nodes for learning purposes and plug and play processes. The Otis Muscle and Tissue Simulation recipe provides a flexible simulation setup for any character with custom muscle geometry. It’s ideal for non-humanoid or stylized characters where the Test Geometry: Otto Muscle and Tissue Simulation recipe doesn’t apply.
Note
This recipe uses the ![]() Otis Solver SOP, the FEM-like muscle and tissue solver in SOPs. Because the Otis solver is not available in Houdini Core, this recipe is not available in Core either. However, a .hip file containing this recipe can still be opened in Houdini Core, and only the Otis Solver will have its parameters greyed out.
Otis Solver SOP, the FEM-like muscle and tissue solver in SOPs. Because the Otis solver is not available in Houdini Core, this recipe is not available in Core either. However, a .hip file containing this recipe can still be opened in Houdini Core, and only the Otis Solver will have its parameters greyed out.
Note
For this recipe, make sure to place it at the geometry context instead of the object level.
Important nodes 
Inputs 
MUSCLE_SURFACES, REST_BONES_TRIANGULATED, ANIM_BONES_TRIANGULATED, REST_SKIN, ANIM_SKIN
These are the required meshes extracted from the Test Geometry: Capybara and then fed into these null inputs. This setup allows you to feed your own muscles, rest bones, animated bones, and render skin into the recipe. See Learning and using this example to replace it with your own geometry.
Muscles 
muscle_setup
This is a subnetwork that contains the nodes to:
-
Convert your muscle surface geometry into a tetrahedral mesh.
-
Paint the fiber grooms.
-
Configure the muscle physical properties and muscle Otis constraints.
See Muscle setup for more information.
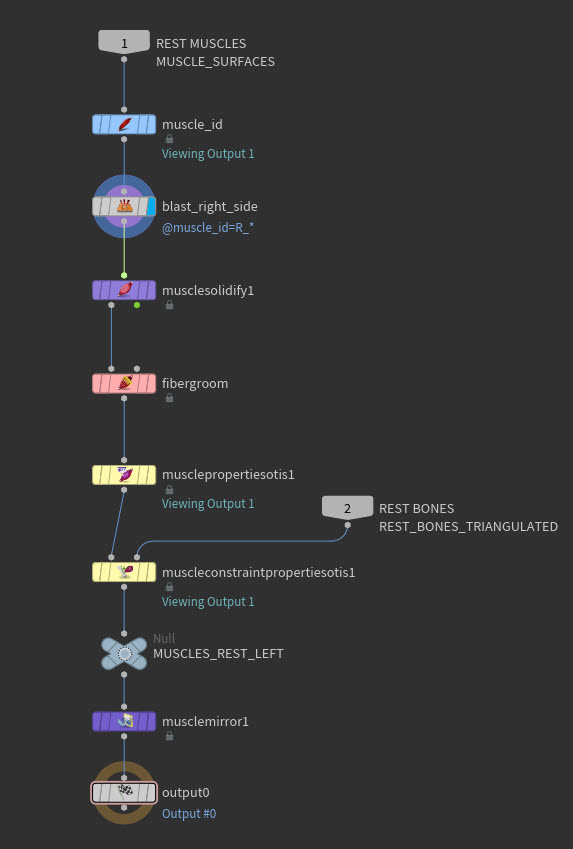
muscle_id
This ![]() Muscle ID SOP, creates Muscle IDs and assigns them to each connected cluster of primitives on the input geometry. If your character’s muscles have a
Muscle ID SOP, creates Muscle IDs and assigns them to each connected cluster of primitives on the input geometry. If your character’s muscles have a path attribute, then the muscle_id will automatically be initialized with the second-to-last chunk from the / separated path.
musclesolidify1
This ![]() Muscle Solidify SOP converts the muscle surface geometry into tetrahedral meshes. The size of the tets are determined by the Min Size and Max Size in the Remesh Surfaces folder. In this recipe the tets are quite large, to keep the resolution lightweight and the simulation times fast, but you will probably want to reduce the tet size for your character if you want more detail to be preserved.
Muscle Solidify SOP converts the muscle surface geometry into tetrahedral meshes. The size of the tets are determined by the Min Size and Max Size in the Remesh Surfaces folder. In this recipe the tets are quite large, to keep the resolution lightweight and the simulation times fast, but you will probably want to reduce the tet size for your character if you want more detail to be preserved.
fibergroom
This ![]() Fiber Groom SOP, allows you to interactively paint the fiber direction for your muscle tetrahedral meshes.
Fiber Groom SOP, allows you to interactively paint the fiber direction for your muscle tetrahedral meshes.
musclepropertiesotis1
This ![]() Muscle Properties Otis SOP, assigns physical properties to your character’s muscles that will determine how they are simulated by the
Muscle Properties Otis SOP, assigns physical properties to your character’s muscles that will determine how they are simulated by the ![]() Otis Solver. These physical properties control muscle behaviors like how receptive or resistant muscles are to shape changes, which regions of a muscle are tendon, how stiff or floppy a muscle is, how much a muscle will bulge on contraction, and so on.
Otis Solver. These physical properties control muscle behaviors like how receptive or resistant muscles are to shape changes, which regions of a muscle are tendon, how stiff or floppy a muscle is, how much a muscle will bulge on contraction, and so on.
muscleconstraintpropertiesotis1
This ![]() Muscle Constraint Properties Otis SOP, creates and modifies the attributes that drive multiple layers of muscle Otis constraints.
Muscle Constraint Properties Otis SOP, creates and modifies the attributes that drive multiple layers of muscle Otis constraints.
Muscle activation 
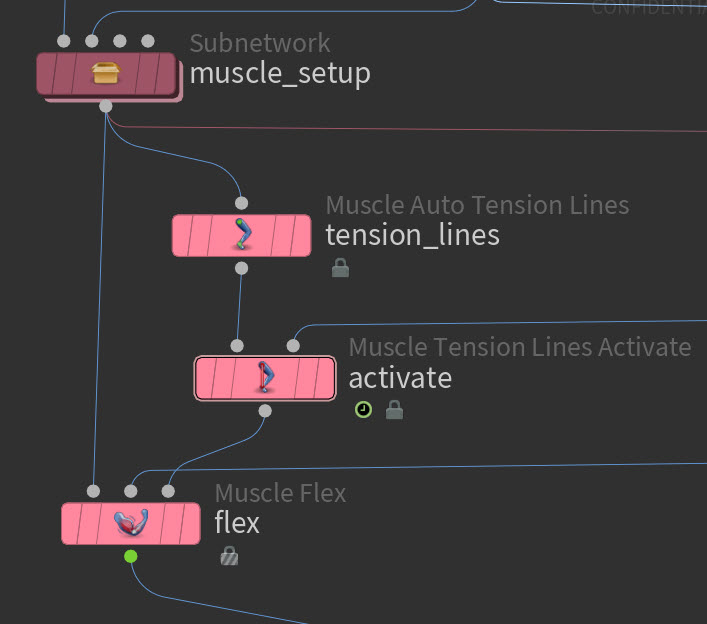
tension_lines, activate, flex
The Otis Muscles and Tissue system can automatically create tension lines using ![]()
![]() Muscle Auto Tension Lines SOP, eliminating the need to manually draw lines for each muscle like in the previous Houdini versions. These tension lines are then fed into
Muscle Auto Tension Lines SOP, eliminating the need to manually draw lines for each muscle like in the previous Houdini versions. These tension lines are then fed into ![]()
![]() Muscle Tension Lines Activate SOP and
Muscle Tension Lines Activate SOP and ![]()
![]() Muscle Flex SOP nodes to set the flexing action of your muscles during simulation.
Muscle Flex SOP nodes to set the flexing action of your muscles during simulation.
See Muscle tension lines and flex for more information.
Fascia or tissue 
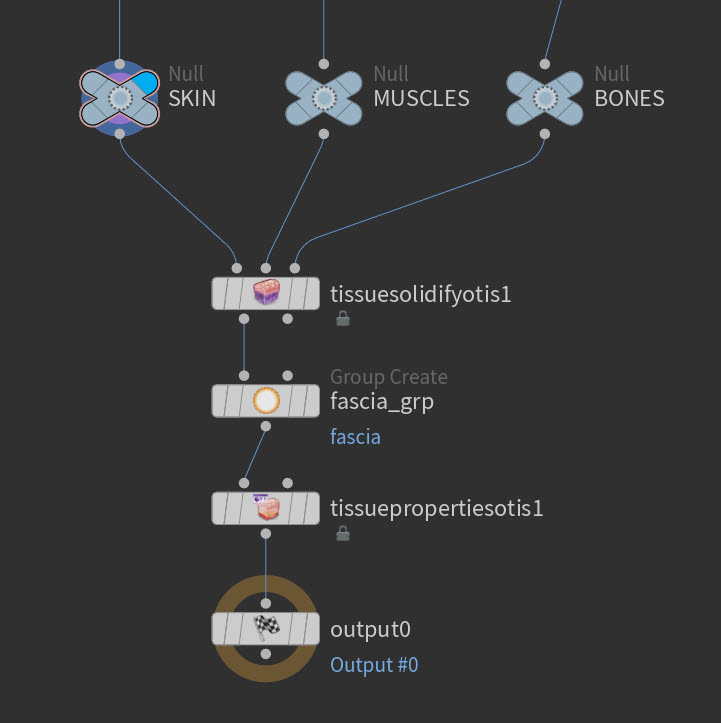
fascia_setup, tissue_setup, sliding_tissue_setup
These three subnetworks contain nodes to setup and configure your fascia or tissue.
See Fascia and tissue setup for more information.
tissuesolidify1
This ![]() Tissue Solidify Otis SOP is in all the fascia and tissue setup subnetworks:
Tissue Solidify Otis SOP is in all the fascia and tissue setup subnetworks: fascia_setup, tissue_setup, sliding_tissue_setup. It prepares anatomical geometry for soft tissue simulation by generating a tetrahedralized volume from an exterior surface mesh, optionally using interior muscle and bone geometry for structural context. In the fascia_setup the Method parameter is set to Fascia while in the tissue_setup it is set to Fused Shell and Core. In sliding_tissue_setup Method is set to Separated Shell and Core (Sliding). The resolution of the fascia is also lower than that of the tissue, as it is only needed to hold the muscles in place, while the tissue needs to eventually drive the skin output.
tissuepropertiesotis1
This ![]() Tissue Properties Otis SOP is in all the fascia and tissue setup subnetworks:
Tissue Properties Otis SOP is in all the fascia and tissue setup subnetworks: fascia_setup, tissue_setup, sliding_tissue_setup. It activates and assigns the physical properties and constraint attributes that govern the behavior of the tissue’s simulation. The Shell Layer tab has no effect on the fascia, as the fascia only consists of the Core Layer. The Shell to Core tab is only relevant to the sliding_tissue_setup where the Shell and Core layers are separated. The sliding contraints for the two layers are controlled here.
switch_sim_tissue
This node allows you to switch between using a fascia, tissue, or sliding tissue simulation. See Learning and using this example on how to switch between the setups.
Otis configure and solver 
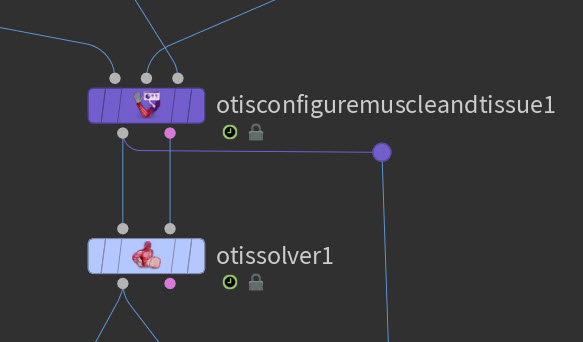
otisconfiguremuscleandtissue1
This ![]() Otis Configure Muscle and Tissue SOP is the final preparation step before simulation. The node collects all geometry and attributes from upstream nodes for any final configuration, creates the constraints required from the incoming attributes, and then sends it all to the Otis solver.
Otis Configure Muscle and Tissue SOP is the final preparation step before simulation. The node collects all geometry and attributes from upstream nodes for any final configuration, creates the constraints required from the incoming attributes, and then sends it all to the Otis solver.
See Otis configure and simulation workflow for more information.
otissolver1
This ![]() Otis Solver SOP, is a specialized solver for tetrahedral soft body constraints that is faster and more accurate than the Vellum Solver for this singular task. This makes it well suited to simulate muscle and tissue.
Otis Solver SOP, is a specialized solver for tetrahedral soft body constraints that is faster and more accurate than the Vellum Solver for this singular task. This makes it well suited to simulate muscle and tissue.
Skin post-processing 
deform_skin
This subnetwork contains the skin post-processing setup which gets applied when the tissue is simmed with the muscles.
See Skin post-processing for more information.
Note
Ensure the switch_sim_tissue switch is set to 1 for this subnet to work correctly.
cache11
This node helps to speed up the post-processing. With the Otis simulation cached out to disk, and the display flag set to this node, play through your frame range. This will cache the sim to memory.
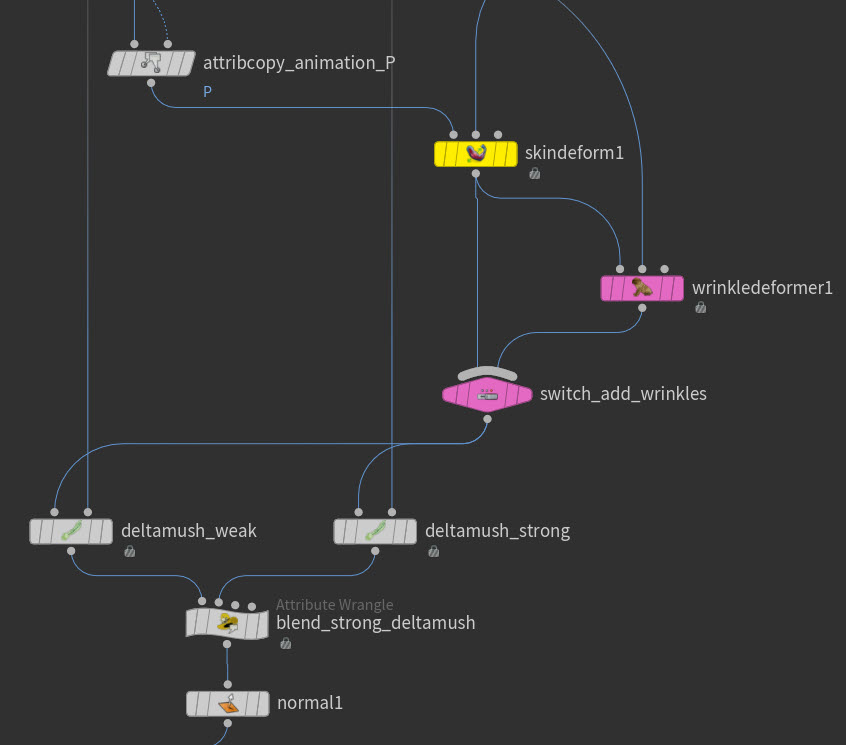
skindeform1
This ![]() Skin Deform SOP takes the render skin animation as the first input, and the simmed tissue outer surface as the second input, and deforms the former with the latter. Regions that aren’t affected by the sim, such as the head, hands, and feet, are excluded from the deformation with the
Skin Deform SOP takes the render skin animation as the first input, and the simmed tissue outer surface as the second input, and deforms the former with the latter. Regions that aren’t affected by the sim, such as the head, hands, and feet, are excluded from the deformation with the skinmask attribute which is created inside the deform_skin subnet. Toggle on Skin Sliding to enable quasistatic skin sliding which gives simulation-like results.
wrinkledeformer1, switch_add_wrinkles
When the switch is set to 1, procedural wrinkles will be added with this ![]() Wrinkle Deformer SOP. Preview the wrinkles in the downstream
Wrinkle Deformer SOP. Preview the wrinkles in the downstream deltamush_weak ![]() Delta Mush SOP or the wrinkles will look too harsh. Custom attributes can be created to control the look of the wrinkles in different areas.
Delta Mush SOP or the wrinkles will look too harsh. Custom attributes can be created to control the look of the wrinkles in different areas.
deltamush_weak, deltamush_strong, blend_strong_deltamush
The deltamush_weak ![]() Delta Mush SOP is applied to the entire character and is very useful for fixing any small scale distortions in the mesh. The
Delta Mush SOP is applied to the entire character and is very useful for fixing any small scale distortions in the mesh. The blend_strong_deltamush wrangle blends the more extreme deltamush_strong to only affect the transition regions between the sim and the anim geometry, such as the wrists, ankles and top of the neck.
Learning and using this example 
| To... | Do this |
|---|---|
|
Use your own character’s muscles, bones, animation, and render skin. |
See Muscle setup’s required asset section for more information about input geometry requirements. |
|
Switch between fascia, tissue, and sliding tissue setup. |
|
|
Deform your animated skin with the simulation. |
|
|
Use a different start frame. |
|