| On this page |
|
The Otis Muscle and Tissue system is a new simulation framework built using the Otis solver. It allows for realistic anatomical motion by simulating muscles and tissue in a single unified simulation pass. The Otis Solver is built on top of the Vertex Block Descent (VBD) architecture. The system enables simplified workflows, more robust collisions, and improved anatomical accuracy.
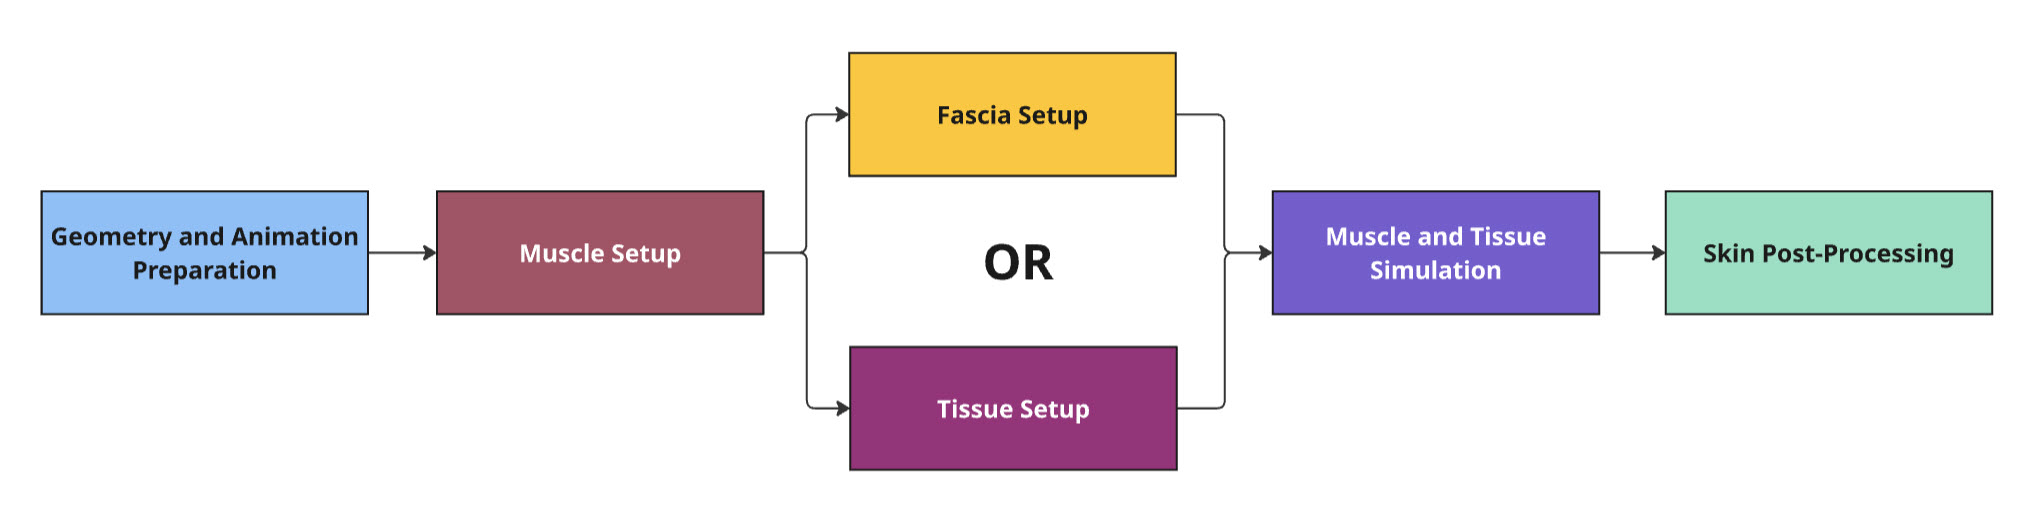
Core Otis workflow 
The previous Vellum system had a multi-pass approach for the muscle, tissue, and skin simulation. The Otis Muscle and Tissue system has a single-pass system where all the simulation layers simulate at the same time.
The core Otis workflow happens in five main stages:
-
Prepare your geometry such as muscles, rest and animated bones, and renderable skin.
-
Setup your muscle simulation settings.
-
Choose between fascia or tissue setup, each setup serves a different purpose. See Fascia and tissue setup for more information.
-
Simulate both the muscles and tissue/fascia at the same time.
-
Post-processing to deform your renderable skin and get skin sliding. This works best with simulated tissue instead of fascia.
Understanding how simulating geometry works 
The Otis Muscle and Tissue system is built on a layered anatomical simulation framework that mimics how real-world muscle and soft tissue behave under motion and force. The system uses a single unified simulation pass that involves three distinct layers:
-
Muscles and bones layer
-
Tissue core layer (internal/fascia)
-
Tissue shell layer (fat)
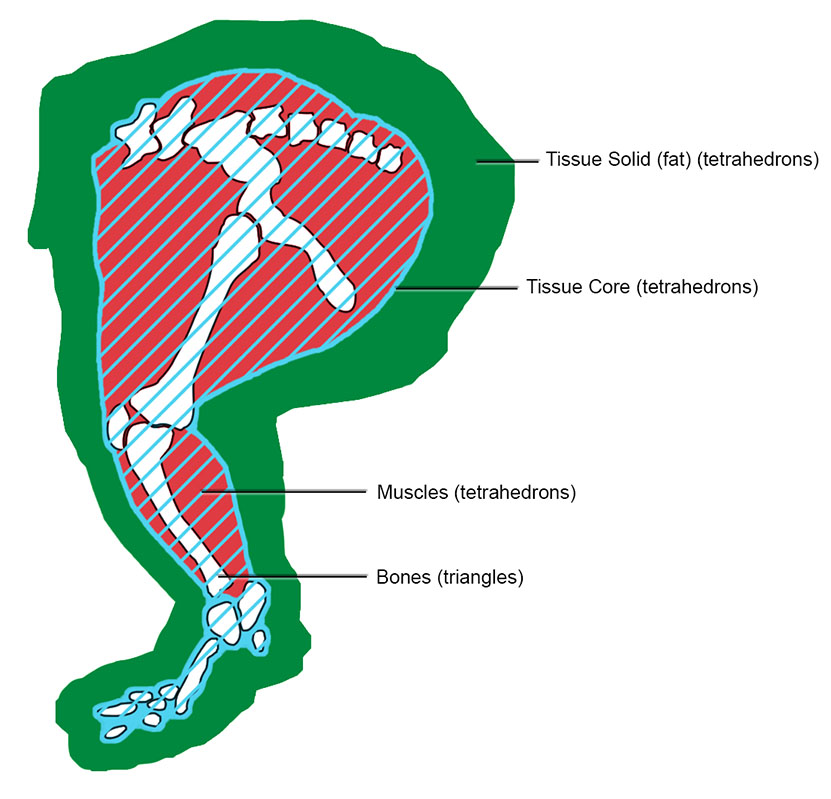
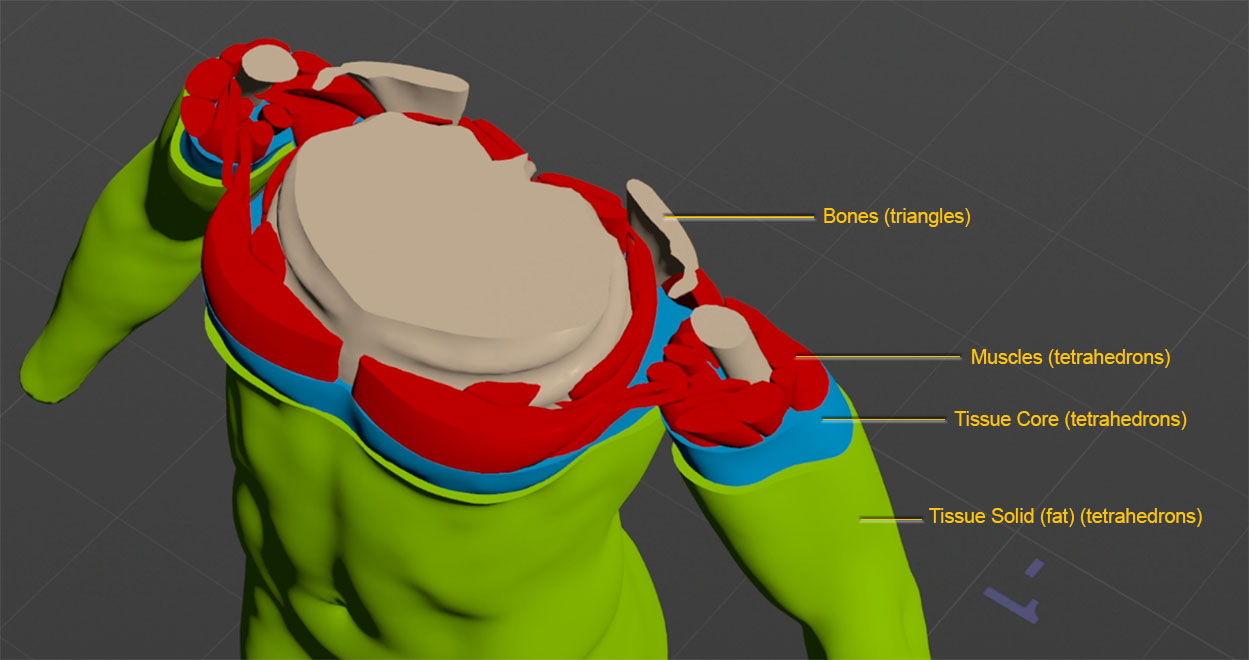
Muscles and bones 
The muscles and bones layer provides the foundational anatomical structure for your character. It’s the base volume and silhouette of the character to help drive the animation and simulation for the tissue layers.
The muscles and bones are involved in the simulation in a few ways:
-
The tissue shell (fat) layer collides with muscles and bone geometry to allow for realistic surface sliding and deformation.
-
The tissue core layer is softly constrained to muscles and bones to anchor movement and transmit forces.
-
The muscles and bones occupy the same space as the core layer. This overlap allows the tissue core layer to move with the muscles and bones which enables continuous motion and a simplified constraint setup.
Tissue layers generation 
The tissue geometry is divided into two tetrahedral layers: the tissue core layer and the tissue shell layer (fat). These layers are automatically generated based on the spatial relationship between the muscles and bone geometry and the outer render skin.
The layering system is entirely geometry driven and automatically calculates the thickness of the tissue core layer based on how far the bones and muscles sit from the render skin. For example, the muscles and bones for a hippo character would be more deeply embedded which results in thick tissue layers. This would allow for a larger and jiggly motion. In contrast, a lean character like a tiger will generate thinner fat layers based on the muscles and bones being closer to the skin geometry.
Tip
To avoid having an really thin tissue shell layer, make sure there is a considerable gap between your muscle and bone geometry and your render skin. If necessary, you can use the ![]() Muscle Adjust Volume SOP to shrink your rest muscles inward slightly before solidifying them.
Muscle Adjust Volume SOP to shrink your rest muscles inward slightly before solidifying them.
Tissue core layer (internal) 
The tissue core layer is automatically generated as an internal tetrahedral volume. The layer shrink wraps around the muscles and bones of a character. It’s important to understand the tissue core and muscles and bones overlaps and fills the same space. This simplifies the setup and helps movement pass through smoothly to the tissue shell layer and render skin.
The tissue core layer anchors to the muscles and bones through soft constraints. Tissue core layer is fused together with the tissue shell layer (fat) as a continuous mesh. The layer is not rigid but acts as a soft anchor that holds everything together while still allowing the character to move and deform naturally. It acts as the bridge that transmits forces from the muscles and bones to the outer tissue shell layer (fat). Once the tissue core layer receives animation and motion from the muscles and bones, it acts as the transmitter that passes the deformation outward to the tissue shell layer (fat).
Tissue shell layer (fat) 
The tissue shell layer (fat) is automatically generated as a tetrahedral volume. The layer is between the tissue core layer and the outer render skin.
Fascia and tissue Simulation 
In the Otis Muscles and Tissue system, there are two approaches to generating the tetrahedral volume layers: Fascia and Tissue. Each approach has its own geometry structure, workflow, and use cases.
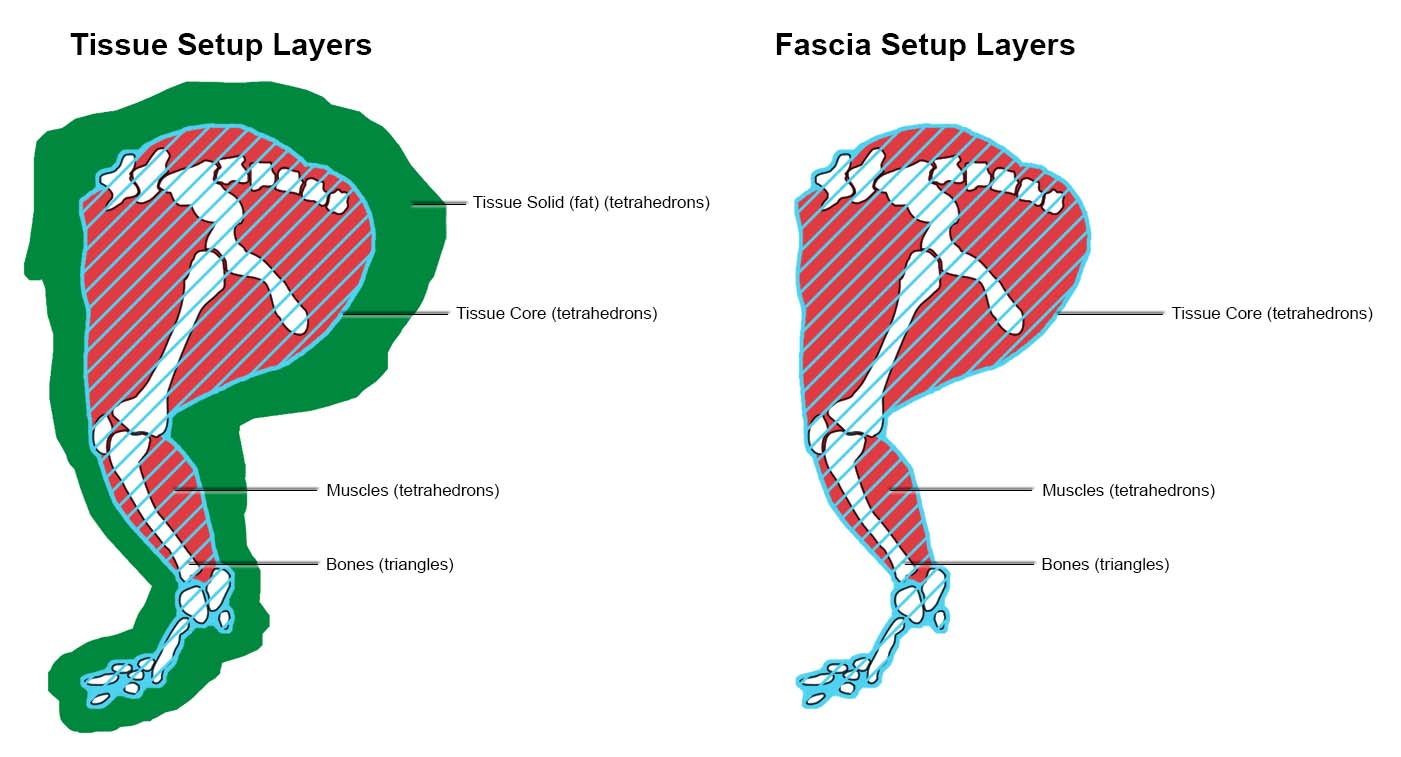
Fascia 
Fascia simulations include only the core layer, a tetrahedral volume shrinkwrapped around the muscles and bones. This setup does not generate an outer fat layer, making it faster to simulate and simpler to configure. Fascia is intended for early development such as validating muscle behavior, debugging collisions, or quickly testing simulation setups.
During simulation, Fascia produces tight and minimal deformation. Without the outer fat layer, the core layer closely follows the motion of the underlying muscles and bones with little secondary motion.
Tissue 
Tissue simulations contain both the tissue core layer and tissue shell layer (fat). This double layer structure allows the system to simulate soft tissue with high degree of anatomical accuracy. Tissue is designed for final quality simulations where realistic volume, jiggling, and motion lag are essential.
During simulation, Tissue produces more complex deformation and dynamic secondary motion. This setup allows the tissue shell (fat) layer to slide, collide, and deform to produce jiggling or wobbling effects. This is useful for characters with thicker tissue like hippos or in regions that require softer motion such as bellies or cheeks.
Skin post-processing 
Once your tissue is simulated, you extract the outer surface of the tissue and use it to deform your renderable skin. You can then procedurally add skin sliding, wrinkles, and sculpt fixes as needed.
How attachments work 
The interaction between components is controlled through a constraint system. These constraints determine how muscles attach to bones, tissue connects to the underlying structures, and point animation attaches to tissue. The system allows for varying degrees of attachment stiffness, which allows you to change the behavior of each component independently.
Understanding the relationship between attachment constraints is key to fine tuning your simulation results. Since multiple attachment constraints co-exist and affect the same geometry in tandem, it’s important to familiarize yourself with each type of constraint operating on a piece of geometry.
To visualize your attachments in Houdini:
-
Click the display flag for
 Otis Configure Muscle and Tissue SOP
 -
In the Visualization tab, click the checkbox for Always Show Visualizations.
You can now see attachments on your character in the viewport.
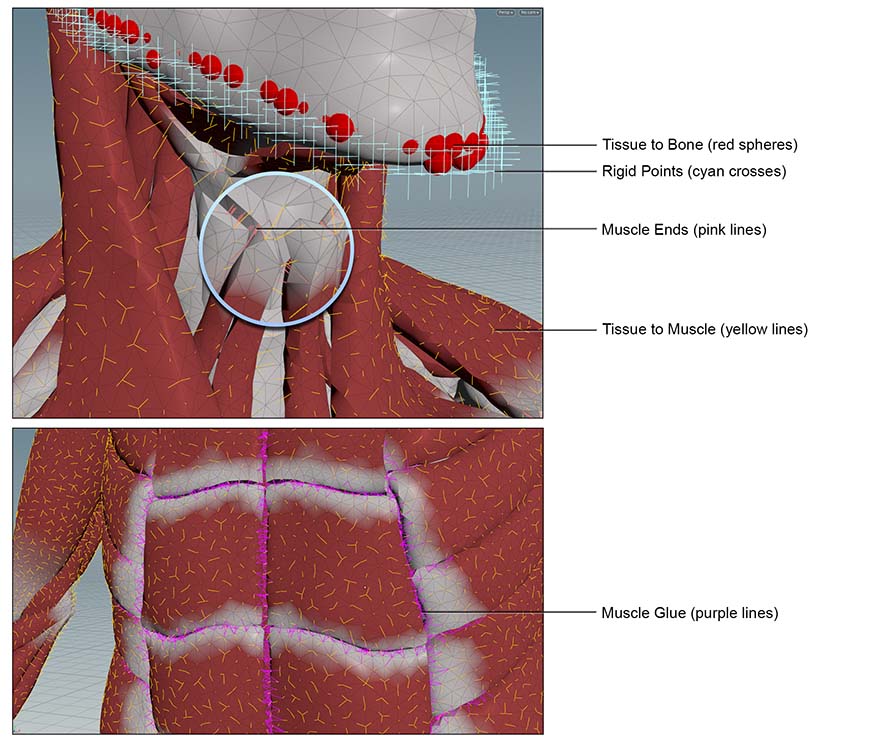
Muscle ends 
Muscle ends have a springy attachment to connect muscles to bones. These are visually shown as pink lines in the viewport. Their primary role is to ensure muscles maintain their correct anatomical position relative to bones during the movement and deformation. Without them, muscles would lose their phyiscal anchor points and drift or float away from the skeleton during simulation, which may lead to unrealistic or unwanted behavior.
You can configure the parameters for Muscle ends in the ![]() Muscle Constraint Properties Otis SOP and
Muscle Constraint Properties Otis SOP and ![]() Otis Configure Muscle and Tissue SOP .
Otis Configure Muscle and Tissue SOP .
Muscle Glue 
Muscle glue has a springy attachment to connect one muscle to another muscle. These are visually shown as purple lines in the viewport. You can use Muscle glue to make separate muscle pieces behave like a single muscle group during simulation. For example, the abdominals are composed of separate smaller muscles that should flex and deform together. Muscle glue helps bind these individual muscles into a unified structure.
You can configure the parameters for Muscle glue in the
![]() Muscle Constraint Properties Otis SOP and
Muscle Constraint Properties Otis SOP and ![]() Otis Configure Muscle and Tissue SOP .
Otis Configure Muscle and Tissue SOP .
Rigid Points 
Rigid points has a firm attachment to connect tissue points to the character’s animation, which is usually bone or rigged animation. These are visually shown as cyan crosses in the viewport. Rigid points are useful in areas where it’s not meant to be simulated but still need to integrate with simulated elements. Common areas are cutoff regions such as the wrists or jawline because the hands or face are not simulated.
You can setup and configure the parameters for Rigid points in the ![]() Otis Configure Muscle and Tissue SOP.
Otis Configure Muscle and Tissue SOP.
Tissue to Bone 
Tissue to bone has a springy attachment to connect tissue to nearby bones. These are visually shown as red spheres in the viewport. This attachment helps to prevent the tissue layers from lagging behind or floating away during motion. It’s recommended to avoid attaching tissue to bones which move a lot relative to surrounding muscle and skin, such as the scapula, rib cage or patella. Attachment to these regions may result in rigid behaviors and stiffening of the surrounding tissues.
You can configure the parameters for Tissue to bone in the ![]() Tissue Properties Otis SOP.
Tissue Properties Otis SOP.
Tissue to Muscle 
Tissue to muscle has a springy attachment to connect tissue to nearby muscles. These are visually shown as yellow lines in the viewport.
The tissue to muscle attachment has two main purposes. First, it maintains a consistent proximity between the tissue and muscles. These constraints prevent unwanted gaps or floating artifacts during simulation. Secondly, it allows muscles to directly influence the tissue layer. When mucles flex, contract, or bulge these constraints can push or pull the tissue to transfer motion.
With the Otis Muscle and Tissue being a single unified simulation pass, this allows the tissue to muscle act as bidirectional constraints. This means the muscles and tissue influence each other. The muscles can pull the tissue and the tissue can also push back or dampen the muscle.
You can configure the parameters for Tissue to muscle in the ![]() Muscle Constraint Properties Otis SOP and
Muscle Constraint Properties Otis SOP and ![]() Tissue Properties Otis SOP.
Tissue Properties Otis SOP.
Starter Recipes 
Starter recipes are example setups that help you get started quickly within the Otis Muscles and Tissue system. You can use the Otto test geometry or your own custom geometry.
Test Geometry: Otto Muscle Transfer 
The Test Geometry: Otto Muscle Transfer recipe quickly transfers Otto’s fully modeled muscles to a biped character with matching topology. This provides simulation-ready muscle geometry without manually modeling or rig muscles from scratch.
The setup can also be a starting template to transfer custom muscle setups between similar characters. For example, if you had a tiger creature with its render skin geometry and muscles geometry, you can adapt this recipe to transfer the muscles to a house cat, and then plug those muscles into the same muscle setup as used for the tiger.
Additionally, it’s designed to plug directly into the Test Geometry: Otto Muscle and Tissue Simulation recipe and provides a ready to run simulation network.
Test Geometry: Otto Muscle and Tissue Simulation 
The Test Geometry: Otto Muscle and Tissue Simulation recipe helps to begin simulating muscles and tissue with minimal setup using either Otto’s muscle geometry or Otto’s muscles transferred to another biped character.
Otis Muscle and Tissue Simulation 
The Otis Muscle and Tissue Simulation recipe provides a flexible simulation setup for any character with custom muscle geometry. It’s ideal for non-humanoid or stylized characters where the Test Geometry: Otto Muscle and Tissue Simulation recipe doesn’t apply.
Related nodes 
Property nodes
Solver nodes
Utility nodes
| See also |