| On this page |
Routing wires with dots 
You can use dots to make wires follow a specific route instead of just going straight from output to input. This can be useful for preventing long wires from overlapping other nodes, or to make organization of the network clearer.
See how to create and edit dots for more information.
Switching in networks 
Often when you're creating networks you want to check the effect of a change, or switch back and forth between different versions of the network, to find problems or explore different looks.
Houdini includes several tools for switching parts of the network on or off:
Switch node
Most network types have a ![]() Switch node type that lets you choose which upstream branch of a network cooks. Often you switch based on the result of an expression, but you can also use a Switch and manually change the active input to quickly switch between different branches.
Switch node type that lets you choose which upstream branch of a network cooks. Often you switch based on the result of an expression, but you can also use a Switch and manually change the active input to quickly switch between different branches.
Bypass flag
Some network types let you turn on a Bypass flag on a node to make the node have no effect. For example, in a geometry network, a bypassed node passes the geometry through without modifying it.
Display or Output flag
A geometry network only cooks the nodes necessary to generate the node with the display flag. You can have a multiple branches of the network generating different outputs (for example, to allow to check the effect of different node combinations or settings), and switch between them by moving the display flag to the end of the different branches.
Rewriting
You can leave sections of the network disconnected and rewire into them to switch to them. This might be useful, for example, to keep an abandoned implementation around in case you want to refer to it later. However, if you're switching back and forth frequently, inserting a Switch node is more convenient than rewiring.
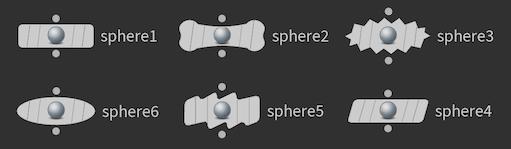
Customizing node shape and color 
You can customize the shapes and colors of individual nodes to help make them stand out in the crowd, allowing you to locate them visually, especially when you're zoomed out.
| To... | Do this |
|---|---|
|
Change a node’s shape or color |
You can resize the palette by dragging the corner.
|
|
Change the default shape/color for all nodes of a certain type |
Hold ⌃ Ctrl when dragging a shape or color onto a node (see above). Note that this any nodes of the same type that already have their own individual custom shape or color will keep them. |
|
Customize the color palette |
Right click a color in the palette to add, edit, or remove colors. Changes are saved only for that pane on the current desktop. To make the current palette the new default, right click the palette and choose Save as defaults. |
|
Turn off display of custom shapes |
In the network editor, turn off View ▸ Show custom node shapes. (You can also set the Use simplified shape when node shapes off option in Edit ▸ Preferences ▸ Network editor. This makes the network editor use a simplified rectangle shape when Show custom node shapes is off. This may speed up the display of extremely dense networks.) |
Themes 
You can create themes with customized node shapes and colors, and switch between themes.
| To... | Do this |
|---|---|
|
Show the Themes tab |
|
|
Switch to a different theme |
On the Themes tab of the display options, click Default node colors or Default node shapes and choose a theme. For example, there is a No Color color theme, or a Flair shape theme that has more interesting shapes for Bone and Light objects. |
|
Start a new color or shape theme |
|
|
Delete a custom theme |
|
Bulk changes 
-
You can set the color or shape of multiple nodes at once by selecting the nodes and then clicking in the color or shape palette.
-
You can get or change custom node colors using the hou.Node.color and hou.Node.setColor methods with the hou.Color class:
>>> n = hou.node("/obj/geo1/box1")
>>> n.setColor(hou.Color(0.996, 0.682, 0.682))
>>> n.color()
<hou.Color r=0.996, g=0.682, b=0.682)
-
Custom shapes are stored as “user data” on the node. You can get or change the node shape programmatically using the hou.Node.userData and hou.Node.setUserData methods:
>>> n = hou.node("/obj/geo1/box1")
>>> n.setUserData("nodeshape", "tilted")
>>> n.userData("nodeshape")
"tilted"
When the
nodeshapeuser data is empty, or does not contain a valid shape name, the node uses the default shape for its type (set in theOPcustomizefile, see above).An easy way to reset any node to its default shape is:
node.setUserData("nodeshape", None)
-
The NodeType.defaultShape method returns the name of the default shape for a given node type. (If the default has not been customized, the method will return the empty string).
-
To programmatically get a list of available shape names, get a reference to a network pane tab and call hou.NetworkEditor.nodeShapes.
>>> editor = hou.ui.paneTabOfType(hou.paneTabType.NetworkEditor)
>>> editor.nodeShapes()
('rect', 'bone', 'bulge', ... )
Network boxes 
Network boxes let you group nodes together. This is useful when you can’t or don’t want to collapse the nodes into a subnetwork but you want to distinguish them from other nodes.
-
Moving the box moves the nodes inside with it.
-
You can use a network box to highlight a group of nodes.
-
You can minimize the box to hide parts of the network, or keep the network tidy by only expanding the parts you're working on.
For example you could group the nodes representing different limbs of a character rig in different boxes. Or you could put different distinct “stages” of a geometry pipeline in different boxes.
Tip
You can embed network boxes inside other network boxes, as well as sticky notes and images.
| To... | Do this |
|---|---|
|
Create a network box |
|
|
Give a network box a title |
Double click in the top bar of the box to edit the network box title. This can be useful to annotate the box’s contents. |
|
Add or remove items to/from a box |
Drag the node onto or out of the box. You can drag an item slowly toward the edge of a box to expand the box, or drag quickly to remove the item from the box. |
|
Move or resize a network box |
|
|
Resize a network box to fit its contents |
Select the box and choose Layout ▸ Resize network boxes to fit. |
|
Remove a network box |
|
|
Minimize and restore network boxes |
You can collapse a box down to its top bar to save space or create a cleaner look when you are not working on the box contents.
|
|
Assign colors to network boxes |
|
|
Manipulate network boxes using Python |
Network boxes have an internal name you can use to script them, but it’s not displayed in the network editor (the text in the netbox title bar is actually the netbox’s comment string).
|
Sticky notes 
Sticky notes are boxes of text in the network. You can use them to explain parts of the network to other people working on the network (or to your future self!).
| To... | Do this |
|---|---|
|
Create a sticky note |
In the network editor, choose Add ▸ Sticky note, or click the You can drag the sticky note to move it where you want in the network. |
|
Edit the contents of a note |
Click in the body of the note to make the text editable. When you're finished editing, click outside the note. |
|
Resize a sticky note |
Drag one of the corners of the sticky note. |
|
Minimize and restore sticky notes |
You can collapse a sticky note down to its top bar to save space or create a cleaner look when the sticky is not needed. Click the minus button in the sticky note’s top bar to collapse it. Click the button in a collapsed sticky to restore it to regular size. |
|
Change the size of the text in a note |
|
|
Change the note colors |
|
|
Delete a sticky note |
Select the note and choose Edit ▸ Delete or press ⌦ Del. |
|
Manipulate sticky notes using Python |
Sticky notes have an internal name you can use to script them, but it’s not displayed in the network editor.
|
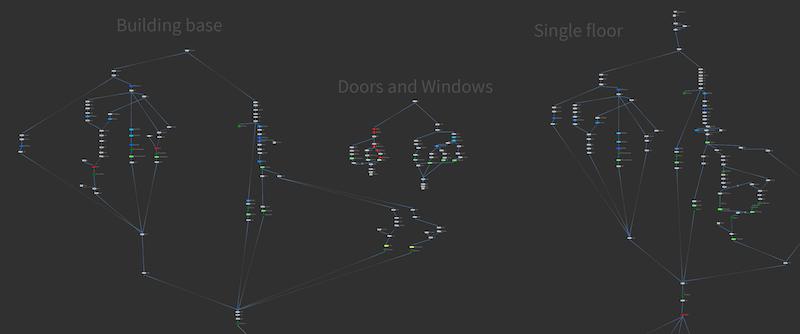
Using sticky notes as big labels 
You can turn off the background of a sticky note to create the appearance of a free-floating label. These labels can be useful to annotate large-scale sections of the network. Making the text large makes the labels visible at far zoom.
-
Create a sticky note and type a (short) label in it.
-
Resize the note so it just fits the label inside.
-
Right click the note and choose Set text size ▸ Large or Extra large.
orHold ⇧ Shift and resize the note to resize the text at the same time.
-
Right click the note and choose Hide background.
Collapsing node branches 
It’s possible to collapse a node branch down to a small stub representing the branch on an input. Parameter nodes for promoted parameters on VOP shaders start out collapsed to keep the network cleaner. You can select the nub to select the hidden Parameter node it represents.
-
Selecting the stub is the same as selecting the nearest collapsed node.
-
Double-click a stub to expand the collapsed branch.
-
To collapse the inputs to a node, right-click the node and choose Inputs ▸ Hide inputs.
Hiding nodes can make the network harder to understand for other users if they don’t notice part of the network is hidden. You might want to use other organization tools (such as collapsing network boxes) to clean up the network instead.
Working with subnetworks 
Subnetworks let you encapsulate multiple nodes inside a single node, streamlining your network visually and conceptually. Note that putting nodes inside a subnetwork changes their path.
The subnetwork node can have up to four inputs, which are passed down to special nodes inside the subnetwork.
| To... | Do this |
|---|---|
|
Create an empty subnet |
|
|
Create a subnetwork from existing nodes |
|
|
Move one or more nodes inside a subnetwork |
|
|
Connect the subnet’s inputs to node inputs inside the subnet |
|
|
Choose the subnet’s output |
|
|
Label the subnet’s inputs |
|
Node comments 
Network background images 
| To... | Do this | |||||||||
|---|---|---|---|---|---|---|---|---|---|---|
|
Add a background image |
In the network editor, choose Add ▸ Background image, or click the |
|||||||||
|
Edit background images |
In the network editor, turn on Tools ▸ Edit background images.
|
|||||||||
|
Link an image to a node so it moves with the node |
Now if you drag the node, the image will move with it. |
You can edit the “comment” string for any node. By default this text is only visible in the info window, but you can make the comment appear next to the node in the network editor. This is useful for networks that will be shared with other people, to let you explain the node’s function in more detail than the name alone can express. It can be especially useful in “demo” or “example” networks.
Edit a node’s comment field
In the network editor, open the node’s info window.
Click in the comment field in the info window to edit it.
Show a node’s comment next to the node in the network
In the network editor, open the node’s info window.
Turn on Show comment in network below the comment field.