| On this page |
Overview 
Crowd simulations require both a geometry (SOP) network and a simulation (DOP) network:
-
A geometry (SOP) network is used to create and define the agents. The full power of Houdini’s SOP nodes can be used to create agent positions from existing models such as terrain.
-
A simulation (DOP) network is used to run the actual crowd simulation. The DOP crowd simulation network holds the logic that controls the movement of each particle (and in turn, the agent that is attached to it). Within the DOP network, agents can interact with other dynamic (DOPs) elements.
Quick start 
Use the Simulate shelf tool to quickly get a basic crowd simulation scene up. Then tweak the network for your purposes.
-
Press ⌃ Ctrl +
 on the
  Simulate tool on the Crowds shelf tab. The tool will automatically build agents and a crowd source network using the
  mocapbiped1 character built into Houdini.
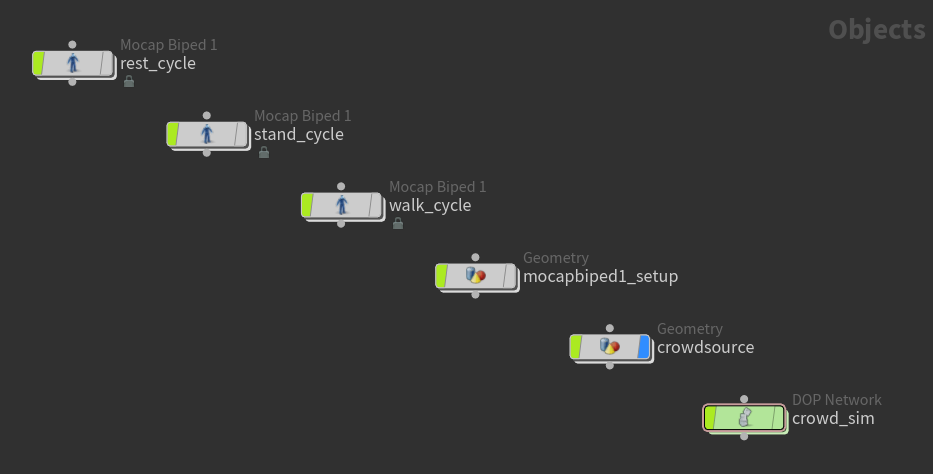
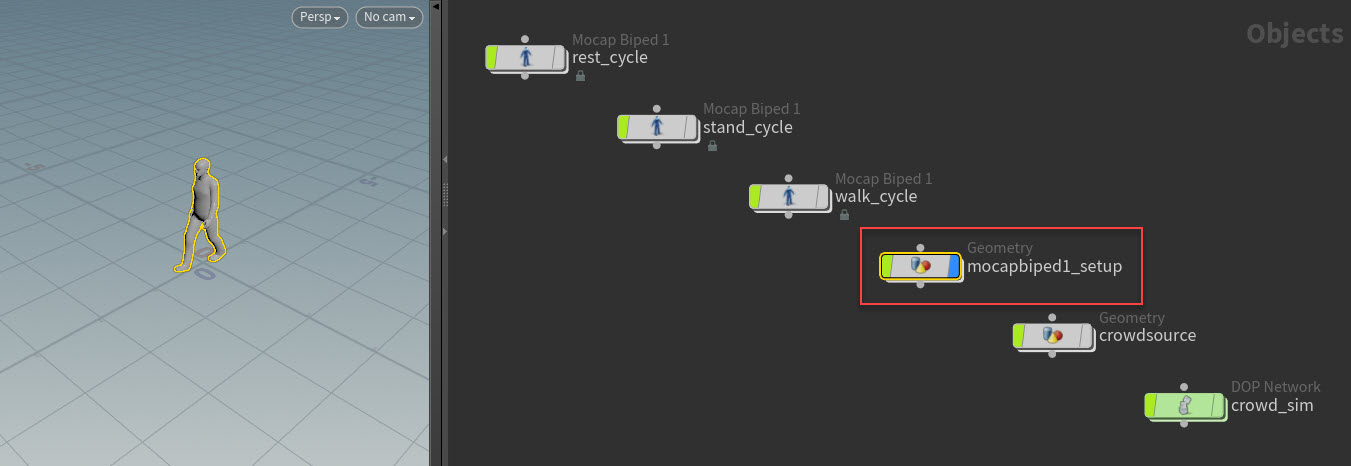
Object level network created from the Simulate shelf tool The crowd simulation network (
crowd_sim) created by the Simulate shelf tool: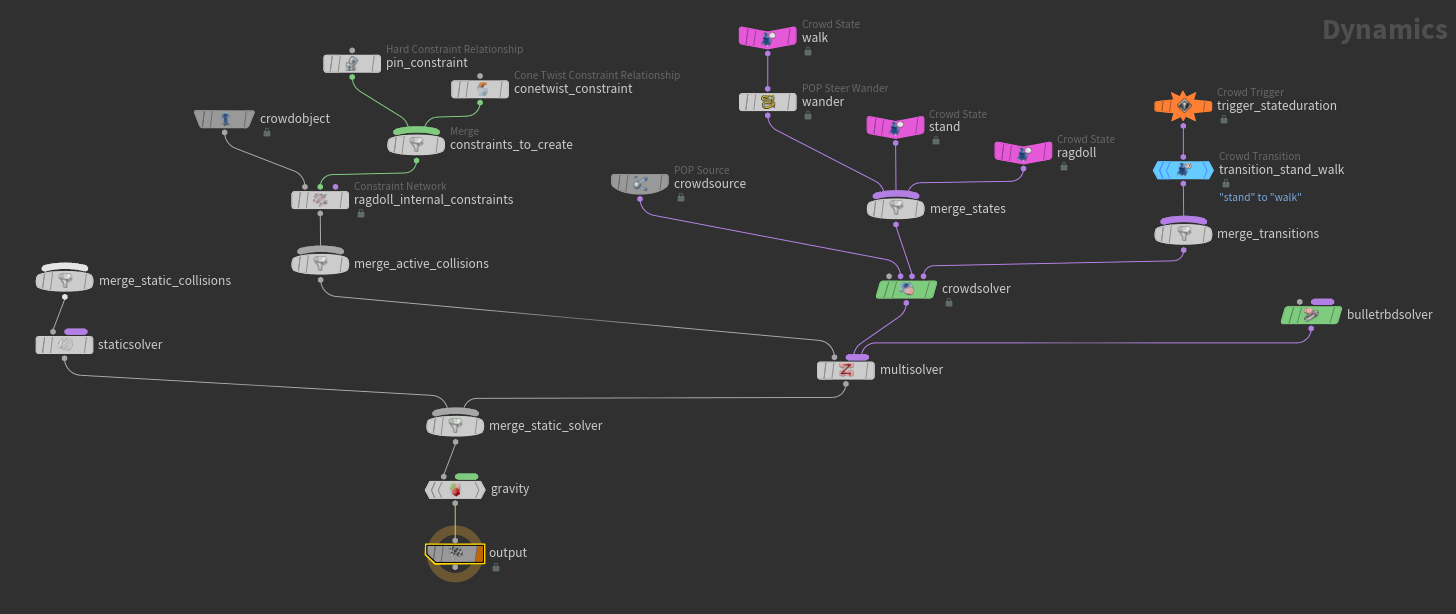
Crowd simulation DOP network -
If you have terrain geometry you want the agents to walk across, select the terrain geometry and click
 Terrain Foot Planting on the Crowds shelf tab. The terrain object will be added as an input to the static solver.
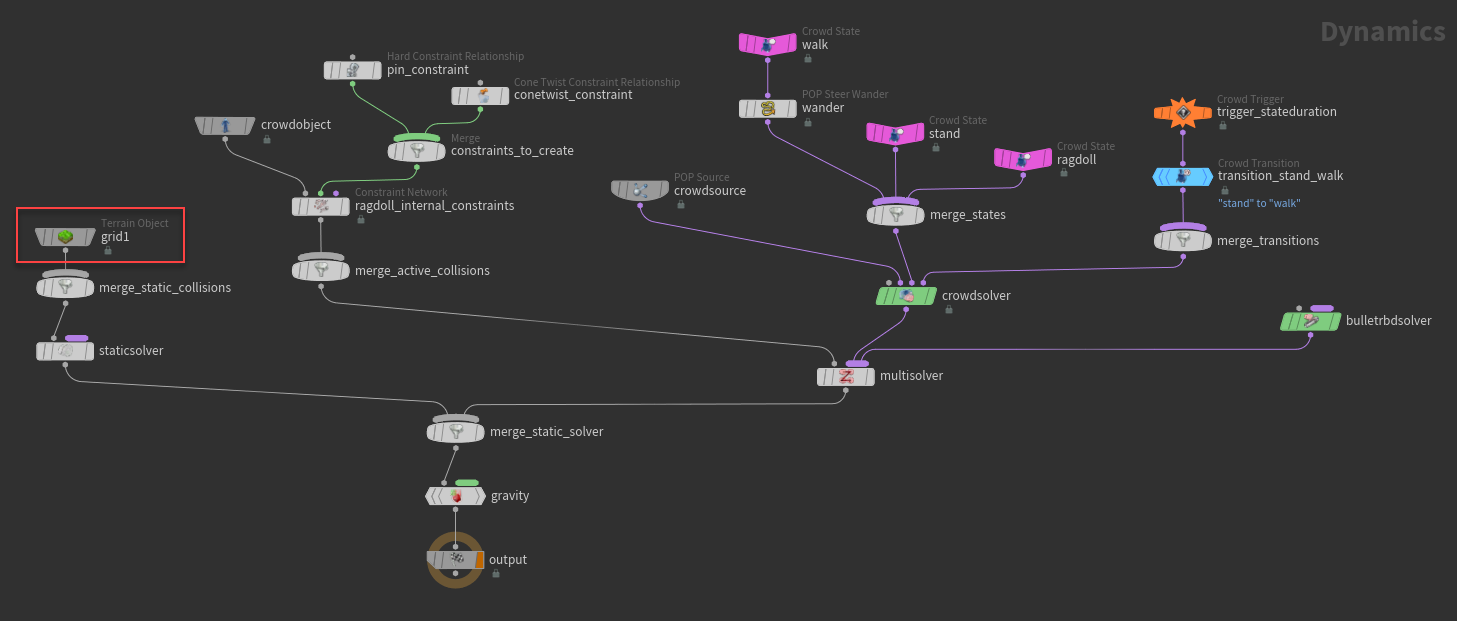
Terrain object in the crowd simulation network -
Play the simulation by clicking
 Play on the playbar. The agents will stand, and then walk.
Define an agent 
An agent is defined in an agent definition network, a geometry (SOP) network where you (or the shelf tools) can add nodes to modify the agent before the crowd simulation. Modifications can include adding layers, and adding collision and rotation information for a ragdoll simulation. See agent definition for more information.
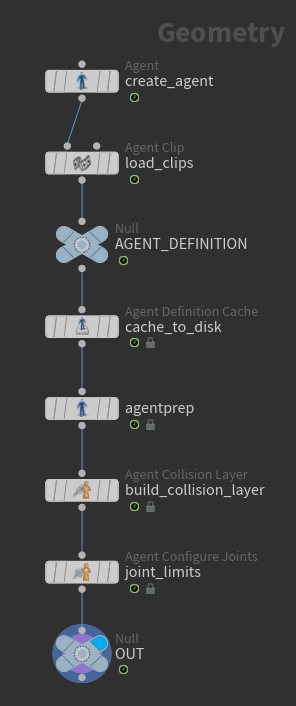
The Simulate shelf tool sets up the below agent definition network in mocapbiped1_setup.
|
Creates an agent primitive, and sets basic information such as its name, the current layer, and the current animation clip. |
|
|
Adds one or more animation clips to the agent definition. |
|
|
A reference used by the crowd simulation network to grab the agents (using a |
|
|
Writes out the agent definition to disk, and in subsequent cooks, reads the definition from the cached files instead of the input. Use this to speed up the agent definition network if cooking the character is slow. |
|
|
Sets up additional information on the agent, such as the names of important joints, and the transforms to use for the different limbs. If you are going to do terrain adaptation (adjust the agent’s animation so that its feet plant properly on the terrain geometry), look ats (edit the agent’s neck joint to point its head at something), or other features that require Houdini to know the joints that represent each body part, the crowd solver uses the information from the Agent Prep SOP to perform foot placement and other procedural changes. This node comes after the Agent Definition Cache, because the Agent Prep SOP is always fast to compute, and so it doesn’t need to be cached. |
|
|
Used for ragdoll simulations. Defines simple geometry around the agent’s skeleton to determine the surfaces to collide against when the agent becomes a ragdoll. |
|
|
Used for ragdoll simulations. Specifies the range of motion for each agent joint. |
|
|
Marker for the end of the “cache-able” section of the agent definition. A convenient node that can be referenced for importing the final agent definition into other networks. |
Adding animation clips to an agent 
A clip is a bit of animation on a character (for example, standing, walking, or running). You can add clips to the agent definition so the agent can perform different animations in different states.
| To... | Do this |
|---|---|
|
Set up animation sources |
Before you can add clips to an agent, you need to set up individual instances of the source character performing each animation. For example, if you have an agent, The Simulate shelf tool creates Mocap Biped characters with rest, stand, and walk animations. 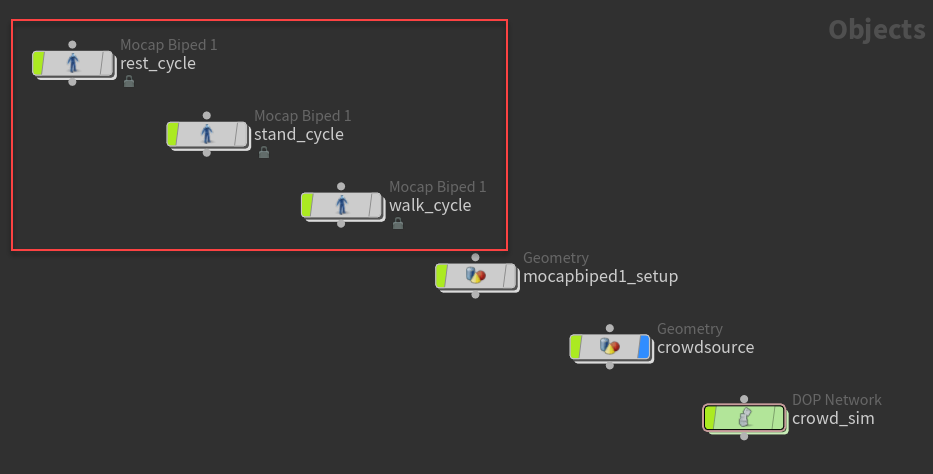
|
|
Add an animation clip to an agent using the shelf tool |
The new animation clip will be added to the Agent Clip SOP in the agent definition network. |
Note
In previous versions of Houdini’s crowd system where agent information was always baked to disk, you would have a single instance of your character, set it to play an animation clip, bake out that clip, edit the same instance to play a different clip, bake out that clip, and so on.
The current crowd system is much more convenient and no longer requires baking files to disk; the crowd system simply cooks the character information it needs directly in Houdini. However, this means you need separate instances of the character asset performing each animation clip so the crowd system can cook them when necessary.
Crowd source 
To create a crowd, you need a crowd source network that creates a crowd of agents. The crowd source network is a geometry (SOP) network that scatters points over a given area, and attaches agents onto the points.
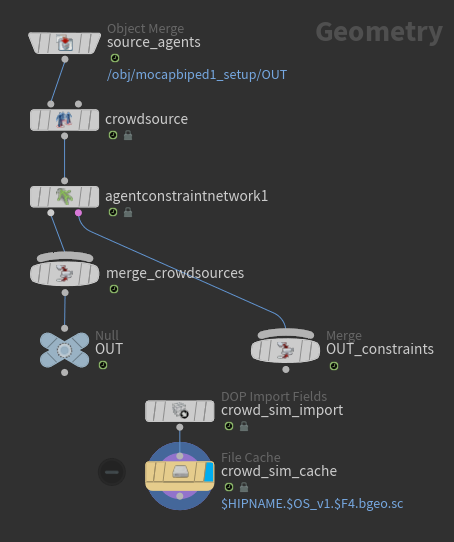
The Simulate shelf tool sets up the below crowd source network in crowdsource.
|
“Imports” the agent from an agent definition network. |
|
|
Copies agents onto points. It has options for automatically scattering agents across a surface or within a defined area, as well as for randomizing their initial states. You can wire geometry into the second input of the Crowd Source node to control the scattering of agents.
|
|
|
Used for ragdoll simulations. Sets up the constraint networks between agent parts. |
|
|
|
Merges the separate Object Merge → Crowd Source → Agent Constraint Network branches for each class of agents in the crowd simulation. |
|
A convenient node that can be referenced for importing the agents into the crowd simulation network. Wire any nodes that you want to apply to all agents between |
|
|
|
This DOP IO node imports the results of the DOP crowd simulation back into this object so it can be rendered. |
| To... | Do this |
|---|---|
|
Create a crowd source network using the shelf tool |
Tip You can edit the resulting network and use various SOPs to set up the points before copying agents onto them. For example, instead of scattering the points, you could use SOPs to set up the points in ordered rows. |
Crowd simulation 
The crowd source SOP network creates a crowd of agents. To make the crowd move and execute behaviors, you need a crowd simulation DOP network.
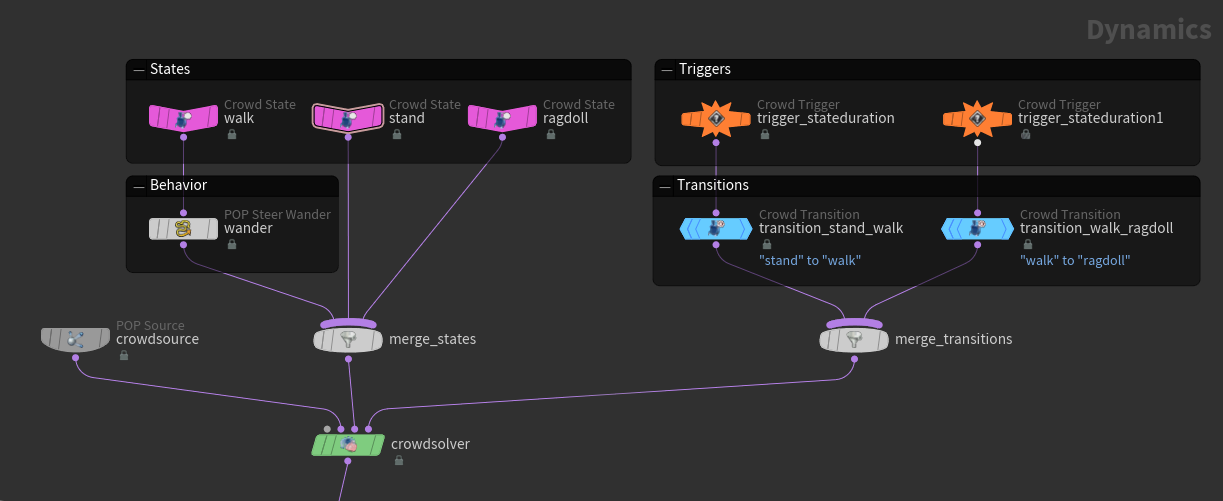
The Simulate shelf tool creates the below crowd simulation network in crowd_sim.
Some components of a crowd simulation network are highlighted below.
|
Each branch leading into the The state node is followed by behavior nodes that affect the agent’s motion, as well as other nodes that affect the agent’s skeletal animation. When these nodes are wired between the state node and the The effects of multiple behaviors are normalized, and the weighted average of the behaviors are applied to the agents by the crowd solver. |
|
|
Each branch leading into the Trigger nodes are followed by |
|
|
This is a |
|
|
Implements the crowd system. The crowd solver has controls for default behaviors that can apply to all agents or a subgroup of agents, such as agent collision avoidance and terrain following. |
|
|
Crowd object |
Data is attached to this object for the crowd system to process. You usually don’t need to modify this node. |
Tip
Houdini automatically color codes certain nodes to make it easier to keep them organized in the network editor (Crowd State pink, Crowd Trigger orange, Crowd Transition blue). You can change a node’s color after it is created.
Shelf tools 
The following tools are on the Crowds tab of the shelf.
|
Creates an agent definition network based on a character. |
|
|
Adds an animation clip to an agent definition by referencing an instance of the character performing the animation. |
|
|
Sets up simple collision geometry around an agent character’s skeleton. For use in ragdoll simulations. |
|
|
Sets up joint rotation limits on an agent character. For use in ragdoll simulations. |
|
|
Creates a crowd source network to scatter agents across the selected geometry, but does not create the crowd simulation network. This may be useful for layout artists who don’t want to create a simulation. |
|
|
Paints density attributes on terrain geometry to control the random distribution of generated agents. |
|
|
Sets up geometry (SOP) and simulation (DOP) networks with sample animated agents and behaviors. This is useful for quickly setting up the various crowd networks. You can then modify them to suit your needs. |
|
|
Sets the selected geometry as terrain for the current crowd simulation. |
|
|
Adds the selected geometry as an obstacle for the current crowd simulation. |
|
|
Creates a |
|
|
Have agents keep their head turned toward the selected object. |
|
|
Have agents chase the selected object. |
|
|
Creates and attaches cameras to the head transform of the selected agents. |