| On this page |
|
The crowds DOP workflow is a simulation-based approach, where at any given time, agents are in a particular state that defines their movement and the animation clip that is played back. In a particular state, agents could, for example, be walking toward a goal, or wandering around and avoiding other agents. The forces that act on the agents and steer their movement are constantly evaluated, as are triggers, which determine what is happening around the agents and transitions them to another state at some point in time. This approach is powerful for large crowds because you can set up a few simple rules to control the general behavior of an entire crowd. The challenge with the DOP simulation workflow, however, is getting precise control for a small number of agents. For example, if you want to update the path of one agent, you would have to think about how to change your crowd setup so that the other agents are not affected. This is difficult because all the agents in a crowd simulation react to one another.
With SOP motion paths, you can quickly make changes to the motion path or animation of a small number of agents without needing to resimulate the entire crowd. The SOP motion path tools do not involve any simulation - they are not going one timestep forward, evaluating forces and triggers, and determining whether to switch agents to a different state. Instead, an agent’s motion path describes the overall position of the agent across time, and manipulations are performed on the path to determine where the agent will go.
The SOP motion path tools provide an alternative way for users to set up crowd shots. You can mix and match SOP motion path tools with the DOP simulation workflow to get the desired behavior.
Setup 
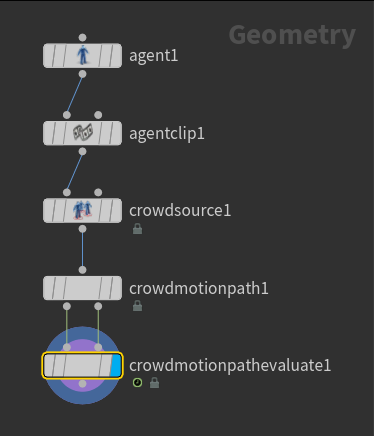
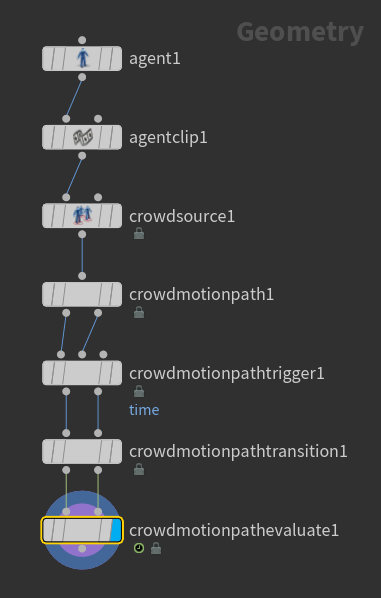
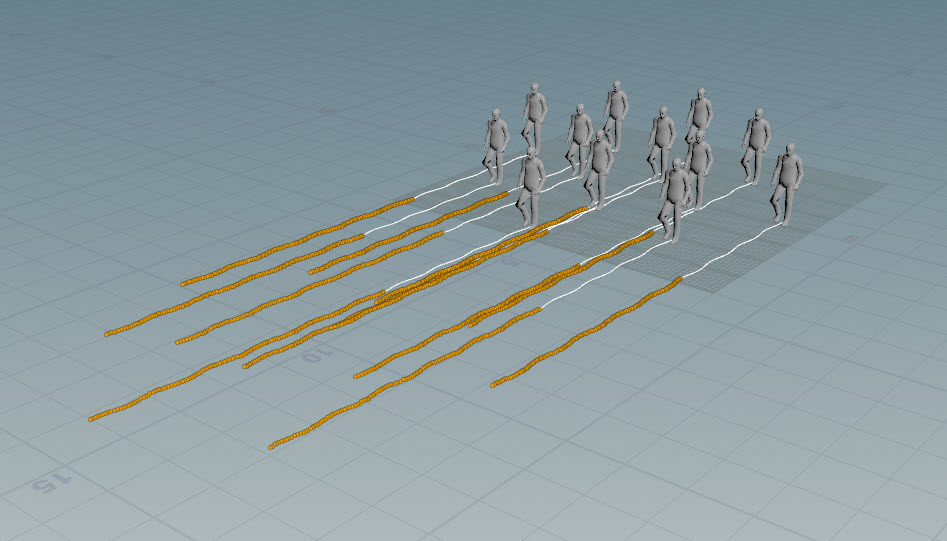
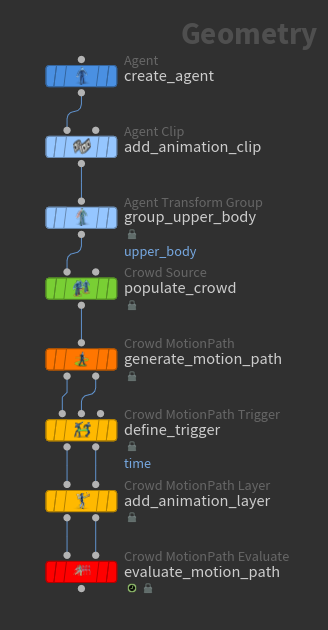
The starting point of the SOP crowds motion path toolset is the ![]() Crowd MotionPath SOP, which generates motion paths from a crowd of agents. The
Crowd MotionPath SOP, which generates motion paths from a crowd of agents. The ![]() Crowd MotionPath Evaluate SOP is the companion node to the Crowd MotionPath SOP. It determines the agent’s position along the path at a particular frame and plays back the animation on the agent.
Crowd MotionPath Evaluate SOP is the companion node to the Crowd MotionPath SOP. It determines the agent’s position along the path at a particular frame and plays back the animation on the agent.
Between the Crowd MotionPath and Crowd MotionPath Evaluate SOPs are operations that:
-
Manipulate the agents' paths, directing where the paths should go.
-
Transition between different animation clips based on various triggers.
Generate crowd motion paths 
The input to the SOP crowds motion path tools is a crowd of agents.
Note
The same setup is used for creating the input crowd for both SOP motion paths and DOP simulations.
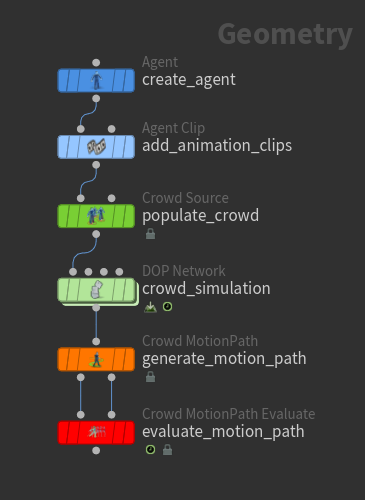
Below is one example of a basic setup for creating a crowd of agents (see setup for more information on how these nodes are used in crowds):
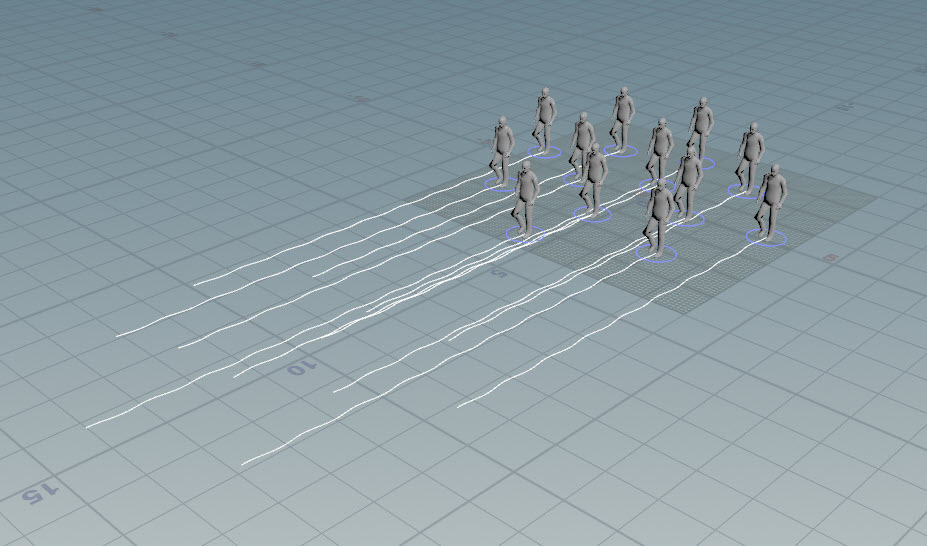
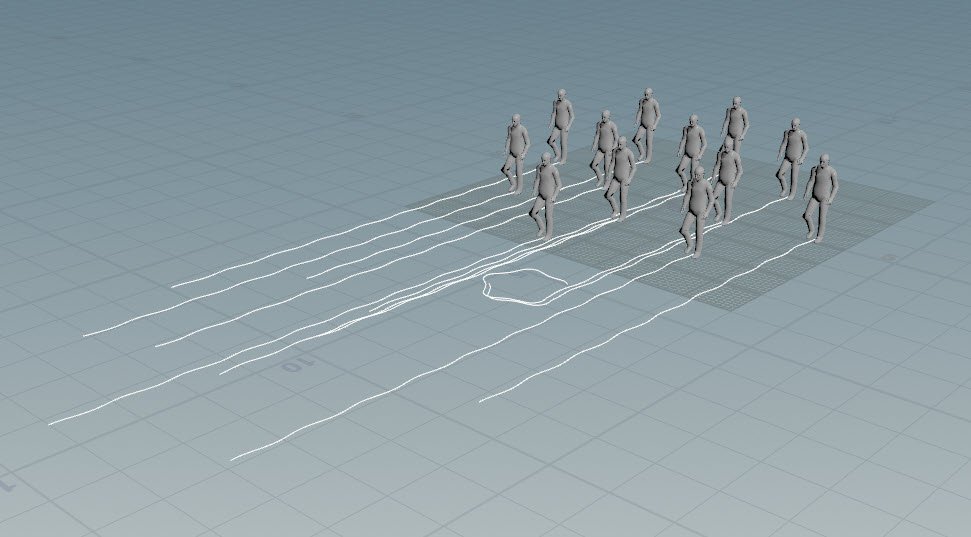
The motion paths generated by the Crowd MotionPath SOP are represented by curves that describe the agents' positions at each point in time within a specified frame range. The paths have the whole time range laid out in front of them. By default, the agents' paths are generated from the animation clip assigned to the agent. The motion data is taken from the animation clip and cycled forward to generate the agents' positions at each point in time. The Crowd MotionPath tools are similar to the MotionClip tools, where the poses of the skeleton are laid out across time.
To change the animation clip(s) used to generate the agent paths:
-
On the Crowd MotionPath SOP, Clip Assignment section, set Clip Names to the name of the clip. If you have a library of animation clips, you can specify different clips to be randomly selected for agents to play. You can specify multiple clips in each Clip Names parameter.
Note
If you select a clip from the Clip Names drop-down menu, the clip name will be appended to the existing set of entries in Clip Names.
-
Set the Weight value for the group of clips. A higher weight makes it more likely for agents to play those clips.
-
Click
 beside Clip Groups to add clips with different weights.
| To... | Do this |
|---|---|
|
Change the frame range used to generate the path |
On the |
|
Change the speed of the animation clip |
On the Crowd MotionPath SOP, adjust the Clip Speed. Vary the clip speed between different agents by selecting Set Varying in the drop-down menu beside Clip Speed, and adjusting the Variance and Variance Seed values. |
|
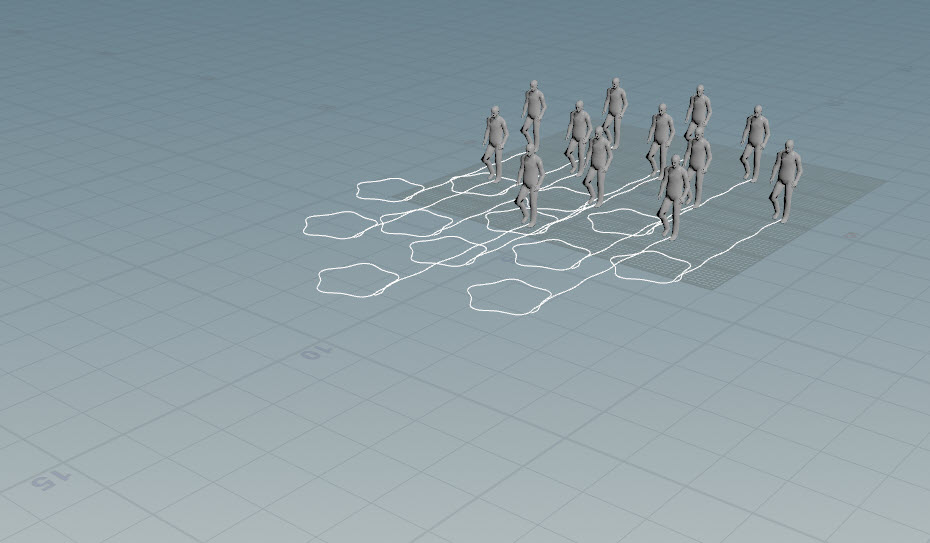
Show the agent position along the path at each point in time |
Turn on |
|
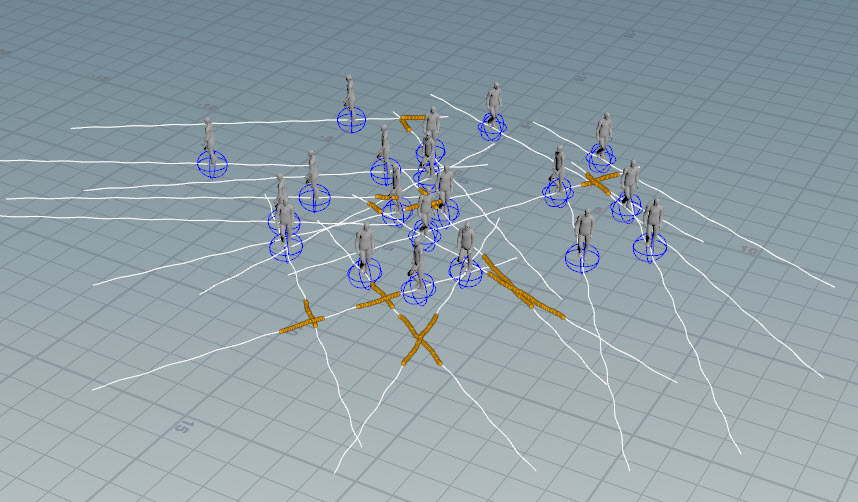
Build the agent paths from a crowd simulation |
Instead of building the agent paths based on the motion in animation clips, the paths can also be generated from a crowd simulation. In the example below, the crowd simulation DOP network makes the agents wander around and avoid each other. To generate paths from the DOP simulation:
This example demonstrates how to generate motion paths from a simulated crowd. |
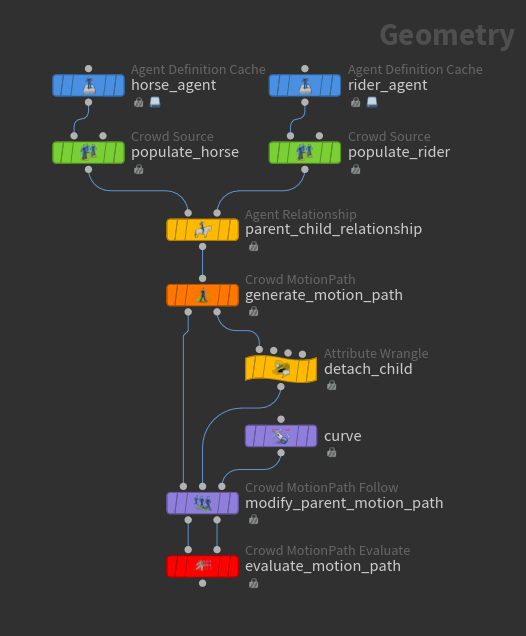
Parent-child relationships between agents 
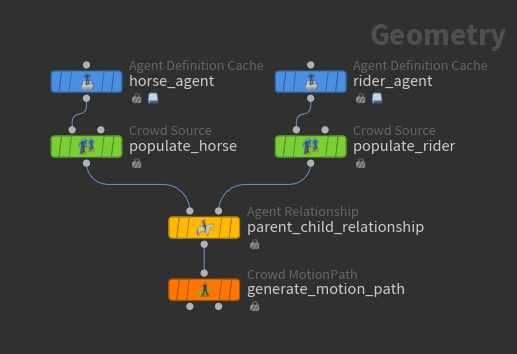
Parent-child relationships between agents can be set up using the ![]() Agent Relationship SOP. When edits are made to the motion paths of the parent agents, the child motion paths are deformed to keep the child agents attached to their parents.
Agent Relationship SOP. When edits are made to the motion paths of the parent agents, the child motion paths are deformed to keep the child agents attached to their parents.
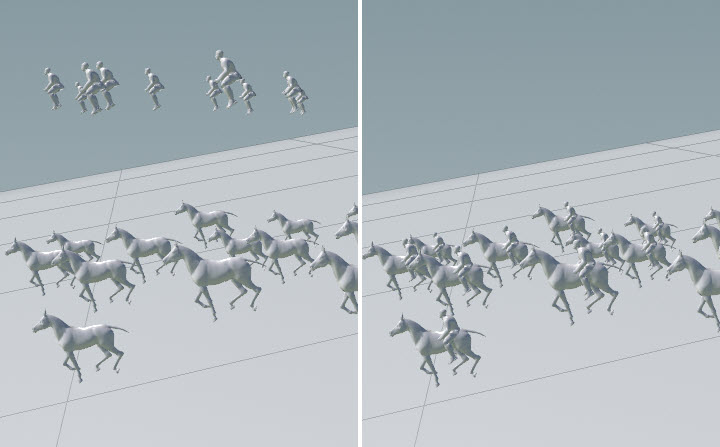
To generate motion paths for both the parent and child agents, connect the Agent Relationship SOP to the ![]() Crowd MotionPath SOP. In this example, we attach rider agents (child) to horse agents (parent):
Crowd MotionPath SOP. In this example, we attach rider agents (child) to horse agents (parent):

See parent-child agent relationships for more information on the Agent Relationship SOP’s parameters and attributes, and using the SOP’s viewer state to adjust the transforms of the child agents.
To set the animation clips for the parent and child agents:
-
On the Crowd MotionPath SOP, click
beside Number of Assignments to add a set of animation clip parameters for each parent and child. -
On each set of parameters, set the Group parameter to the group of parent or child agents, for example,
@agentname=horse.Tip
The
agentnameattribute is created by upstream nodes such as the Agent Definition Cache SOP or
  Agent from Rig SOP. To view the
 agentnameattribute of each agent:-
Select the Agent Relationship SOP.
-
Open the geometry spreadsheet - at the top of a pane, click the
 New Tab icon and select New Pane Tab Type ▸ Inspectors ▸ Geometry Spreadsheet.
 -
Select
 Points on the top toolbar.
-
-
Set the Clip Names parameter to the animation clips you want to use for the agent. See generating crowd motion paths for more information on specifying animation clips for agents.
By default, the motion paths for the child agents are hidden (on the Crowd MotionPath SOP, Hide Child Agent Paths is turned on):
Note
The parent and child motion paths must have the same number of points (identical time sampling). This will happen by default if you generate the parent and child motion paths using the same Crowd MotionPath SOP (they have the same frame range and number of subframes - Start/End/Inc values).
| To... | Do this |
|---|---|
|
Show the motion path for the child agents |
On the Crowd MotionPath SOP, turn off Hide Child Agent Paths. |
|
Detach a child from its parent |
In this example, we detach a child from its parent, and then modify the parent’s motion path with a
One of the child agents is no longer attached to its parent: |
|
Reattach a child agent to its parent after performing a post-processing step on the agents |
After performing a post-processing step on the agents, you could use the
|
Manipulate agent paths 
The following nodes change the paths that agents follow across time:
Deforms the original agent paths to follow the curve(s) drawn in the viewport.
Allows you to directly manipulate the paths to determine exactly where the agents should go. This offers a finer level of control than Crowd MotionPath Follow.
Performs collision detection and avoidance between agents.
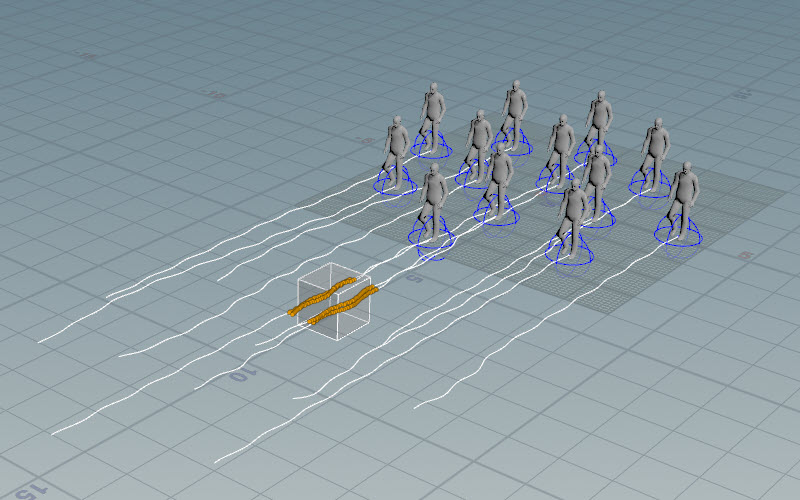
Agent paths follow guiding curves 
You can quickly draw guiding curves for agents to follow, which is useful, for example, if you want agents to follow along a path on a road. The ![]() Crowd MotionPath Follow SOP deforms the original agent paths to follow the curves drawn. It changes the position and orientation of the points along the path, but not the animation clip.
Crowd MotionPath Follow SOP deforms the original agent paths to follow the curves drawn. It changes the position and orientation of the points along the path, but not the animation clip.
Connect the Crowd MotionPath Follow SOP between the Crowd MotionPath and Crowd MotionPath Evaluate SOPs:
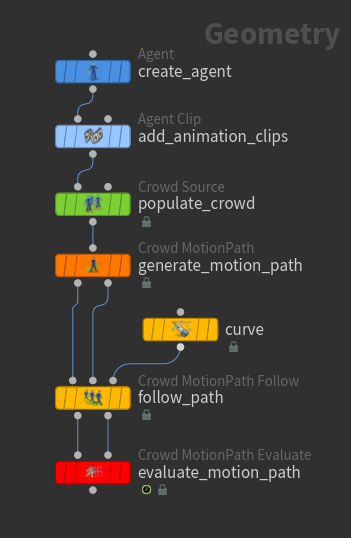
Draw a curve (or multiple curves) in the viewport using the Curve SOP. By default, agent paths follow the closest curve:
-
Set the display flag on the Crowd MotionPath Follow SOP so that you can see how the paths are being deformed as you draw the curve.
-
Select the Curve SOP and click
 on the left toolbar to enter the viewer state.
 -
Draw the curve(s).
Tip
Display the construction plane so that the curves automatically snap onto the construction plane. Click
 Display Construction Plane on the right viewport toolbar.
 -
Select and display the Crowd MotionPath Evaluate SOP.
-
Click
 in the playbar to play the animation of the agents moving along the updated paths.
Agents follow curves drawn in the viewport
This examples demonstrates how to deform motion paths to follow guiding curves, along with more advanced options such as following closed loops and using attributes to control which curves are followed by each agent.
| To... | Do this |
|---|---|
|
Remove all the curves drawn |
On the |
Directly manipulate agent paths 
With the ![]() Crowd MotionPath Edit SOP, you can directly manipulate the paths to determine exactly where the agents should go. This node offers a finer level of control for manipulating paths than the Crowd MotionPath Follow SOP.
Crowd MotionPath Edit SOP, you can directly manipulate the paths to determine exactly where the agents should go. This node offers a finer level of control for manipulating paths than the Crowd MotionPath Follow SOP.
-
Connect the Crowd MotionPath Edit SOP between the Crowd MotionPath and Crowd MotionPath Evaluate SOPs.
-
Select and display the Crowd MotionPath Edit SOP.
-
In the viewport, drag points along the curve to deform the path. These points are called pins.
Note
If there is a parent-child relationship between agents, only the points on the parent path can be selected.
Tip
Turn on the construction plane so that when you drag points on a flat terrain, they will be dragged along the construction plane.
Directly edit agent paths
A few notes:
-
Each pinned point on the motion path has a weight, which determines how strongly the path is affected by the pin. You can change the weight of each pin with the Pin Weight parameter in the HUD slider.
-
When the deformed curve does not pass through the pinned point, a dotted line is displayed to show the relationship between the pin and its original point on the curve.
-
By default, the length of the curve is generally preserved as the motion path is changed.
This example demonstrates how to use the Crowd MotionPath Edit SOP to interactively adjust the paths of specific agents.
| To... | Do this |
|---|---|
|
Drag multiple pins |
|
|
Delete the selected pins |
Press Delete. |
|
Change the weight of the selected pins |
Use |
|
Set the default weight of new pins |
Set the Default Pin Weight parameter. |
|
Change the weight of the starting point of the motion paths |
Set the Start Point Weight parameter. |
|
Remove all edits on the selected paths |
Press U to delete the edits on all paths with selected pins. |
|
Remove all edits |
Click Reset All Changes in the parameter editor. |
Collision detection and avoidance 
The ![]() Crowd MotionPath Avoid SOP performs collision detection and avoidance between agents.
Crowd MotionPath Avoid SOP performs collision detection and avoidance between agents.
-
Connect the Crowd MotionPath Avoid SOP between the Crowd MotionPath and Crowd MotionPath Evaluate SOPs.
-
Select and display the Crowd MotionPath Avoid SOP.
By default, Visualize Collisions is turned on, which highlights the parts of the motion paths that have collisions. The sphere-shaped guide geometry shows the agent’s size that is used for collision detection:
Visualize collisions -
Adjust the parameters in the Steering tab and the number of Iterations to try to resolve the collisions. Iterations is the number of avoidance passes that are made on the curves to try to resolve collisions. Later iterations may have little effect if the Steering parameters are too restrictive.
Note
If you want more control over where the agents should go, use the Crowd MotionPath Follow or Crowd MotionPath Edit SOPs.
| To... | Do this |
|---|---|
|
View potential collisions |
Turn on Visualize Collisions. The parts of the motion paths with collisions are highlighted. Visualize Collisions is useful for determining where collisions occur even if Avoidance is turned off. |
|
Perform collision avoidance on specific paths |
The agents specified in Group can still collide with agents that are not listed in Group. |
|
Specify how far in advance for agents to start avoiding potential collisions |
Adjust the Max Collision Time. With a higher Max Collision Time, agents start trying to avoid potential collisions earlier. |
|
Change the agent’s size for collision detection |
Adjust the Particle Scale Multiplier to change the collision size for all agents. Each agent can also inherit the attribute |
|
Set the frame range to apply collision avoidance |
Turn on and specify the Start Frame and End Frame. |
|
Set the initial rotation angle at the start of the path |
Turn on and set Max Initial Rotation. This is useful if the agents are very close together at the start of the motion path and you want them to move away from each other. Max Initial Rotation allows you to configure the agents to immediately turn and face the other way only in the beginning. This avoids having to adjust the Max Turn Rate, which affects the turn rate for the entire time range. |
|
Preserve the original end position of the paths |
Increase the Goal Position Weight. |
|
Avoid neighboring agents |
|
|
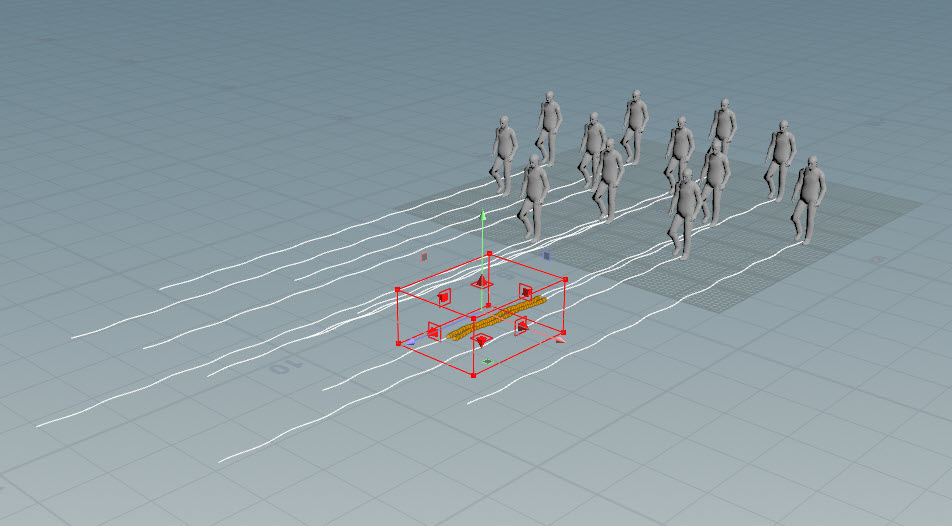
Avoid obstacles |
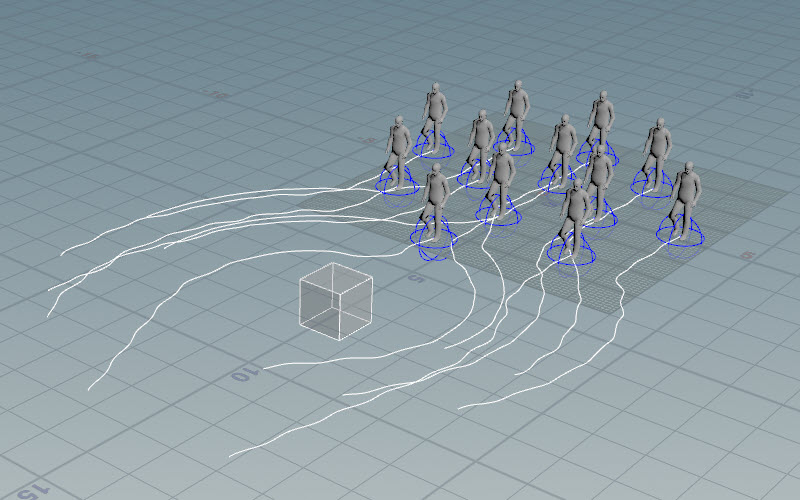
This example demonstrates how the Crowd MotionPath Avoid SOP can be used to avoid obstacles. |
|
Specify certain groups of agents to ignore collisions with other groups |
This example demonstrates how the Crowd MotionPath Avoid SOP can be used to apply avoidance between neighboring agents. The If an agent’s If an agent’s If an agent’s |
|
Set a path for agents to follow |
The Crowd MotionPath Avoid SOP can be used to make agents follow a path. Input a line geometry as an obstacle to the Crowd MotionPath Avoid SOP, which will be treated as a tube shape that the agent tries to avoid. |
|
Output a point group on geometry that contains the points with collisions |
Turn on Collision Point Group and specify a name for the point group. |
Transition between animation clips 
The following nodes control the transition between animation clips:
Switches to a different animation clip.
Sets the conditions that trigger a transition to another animation clip.
Layers different animation clips on top of the agent’s base animation. Layered clips can be applied to specific parts of the skeleton.
Blends between animation clips based on how quickly the agent is turning.
Manually select clip transition point 
Transition to a new animation clip using the ![]() Crowd MotionPath Transition SOP.
Crowd MotionPath Transition SOP.
-
Connect the Crowd MotionPath Transition SOP between the Crowd MotionPath and Crowd MotionPath Evaluate SOPs.
-
On the Crowd MotionPath Transition SOP, set Clip Name to the new animation clip.
By default, Crowd MotionPath Transition switches the agents' animation clips at the beginning of the frame range:
Transition to new animation clip at beginning of frame range
To transition to the new animation clip at a later point on the path:
-
On the Crowd MotionPath Transition SOP, click
 beside Trigger Group.
 -
In the viewport, select the points on the paths at which to start the transition. Hold SHIFT to select points on different paths. If multiple points are selected along a single path, the transition will occur at the first selected point.
-
Click ENTER. The Trigger Group parameter will be populated with the selected points.
Transition to new animation clip at manually selected points
This example demonstrates how to use the Crowd MotionPath Transition SOP to blend between animation clips, and how to use intermediate transition clips defined by a clip transition graph.
| To... | Do this |
|---|---|
|
Switch to a new animation clip based on multiple triggers |
In the Combine Triggers section, use boolean logic to specify different combinations of triggers. |
|
Transition agents to a new animation clip at slightly different times |
|
|
Transition to different animation clips |
If you have a library of animation clips, you can specify different clips to be randomly selected as the next clip to transition to.
|
|
Transition to a new clip through a sequence of transitions |
Use a clip transition graph to have more control over the clip transitions. The clip transition graph automatically finds transition regions between pairs of clips to determine a point where the current clip blends nicely into the new clip. You can also specify a sequence of transitions from the current clip to the new clip.
Using the clip transitions above as an example, if you specify:
Then agents playing the initial
Agents playing the initial
Note You can initialize clips in either the Crowd Source SOP or the Crowd MotionPath SOP. It is a workflow preference as to whether you want to assign clips when populating the crowd layout, or just before generating the agent paths. Assigning clips in the Crowd MotionPath SOP is a bit more flexible since you can use the Group parameter to set up clip assignments for different groups of agents and override the clips for specific agents. |
Transition to new animation clip based on trigger conditions 
The ![]() Crowd MotionPath Trigger and
Crowd MotionPath Trigger and ![]() Crowd MotionPath Transition SOPs work together to switch the agents' animation clips when certain conditions are met.
Crowd MotionPath Transition SOPs work together to switch the agents' animation clips when certain conditions are met.
Crowd MotionPath Trigger sets the conditions that trigger a transition to another animation clip, and Crowd MotionPath Transition switches the agents' animation clips when the trigger conditions are met.
-
Connect the Crowd MotionPath Trigger and Crowd MotionPath Transition SOPs between the Crowd MotionPath and Crowd MotionPath Evaluate SOPs:
-
On the Crowd MotionPath Trigger SOP, Trigger Name is set to
$OSby default, which sets the trigger name to the name of the Crowd MotionPath Trigger SOP. You can change Trigger Name to a more meaningful name, as it is used by subsequent nodes, such as the Crowd MotionPath Transition SOP, to reference the trigger. -
On the Crowd MotionPath Trigger SOP, set the trigger type in the Type parameter. To switch the animation clip at a particular frame:
-
Set Type to Time.
-
Set Frame to the frame at which to transition to a different animation clip.
In the example below, the Crowd MotionPath Trigger SOP is selected and displayed. The points on the path that satisfy the trigger condition are highlighted:
Trigger condition satisfied at the highlighted points on the paths -
-
On the Crowd MotionPath Transition SOP:
-
Set Trigger Group to the name of the trigger (defined in the upstream Crowd MotionPath Trigger SOP, Trigger Name parameter).
-
Set Clip Name to the new animation clip.
In the example below, the Crowd MotionPath Transition SOP is selected and displayed. The points on the path that satisfy the trigger condition are transitioned to the new animation clip:
Transition to a new animation clip -
Note
The Crowd MotionPath Trigger and Crowd MotionPath Transition nodes are the SOP-level equivalents to the ![]() Crowd Trigger and
Crowd Trigger and ![]() Crowd Transition DOPs in the crowd simulation network.
Crowd Transition DOPs in the crowd simulation network.
This example demonstrates how to use the Crowd MotionPath Trigger and Crowd MotionPath Transition SOPs to blend between animation clips.
| To... | Do this |
|---|---|
|
Switch to a new animation clip when the agents are inside an area or geometry |
The Comparison method of Incoming highlights the one point on each path where the transition is triggered: 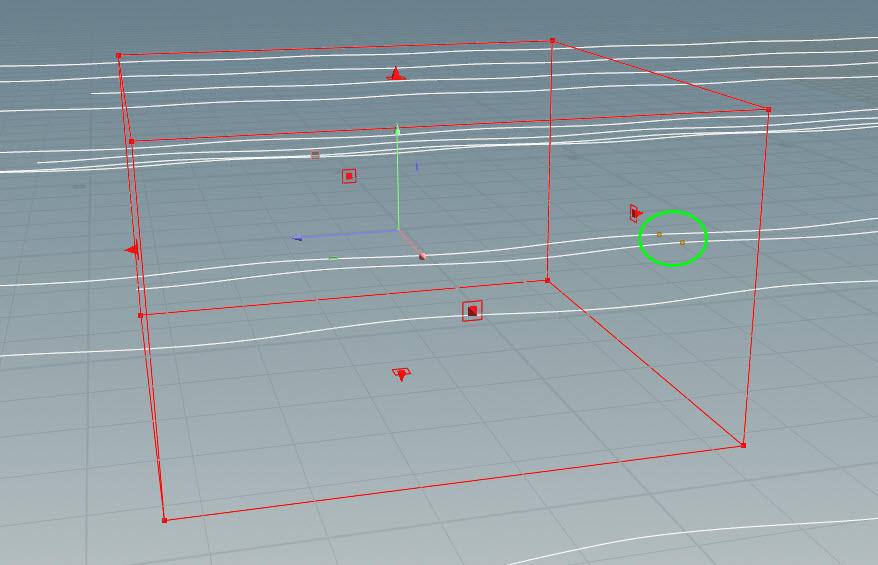
You can also use other geometry as the bounding region that triggers a transition. In the example below, the
The transition to the new animation clip is triggered when the agents are inside the rubber toy geometry (the rubber toy geometry is templated below): See the This example demonstrates how to layer a clip onto an agent and activate the clip when the agent is inside a bounding object. |
|
Switch a child agent’s animation when its parent’s animation changes |
If the agent is attached to another agent, turn on Match Parent Agent’s Trigger on the Crowd MotionPath Trigger SOP to switch the animation of the child agent when the parent’s animation changes. |
Layer animations 
The ![]() Crowd MotionPath Layer SOP provides an easy way to add additional motion onto an agent, like waving or turning the agent’s head, without having a whole new animation clip that performs the desired combination of different motions. Crowd MotionPath Layer is similar to Crowd MotionPath Transition, but instead of switching to a completely new animation clip, Crowd MotionPath Layer adds different clips on top of the agent’s base animation. Layered clips can also be applied to specific parts of the skeleton.
Crowd MotionPath Layer SOP provides an easy way to add additional motion onto an agent, like waving or turning the agent’s head, without having a whole new animation clip that performs the desired combination of different motions. Crowd MotionPath Layer is similar to Crowd MotionPath Transition, but instead of switching to a completely new animation clip, Crowd MotionPath Layer adds different clips on top of the agent’s base animation. Layered clips can also be applied to specific parts of the skeleton.
Connect the Crowd MotionPath Trigger and Crowd MotionPath Layer SOPs between the Crowd MotionPath and Crowd MotionPath Evaluate SOPs:
-
The
 Agent Transform Group SOP creates a named group of joints that specifies the parts of the skeleton to apply the layered clip to. See layer animation clips for more information. On the Agent Transform Group SOP, we set Name to
 upper_body. -
On the Crowd MotionPath Trigger SOP, specify a name for the trigger in the Trigger Name parameter. In our example, we set Trigger Name to
trigger_zombie. -
Set up the layer using the Crowd MotionPath Layer SOP:
-
Set Trigger Name to the trigger that causes the layer clip to start playing, in our example,
trigger_zombie. -
Set Transform Group to the joint group that will play the layered clip, in our example,
upper_body. -
Set Clip Name to the layered clip.
-
In the example below, the agents' upper bodies start playing the layered zombie clip at a certain point on the path, while the lower bodies keep playing the original walking clip:
This example demonstrates how to use the Crowd MotionPath Layer SOP to layer a clip onto the upper body of an agent. The clip is activated when the agent is inside a bounding object.
| To... | Do this |
|---|---|
|
Switch to a new animation clip based on multiple triggers |
In the Combine Triggers section, use boolean logic to specify different combinations of triggers. |
|
Transition to different animation clips |
If you have a library of animation clips, you can specify different clips to be randomly selected as the next clip to transition to.
|
|
Change how quickly the original clip blends into the layered clip |
Adjust Blend In Frames and Blend Out Frames. |
|
Partially blend the layered motion clip with the original animation |
Adjust the Blend Ratio. A Blend Ratio of |
|
Set the layered clip to play for only a few seconds |
Turn on Number of Loops and adjust the parameter value. If Number of Loops is set to |
Blend between animation clips based on an agent’s turn rate 
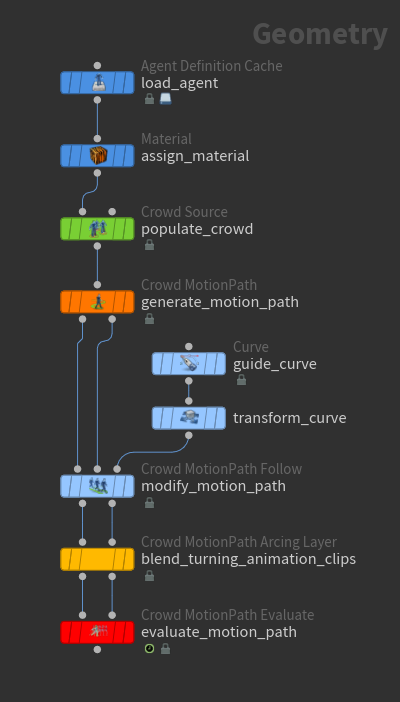
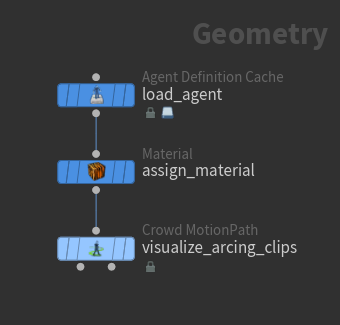
The ![]() Crowd MotionPath Arcing Layer SOP allows you to blend between animation clips based on an agent’s turn rate, giving you more realistic motion when the agent is turning quickly:
Crowd MotionPath Arcing Layer SOP allows you to blend between animation clips based on an agent’s turn rate, giving you more realistic motion when the agent is turning quickly:
It’s important that the animation clips for the turning motion are synced with the base animation. The Crowd MotionPath Arcing Layer SOP blends between the different animation clips, so the turning clips need to be at the same plane as the base animation.
In this example, we deform the motion path using a ![]() Crowd MotionPath Follow SOP. We then blend between the animation clips of the horse agents along the bend of the motion path using the Crowd MotionPath Arcing Layer SOP:
Crowd MotionPath Follow SOP. We then blend between the animation clips of the horse agents along the bend of the motion path using the Crowd MotionPath Arcing Layer SOP:
The agent definition has the following animation clips (see layering animation for information on how to view an agent’s clips):
-
Connect the Crowd MotionPath Arcing Layer SOP between the
 Crowd MotionPath and
  Crowd MotionPath Evaluate SOPs.
 The Crowd MotionPath SOP stores the “rest pose” of the motion path by adding a
rest_transformattribute to the motion paths. After we make edits to the motion path (for example, using the Crowd MotionPath Follow SOP), the Crowd MotionPath Arcing layer SOP compares the updated path to the original path, and this difference is used to compute the agent’s turn rate. It’s important that the turn rate along the motion path is smooth because the turn rate is used to drive the blend weight of the animation clips, so a turn rate that is changing rapidly will cause the animation to jump back and forth between the different clips. -
On the Crowd MotionPath Arcing Layer SOP, set Group to the agents you want to apply the turning animation to.
-
Set Base Clip Name to the base animation clip. To add multiple base animation clips and their associated turning clips, click
beside Clip Sets. -
Specify the different turning clips to blend between:
-
Click
beside Arcing Clips to add a different clip. -
Set Clip Name to the name of the turning clip.
-
Set the Turn Direction and Radius. To figure out the turning radius, connect the agent clip to a Crowd MotionPath SOP, and set Clip Names to the clip you want to view:
Note
The turning radius does not need to be completely precise. A ballpark value works.
-
-
To visualize how sharply the agent is turning along the path, turn on Turn Rate Attribute, and click
 to the right of the parameter. We want the turn rate (colors) to change smoothly along the path so that the clip blending also changes smoothly.
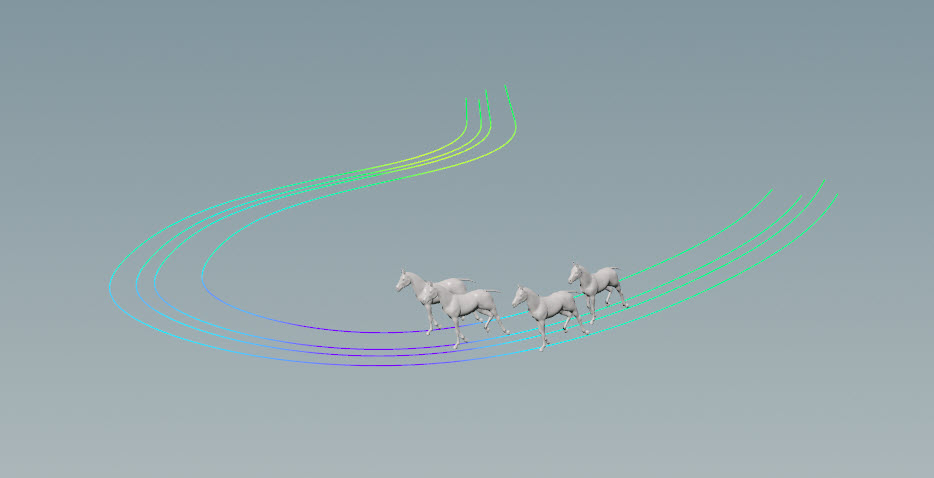
Visualize agent turn rate Tip
If the animation jumps between different animation clips, it’s because the blend weights between the clips are jumping back and forth. Try increasing the value of the Crowd MotionPath Arcing Layer SOP’s Strength parameter to smooth out the turn rate of the path so that the blending between clips is also smoother.
| To... | Do this |
|---|---|
|
Visualize the agent turn rate |
On the Crowd MotionPath Arcing Layer SOP, click |
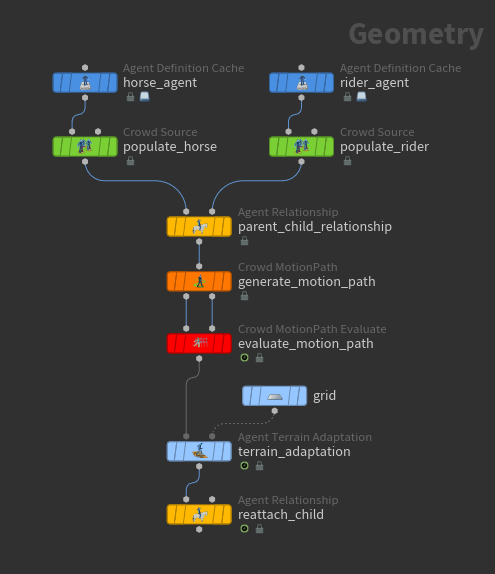
Post-processing 
After using the SOP motion path tools, you can further manipulate the agents' poses with SOPs such as the ![]() Agent Terrain Adaptation SOP,
Agent Terrain Adaptation SOP, ![]() Agent Look At SOP, or
Agent Look At SOP, or ![]() Agent Edit SOP. Place these SOPs after the
Agent Edit SOP. Place these SOPs after the ![]() Crowd MotionPath Evaluate SOP.
Crowd MotionPath Evaluate SOP.
If you have agents in a parent-child relationship, like a rider (child) on a horse (parent), and you use, for example, the Agent Terrain Adaptation SOP as a post-processing step to modify the transforms of the horse, the ![]() Agent Relationship SOP can be used to attach the rider back onto the horse after the post-processing step. See parent-child relationships for an example.
Agent Relationship SOP can be used to attach the rider back onto the horse after the post-processing step. See parent-child relationships for an example.
Other operations 
Speeds up, slows down, crops or shifts the animation motion.