| On this page |
|
The following nodes can be used to layer animation clips on top of an agent’s base animtion:
-
The
 Agent Clip Layer DOP layers additional animation clips onto an agent.
 -
The
Agent Arcing Clip Layer DOP blends between a set of animation clips based on an agent’s turn rate.
These nodes are wired into the crowd simulation network after the ![]() Crowd State DOP, and can be placed before or after state behavior nodes like the
Crowd State DOP, and can be placed before or after state behavior nodes like the ![]() POP Steer Path DOP:
POP Steer Path DOP:

Layer animation clips onto an agent 
You can layer additional animation clips on top of an agent’s base animation clip using the ![]() Agent Clip Layer DOP. This is useful for introducing variations into a crowd shot, such as adding clips with upper body motion on top of a walk cycle. Multiple Agent Clip Layer DOPs can be wired together to create several layers of animation.
Agent Clip Layer DOP. This is useful for introducing variations into a crowd shot, such as adding clips with upper body motion on top of a walk cycle. Multiple Agent Clip Layer DOPs can be wired together to create several layers of animation.
Layered animation clips can be used with the base animation in two ways:
-
The layered clip is blended with the base animation based on a blend ratio:
Original pose (left), layered pose (right) 
Final pose with blend ratio = 0 (left), blend ratio = 0.5 (middle), blend ratio = 1 (right) -
The layered clip is used as a difference clip, where differences are calculated between the layered clip poses and a reference pose from the same clip. This difference is then added on top of the base animation:
Original pose (left), reference pose (middle), difference pose (right) 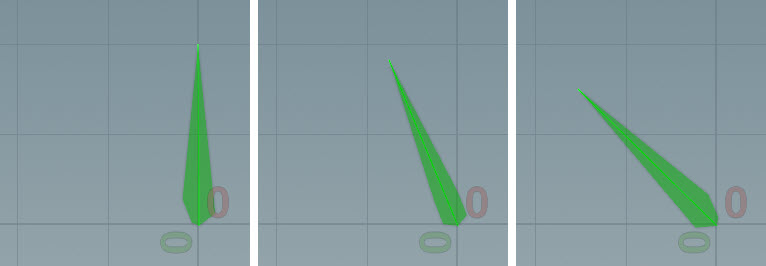
Final pose with percentage of difference pose added on top of base animation: 0% (left), 50% (middle), 100% (right)
Blend between the base and layered animation 
In this example, we layer a clapping animation on top of the agent’s base animation walk cycle. The clapping animation is triggered on the agent’s upper body when the agent is inside a bounding box:
This example demonstrates how to use the Agent Clip Layer DOP to apply a clip to the upper body of an agent. The clip is activated when the agent is inside a bounding box.
Object level and SOP network setup 
-
Define the available animation clips at the object level, and set up the crowd network at the geometry level (SOP network). The
 Agent SOP, Agent Clip SOP, and Agent Transform Group SOP make up the agent definition:
-
Create the agent using an
Agent SOP:-
Set the Character Rig parameter to the node that contains the character rig with the base animation. You can use the
 button on the right of the parameter to choose from the window that pops up. In our example, we set Character Rig to
 ../../mocapbiped3_walk.
-
-
Add the base (walking) animation clip to the agent definition using an
Agent Clip SOP:-
In the Clips set of parameters, set Name to
walk. -
Set Character Rig to
../../mocapbiped3_walk.
-
-
We want the agent to keep moving forward while looping the walking clip, so on the Agent Clip SOP:
-
Set Locomotion Node to the joint that has the agent’s overall translation and moves it forward in space. For a biped, this is usually the hip joint.
-
Delete the channels on Start/End/Inc -
 Start/End/Inc and select Delete Channels.
 -
On Start/End/Inc, set the start and end frames of the walking clip.
-
Turn on Convert to In-Place Animation.
Note
To preview the clip:
-
Turn on Set Current Clip and set the parameter to
walk. -
Turn on Apply Clip Locomotion to see the agent’s position keep moving forward over time while the clip loops. To see the agent walk in place, turn off Apply Clip Locomotion.
-
-
Add the layered (clapping) animation clip to the agent definition using the same Agent Clip SOP:
-
Click
 beside Clips to add another set of clip parameters.
 -
Set Name to
clap. -
Set Character Rig to
../../mocapbiped3_clap.
-
-
The
Agent Transform Group SOP creates a named group of joints that specifies the parts of the skeleton to apply the layered clip to. Place the Agent Transform Group SOP anywhere in the agent definition after the Agent SOP and before the  Crowd Source SOP:
-
Use the Transform Groups multiparm to create new joint groups. Specify a name for the joint group in the Name parameter, in our example,
upper_body. -
In Root Transforms, select the root joint(s) for the group. Each root joint and its descendants are added to the group. In our example, we set Root Transforms to
Spine_To_Spine1. To see the joints that are part of the group, turn on Show Guide Geometry, which displays spheres around the selected joints. Display the agent as Wireframe to more clearly see the guide geometry: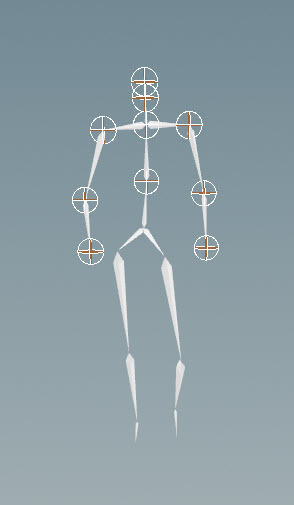
Agent joints to layer the animation clip onto
-
-
On the
Crowd Source SOP, set the Initial State parameter to one of the available states in the DOP network. The states are specified in the Crowd State DOP’s State Name parameter. In our DOP network, there is a walkstate, so we set Initial State towalk. -
Set up the DOP simulation network.
DOP simulation network 
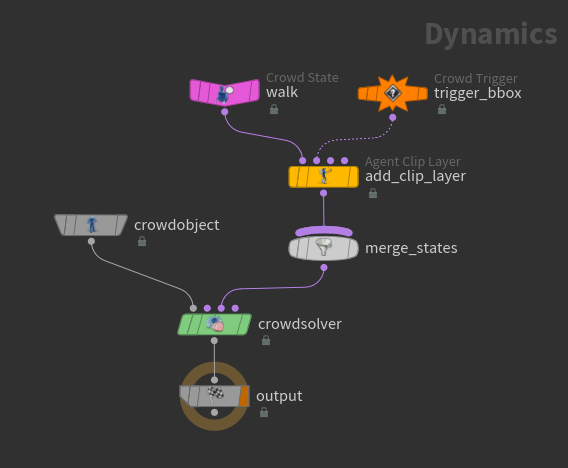
The image below displays the DOP network, crowd_simulation, from the parent SOP network:
-
Connect the following inputs to the
crowdsolverDOP:-
The
crowdobjectDOP to the 1st input (Crowd Object input) of thecrowdsolverDOP. -
The crowd states to the 3rd input (States input) of the
crowdsolverDOP.
Note
The Agent Clip Layer DOP can also be placed after merging the states and before the crowd solver.
-
-
On the
crowdobjectDOP, set Source to First Context Geometry because the Crowd Source SOP in the parent SOP network is connected to the first input of thecrowd_simulationDOP network node. -
On the
 Crowd State DOP, set up the crowd state that plays the base animation clip:
-
Rename the Crowd State DOP to the name of the base animation clip,
walk.Note
By default, Clip Name is set to
$OS, which sets the animation clip that the state plays to the name of the Crowd State DOP. -
Set Type to Locomotive because the original walking clip had some overall root motion.
-
-
On the
 Crowd Trigger DOP, set the trigger that activates the layered clip:
-
Set Type to Object Bounds.
-
Set Object SOP Path to the bounding box, in our example,
../../../box. -
Set Check to Continuous so that the layered clip is triggered as long as the agent is inside the bounding box.
-
-
On the
Agent Clip Layer DOP, set the clapping animation clip to layer on top of the skeleton:-
By default, the Blend Mode is set to Interpolate, so an interpolation is performed between the base animation and layered clip depending on the value of the Blend Ratio.
Note
To instead add the effect of the layered animation on top of the base animation, see additive layers for more information.
-
Set Clip Name to
clap. This is the clip to layer on top of the base animation. -
Set Transform Group to
upper_body. This is the group of joints that plays the layered animation. -
Adjust the Blend Ratio to control the blend between the layer and base animation.
-
Turn on Activate with Trigger. The Crowd Trigger DOP is connected to the 1st trigger input (2nd input) of the Agent Clip Layer DOP, so select First Trigger Input from the drop-down menu.
-
The final animation of the agents clapping when they are inside the bounding box:
Add the effect of layered clips on top of the base animation 
Instead of blending the base animation into the actual transforms of the layered clip, we can use the layered clip as a difference clip, where the differences between the layered clip poses and a reference pose from the same clip are calculated. This difference is then added on top of the base animation.
In this example, we layer a head turning clip onto a walking base animation:
Object level and SOP network setup 
The setup of the object and SOP-level networks is similar to the previous example, but now, we have the addition of setting up the layered clip to be a difference clip:

-
For the parameters to set on the
Agent SOP, see the previous example. -
Add the base (walking) animation clip to the agent definition using the first
Agent Clip SOP, add_clips. See the previous example for the parameters to set. -
Add the head turning clip to the agent definition using the same Agent Clip SOP,
add_clips:-
Click
beside Clips to add another set of clip parameters. -
Set Name to
head_turn. -
Set Character Rig to
../../head_turn. -
Delete the channels on Start/End/Inc -
Start/End/Inc and select Delete Channels. -
On Start/End/Inc, set the start and end frames of the walking clip.
-
-
For the parameters to set on the
Agent Transform Group SOP, see the previous example. -
We only want to see one agent in the crowd, so on the
Crowd Source SOP:-
Set Layout to Formation.
-
Set Rows and Columns to
1. -
Set Initial State to
walk.
-
-
Set up the DOP simulation network.
Set up the difference clip 
-
Set up the CHOP network to create the difference clip:
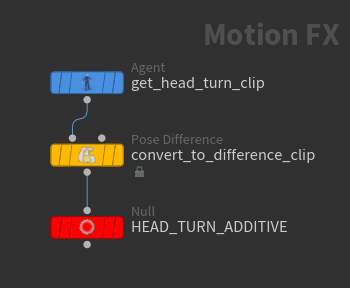
CHOP network -
Import the head turning clip from the agent definition using an
Agent CHOP. On the Agent CHOP:-
Set SOP Path to the SOP node that contains the agent with the clip to import, in our example,
../../add_clips. -
Set Clip Name to the name of the layered animation clip, in our example,
head_turn.
-
-
On the
 Pose Difference CHOP, set the frame number of the clip you want to use for the reference pose.
 -
In the parent SOP network, add the difference clip to the agent definition using the second Agent Clip SOP,
add_difference_clip:-
Set Input to CHOP.
-
Specify a name for the difference clip in the Name parameter, in our example,
head_turn_additive. -
Set CHOP to the CHOP network output, in our example,
../set_up_difference_clip/HEAD_TURN_ADDITIVE.
Warning
If you try to add the difference clip into the Agent Clip SOP that contains the original layered animation, this will result in an error.
-
DOP simulation network 
The image below displays the DOP network, crowd_simulation, from the parent SOP network:

-
See the previous example for information on setting the parameters in the
Crowd Object and Crowd State DOPs. -
On the
Agent Clip Layer DOP, set the head turning difference clip as a layer on top of the base animation:-
Set Blend Mode to Additive, which adds the effect of the layer clip on top of the base animation.
-
Set Clip Name to the difference clip, in our example,
head_turn_additive. This clip name was set in the parent SOP network's Agent Clip SOP,add_difference_clip. -
Set Transform Group to
upper_body. -
Adjust the Blend Ratio to control the percentage of the layer to add on top of the base animation.
-
The final animation with the head turning clip layered on top of the walking animation is shown on the right:
How-to 
| To... | Do this |
|---|---|
|
Apply the layered clip to a specific group of agents |
On the |
|
Override the base animation with the layered clip |
On the Agent Clip Layer DOP:
|
|
Smooth out the transition between the base animation and layered clip |
On the Agent Clip Layer DOP:
|
|
Only play the layered clip once when triggered |
On the Agent Clip Layer DOP:
|
|
Set the layered clip to start at a specific time |
On the Agent Clip Layer DOP, turn on Initial Clip Time and set the value. |
|
Speed up playback of the layered clip |
On the Agent Clip Layer DOP, turn on Clip Speed Multiplier and increase the value. |
|
Add multiple layered clips that are activated by different triggers |
|
|
Randomize the layered clips that are played by the agents |
If you have a library of animation clips, you can specify different clips to be randomly selected as the layered clip to play on top of the base animation.
|
|
Set up more than 3 triggers |
Chain multiple Agent Clip Layer DOPs one after another. |
Blend between animation clips based on an agent’s turn rate 
The ![]() Agent Arcing Clip Layer DOP allows you to blend between animation clips based on an agent’s turn rate, giving you more realistic motion when the agent is turning quickly:
Agent Arcing Clip Layer DOP allows you to blend between animation clips based on an agent’s turn rate, giving you more realistic motion when the agent is turning quickly:
It’s important that the animation clips for the turning motion are synced with the base animation. The Agent Arcing Clip Layer DOP blends between the different animation clips, so the turning clips need to be at the same plane as the base animation.
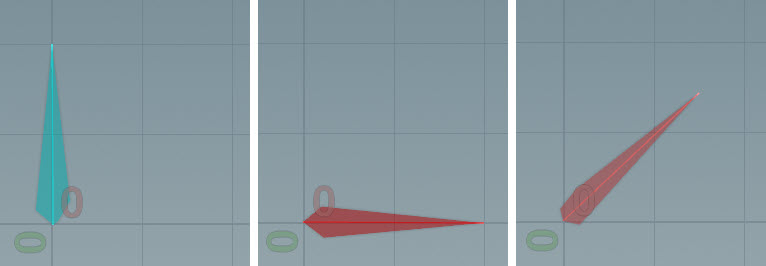
To view the animation clips, use an ![]() Agent Clip SOP:
Agent Clip SOP:
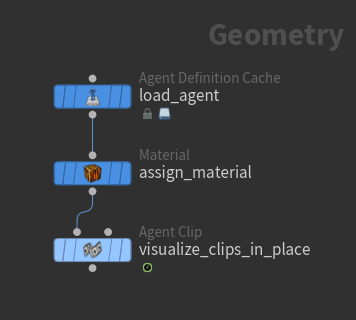
-
On the Agent Clip SOP, turn on Set Current Clip and select the animation clip you want to view from the drop-down menu. These are the names of the animation clips that are later referenced in the crowd simulation network's Crowd State DOP nodes.
-
Click
 in the playbar to play the clip. If the animation plays really fast, try clicking the
  Real Time Toggle in the playbar.
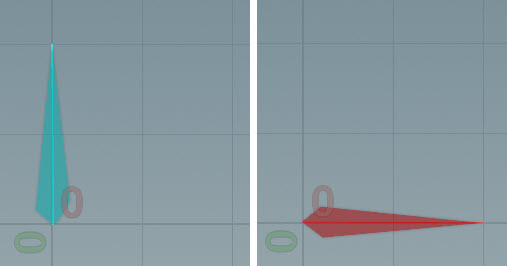
Base animation Turning animation
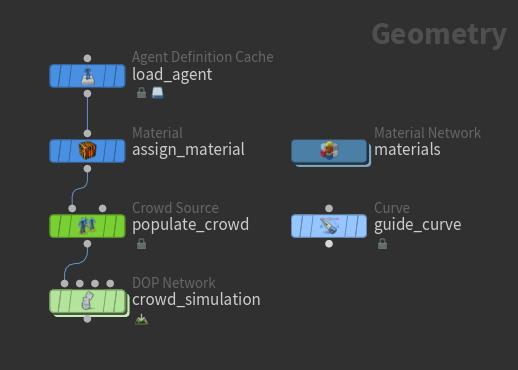
SOP network 
The crowd setup in the SOP network is shown below. The path that the horse agents follow is also defined in the SOP network:
-
The horse agent is defined using an
 Agent Definition Cache SOP.
 -
Use a
 Curve SOP to draw a path for the horse agents to follow.
 -
We want to have 4 horse agents start in a smaller area, so on the
Crowd Source SOP:-
Reduce the Area Size.
-
Set Number of Agents to
4.
-
-
Set up the DOP simulation network.
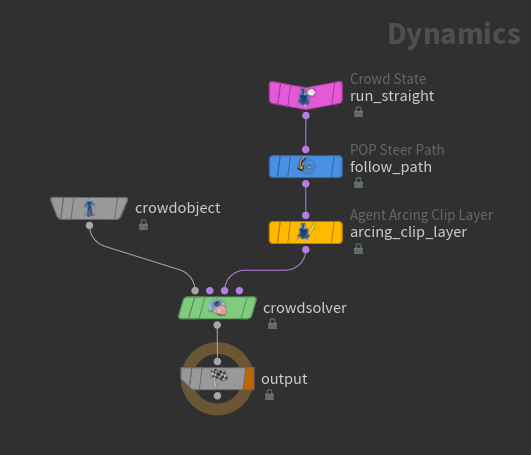
DOP simulation network 
In the DOP simulation network, the agents are steered along the path using a ![]() POP Steer Path DOP, and the base animation clip is blended with the turning clips along the bend of the path by the
POP Steer Path DOP, and the base animation clip is blended with the turning clips along the bend of the path by the ![]() Agent Arcing Clip Layer DOP:
Agent Arcing Clip Layer DOP:
Note
The Agent Arcing Clip Layer DOP is wired into the crowd simulation network after the ![]() Crowd State DOP, and can be placed before or after state behavior nodes like the
Crowd State DOP, and can be placed before or after state behavior nodes like the ![]() POP Steer Path DOP.
POP Steer Path DOP.
-
On the
crowdobjectDOP, set Source to First Context Geometry because the Crowd Source SOP in the parent SOP network is connected to the first input of thecrowd_simulationDOP network node. -
The base animation is defined in the Crowd State DOP - rename the Crowd State DOP to the name of the base animation.
-
On the POP Steer Path DOP, set Output Attribute to Crowds steerforce because we are working with agents and not particles.
-
In the Parameters tab, set SOP Path to the curve in the SOP network that the agents are to follow, in our example,
../../guide_curve. -
On the Agent Arcing Clip Layer DOP, turn on the Group parameter and specify the agents you want to apply the turning animation to.
-
To add turning animation clips, click
beside Clips. -
Specify the different turning clips to blend between:
-
Set Clip Name to the name of the turning clip.
-
Set the Turn Direction and Radius. To figure out the turning radius of the clip, connect the agent (with clip) to a
 Crowd MotionPath SOP and set Clip Names to the clip you want to view:
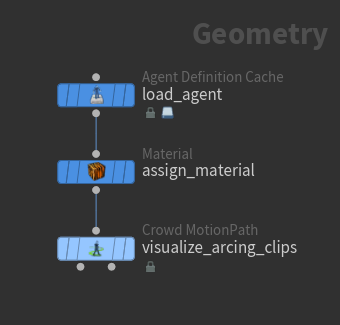
Note
The turning radius does not need to be completely precise. A ballpark value works.
-
Note
It’s important that the turn rate along the path is smooth. The turn rate is used to drive the blend weight of the animation clips, so a turn rate that changes rapidly will cause the animation to jump back and forth between the different clips. To smooth out the turn rate, turn on Constrain Turn Acceleration on the ![]() Crowd Solver DOP and adjust the Turn Stiffness as needed. You could also try adjusting the Max Turn Rate parameter.
Crowd Solver DOP and adjust the Turn Stiffness as needed. You could also try adjusting the Max Turn Rate parameter.