| On this page |
|
Overview 
You can create a custom scheduler node to send work to scheduler software not supported by the built-in scheduler nodes. The custom node could schedule work itself (for example, if you wanted to use a custom scheduling algorithm), or access the API of a third-party or in-house scheduler.
Warning
Making a custom scheduler requires Python programming experience and knowledge of the scheduler software you want to integrate. What you do in the Python code, and what is efficient or inefficient, depends entirely on the scheduler software, so it’s not possible to give step-by-step instructions here. Writing the integration snippets may require threading programming, running servers, and other non-beginner programming.
Also, the current implement can be considered a first draft and may be fixed/changed in the future. We welcome any feedback you may have on trying to implement a custom scheduler. It can help guide future efforts in this area.
How to create a custom scheduler 
To implement a custom scheduler, do the following:
Without Python Scheduler TOP 
-
Create a
pdg/typesdirectory in your HOUDINI_PATH, for example~/houdini18.5/pdg/types. -
Create a python package for your scheduler, by creating a directory named after the new scheduler, and adding an init.py file for example
~/houdini18.5/pdg/types/customscheduler/__init__.py. -
Create a python module for your scheduler within the new package directory. For example
~/houdini18.5/pdg/types/customscheduler/customscheduler.py -
Inside
customscheduler.pyimplement your scheduler type. It may be initially helpful to subclass our internal scheduler so you have something working right away. This is a simple example of a Local Scheduler which does serial spawning of jobs.
import os
import shlex
import subprocess
import sys
import tempfile
import six.moves.urllib.parse as parse

# Add the schedulers types folder in $HFS to the PYTHONPATH so that we can
# import LocalScheduler class (it won't be loaded yet)
import pdg
sys.path.append(os.path.expandvars("$HFS/houdini/pdg/types/schedulers"))
from local import LocalScheduler
sys.path.pop()
from pdg.utils import expand_vars

class CustomScheduler(LocalScheduler):
    def onSchedule(self, work_item):
        print("onSchedule {}".format(work_item.name))
        item_command = work_item.command
        item_id = work_item.id
        item_command = self.expandCommandTokens(item_command, work_item)
        job_env = self._generateEnvironment(work_item, 0)
        # Ensure directories exist and serialize the work item
        self.createJobDirsAndSerializeWorkItems(work_item)
        # replace any job vars, and then any Houdini vars ($HFS etc)
        item_command = expand_vars(item_command, job_env)
        item_command = os.path.expandvars(item_command)
        self.workItemStartCook(item_id, -1)
        # ensure no unicode is in the command, because we want to use shlex
        if sys.version_info.major < 3:
            item_command = item_command.encode('ascii', 'ignore')
        argv = shlex.split(item_command)
        try:
            log = subprocess.check_output(argv, shell=True, env=job_env)
            with tempfile.NamedTemporaryFile(delete=False) as f:
                f.write(log)
                work_item.setStringAttrib("custom_log", f.name)
            self.workItemSucceeded(item_id, -1, 0)
        except subprocess.CalledProcessError:
            self.workItemFailed(item_id, -1, 0)
        return pdg.scheduleResult.Succeeded
    def getLogURI(self, work_item):
        log = work_item.stringAttribValue('custom_log')
        if log:
            return parse.urlunparse(('file','', log, '', '', ''))
        return ''
-
Inside
__init__.py, register your new scheduler type.
from . import customscheduler

def registerTypes(type_registry):
    print("Registering customscheduler")
    type_registry.registerScheduler(customscheduler.CustomScheduler, label="Test Custom Scheduler")
-
When PDG initializes it will import your customscheduler package, which will register your new scheduler type. It will show up in the TOPs TAB Menu as
customscheduler.
Tip
Set HOUDINI_PDG_TYPE_ERROR=2 in your environment to get extra logging information about PDG types as they are loaded.
Using Python Scheduler TOP 
-
Create a
Python Scheduler node in your TOP network.This node provides fields for callback functions that define the behavior of the scheduler. The node will function just like any other scheduler, and will evaluate and execute the python code entered into its callback function fields. This is very useful to let you prototype your scheduler code in a working network.
-
See implementing the callbacks below for how to fill out the various Python snippets on the node’s tabs.
Scheduler TOP 
-
Add spare parameters to allow the user to control how the node works.
This is much more flexible and convenient than hard-coding values into the Python code. You can continue to refine the interface as you work on the code, adding or removing parameters as you work out the code.
See how to give your custom scheduler a parameter interface below.
-
Once the scheduler is working correctly, you can convert it into a digital asset for use by other users and in other networks. This also allows individual TOP nodes to override scheduler parameters (you can’t override a Python Scheduler instance).
Implementing the scheduler 
See Scheduler Node Callbacks for a reference of the callbacks that you may want to override.
Initialization and cleanup > Start and Stop 
Use the Python snippets on the Initialization and cleanup tab for code that should run when the scheduler first starts, should run when the TOP network starts cooking, should run when the network stops cooking, and/or should run when the scheduler is no longer needed.
The working directory is a directory where the TOP network’s code runs, and is usually where generated files are saved. In a farm set-up, the working directory should be on a shared network filesystem. PDG needs to know the local path to the working directory, as well as the remote. These correspond to a path which is valid on the user’s file-system (where the network is cooking), and a path which is valid on a remote render farm host respectively. The paths supplied to PDG will be used to convert file paths between local and remote (referred to as localize and delocalize)
The code to generate/translate local and remote paths is scheduler-specific. For example, your scheduler software may have its own API for discovering the shared directory, or it might have set system environment variables (for example, $REPO_DIR).
The Python Scheduler node has a Working directory parameter that you can access in the code using self["pdg_workingdir"].evaluateString(). By convention, this parm can be either a full local path, or a relative path which is assumed to be relative to the mount point for your farm file system.
Scheduling > Schedule 
This is the key method that does the “real work” of scheduling jobs. It is called by cooking nodes to process and schedule their work items. It receives a pdg.WorkItem object as work_item.
This is where you must implement the scheduler-specific logic to take WorkItem data and use it to create a scheduled job in whatever custom system you are integrating. This may involve running the command line in an environment with certain variables defined, copying dependent files, calling scheduler APIs, and so on.
-
The
commandstring attribute contains the command line the job should run. -
If the scheduler needs/accepts a per-job unique key to look up the job later, use
WorkItem.name. -
The snippet should return a pdg.scheduleResult value once the job is scheduled (or encounters an error).
Scheduling > Ticking 
Often you will need to monitor the progress of a job using polling of your farm scheduler’s API. This can be done by implementing the onTick callback. The return value pdg.tickResult of this tick function will inform PDG of your binding’s state.
For example you can return SchedulerCancelCook if you've lost connection to your farm scheduler and there’s no way to recover. SchedulerBusy and SchedulerReady let PDG know if you are ready to handle more onSchedule callbacks. You can use this to rate-limit item submission to your farm in order to control load on the server and other resources.
tickPeriod and maxItems scheduler node parameters can be used to configure the rate of calls to onTick and onSchedule
Scheduling > Schedule static 
See onScheduleStatic. This is only used for static cook mode, which is not currently exposed in the TOP UI.
Job status notification 
You must implement a method to communicate job status changes back to the TOP network. How to get notifications back from the scheduler software is implementation specific. However Houdini ships with python implementations of several scheduler bindings which code you can likely re-use. It is highly recommended to examine the source code in $HFS/houdini/pdg/types/schedulers and $HHP/pdg.
Note that if the scheduler requires polling to detect status changes, you should do this in the onTick method.
Remember to keep a reference to self (the Scheduler object) in any threads or callbacks you use.
Note
The pdg.Scheduler notification methods require you pass the id integer and index integer of the original work item that created the job. Note that the index in this case refers to a the batch sub index. Non-batch jobs should pass an index of -1. If your scheduler software may allow you to attach them to the job as data, or you may need to store them yourself somehow (for example, you might need to keep a Python dict in memory mapping the scheduling software’s internal job IDs to (id, index) tuples).
However you detect status changes in the scheduler software, you would then call one of the following methods on pdg.Scheduler (self):
self.onWorkItemStartCook(id, index, clear_outputs=False)
Call this method when a job that was previously queued starts running.
self.onWorkItemSucceeded(id, index, cook_duration)
Call this method if the job succeeded. In addition to id and index, pass it the cook_duration (the duration, in floating point seconds, that the job ran for).
self.onWorkItemFailed(id, index)
Call this method if the job succeeded. Pass it the original work item’s id and index.
self.onWorkItemCanceled(id, index)
Call this method is the job was manually canceled by a user. Pass it the original work item’s id and index.
self.onWorkItemAddOutput(id, index, path, tag, checksum, active_only=False)
Called when a work item produces an output file. The path is the path to the file as a string, tag is the file tag string (for example, file/geo), and checksum is an integer value. If active_only is True PDG will filter out calls that are made to work items that have already finished cooking, and won’t add files to them.
Scheduling > Submit as job 
This is called if a user tries to submit an entire TOP network as a single job. This is optional functionality you can choose to implement. For example, the HQueue Scheduler has a Submit graph as job button.
-
The
graph_filevariable contains the path to a HIP file containing the TOP network to cook. This path is relative to the working directory on the machine cooking the network. -
The
node_pathvariable contains a node path of the TOP network node to cook inside the HIP file.
If you want to support this functionality, it is up to your code to create and schedule a script job that runs Houdini, loads the specified HIP file, and cooks the specified network.
Tip
To tell Houdini to cook a TOP network in HOM, find the parent network, find the TOP node inside with the display flag, and call the hou.TopNode.cookWorkItems method on it. For more details see /tops/cooking.html#cookhom.
Shared servers > Transfer file 
Logging 
These snippets provide a pdg.WorkItem object in the work_item variable. If you can use work item’s data, in combination with the scheduler’s API if necessary, to calculate the location of the corresponding job’s logs and/or status page, the TOPs interface can then display them as part of the work item’s information.
Log URI
See getLogURI
For the work item, return a URL the system can retrieve to show the corresponding job’s output/error logs. This can be a file: URL to refer to files on the shared network filesystem, for example file:///myfarm/tasklogs/jobid20.log.
If your scheduler does not support this, return an empty string.
Status URI
See getStatusURI
For the work item, return a URL the system can open to show the corresponding job’s status. This will usually be a http: link to the job’s status page in a scheduler’s web interface.
If your scheduler does not support this, return an empty string.
Creating a user interface 
Spare parameters are “extra” parameters you add to an existing node’s parameter interface. This is how you add user-configurable options to your scheduler. If you later convert the node to an asset, it will automatically use the spare parameters as the asset’s interface.
-
See spare parameters for how to add spare parameters.
-
Within the Python code snippets on the node, you can use
selfto reference a pdg.Scheduler instance representing this scheduler (this is not a Houdini network node object).Any spare parameters on the Python Processor node/asset are copied into this object as pdg.Port objects. You can access them using
self["‹parm_name›"]and read the value usingPort.evaluateFloat(),Port.evaluateInt(), and so on.# Get the value copied from the node's "url" parameter url = self["url"].evaluateString()
-
Try to give the parameters short but meaningful internal names, so you can refer to them easily in scripts.
-
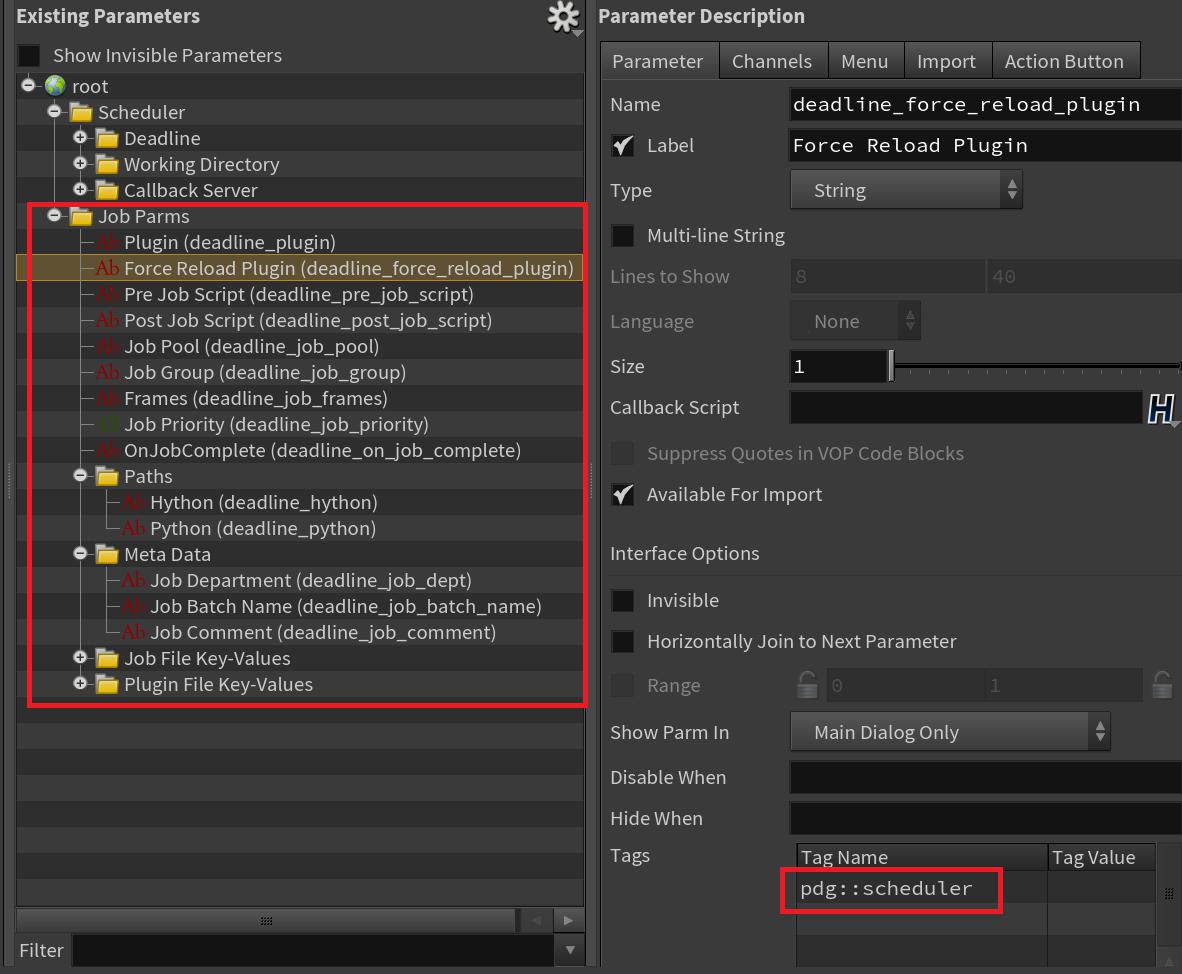
For parameters you want to allow individual nodes to override: in the spare parameter editing interface, add a
pdg::schedulertag to the parameter. This tag indicates to PDG that the parameter is a scheduler job parameter and can be overriden on individual nodes. These parameters should also be added to the Node Properties menu so that users can easily see which parameters can be overriden and override those values. See the adding a Schedulers Properties folder section for more details.-
See scheduler overrides for more information about using scheduler overrides.
-
The tag value is not currently used. The system only checks if tag named
pdg::schedulerexists. -
Note that this only works once the node is converted into an asset. You cannot override parameters on a Python Scheduler instance.
Note
When evaluating parameters that you can be overidden on individual nodes, you must use the following methods:
-
Adding a Scheduler Properties folder 
The overridable scheduler properties for all built-in schedulers appear in the Scheduler Properties folder. For more information on using scheduler properties, see the scheduler override documentation.
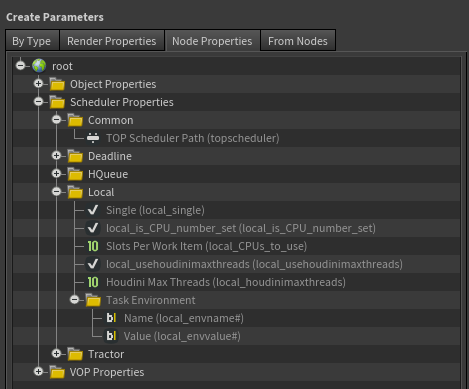
To allow users to more easily override scheduler parameters for your custom scheduler, the overridable scheduler properties should be added to the Scheduler Properties folder structure. To do this, the scheduler properties should be added to a file called topscheduler.user.ds. The topscheduler.user.ds file can be placed anywhere on the user’s HOUDINI_PATH.
The topscheduler.user.ds file is a dialog script file containing the definitions of the scheduler’s overridable properties.
Tip
To create the dialog script for your custom scheduler, follow these steps:
-
Run Houdini and place your custom scheduler node in
/tasks/topnet1. -
Run this Hython code:
open("topscheduler.user.ds", "w").write(hou.node("/tasks/topnet1/foo").parmTemplateGroup().asDialogScript(full_info=True))
-
Remove any parameters from the file that are not scheduler properties and cannot be overridden on individual nodes.
-
To place all of the properties under a common folder, add
parmtag { spare_category "foo" }to every parm definition, wherefoois replaced with the category of your custom scheduler, where the category matches the argument that was passed to pdg.TypeRegistry.registerScheduler.
Using the custom scheduler 
You can set your Python Scheduler instance or custom scheduler asset as the default TOP scheduler for the entire graph (i.e. all work items), or for only work items generated from specific nodes.
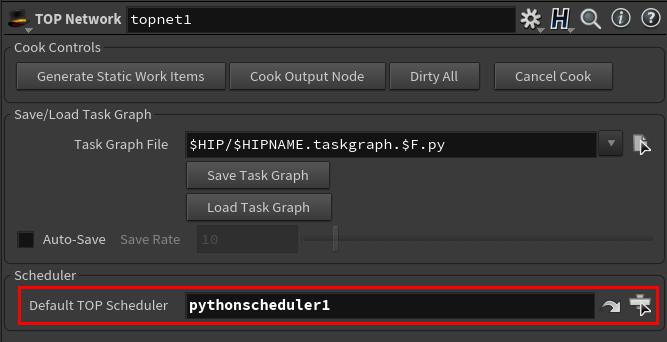
-
To set as the default TOP scheduler, select the TOP network, and change the Default TOP Scheduler to the custom scheduler node.
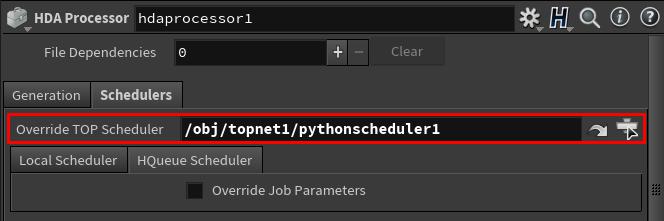
-
To set for a specific TOP node, select the TOP node, and set the Override TOP Scheduler to the custom scheduler node.
Now when the TOP network or node is cooked, the custom scheduler will be used to process the work items.
Fully Static Cooks 
PDG is designed to handle the cook-time dependency resolution and work item scheduling of a PDG Graph. However in many typical farm setups (for example Tractor) it’s customary that a job is specified as one monolithic, hiearcharical description, which is statically determined at the start of the cook. There are many reasons why this is not easy to do with PDG graphs in general:
In order to show status changes in the TOP graph, the implementation will have to provide a callback server so that jobs can report results and status changes. As well it will have to ensure that all work items are serialized such that their JSON representation is available to the job scripts when executed. In addition, not all TOP nodes support this mode of cooking, and may require some customization to work with your farm scheduler. For example ![]() ROP Fetch and other ROP-based nodes will poll the callback server if
ROP Fetch and other ROP-based nodes will poll the callback server if ![]() ROP Fetch
ROP Fetch cookwhen is not set to All Frames are Ready when batched. Per-frame dependencies with Batch Items may not be possible to represent.
For the above reasons we do not recommend attempting to generate fully static jobs from PDG graphs.
Static Cook Hybrid Approach 
Instead of a fully static job, it may be possible to instead pre-populate the farm job with all the child Tasks that are going to eventually be run, as placeholders, which are in a suspended state. Then as the PDG cook proceeds as normal the custom scheduler will activate those jobs as they become ready via the onSchedule callback.
With the approach the farm wrangler will get an overview of the full scope of the cook up front as they would with a static job description.
In order to pre-populate the Job, the custom scheduler should inspect the statically generated PDG task graph at the start of the cook. This task graph can be accessed with pdg.SchedulerBase.dependencyGraph. Note that the TOP graph should be fully generated before querying the task graph.
Here’s an example of how to generate a DOT format graph of a given task graph, which can be viewed with Graphviz software.
def taskgraphDOT(scheduler, dotfile=None):
    import sys
    dependencies, dependents, ready = scheduler.dependencyGraph(True)
    outf = open(dotfile, 'w') if dotfile else sys.stdout
    outf.write("digraph taskgraph {\n")
    for work_item, children in dependents.items():
        if not children:
            continue
        child_list = " ; ".join((child.name for child in children))
        if len(children) > 1:
            outf.write("%s -> {%s};\n" % (work_item.name, child_list))
        else:
            outf.write("{} -> {};\n".format(work_item.name, child_list))
    outf.write("}")

# Get the scheduler of interest, generate the task graph and get the dep graph.
node = hou.node('/obj/topnet1/localscheduler')
sch = node.getPDGNode()
output_node = node.parent().displayNode()
output_node.cookWorkItems(block=True, generate_only=True)
taskGraphDOT(sch, '/tmp/depgraph.dot')
| See also |