| On this page |
About this tutorial 
In Houdini, HDAs (Houdini digital assets) let you package complex scene components, tools, and even extra files into special nodes with custom controls that you can then easily install and distribute.
With PDG, you can use the ![]()
![]() HDA Processor TOP node to configure an HDA’s parameters, generate work items (tasks) for an HDA, and cook an HDA.
HDA Processor TOP node to configure an HDA’s parameters, generate work items (tasks) for an HDA, and cook an HDA.
In this tutorial you will learn how to wedge out an HDA, use HDA processors to run jobs for the wedges using multiple cook methods, filter out the versions of the HDA’s geometry you do not want to keep, and then lower the quality of the final output geometry.
Tip
To learn more about about TOPs & PDG, see Intro to TOPs.
Prerequisites 
-
Basic understanding of TOP network set-up.
-
Some experience with the PDG workflow.
Tip
You can learn the basics of PDG by stepping through the FX Workflow beginner tutorial.
What you will learn 
-
Specify HDA parameter settings.
-
Create variations of an HDA.
-
Cook an HDA with three different cook modes.
-
Visualize PDG outputs.
-
Set-up PDG services.
Before you begin 
Copy over the HDA files 
Before you begin, please copy over the HDA files that you will be working with in this tutorial:
-
Open a file browser window and then navigate to your Houdini install directory.
-
In the install directory, navigate to the
$HH\help\files\pdg_tutorials\intro_to_hdaprocessorfolder. -
In the
\intro_to_hdaprocessorfolder, copy thehe_polyreduce.hdaandSideFX_spaceship.hdafiles. -
Navigate to your PDG working directory and then create a new folder named
\PDG_TUTORIAL_FILES. -
In the
\PDG_TUTORIAL_FILESfolder, paste the HDA files.
Step 1 - Inspect the HDA 
In the first step of this tutorial you will install the SideFX_spaceship.hda and become familiar with its contents.
-
Run Houdini and start a new session.
-
Import the
SideFX_spaceship.hdatutorial file, and then install and create the spaceship HDA.For more information about installing HDAs, see Install and manage digital assets.
-
Look at the Controls parameters on the spaceship HDA.
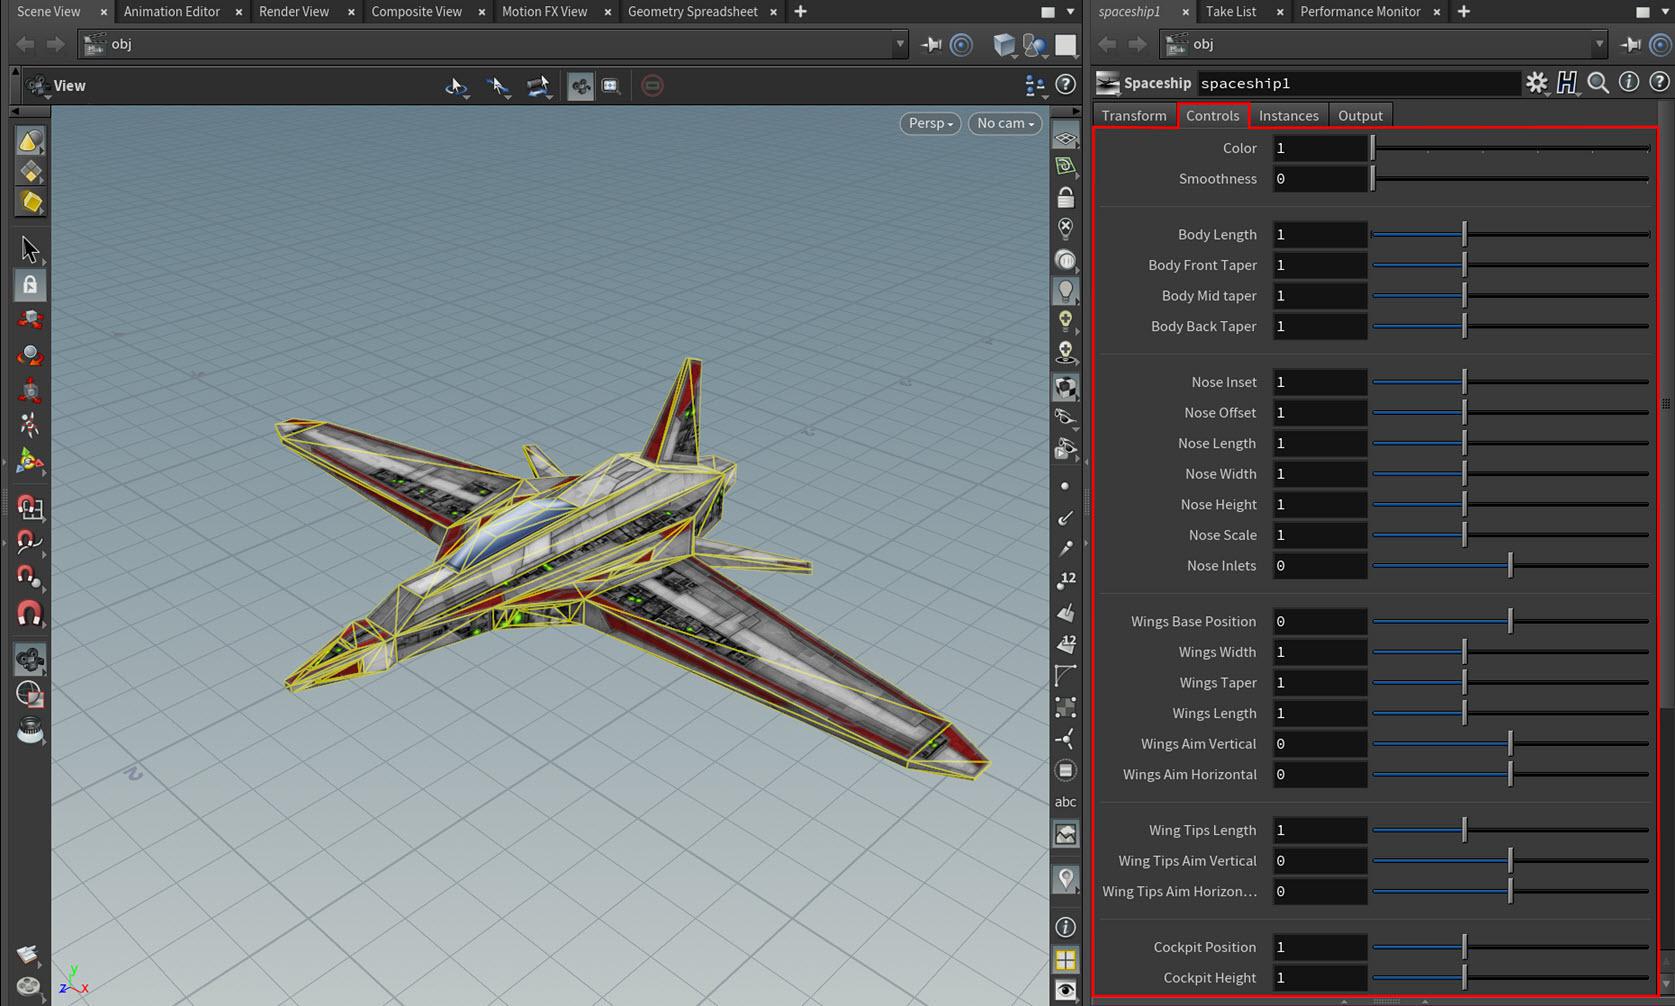
Later on in this tutorial, you will be referencing these parameters from PDG.
-
Adjust the values of some of the Controls parameters.
Notice how your changes affect the spaceship HDA’s geometry in the viewport.
Later on in this tutorial, you will use various TOP nodes to adjust the spaceship HDA’s settings and then output the modified versions of its geometry.
Step 2 - Set up PDG output visualization 
In the second step of this tutorial you will set up a special ![]()
![]() File SOP node that will allow you to see your adjustments to the spaceship HDA in the viewport.
File SOP node that will allow you to see your adjustments to the spaceship HDA in the viewport.
-
Start a new Houdini session.
-
Save your new scene.
-
Name your scene file
hdaprocessorpt1tutorial.hip. -
Save your
.hipto the\PDG_TUTORIAL_FILESfolder directory.
This will be your working project file for the rest of the tutorial.
-
-
In the Network Editor, navigate to the Object context if you are not already in that context.
-
Create a new Geometry SOP node and then dive into the
geo1node. -
Create a File node.
-
In the File node’s parameters, click in the Geometry File parameter field and then type the following expression:
`@pdg_output`
Note
The
@pdg_outputattribute must be in back ticks. This is necessary to escape the expression since the Geometry File path is a string parameter. For more information, see Using attributes in expressions.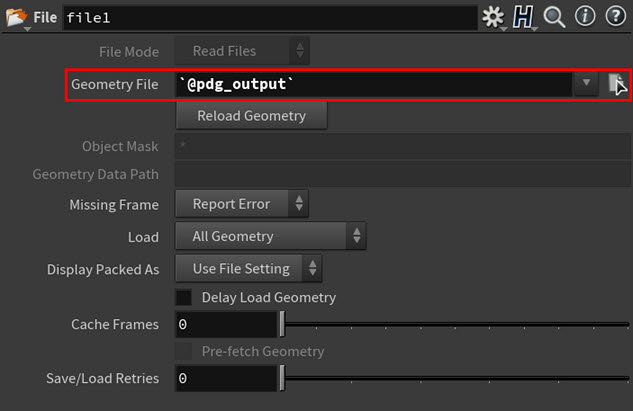
@pdg_outputtells Houdini to display the current, selected PDG work item’s output geometry in the viewport.Later on in this tutorial, you will now be able to visualize the spaceship HDA geometry variants in the viewport by clicking its work items in your TOP network.
-
Save your tutorial scene.
Step 3 - Define the properties for the HDA variations 
In the third step of this tutorial you will use three ![]()
![]() Wedge TOP nodes to set-up a series of variations for the
Wedge TOP nodes to set-up a series of variations for the SideFX_spaceship.hda file by defining which PDG attributes (that correlate to the controls on the HDA) to create variations of and the number of variations to create.
The wedges that these nodes create will allow you to generate and compare multiple versions of your spaceship HDA in step 4 of this tutorial.
-
In the Network Editor, navigate to the Tasks context and then dive into the
topnet1network. -
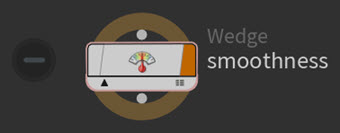
Create a Wedge node and then rename it to
smoothness.In the TOPs ⇥ Tab menu, you can find Wedge in the Data category.
The parameters on this Wedge node will specify the amount of
smoothnessto apply to its wedges as well as the number of wedges to generate. -
Select the
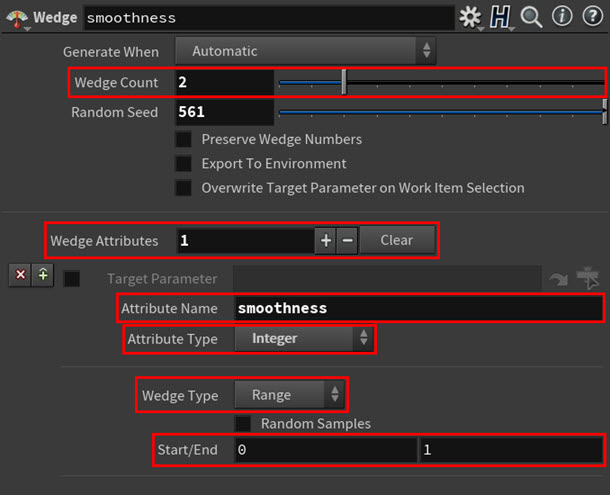
smoothnessnode and then configure its parameters:-
Set Wedge Count to 2.
This determines the number of variations or wedges to generate.
-
Set Wedge Attributes to 1.
This determines the number of attributes to vary.
-
In the Wedge Attributes multiparm, do the following:
-
In the Attribute Name parameter field, type
smoothness.This allows you to vary the
smoothnessattribute in your wedges.This attribute directly correlates to the Smoothness control on the spaceship HDA.
-
In the Attribute Type parameter drop-down menu, select Integer.
This makes sure that the
smoothnessvalue is always a whole number percentage. -
In the Wedge Type parameter drop-down menu, select Range and leave the Start/End parameters set to their default values of 0 and 1 respectively.
This tells the node to use a binary range (either zero or one) for the
smoothnessattribute in its wedges.These values also reflect the minimum (0) and maximum (1) Smoothness control values on the spaceship HDA.
-
-
Leave all the other parameters at their default values.
-
-
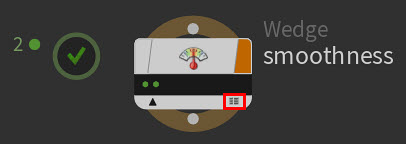
Cook the
smoothnessnode.2 work items appear on the
smoothnessnode representing the 2 wedges and then cook.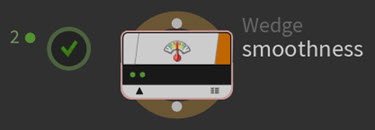
The
smoothnessnode generates 2 wedged versions of the spaceship HDA, one with a 0smoothnessvalue (0% smooth) and the other with a 1smoothnessvalue (100% smooth).
smoothness node work items in the Task Graph Table Tip
You can open the PDG Task Graph Table by clicking the task graph table icon located in the bottom right-hand corner of the node or by selecting Tasks > Task Graph Table from the tasks toolbar.
-
Create a Wedge node, rename it to
bodylength, and then connect its input to the output of thesmoothnessWedge node.In the TOPs ⇥ Tab menu, you can find Wedge in the Data category.
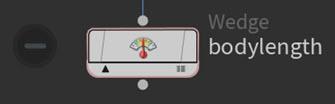
The parameters on this Wedge node will specify the
bodylengthvalues to apply to its wedges as well as the number of wedges to generate. -
Select the
bodylengthnode and then configure its parameters:-
Set Wedge Count to 10.
This determines the number of variations or wedges to generate.
-
Set Wedge Attributes to 1.
This determines the number of attributes to vary.
-
In the Wedge Attributes multiparm, do the following:
-
In the Attribute Name parameter field, type
bodylength.This allows you to vary the
bodylengthattribute in your wedges.This attribute directly correlates to the Body Length control on the spaceship HDA.
-
In the Attribute Type parameter drop-down menu, select Float.
This specifies that the
bodylengthvalue is a fractional percentage. -
In the Wedge Type parameter drop-down menu, select Range.
This allows you to set a value range for the
bodylengthattribute for each wedge. -
In the Start field type 0.5, and in the End field type 2.
This tells the node to pick values that are uniformly distributed between the Start and End field values for the
bodylengthattribute in its wedges.These values also reflect the minimum (0.5) and maximum (2) Body Length control values on the spaceship HDA.
-
-
Leave all the other parameters at their default values.

-
-
Cook the
bodylengthnode.20 work items appear on the
bodylengthnode representing 10 wedges ofbodylengthfor each of the 2smoothnesswedges and then cook.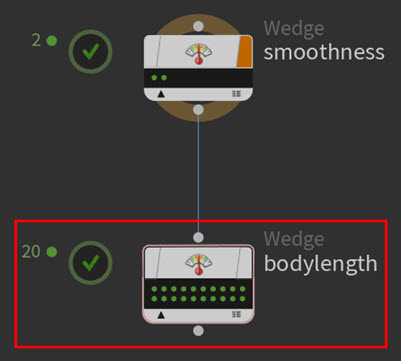
The
bodylengthnode creates 20 wedges for the spaceship HDA, 10 smooth and 10 not smooth, with 20 value variations of thebodylengthattribute.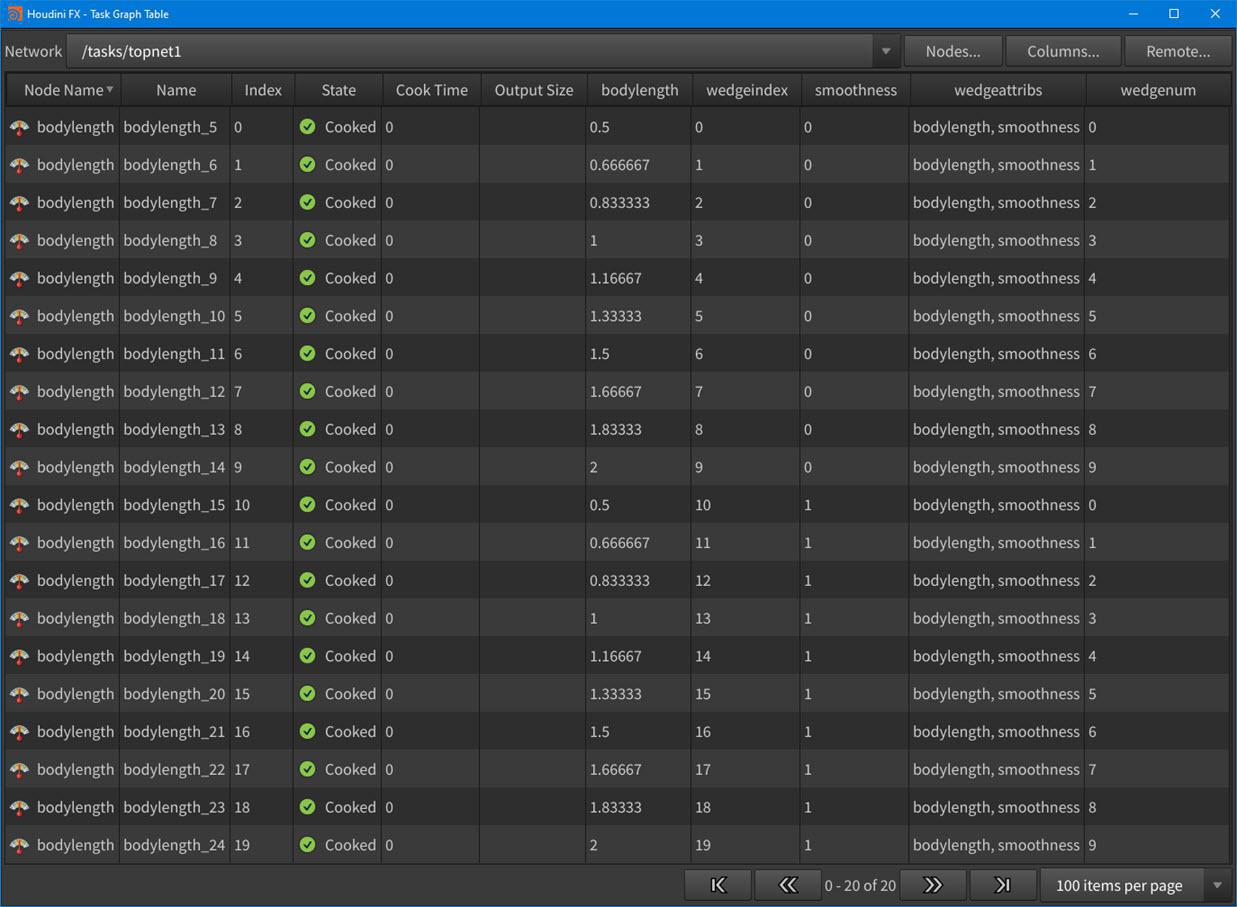
bodylength node work items in the Task Graph Table -
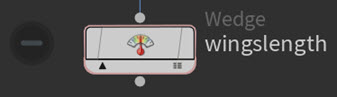
Create a Wedge node, rename it to
wingslength, and then connect its input to the output of thebodylengthWedge node.In the TOPs ⇥ Tab menu, you can find Wedge in the Data category.
The parameters on this Wedge node will specify the
wingslengthvalues to apply to its wedges as well as the number of wedges to generate. -
Select the
wingslengthnode and then configure its parameters:-
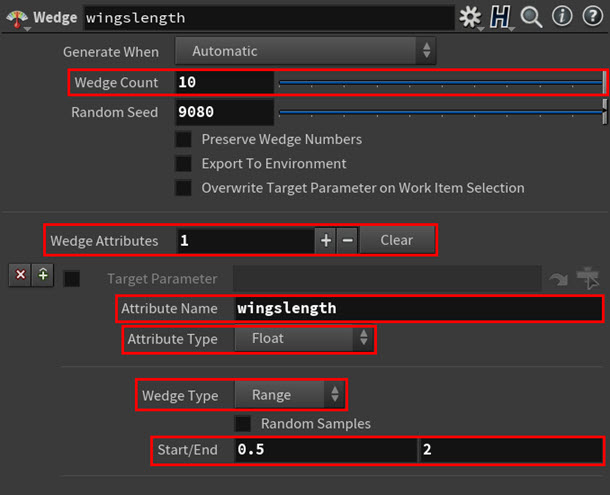
Set Wedge Count to 10.
This determines the number of variations or wedges to generate.
-
Set Wedge Attributes to 1.
This determines the number of attributes to vary.
-
In the Wedge Attributes multiparm, do the following:
-
In the Attribute Name parameter field, type
wingslength.This allows you to vary the
wingslengthattribute in your wedges.This attribute directly correlates to the Wings Length control on the spaceship HDA.
-
In the Attribute Type parameter drop-down menu, select Float.
This specifies that the
wingslengthvalue is a fractional percentage. -
In the Wedge Type parameter drop-down menu, select Range.
This allows you to set a value range for the
wingslengthattribute for each wedge. -
In the Start field type 0.5, and in the End field type 2.
This tells the node to pick values, between the Start and End field values, for the
wingslengthattribute.These values also reflect the minimum (0.5) and maximum (2) Wings Length control values on the spaceship HDA.
-
-
Leave all the other parameters at their default values.
-
-
Cook the
wingslengthnode.200 work items appear on the
wingslengthnode representing 10 wedges ofbodylengthfor each of the 2smoothnesswedges and then cook.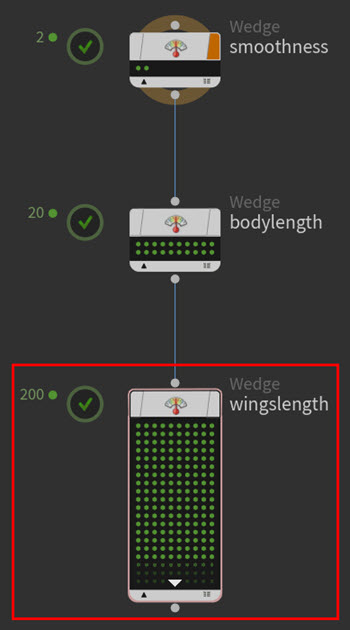
The
wingslengthnode creates 200 wedges for the spaceship HDA, 100 smooth and 100 not smooth, with 200 value variations of thebodylengthandwingslengthattributes.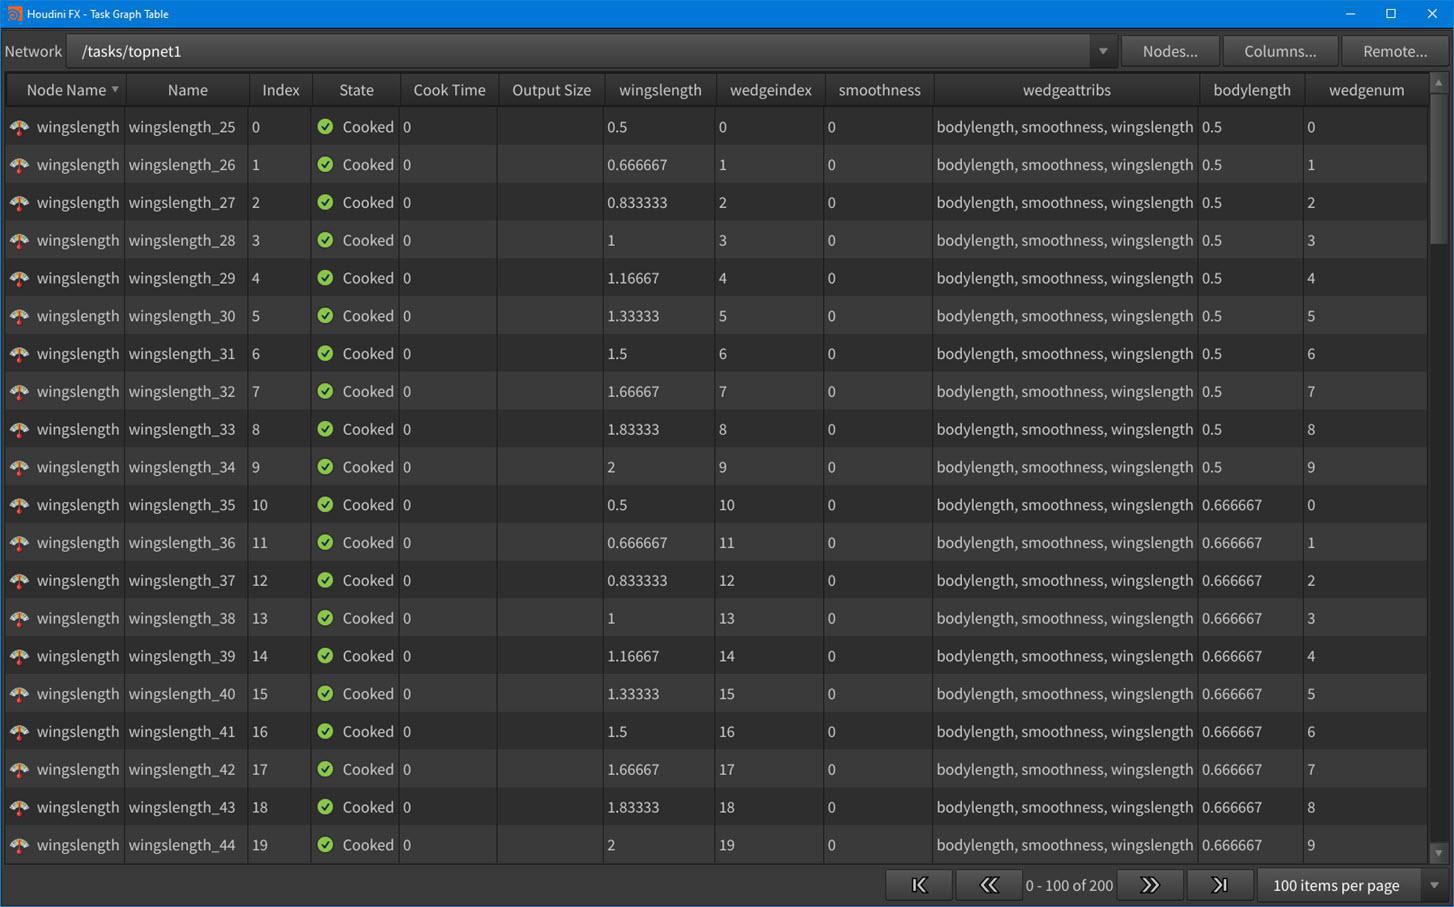
wingslength node work items in the Task Graph Table -
Click on some of the work item dots inside the
wingslengthnode.Notice the lines that appear between the work items on the
smoothnessandbodylengthnodes and their associated tasks on thewingslengthnode. These lines and their corresponding dot highlights indicate the dependencies between the work items.Work item dependency connections between nodes Tip
You can use the [ and ] keys to step through work items on a node.
-
Save your tutorial scene.
Step 4 - Create the HDA geometry variants 
In the fourth step of this tutorial you will use a series of ![]()
![]() HDA Processor TOP nodes to generate the variant geometry for the
HDA Processor TOP nodes to generate the variant geometry for the SideFX_spaceship.hda file using the settings from its Wedge TOP node inputs. This process is helpful in situations where you want to create and visually compare different versions of an HDA.
Each HDA Processor node will output the spaceship HDA geometry variants using a different cook method: regular cook, batch cook, and service cook. These different cook methods can save you a lot of time when cooking your own HDA-based TOP networks outside this tutorial.
-
Create a HDA Processor node, rename it to
regular_cook, and then connect its input to the output of thewingslengthWedge node.In the TOPs ⇥ Tab menu, you can find HDA Processor in the Geometry category.
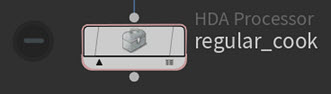
The parameters on this HDA Processor node will specify which HDA file to bring in and which of the Wedge node’s attributes it will reference.
-
Select the
regular_cooknode and then configure its parameters:-
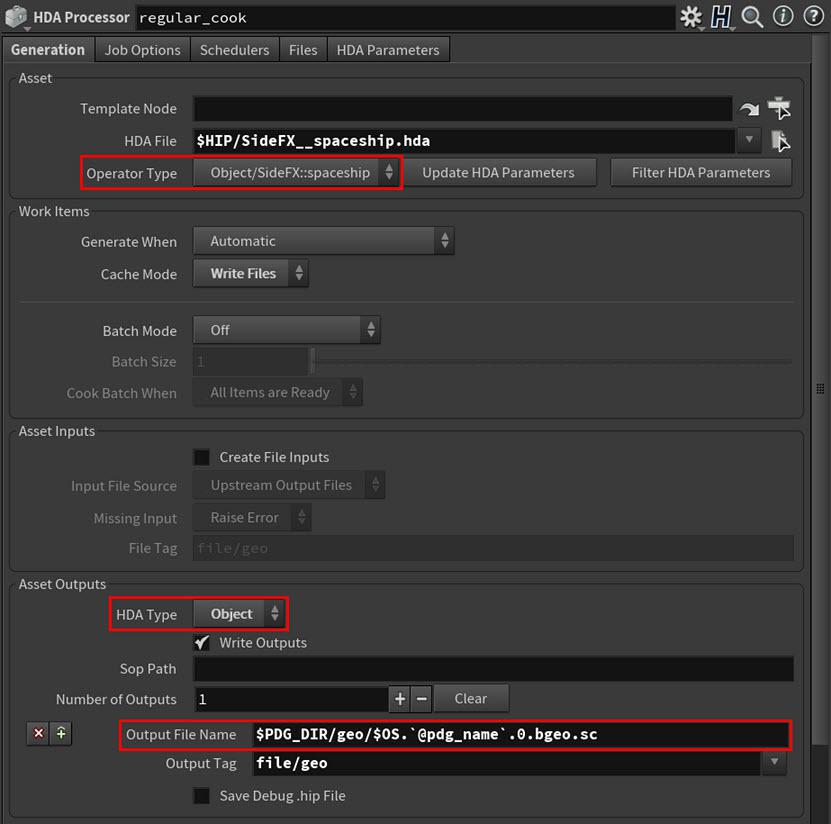
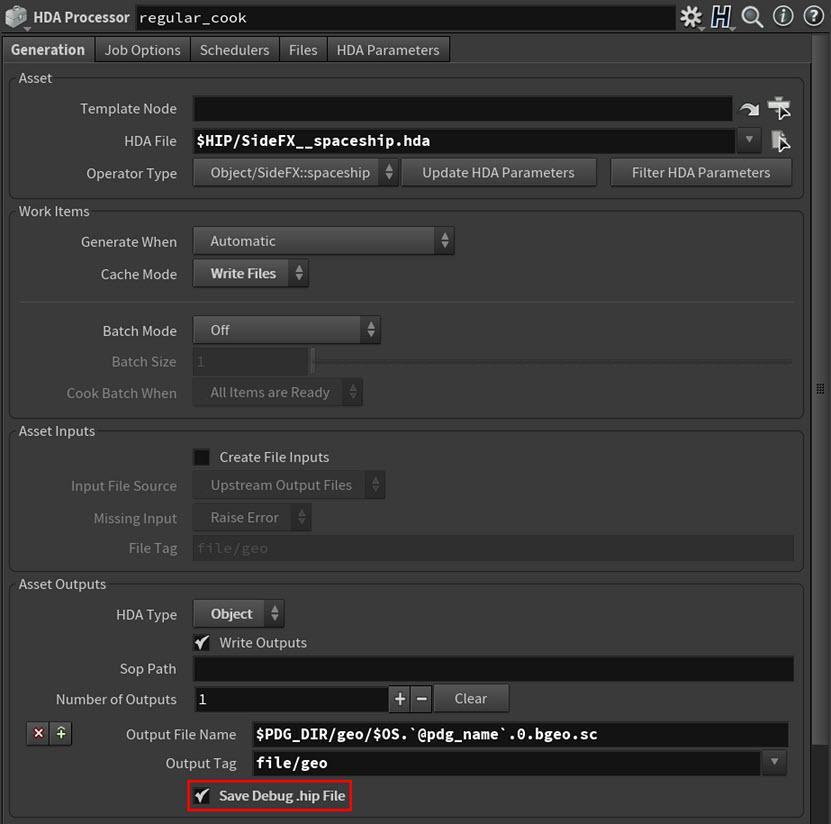
In the Generation tab, click the file chooser button next to the HDA File parameter.
-
In the Choose File browser window that appears, locate the
SideFX__spaceship.hdafile in your$HIPdirectory, select the file, and then click Accept.This tells the node which HDA file to use as its input asset.
The following occurs:
-
The node automatically detects and sets the operator and HDA types as well as how many outputs the HDA has.
-
All the HDA’s parameters are created on the node as if you actually instantiated the HDA.
-
-
-
In the Work Items > Cache Mode parameter drop-down menu, select Write Files.
This tells the node to always overwrite the cache files.
For this tutorial, you want to always write out new cache files on cook in case you changed any of the parameter values on your Wedge nodes. Otherwise, you will not see any of your changes to the spaceship variations in the viewport.
-
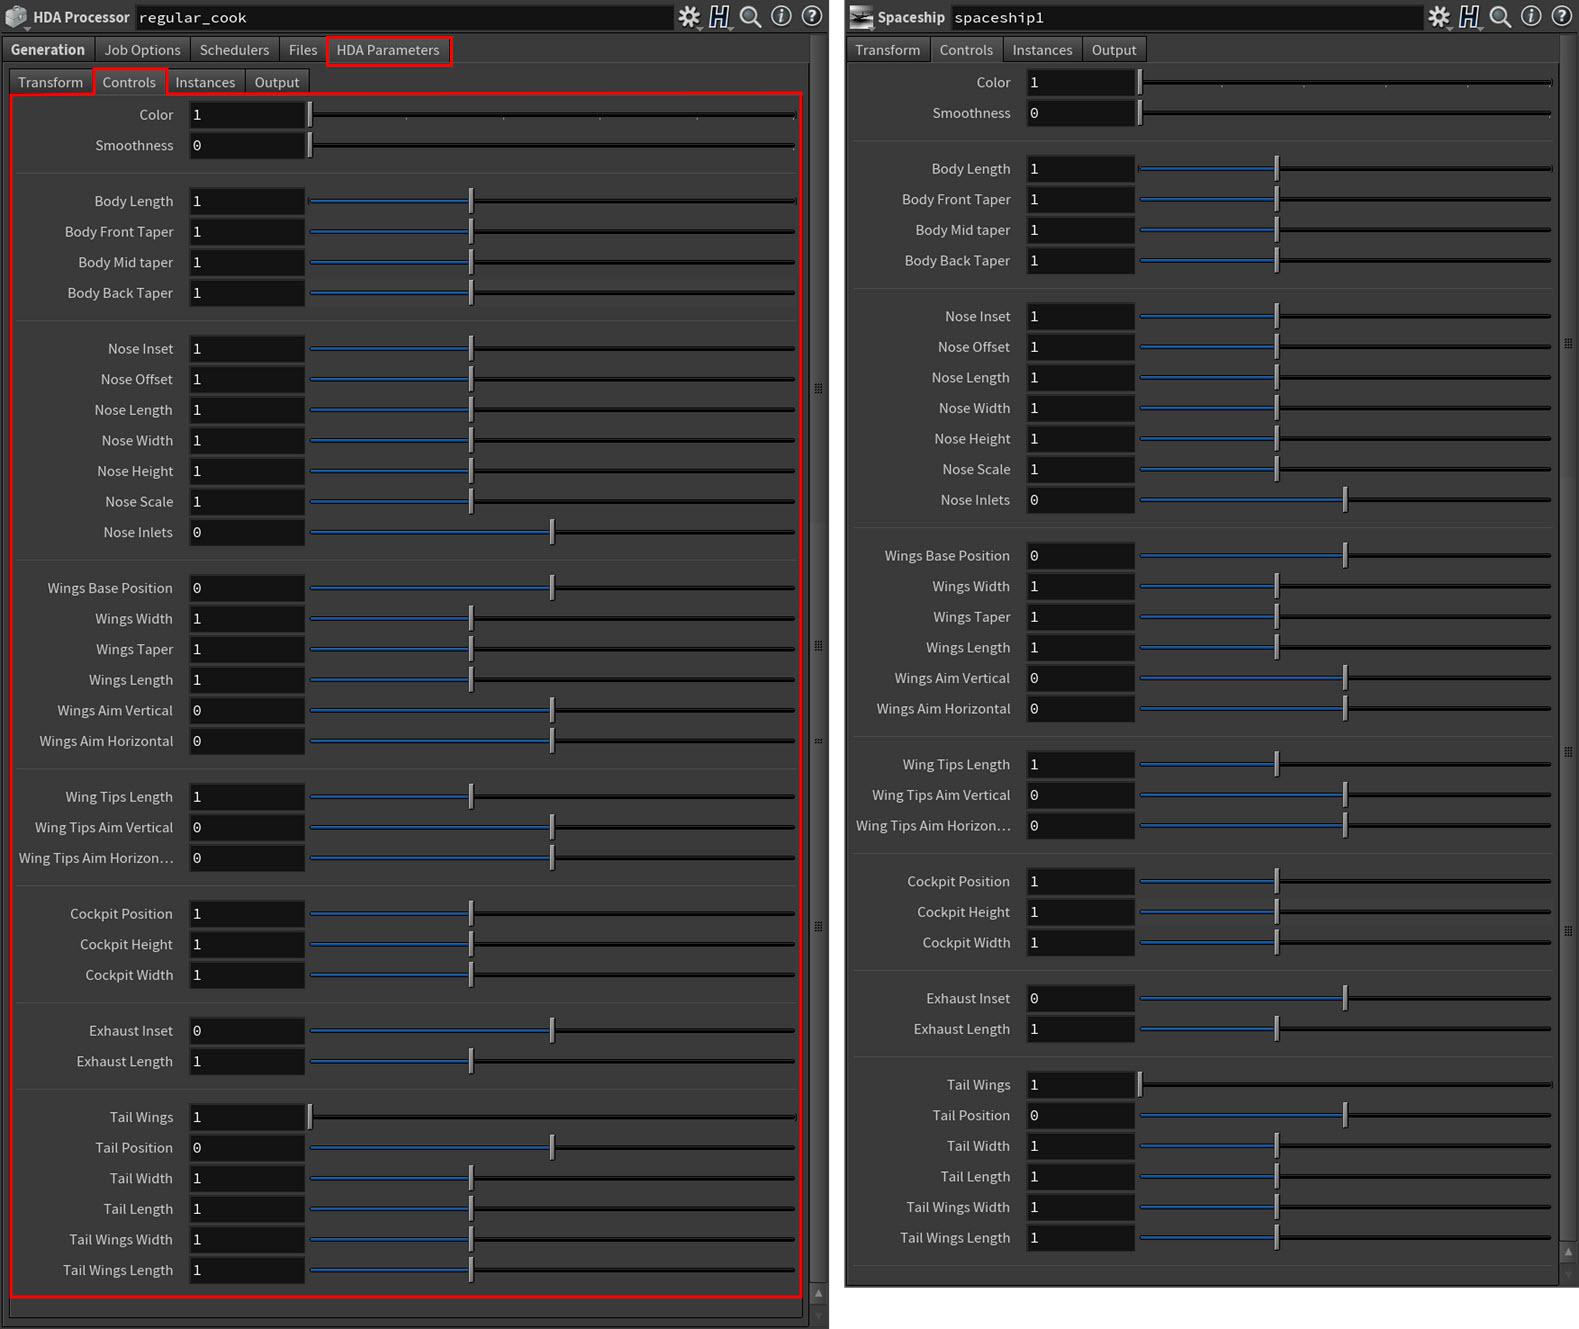
In the HDA Parameters tab > Controls tab, use
@attribute referencing to point the Smoothness, Body Length, and Wings Length parameters to their corresponding attributes on the Wedge nodes.-
In the Smoothness parameter field, type
@smoothness. -
In the Body Length parameter field, type
@bodylength. -
In the Wings Length parameter field, type
@wingslength.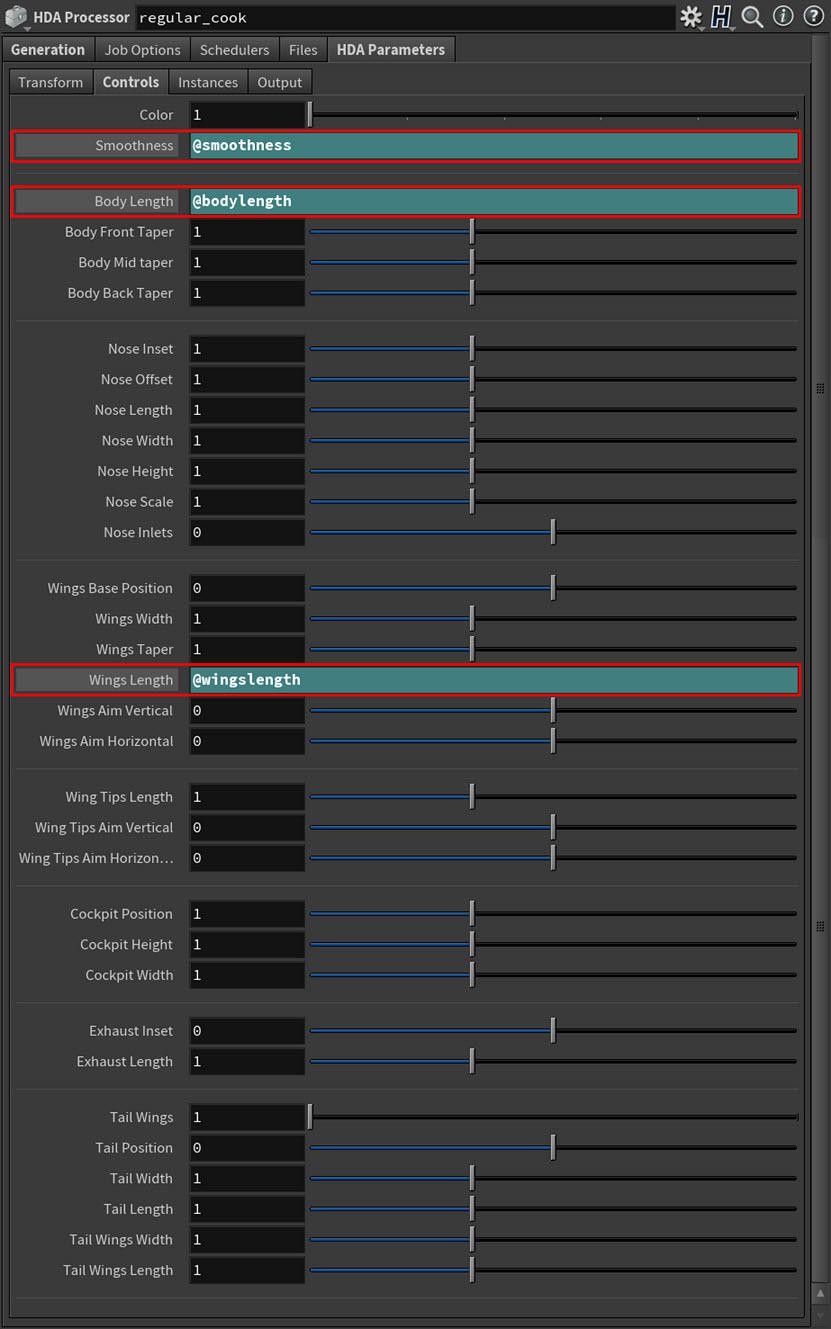
Now the values of these parameters are determined by the attribute settings on the Wedge nodes.
Note
Using
@attribute referencing to create these kinds of relationships is called pull-style wedging. To learn more about the different kinds of TOPs wedging techniques, see Pull vs. push. -
-
Leave all the other parameters at their default values.
Tip
In your own set-ups outside this tutorial, you may need to troubleshoot the behavior of your HDA Processor node.
To help with this process, we recommend that you do the following:
-
Turn on the Asset Outputs > Save Debug .hip File parameter in the Generation tab on your HDA Processor node to configure it to output a debug HIP file on cook.
-
Navigate to your
 Local Scheduler node and then set its Temp Directory > Location parameter to Working Directory to make the debug HIP file easy to find on your local drive.
-
-
-
Cook the
regular_cooknode.200 work items appear on the
regular_cooknode representing the spaceship HDA variations and then cook.regular_cookstarts up a process for each work item and then cooks each task individually.regular_cookuses the HDA Processor node’s default cook method, which is also its slowest. Typically for this cook method, the time it takes to start its processes is longer than the time it takes to actually cook the node.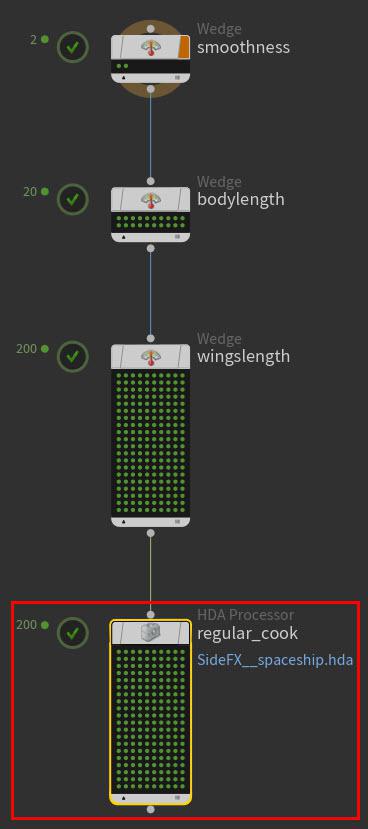
Cooked regular_cook node The
regular_cooknode creates and outputs 200 versions of the spaceship HDA’s geometry, 100 smooth and 100 not smooth, with 200 value variations of thebodylengthandwingslengthattributes. -
Click on some of the work item dots inside the
regular_cooknode.In the Network Editor, notice the lines that appear between the work items on the
smoothness,bodylength, andwingslengthnodes and their associated tasks on theregular_cooknode. These lines and their corresponding dot highlights indicate the dependencies between the work items.In the viewport, notice the variations of the spaceship HDA that appear. This visualization is made possible through a combination of the File SOP node (with the Geometry File
@pdg_outputparameter value) you set up in step 2 of this tutorial and the@attribute referencing you used in theregular_cooknode’s Control parameters.Work item dependency connections between nodes and HDA variations in the viewport Tip
-
You can also use the [ and ] keys to step through work items on a node.
-
You can view the results of an individual
regular_cookwork item in GPlay by double-clicking on the work item and then clicking the Output link in the work item details window that appears.
-
-
 -click on some of the work item dots inside the
 regular_cooknode and examine their values.Notice how the values of the
smoothness,bodylength, andwingslengthattributes change from work item to work item. It is these values that contribute to the shape, length, and smoothness of the spaceship HDA variants in the viewport.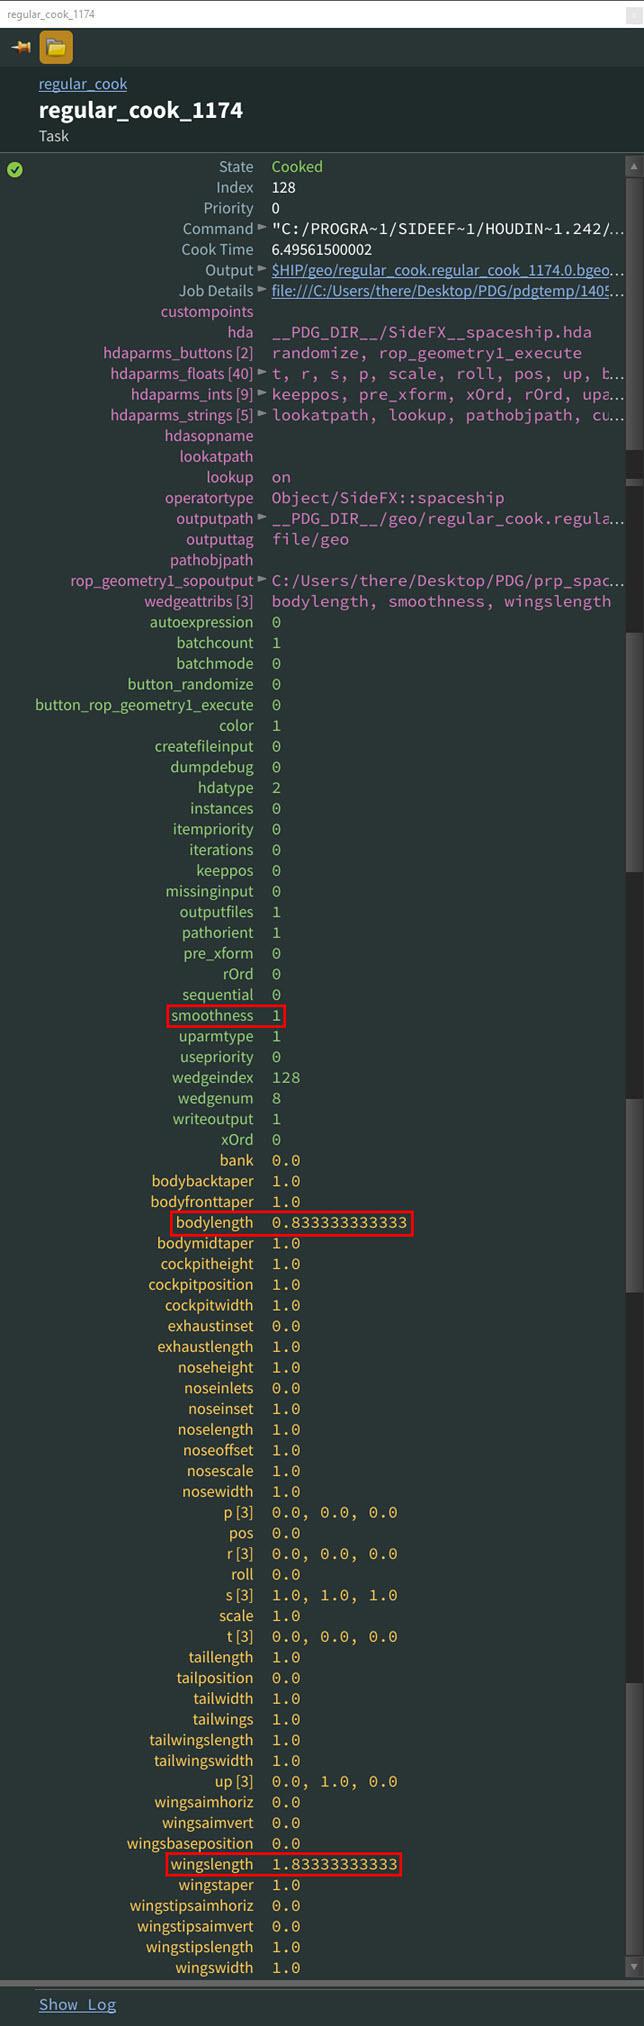
-
Save your tutorial scene.
Now that you have created the first HDA Processor node and understand how it works, you can try out the other, faster cook methods with the next two HDA Processor nodes you will create.
-
Select the
regular_cooknode, press ⌃ Ctrl + c, and then press ⌃ Ctrl + v.A new duplicate HDA Processor node named
regular_cook1appears in the Network Editor, and its input is already connected to the output of thewingslengthnode.-
Select the
regular_cook1node and rename it tobatch_cook.
This will be the HDA Processor node that uses the batch cook method.
-
-
Select the
batch_cooknode and then configure the following parameters:-
Select the Generation tab and then select All Items in One Batch from the Work Items > Batch Mode parameter drop-down menu.
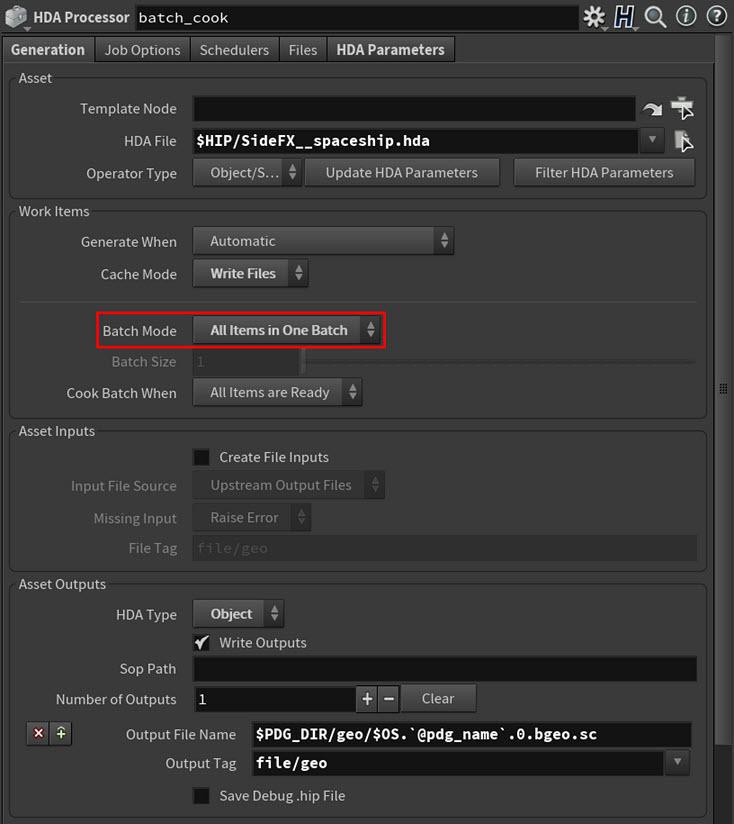
This tells the node to cook all the spaceship HDA geometry variants in one job. This will save a lot of cook time as the overhead of starting up individual processes is overwhelmingly larger than the time it takes to cook the actual tasks in the job.
Tip
In your own set-ups outside this tutorial, we recommend the following:
-
Batch your HDA Processor’s work items when it has a large number of little tasks that cook quickly.
-
Do not batch your HDA Processor’s work items when its tasks take a long time to cook as this makes the start-up cost of the processes irrelevant.
-
-
Leave all the other parameters at their default values.
-
-
Cook the
batch_cooknode.200 work items appear on the
batch_cooknode representing the spaceship HDA variations and then cook.batch_cookstarts up a single process and cooks all its work items at the same time. In many cases, this cook method is faster than the cook method used byregular_cook. For this tutorial, the batch cook method is definitely the faster of the two cook modes.regular_cook and batch_cook cook speeds compared The
batch_cooknode creates and outputs 200 versions of the spaceship HDA’s geometry, 100 smooth and 100 not smooth, with 200 value variations of thebodylengthandwingslengthattributes.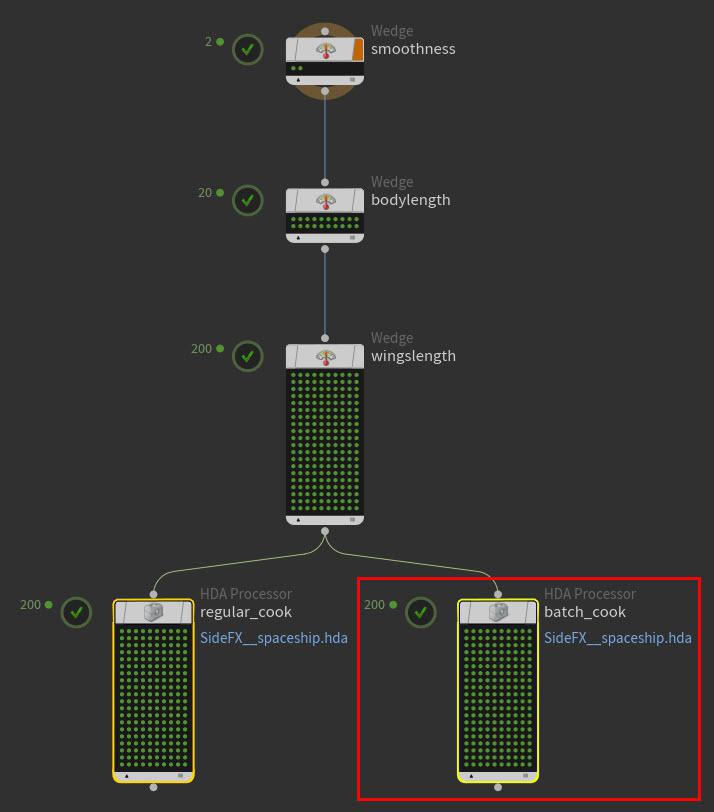
Cooked batch_cook node -
Save your tutorial scene.
Now that you have created the second HDA Processor node and understand how batching works, you can now try out the fastest cook method with the next HDA Processor node you will create.
-
Select the
regular_cooknode, press ⌃ Ctrl + c, and then press ⌃ Ctrl + v.A new duplicate HDA Processor node named
regular_cook1appears in the Network Editor, and its input is already connected to the output of thewingslengthnode.-
Select the
regular_cook1node and rename it toservice_cook.
This will be the HDA Processor node that uses the service cook method.
-
-
Select the
service_cooknode and then configure the following parameters:-
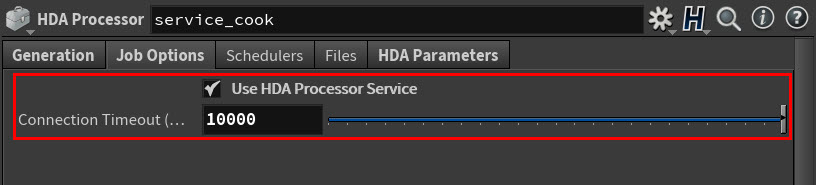
Select the Job Options tab and then turn on Use HDA Processor Service.
-
Click in the Connection Timeout (ms) field and type 10000 (10 seconds).
This tells the processor service that if the job does not complete in 10 seconds, then it should fail. This is a fail safe so that the job does not continue to process indefinitely if there is a disruption (for example, like if you are experiencing a network outage).
-
Leave all the other parameters at their default values.
-
-
In the Network Editor’s tasks menu bar, select Tasks > PDG Service Menu.
For more information about the PDG Service Menu, see PDG Service Manager.
-
In the PDG Service Menu, click Add Service.

-
In the Register PDG Service window that appears, do the following:
-
Set the Service Type to HDA Processor Service.
-
Leave Scheduler Type set to the default Local Scheduler setting.
-
Click in the Pool Size field and then type 10.
This tells the PDG Service Manager to create ten instances for the HDA Processor Service’s pool.
-
Click Register.
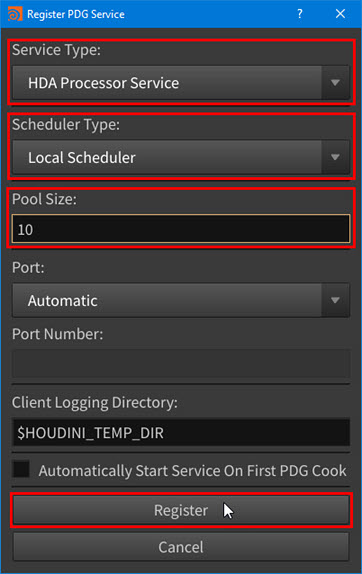
The new service is now available for you to use.
-
-
In the PDG Service Menu, click Start.
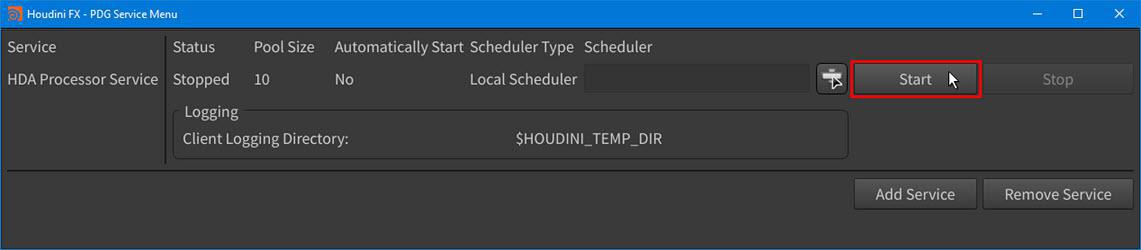
The HDA Processor Service starts with ten instances in its service pool.
You can now see all the HDA Processor Service instances listed (as multiple
hython.exeprocesses) in your system’s running processes under your current Houdini session.
-
Cook the
service_cooknode.200 work items appear on the
service_cooknode representing the spaceship HDA variations and then cook.service_cookuses the 10 running HDA Processor Service instances (processes) to cook each of its work items. For this tutorial, the service cook method is definitely the fastest cook mode. However, in scenarios outside this tutorial where you need to process a job that will take a long time to cook, you are probably better off using the regular cook or batch cook methods.regular_cook, batch_cook, and service_cook cook speeds compared The
service_cooknode creates and outputs 200 versions of the spaceship HDA’s geometry, 100 smooth and 100 not smooth, with 200 value variations of thebodylengthandwingslengthattributes.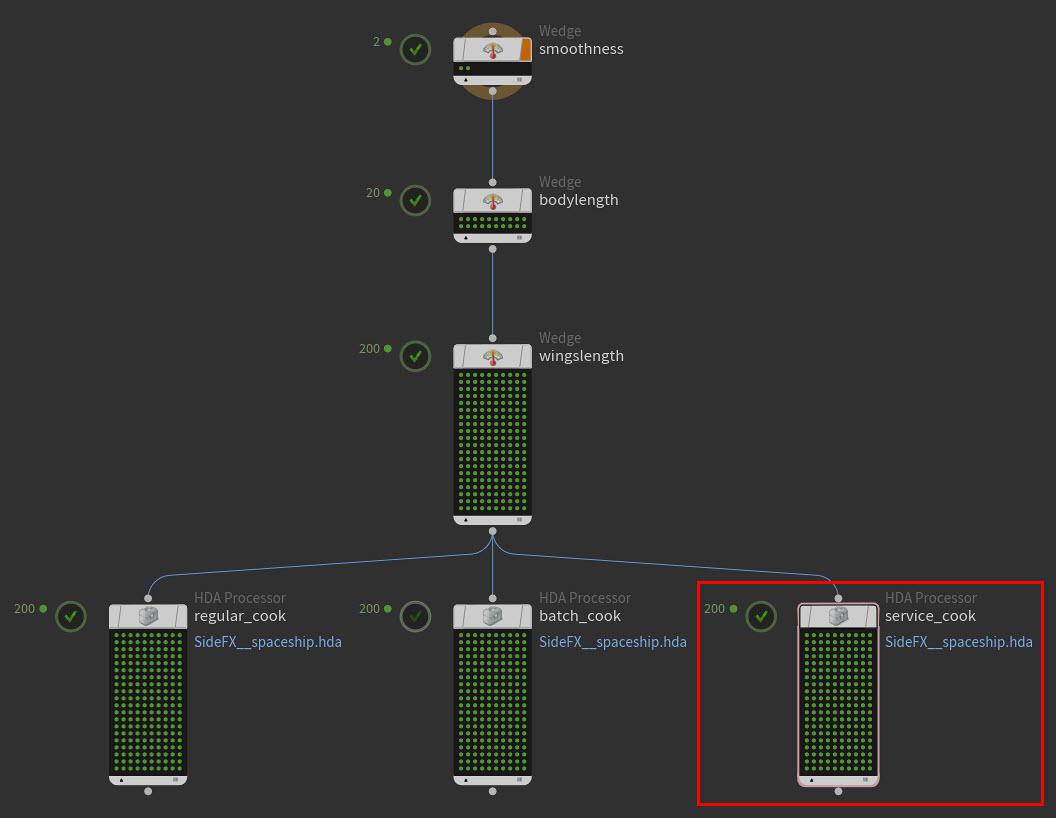
Cooked service_cook node -
In the PDG Service Menu, stop the HDA Processor Service and then close the window.
-
Save your tutorial scene.
Now that you have created the third HDA Processor node and understand how to set up PDG services, you can now filter out the HDA geometry variants that you do not want to keep.
Step 5 - Filter out the HDA geometry variants you do not want 
In the fifth step of this tutorial you will use a ![]()
![]() Filter by Expression TOP node to filter out the non-smooth versions of the spaceship HDA geometry variants and keep only the smooth spaceships.
Filter by Expression TOP node to filter out the non-smooth versions of the spaceship HDA geometry variants and keep only the smooth spaceships.
This process is helpful when you want remove HDA geometry variants from the output of your own production workflows.
-
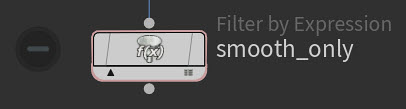
Create a Filter by Expression node, rename it to
smooth_only, and then connect its input to the output of thebatch_cookHDA Processor node.In the TOPs ⇥ Tab menu, you can find Filter by Expression in the Data category.
The parameters on this Filter by Expression node will determine which of the spaceship HDA geometry variants output by
batch_cookwill be kept and which will be filtered out. -
Select the
smooth_onlynode and then configure the following parameters:-
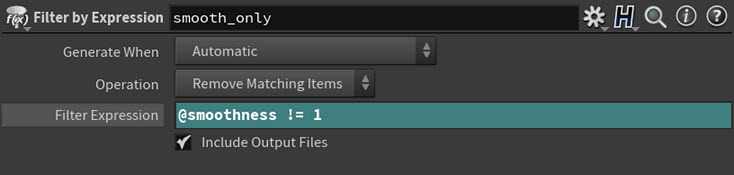
Click in its Filter Expression parameter field and type the following expression text:
@smoothness != 1
This expression tells the node to remove any spaceship HDA geometry variant that has a smoothness Wedge attribute value other than 1 from its output.
Note
For this tutorial, the
@smoothness != 1expression is equivalent to the@smoothness = 0expression when Operation > Remove Matching Items is selected and the@smoothness = 1expression when Operation > Keep Matching Items is selected. -
Leave all the other parameters at their default values.
-
-
Cook the
smooth_onlynode.100 work items appear on the
smooth_onlynode representing the smooth spaceship HDA variations and then cook.The
smooth_onlynode filters out the 100 non-smooth versions of the spaceship HDA geometry variants, and outputs the 100 smooth versions of the spaceship HDA geometry variants.
Cooked smooth_only node -
Click on some of the work item dots inside the
smooth_onlynode.Notice the lines that appear between the work items on the
smooth_onlynode and their associated tasks on the upstream nodes. These lines and their corresponding dot highlights indicate the dependencies between the work items.Work item dependency connections between nodes Notice how these lines only connect to the second
smoothnesswork item, the bottom row ofbodylengthwork times, the bottom half of thewingslengthwork items, and the bottom half of thebatch_cookwork items. These are all the work items that have a smoothness Wedge attribute value of 1.Tip
You can use the [ and ] keys to step through work items on a node.
-
Save your tutorial scene.
Now that you only have the versions of the spaceship HDA variant geometry that you want to keep, you can can make additional modifications to that geometry.
Step 6 - Reduce the quality of the final HDA output 
In the final step of this tutorial you will use another ![]()
![]() HDA Processor TOP node to bring in a setting from a different input HDA asset file and apply it to the smooth spaceship HDA geometry variants.
HDA Processor TOP node to bring in a setting from a different input HDA asset file and apply it to the smooth spaceship HDA geometry variants.
With this HDA Processor, you will reduce the number of polygons in the smooth spaceship HDA geometry variants. This process is helpful when you want to create LOD geometry in your own production workflows.
-
Create a HDA Processor node, rename it to
reduce_polygons, and then connect its input to the output of thesmooth_onlyFilter by Expression node.In the TOPs ⇥ Tab menu, you can find HDA Processor in the Geometry category.
The parameters on this HDA Processor node will specify which HDA file to bring in and how to use its attributes to modify the smooth spaceship HDA geometry variants.
-
Select the
reduce_polygonsnode and then configure its parameters:-
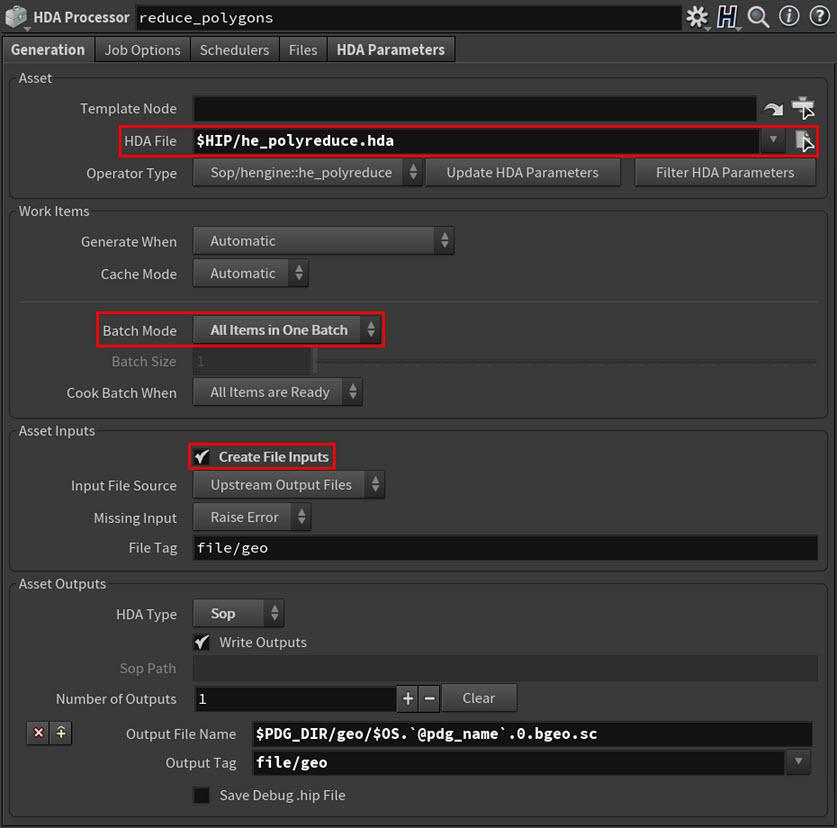
In the Generation tab, click the file chooser button next to the HDA File parameter.
-
In the Choose File browser window that appears, locate the
he_polyreduce.hdafile in your$HIPdirectory, select the file, and then click Accept.This tells the node which HDA file to use as its input asset.
The following occurs:
-
The node automatically detects and sets the Operator Type, HDA Type, and Number of Outputs.
-
All the HDA’s parameters are created on the node as if you actually instantiated the HDA.
-
-
-
Select All Items in One Batch from the Batch Mode parameter drop-down menu.
This tells the node to cook all its tasks in one job.
-
Turn on Asset Inputs > Create File Inputs.
This tells the node to take in the smooth spaceship HDA geometry variants as its inputs.
-
In the HDA Parameters tab, set Percent To Keep to 50.
This tells the node to reduce the number of polygons in its inputs by 50%.
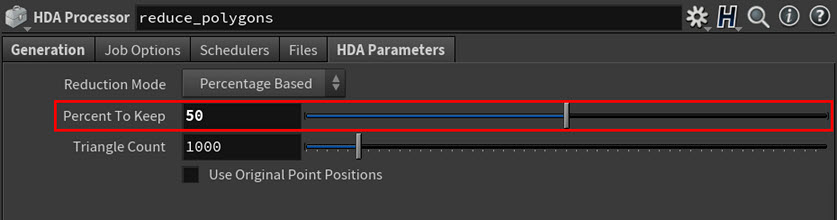
This attribute directly correlates to the Percent To Keep parameter on the poly reduce HDA.
-
Leave all the other parameters at their default values.
-
-
Cook the
reduce_polygonsnode.100 work items appear on the
reduce_polygonsnode representing the 100 smooth spaceship HDA geometry variants and then cook.The
reduce_polygonsnode reduces the polygon count of the smooth spaceship HDA geometry variants by 50% and outputs the reduced polygon versions of the spaceship HDA geometry variants to disk.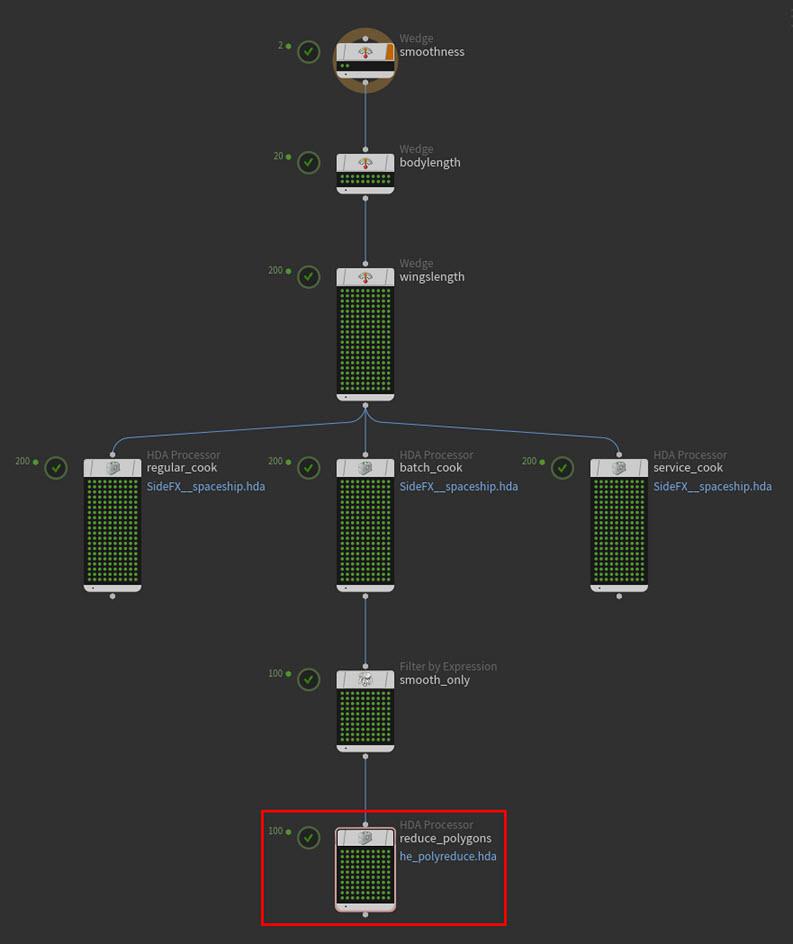
Cooked reduce_polygons node -
Click on some of the work item dots inside the
reduce_polygonsnode.Notice the lines that appear between the work items on the
reduce_polygonsnode and their associated tasks on the upstream nodes. These lines and their corresponding dot highlights indicate the dependencies between the work items.Also notice the reduced polygon versions of the spaceship HDA geometry variants in the viewport.
Smooth spaceship HDA variations with and without reduced polygons Tip
You can use the [ and ] keys to step through work items on a node.
-
Save your tutorial scene.
Congratulations! You have completed part 1 of the HDA Processor PDG tutorial series.
If you would like to see what your final TOP network should look like, see the hdaprocessor_part1_tutorial.hip example file located in your Houdini example file directory ($HH\help\files\pdg_tutorials\intro_to_hdaprocessor).
To continue learning about PDG workflows, you can step through the other beginner tutorials in this Houdini docs series or visit the Pipeline|PDG Learning Path on our website.