| On this page |
|
The Houdini asset details panel is displayed in the details panel when you select an HDA asset.
Houdini Engine 

In the Details panel for a HoudiniAssetActor, the Houdini Engine section lists a number of options and actions that can be performed on the Houdini Asset.
Cook 
Displayed under the Houdini Engine logo is the Session Status.
This indicates the current status of the Houdini Engine session, and if the plugin is connected to Houdini.
Status |
Description |
|---|---|
Not Started |
The Houdini Engine session has not been initialized yet. (the plugin only starts a session after instantiating a new HDA or modifying an existing HDA). |
Ready |
The Houdini Engine Session was successfully created and the plugin is actively communicating with Houdini Engine. |
Stopped |
The Houdini Engine session was manually interupted by the user. |
Failed |
The plugin was unable to start a Houdini Engine session. The logs will likely indicate the reason of the failure. |
Lost |
The plugin had lots contact with the Houdini Engine Session. This likely indicates that either Houdini / HARS was manually interrupted, or that it crashed. |
Failed - No License |
This indicates that the plugin was unable to start a Houdini Engine session due to the lack of Houdini Engine / Houdini License. |
Off |
This indicates that the session type is set to None in the plugin settings. The plugin will not try to create a Houdini Engine session, and will not be able to instantiate/cook HDAs. |
Setting |
Description |
Recook |
Forces the asset to recook even if no change has been detected. |
Rebuild |
Reimports the asset’s .hda file in and forces the asset to recook even if no change has been detected. This is useful when the underlying .hda has been updated or if something is out of sync. Rebuilding an HDA will update its interface, and any new parameter or input will be visible in the details panel. Value of existing parameter or input will be kept after a rebuild, but the input data will be recreated on the Houdini side. |
Cook Triggers 
In the context of a HoudiniAssetActor, Cooking refers to the same concept as in Houdini. The outputs of a Digital Asset inside Houdini are recalculated when a cook is triggered. This generally happens either manually by a forced recook or (optionally) automatically when a parameter or input of the Houdini Asset changes.
Assets can also be cooked or rebuilt via Console Commands or Keyboard Shortcuts.
Setting |
Description |
|---|---|
On Parameter Change |
When any parameter is changed on the HDA, a cook of the asset will be triggered. Turning this off allows parameters to be changed without recooking the ouputs. You can manually cook by selecting Recook. This can be helpful for complex assets that have a long cooking time. |
On Input Change |
When any input is changed on the HDA, a cook of the asset will be triggered. Turning this off allows inputs to be changed without recooking the ouputs. You can manually cook by selecting Recook. This can be helpful for complex assets that have a long cooking time. |
On Transform Change |
When on, translating, rotating, or scaling the Houdini Asset Actor in Unreal will automatically trigger a recook of the HDA. |
On HDA Input Cook |
When using another HDA in a World Input, this option lets you decide if this HDA should be recooked automatically when its input HDA is cooked (after modifying its parameters or inputs). |
Reset Parameters |
Resets all of the asset’s parameters to their default state saved in the Digital Asset. |
Cook Output Options 
Most Houdini assets need to have some of their temporary cooked content written to a UAsset file. Static Meshes, Materials, Textures, Landscape Infos etc. will be stored in the Temporary Cook Folder (by default Game/HoudiniEngine/Temp). All unused and unreferenced assets stored in this folder can be cleaned up automatically by using the Clean Houdini Engine Temp Folder entry in the Houdini Engine menu.
Cooked data should be considered temorary and not referenced directly by other assets.
Setting |
Description |
|---|---|
Temporary Cook Folder |
Indicates the directory that will be used to save the temporary output files generated by the Houdini Asset when cooking. This can also be set via the “unreal_temp_folder” attribute. |
Do Not Generate Outputs |
Prevents the Houdini Asset from generating outputs. The asset will be cooked in Houdini but will not produce anything in Unreal. This can be useful when chaining multiple Houdini Assets together using Asset Inputs. |
Use Output Nodes |
When on, the plugin uses the HDA’s output nodes to produce the cook result. When off, the plugin uses the node that has the display flag on to produce the HDA’s outputs. |
Use Templated Geos |
When on, outputs will be created for templated nodes found in the HDA. Templated outputs are editor-only and use a wireframe material. This can be useful as a visualizer (ex. a cutting plane) directly in the Unreal Editor. |
Cook Options 
Setting |
Description |
|---|---|
Push transform to Houdini |
When on, sets the Unreal world transform on the digital asset’s input node in Houdini. |
Temp Landscape Layers |
Allows you to preview the cooked data in a separate layer. This is useful when modifying an Edit Layer on an existing Landscape, as writing to an Edit Layer is destructive and changes can’t be undone easily. Note This feature creates a new temporary Edit Layer, which will cause Unreal to checkout every Landscape Streaming Proxy on the Landscape (when using World Partition). This limitation can be bypassed by only loading the Landscape Streaming Proxies that are being worked on (ex. using Data Layers). |
Enable Editable Curves |
When on, enables a legacy/deprecated workflow that uses editable curve::1.0 nodes to create curve inputs. |
Bake 
Baking refers to the process of finalizing cooked data so that the data no longer consider temporary. Contrary to cooked outputs, which are still owned by the Houdini Asset Actor, and will be destroyed with it, baked output are independent, and are not tied to the Houdini Asset that generated them. Baked assets can still be regenerated and deleted as needed.
Button |
Description |
|---|---|
Bake |
Bake all the outputs of the Houdini Asset. The type of asset produced when baking can be control by the combo box below bake button. |
Delete Bake |
Deletes baked output created by the previous bake. This button has no effect on landscapes. |
Unlink Bake |
Unlinks all baked output created by the previous bake, essentially making the Houdini Asset Actor forget that it generated the previous bake. |
Bake Output Options 
All Houdini assets in the level can be replaced automatically by their baked counterpart using the Bake And Replace All Houdini Assets setting in the file menu. This process cannot be reverted and should only be used with final content.
Baking all or only selected Houdini Asset Actors can also be done in Console Commands or Keyboard Shortcuts.
Settings |
Description |
|---|---|
Bake Output Type |
Choose the bake output type from the dropdown. Actor Bake the current asset outputs to Actors in the world. Baking to Actors will bake all outputs and then spawns new individual Unreal-native actors for each outputa. The new actors will be added to a new folder in the World Outliner. Blueprint Bake the current asset outputs to a BluePrint Actor in the content browser. All of the Houdini Asset’s outputs are baked to .uasset files in the bake folder, and a new Blueprint Actor class is created, which has components that uses all the baked outputs. Asset Bake the current asset outputs to native Unreal Assets in the content browser. All of the Houdini Asset’s outputs are baked to |
Bake Actor Grouping |
Choose the bake actor grouping from the dropdown. One Actor Per Component (Bake To Actor only) When on, creates individual actors for each output component in the HDA when baking. One Actor Per HDA (Bake To Actor only) When on, creates a single actor when baking an HDA with each output as an individual component of that actor. |
Bake Folder |
Set the directory where baked output assets will be saved if the |
Remove Cooked Ouput After Bake |
After baking, all the temporary/cook outputs of the HDA will be automatically destroyed. This is useful when baking to Actors since it avoids having both baked and cooked outputs overlapping. |
Recenter Baked Actors |
When on, this option automatically recenters the position of all the baked Actors, making them use the center of their bounding box instead of the HDA’s location. |
Auto Bake |
When on, the temporary outputs of the Houdini Assets are automatically baked after a succesfull cook. |
Replace previous Bake |
When on, baking will always overwrite the previous bake’s results. When off, the baked files will be created incrementally, and will never replace previous bake files. |
Help and Debug 
Setting |
Description |
|---|---|
Show Cook log |
Displays the contents of the Houdini cook log. This is useful for troubleshooting/debugging the Digital Asset. |
Asset Help |
Displays the contents of the Digital Asset help. The help is created via the Help tab in the Operator Type Properties window for the Digital Asset in Houdini. |
Houdini Parameters 
This section appears if you promote parameters in Houdini to your HDA. The context changes depending on the parameters you promoted.
Houdini Inputs 
This section appears if you create inputs on your HDA.
Geometry Input 

Geometry inputs marshall data from Unreal assets (in the content browser) to Houdini.
You can either drag and drop an Unreal asset from the content browser onto it, or select one from the drop down menu. Multiple assets can be dragged onto the input.
Export Options
Setting |
Description |
|---|---|
Keep World Transform |
Controls the way the geometry’s transform is used in Houdini. When on, the Unreal Transform will be used in Houdini. When off, the Unreal Transform will be ignored in Houdini, treating the geometry at the origin. |
Pack Geometry before merging |
When on, individual packed primitives will be created for each input object. When off, all the input objects will be merged into a single geometry. |
Export Input as References |
When on, the input object’s full geometry will not be exported to Houdini. Instead, they will be exported as a point with the |
Export LODs |
Export all the LODs meshes found in the asset to Houdini. Each LOD mesh will be available in a separate group. See Level of Details for more information. |
Export Sockets |
Export all the mesh sockets found in the asset to Houdini. See Mesh Sockets for more information. |
Export Colliders |
Exports all the simple colliders found in the asset to Houdini as grouped geometry, using the correspond |
Use Mesh Description |
When on, input atemmpts to uses the Unreal mesh description. |
Export Material Paramaters |
Exports all the material parameters found in the asset’s materials as attributes. This option can be costly on large meshes that have multiple materials with a lot of exposed parameters. |
Merge Spline Mesh Components |
When on, spline mesh components in the input will be merge into a single static mesh. |
Prefer Nanite Fallback Mesh |
When on, Nanite fallback meshes will be used for the input asset instead of the full Nanite geometry. |
Inputs Selected
Setting |
Description |
|---|---|
Add |
Creates extra input slots that can be used to import multiple assets. |
Clear All |
Deletes and empties all the current inputs slots. |
A row of icon displayed on the current input slots allows you to:
-
use the current selection
-
browse to the input object
-
reset the current input object
-
edit the current input object’s transform offset
-
insert, duplicate and delete input objects
-
delete the geometry input object.
World Input 
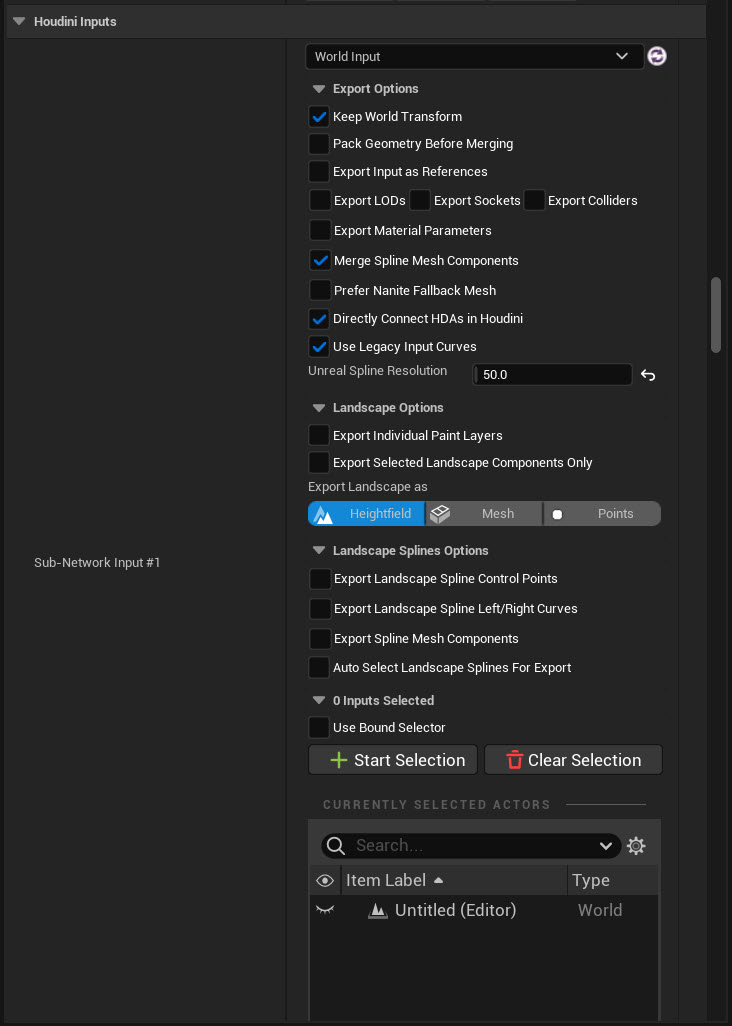
World inputs marshall data from Unreal Actors (placed in world) to Houdini.
To set a World input:
-
Select the Start Selection, select the desired actors, then select Use Current button. Multiple actors can be selected.
Export Options
Setting |
Description |
|---|---|
Keep World Transform |
Controls the way the geometry’s transform is used in Houdini. When on, the Unreal Transform will be used in Houdini. When off, the Unreal Transform will be ignored in Houdini, treating the geometry at the origin. |
Pack Geometry Before Merging |
When on, individual packed primitives will be created for each input object. When off, all the input objects will be merged into a single geometry. |
Export Input as References |
When on, the input object’s full geometry will not be exported to Houdini. Instead, they will be exported as a point with the |
Export LODs |
Export all the LODs meshes found in the asset to Houdini. Each LOD mesh will be available in a separate group. See Level of Details for more information. |
Export Sockets |
Export all the mesh sockets found in the asset to Houdini. See Mesh Sockets for more information. |
Export Colliders |
Exports all the simple colliders found in the asset to Houdini as grouped geometry, using the correspond |
Use Mesh Description |
When on, input atemmpts to uses the Unreal mesh description. |
Prefer Nanite Fallback Mesh |
When on, Nanite fallback meshes will be used for the input asset instead of the full Nanite geometry. |
Export Material Paramaters |
Exports all the material parameters found in the asset’s materials as attributes. This option can be costly on large meshes that have multiple materials with a lot of exposed parameters. |
Prefer Nanite Fallback Mesh |
When on, Nanite fallback meshes will be used for the input asset instead of the full Nanite geometry. |
Merge Spline Mesh Components |
When on, spline mesh components in the input will be merge into a single static mesh. |
Export Level Instance Content |
When on, level instance content is sent to Houdini. |
Directly Connect HDAs in Houdini |
When on, Houdini Asset Actors in the selection will be directly connected in Houdini to this HDA. When off, the Houdini Actor’s Unreal output will be sent to Houdini. |
Use Legacy Input Curves |
When on, the plugin will automatically create curve::1.0 nodes for spline inputs. This can be useful for backward compatibility with older HDAs that relied on the curve node. |
Unreal Spline Resolution |
Controls the sample length used to resample Unreal splines. The default value of |
Landscape Options 
Options that were previously available only on the now deprecated Landscape inputs are now available under the landscape options folder.
Setting |
Description |
|---|---|
Export Height Data Per Edit Layer |
Exports the height data for each edit layer. Turn off to improve performance. |
Export Paint Layers Per Edit Layer |
Exports each paint layer for each edit layer. Turn off to improve performance. |
Export Merged Paint Layers Per Landscape |
Exports a single paint layer of all edit layers' paint layers into one. |
Export Selected Landscape Components Only |
When on, only the selected landscape component will be exported. |
Export Landscape as |
Controls how Landscapes are exported in Unreal: as Heightfield, as Mesh or as a Point cloud. |
Landscape Spline Options 
The following options are available only when exporting a landscape as mesh/points.
Setting |
Description |
|---|---|
Export Landscape Materials |
The landscape’s face and hole materials will be exported to Houdini. |
Export Landscape Tile UV |
The landscape’s UVs will be exported in a separate texture for each tile. |
Export Landscape Normalized UVs |
The landscape’s UV values will be exported in |
Export Landscape Lighting |
The landscape’s UVs will be exported in a separate texture for each tile. |
Landscape Spline Options 
Setting |
Description |
|---|---|
Export Landscape Spline Control Points |
When on, the control points of Landscape splines will be exported as a point cloud in Houdini. |
Export Landscape Spline Left / Right Curves |
When on, the left and right curve of the landscape spline will be exported to Houdini. |
Export Spline Mesh Components |
When on, the Landscape Spline’s mesh component will also be exported to Houdini. |
Auto Select Landscape Spline For Export |
When on, any Landscape selected by the input will automatically export its Landscape Splines to Houdini. |
Inputs Selected 
Setting |
Description |
|---|---|
Use Bound Selector |
When on, the selected Actors will acts as bound selectors: any Actors within their bounding box will be exported to Houdini. |
Update Automatically |
When on, this input automatically updates if its selected objet or actors are changed. |
Start Selection/Use Current |
This selection will lock the details panel and allow you to start selecting actors to be exported using the World Input. Selecting Use Current will unlock the details panel and use the selected actors for the input. |
Clear Selection |
Clears and empties the current selection. |
Currently Selected Actors |
Displays a list of the Actors that are currently being exported to Houdini. |
Curve Input 

Export Options
Setting |
Description |
|---|---|
Keep World Transform |
Controls the way the geometry’s transform is used in Houdini. When on, the Unreal Transform will be used in Houdini. When off, the Unreal Transform will be ignored in Houdini, treating the geometry at the origin. |
Auto Update |
When on, a cook will be automatically triggered everytime you update the curve. When off, prevents cooks when the curve is modified. This lets you move thte contgrol without being interrupted. |
Add Rotation/Scale Attributes |
When on, adds rotation and scale attributes for each of the control point of the curve. This can be useful to turn off when working with older HDAs or nodes that do not support curves with rotation and scale attributes. |
Use Legacy Input Curves |
When on, the plugin will automatically create curve::1.0 nodes for spline inputs. This can be useful for backward compatibility with older HDAs that relied on the curve node. |
Curve
Add |
Create extra curves. |
Clear All |
Clears all curves created by ths input. |
Reset Offset |
Resets the incremental position offset that is used when creating extra curves. |
Closed |
Decide if the curve’s last point should be connected to the curves first points. |
Reversed |
Reverse the order of the curve’s control points, and can be usefull to invert the direction of the curve, or the winding of the curve’s polygon when closed. |
Visible |
Shows or hides the curve in the viewport. |
Curve Type |
Choose the curve type between Polygon (linear), NURBS, Bezier, or Points. |
Curve Method |
Choose the way the curve’s CV are used when using either Bezier or NURBS curves. If CVs is selected, the curve point will be treated as Control Vertices, so the NURBS and Bezier curves will not pass through them. If set to Breakpoints, Houdini will automatically calculate the appropriate Control Vertices so that Bezier and NURBS curves pass through the curve’s control point. The Freehand method should be ignored in the Unreal plug-in. |
Bake To Actor |
Bake the curve’s |
Bake To BP |
Bake the curve’s |
Spline Point Editor |
Displays similar controls than Unreal spline component, that lets you manually edit the transform for the currently selected control point(s). |
Houdini Asset 
Displays the Houdini Asset that is currently used by the selected Houdini Asset Actor.
Houdini PCG 
When you are in the PCG graph and have created a Houdini Digital Asset (HDA) PCG node, an additional Houdini PCG tab appears. See Details Panel for the full list of HDA settings.
Setting |
Description |
|---|---|
Houdini Asset |
Set the Houdini Asset from the dropdown for the HDA PCG node in the PCG Graph. Geometry Input - Marshalls data from Unreal assets in the content browser to Houdini. __World Input___ - Connect any actor in the world/level to your Asset’s input. PCG Data - The raw data or attributes to send to Houdini. |
Output Type |
Dropdown menu to select the output. Cook - When you cook an asset, it follows these steps
After cooking scene components such as meshes, they're attached to the HoudiniPCGActor. Actors are placed in the current level. Assets are created in the temperary Houdini directory located in Game/HoudiniEngine/Temp. Cook and Bake - First, cooks the PCG Node following the Cook description process. Then, bakes the cooked data which typically means copying the data from the Cook stage to its final output location. Scene components are replaced with actors in the level. Actors are placed using the final baked actor naming convention. Assets moved to the Baked folder. Note Baked actors and assets are deleted when regenerating the PCG graph or selecting Cleanup in the PCGComponent settings. To prevent this, select Clear PCG Link on the PCGComponent. |
Create Scene Component |
When on, scene components and actors will be created for HDA outputs in the current level. When off, only assets are created in the content folder. This is useful for creating assets which are then used to spawn other actors in the PCG Graph such as the Static Mesh Spawner node. |
Automatically Delete Temp Assets |
When on, automatically deletes assets stored in the Houdini Engine temporary folder in the Content folders. This folder can become full when using PCG, so turn it on to reduce disk space. |
Use PCG Cache |
To optimize PCG performance, Unreal uses an internal cache to store outputs generated by PCG nodes. If the inputs do not change, the cache assumes the outputs can be reused and speeds up the PCG graph generation. However, using the PCG cache is not desirable if the HDA PCG node depends on assets outside of Unreal. For example, if an HDA loads a Note This setting only affects the node applied, the rest of the graph’s nodes still uses the PCG cache. Tip When this setting is on and a node does not generate correctly. Use Force Generate to clear the cache. You can also use CTRL + |
Force PCG Outputs |
When on, forces the HDA to output PCG attributes automatically as if |
Apply PCG Transform |
Applies the PCG Volume transform to any PCG point or spline outputs. |
Houdini Image 
These settings are only available when you import an HDA with COPs.
Setting |
Description |
|---|---|
Override Default Resolution |
When on, overrides the texture’s resolution generated by this COP HDA. |
Resolution Override |
Set the resolution of the overridden texture. |
Override Default Pixel Scale |
When on, overrides the texture’s pixel scale generated by this COP HDA. |
Pixel Scale |
Set the scale of the ovrriden pixel. |
Image Data Format |
Override the texture’s data format generated by this COP HDA. Choose between auto, Int8, Float16, or Float32. |
Generate Material |
When on, Proxy meshes will automatically refine to Static Meshes when Playing In Editor (PIE). |
Source Material |
When on, Proxy meshes will automatically refine to Static Meshes when Playing In Editor (PIE). |
Houdini Mesh Generation 
These settings allow you to override the global settings in the Plugin Settings
See Plugin Settings for more information.
Setting |
Description |
|---|---|
Split Mesh Support |
When on, supports multiple mesh outputs on one HDA outputs. This is currently in Alpha testing. Note For testing purposes only. |
Static Mesh Generation Properties |
When on, overrides the default Static Mesh Generation properties used to create this HDA’s mesh outputs. |
Static Mesh Build Settings |
When on, overrides the default Static Mesh Build Settings used when creating this HDA’s mesh outputs. |
Houdini Proxy Mesh Generation 
These settings allow you to override the global settings in the Plugin Settings
See Plugin Settings for more information.
Setting |
Description |
|---|---|
Override Global Proxy Static Mesh Settings |
When on, overrides the static mesh settings in Plugin Settings. |
Enabled Proxy Mesh |
When on, the plugin will create fast Houdini Mesh Proxy when cooking. These proxies can the be later refined to Static Meshes by the plugin. |
Refine Proxy Static Meshes after a timeout |
When on, automatically refines proxy mesh after a timeout that is specified by the “Proxy Mesh Auto Refine Timeout Seconds” property. |
Proxy Mesh Auto Refine Timeout Seconds |
The number of seconds before automatically refining Proxy Meshes. |
Refine Proxy Static Meshes When Saving A Map |
When on, Proxy meshes will automatically refine to Static Meshes when the current map/level/world is saved. |
Refine Proxy Static Meshes On PIE |
When on, Proxy meshes will automatically refine to Static Meshes when Playing In Editor (PIE). |