| On this page |
Node Sync is a feature of the Houdini Engine for Unreal Plugin that enables sharing assets between Unreal and Houdini when using Session Sync.
You can send and receive data to and from Unreal without a dedicated HDA. Node Sync can send to Houdini any type of asset that is supported by HDA inputs, and fetch any type of assets that can be outputted by the plugin.
Launch Houdini with SessionSync 
From Unreal, you can launch a new instance of Houdini with Session Sync.
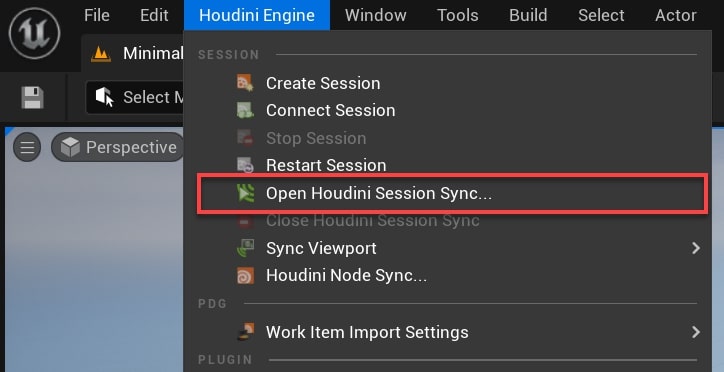
In Unreal’s main toolbar, click Houdini Engine then Open Houdini Sync Session.
A new Houdini application will open.
Note
You can start, stop, and restart your Houdini session using the options in the Houdini Engine menu.
Learn more about Using SessionSync on its documentation page.
Houdini Node Sync Tab 
The Houdini Node Sync tab allows you to control various options when sending or fetching data to/from Houdini.
To open the Houdini Node Sync tab:
-
In Unreal’s main toolbar, select the Houdini Engine menu.
-
Select Houdini Node Sync.
The tab will be opened on the left of the viewport, next to the Place Actors tab.

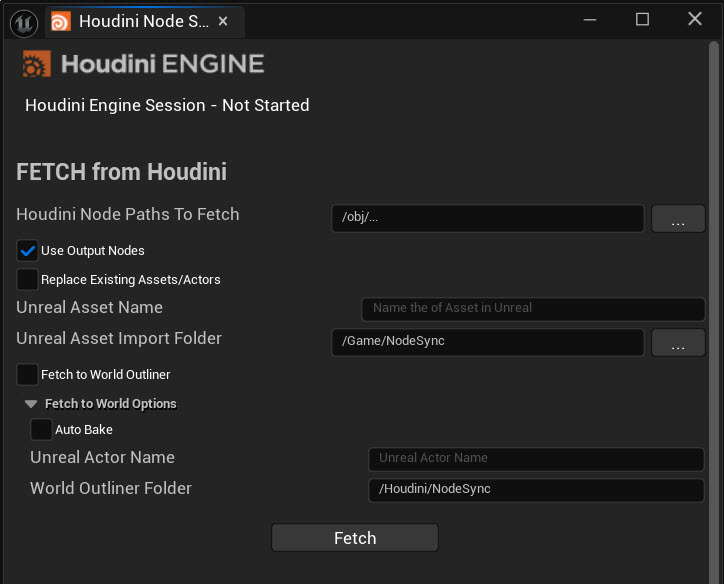
It displays the current Houdini Engine Session status, and is divided in two sections: FETCH from Houdini, and SEND to Houdini.
Fetch from Houdini 
The Fetch from Houdini tool allows you to send the output of your SOP, OBJ, COP2, or Copernicus (COP) nodes in Houdini to Unreal.
You can access it in the Houdini Node Sync tab:
-
In Unreal’s main toolbar, select the Houdini Engine menu, then Houdini Node Sync.
Setting |
Description |
|---|---|
Houdini Node Paths to Fetch |
The path of the nodes in Houdini you want to fetch. Use copy and paste or the browse button to find node. See Node browser to fetch for more information. |
Use Output Nodes |
When on, prefers output nodes over the display flag when fetching a node’s data. |
Replace Existing Assets/Actors |
When on, existing assets or actors will be overwritten by the newly fetched data. |
Unreal Asset Name |
Name of the fetched data in Unreal. If empty, uses the node’s name for the Unreal asset name. |
Unreal Asset Import Folder |
Path to the project folder that contains the generated assets in Unreal. |
Fetch to World Outliner |
When on, the fetched data from Houdini is instantiated as an Actor in the current level. |
Setting |
Description |
|---|---|
Auto Bake |
When on, output data fetched to world will automatically be baked. When off, they are created as temporary cooked data and attached to a Houdini Node Sync component. |
Unreal Actor Name |
Name of the generated Actor in Unreal. |
World Outliner Folder |
Path to a world outliner folder that contains the created Actor. |
Selecting nodes using the node browser 
To select which Houdini nodes to fetch data from, you can either use the node browser or manually enter the node path.
To use the node browser:
-
In Node Sync Panel, click the … button next to Houdini Node Paths to Fetch to open the Node Browser dialog.
-
Turn on the checkbox next to a node to mark it for selection. You can select multiple nodes to fetch them simultaneously.
-
Once you are done making your selection, click OK to close the Node Browser dialog. This will update the Houdini Node Paths to Fetch text field with your selection.
Selecting nodes manually 
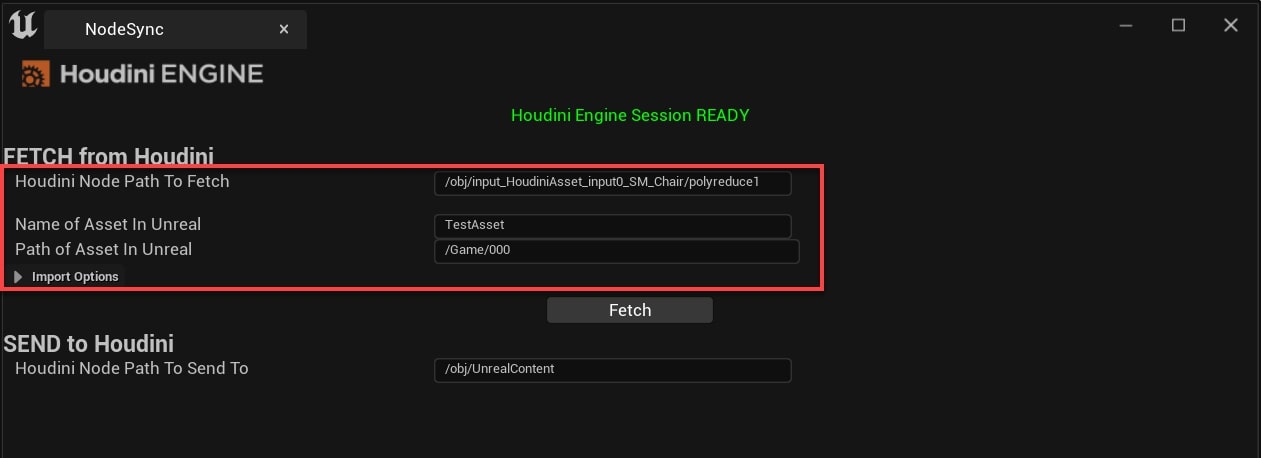
To manually select nodes, copy their node path:
-
In Houdini, select the output node you want to export.
-
Press CTRL + C to copy the node path.

-
In the Houdini Node Path to Fetch text field, CTRL + V to paste the node path. Alternatively, you can manually enter the node path.
-
Multiple node paths can be entered at the same time. Use ; to separate them.
Fetching and fetch options 
After selecting the nodes that you want to fetch:
-
Set your desired name for the fetch result using the Unreal Asset Name text field.
-
Choose where you want the fetch result to save to using the Unreal Asset Import Folder text field. If you use a path that doesn’t exist, a new folder will be created.
-
Select Fetch. Your assets should appear in the Content Browser under the named folder.
By default, data will be fetched using the node’s outputs. If you turn off the Use Output Nodes option in the Node Sync tab, the display geo will be used instead.
Output data is created incrementally by default. If you want to overwrite previous fetch results instead, turn on the Replace Existing Assets/Actors option.

Turn on the Fetch to World Outliner option if you want the fetched data to be automatically instanced in the current level.
When Fetch to World is on, select the Fetch button to create new Houdini Asset Actors in the level with Node Sync Components (one Actor per fetched node). Node Sync components have the Live Sync property on by default. This means that a change made to their corresponding node in Houdini will automatically update its unreal counterpart. If Live Sync is off, the Node Sync component’s outputs can be manually updated by using the Fetch button.
Turn on the Auto Bake option creates native unreal actors/components when fetching data.
By default, the created actors use their fetched node’s name, but you can specify the name by using Unreal Actor Name.
You can also choose a default world outliner folder for the fetched actors by changing the World Outliner Folder value.
Send to Houdini 
Send to Houdini allows you to send assets from Unreal to Houdini.
-
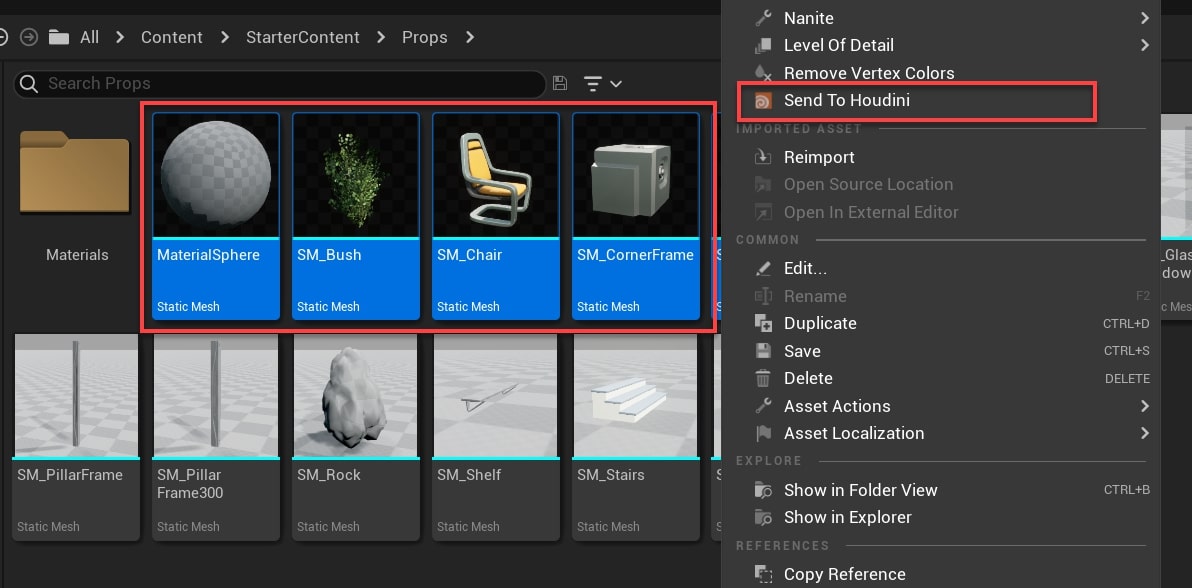
In the Content Browser, select your Asset to send.
-
Right-click and select Send to Houdini.

-
In Houdini, your asset should appear.
You can select multiple assets at one time and send them to Houdini.
You can also use the World Outliner to select Actors and send them to Houdini.
Note
Send to Houdini is only available when a valid Houdini Engine Session has been created.
Send to Houdini using Node Sync tab 
You can control how the data is sent to Houdini by opening the Houdini Node Sync tab:
-
In Unreal’s main toolbar, click on the Houdini Engine menu, then Houdini Node Sync.

Setting |
Description |
|---|---|
Keep World Transform |
Controls the way the geometry’s transform is used in Houdini. When on, the Unreal Transform will be used in Houdini. When off, the Unreal Transform will be ignored in Houdini, treating the geometry at the origin. |
Pack Geometry before merging |
When on, individual packed primitives will be created for each input object. When off, all the input objects will be merged into a single geometry. |
Export Input as References |
When on, the input object’s full geometry will not be exported to Houdini. Instead, they will be exported as a point with the |
Export LODs |
Export all the LODs meshes found in the asset to Houdini. Each LOD mesh will be available in a separate group. See Level of Details for more information. |
Export Sockets |
Export all the mesh sockets found in the asset to Houdini. See Mesh Sockets for more information. |
Export Colliders |
Exports all the simple colliders found in the asset to Houdini as grouped geometry, using the correspond |
Export Material Paramaters |
Exports all the material parameters found in the asset’s materials as attributes. This option can be costly on large meshes that have multiple materials with a lot of exposed parameters. |
Merge Spline Mesh Components |
When on, spline mesh components in the input will be merge into a single static mesh. |
Prefer Nanite Fallback Mesh |
When on, Nanite fallback meshes will be used for the input asset instead of the full Nanite geometry. |
Directly Connect HDAs in Houdini |
When on, Houdini Asset Actors in the selection will be directly connected in Houdini to this HDA. When off, the Houdini Actor’s Unreal output will be sent to Houdini. |
Use Legacy Input Curves |
When on, the plugin will automatically create curve::1.0 nodes for spline inputs. This can be useful for backward compatibility with older HDAs that relied on the curve node. |
Unreal Spline Resolution |
Controls the sample length used to resample Unreal splines. The default value of |
Setting |
Description |
|---|---|
Export Individual Paint Layers |
When on, Paint Layers will be exported individually per Edit Layers. This may be slow for large Landscape with many layers. |
Export Selected Landscape Components Only |
When on, only the selected landscape component will be exported. |
Export Landscape as |
Controls how Landscapes are exported in Unreal: as Heightfield, as Mesh or as a Point cloud. |
Setting |
Description |
|---|---|
Export Landscape Spline Control Points |
When on, the control points of Landscape splines will be exported as a point cloud in Houdini. |
Export Landscape Spline Left / Right Curves |
When on, the left and right curve of the landscape spline will be exported to Houdini. |
Export Spline Mesh Components |
When on, the Landscape Spline’s mesh component will also be exported to Houdini. |
Auto Select Landscape Spline For Export |
When on, any Landscape selected by the input will automatically export its Landscape Splines to Houdini. |
Send |
Send Asset to Houdini. |
You can choose the node that will contain the sent data by modifying the Houdini Node Path To Send To section. You must provide a valid Houdini destination such as /obj/SentFromUnreal" or the send action will fail.
The Houdini Node Sync tab also gives you control over the various Export Options used when sending the data to Houdini. See Inputs to learn more about these options.
If the Sync World Inputs option is enabled, changes made to the sent actors in Unreal will automatically be reflected in Houdini.
Actors that have been sent to Houdini are listed in the Sent Data list view, and can be manually updated or deleted via the update all and delete all buttons respectively.
The following type of objects can be sent to Houdini in Node Sync:
-
Static Mesh
-
Static Mesh Components
-
Instanced Static Mesh Component
-
Skeletal Mesh
-
Skeletal Mesh Components
-
BSP Brushes
-
Geometry Collection
-
Geometry Collection Component
-
Unreal Spline Components
-
Landscape
-
Landscape Splines
-
Spline Mesh Components
-
Foliage
-
Data Tables
-
Actors
-
Blueprints
-
Houdini Asset Actors
-
Level Instances
-
Packed Level Actors
-
Animations
-
Textures