| On this page |
|
Pyro shaders control how smoke, fire and explosions look when rendered. Houdini’s pyro shaders provide convenient access to all relevant attributes and give you control over every aspect of the rendering process.
Understanding Pyro Bake Volume 
The ![]() Pyro Bake Volume node provides controls to enhance the look of a pyro solve in the viewport. It also handles automatic material assignment to best match the rendering results to the viewport display, and is designed to provide a similar interface to the
Pyro Bake Volume node provides controls to enhance the look of a pyro solve in the viewport. It also handles automatic material assignment to best match the rendering results to the viewport display, and is designed to provide a similar interface to the ![]() Pyro Shader. When scattering is turned on, it bakes out a
Pyro Shader. When scattering is turned on, it bakes out a scatter volume that is used by the ![]() Pyro Shader to approximate the look of light scattering inside the explosions.
Pyro Shader to approximate the look of light scattering inside the explosions.
Using Pyro Bake Volume with the Pyro Shader 
The ![]() Pyro Bake Volume node contains a
Pyro Bake Volume node contains a ![]() Pyro Shader, which is automatically assigned to the processed volumes. The embedded shader references parameters on Pyro Bake Volume to ensure that the render matches the viewport. Therefore, you can create copies of the Pyro Bake Volume node and render different variants without adjusting material assignments at the object level.
Pyro Shader, which is automatically assigned to the processed volumes. The embedded shader references parameters on Pyro Bake Volume to ensure that the render matches the viewport. Therefore, you can create copies of the Pyro Bake Volume node and render different variants without adjusting material assignments at the object level.
Tip
You can dive inside the Pyro Bake Volume node to access the Pyro Shader and its controls.
Although most of the Pyro Shader’s features are available on the Pyro Bake Volume node, there are a few extra parameters on the shader that are not available in the viewport. To see the effect of these parameters, you need to render the volumes.
The following are additional things you can control with the ![]() Pyro Shader.
Pyro Shader.
-
Clamp or remap the smoke density, or scale it by another volume (such as
temperature) with the Use Control Volume parameter. -
Set the Smoke Brightness.
-
Change the color of the smoke using absorption with the Absorption Color parameter.
-
Change the color of the shadows with the Shadow Color parameter.
-
Set the Scattering Phase.
Note
When Auto Update ![]() is enabled on the Render View, the render update can be slower with heavier volumes, since the underlying geometry has to recook on every parameter change to update viewport visualization attributes.
is enabled on the Render View, the render update can be slower with heavier volumes, since the underlying geometry has to recook on every parameter change to update viewport visualization attributes.
When you break material references using the Quick Setups menu, the assigned material becomes independent of the Pyro Bake Volume’s parameters. This lets you adjust material parameters without recooking the SOP geometry, speeding up renders. However, render and viewport looks will be different, since shader parameter changes aren’t propagated to the Pyro Bake Volume node.
Note
Certain combinations of settings (for example, multiple emissive elements) cannot be directly visualized in the viewport given the functionality of ![]() Volume Visualization. In these cases, a combined Emission Volume (
Volume Visualization. In these cases, a combined Emission Volume (Ce by default) is created internally to help with visualization. When this happens, the node will display a message that a different output is visualized, and displaying the geometry downstream will produce a different look in the viewport.
Setting up scattering 
-
Turn on Enable Scatter on the Scatter tab.
-
Turn off Enable Mask to visualize the full extent of the scatter without masking.
-
Know your maximum
temperaturevalues on the frames you are testing, and adjust Source Range accordingly.-
By increasing the minimum value of Source Range, you will cut off the low temperature values so they will not contribute to the scattered emission.
-
First set the maximum value of the Source Range. To find an appropriate setting, you can begin by calculating the maximum
temperaturevalue over a few sample frames. The average of these values can serve as a starting value, and you can tweak it further to fine-tune the look.
-
-
Adjust Scale and Hot Core Scale for the intensity of the scatter.
-
Change the amount of blurring based on the size of your simulation. Turn on Use Blur Steps to further smooth out the scatter area.
-
Examine frames from the beginning, middle, and end of your simulation while refining the aforementioned parameters.
-
Turn on Enable Mask and find values for Mask Center and Mask Width that produce the desired results in the viewport. Alternatively, you can break the material reference and examine renders as you tweak parameters on the assigned shader.
Tip
All range settings should consider the range of values in their respective bound volumes. The ![]() Pyro Solver will write the minimum and maximum values for each exported volumes into primitive attributes when Compute Min/Max Values is enabled on the Export tab.
Pyro Solver will write the minimum and maximum values for each exported volumes into primitive attributes when Compute Min/Max Values is enabled on the Export tab.
Understanding the Pyro Shader 
The ![]() Pyro Shader can be used to create realistic renders of smoke, fire, and explosion simulations or procedurally generated volumes.
Pyro Shader can be used to create realistic renders of smoke, fire, and explosion simulations or procedurally generated volumes.
Smoke and Emission 
The combination of these two components make up the final volume render. Some renders such as chimney smoke, dust clouds, and other generic smoke elements only need to be shaded as smoke. Smoke is mainly controlled by its density and color. Emission on the other hand, controls the overall intensity and color of light emitted by the fire.
Each of these components relies on a set of volumes to do its work. A density volume is usually bound to the smoke component, and parameters in the Smoke tab control its resulting look. You can use up to 3 emissive elements with this shader: scatter, fire and secondary fire.
Scatter uses a scatter volume produced by the ![]() Pyro Bake Volume SOP, which can have the effect of internal scattering pre-baked. Although this scattering is an approximation to true behavior, this approach is much cheaper to render compared to using volume lights and a high number of volume bounces. It also gives you greater artistic control over the look.
Pyro Bake Volume SOP, which can have the effect of internal scattering pre-baked. Although this scattering is an approximation to true behavior, this approach is much cheaper to render compared to using volume lights and a high number of volume bounces. It also gives you greater artistic control over the look.
Fire and secondary fire provide a more traditional set of controls that mirrors ![]() Pyro Shader - Classic. In particular, each of these emissive elements needs an intensity and a color field, governing the amount and color of the emitted light, respectively. Similar to scatter, fire can also be masked by another volume.
Pyro Shader - Classic. In particular, each of these emissive elements needs an intensity and a color field, governing the amount and color of the emitted light, respectively. Similar to scatter, fire can also be masked by another volume.
Tip
All range settings should consider the range of values in their respective bound volumes. The ![]() Pyro Solver will write the minimum and maximum values for each exported volumes into primitive attributes when Compute Min/Max Values is enabled on the Export tab.
Pyro Solver will write the minimum and maximum values for each exported volumes into primitive attributes when Compute Min/Max Values is enabled on the Export tab.
Emission Masking 
The ![]() Pyro Shader has the ability to mask scatter and fire by another field. By default, the mask field is set to
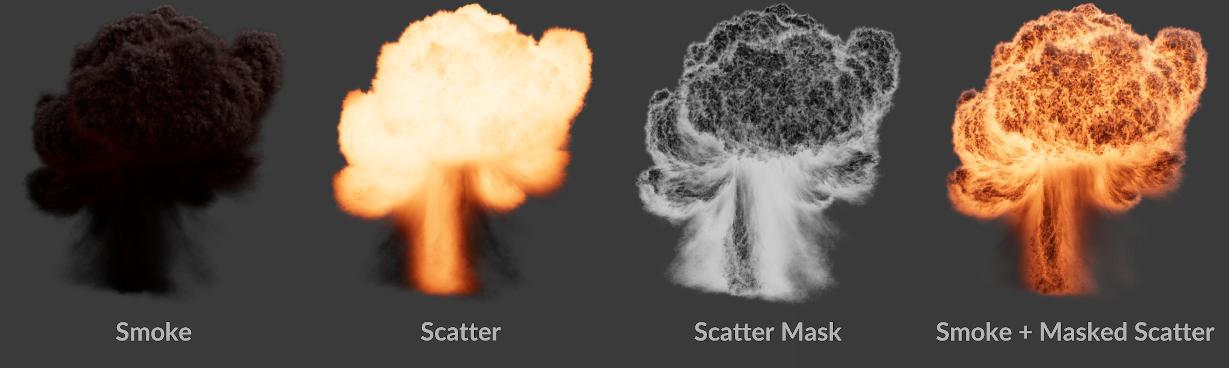
Pyro Shader has the ability to mask scatter and fire by another field. By default, the mask field is set to density, and its effect is to reduce emission in areas with higher density. Masking is especially useful when rendering explosions, since it can introduce crunchy details to the soot. When used correctly, the volume will appear to glow internally, with this glow peeking through cracks in the smoke.
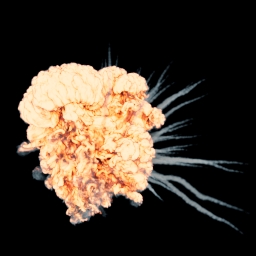
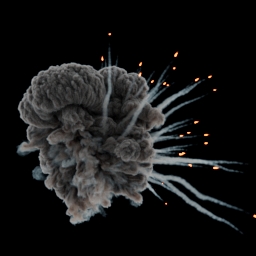
The following image shows the smoke, scatter, scatter mask, and the final combined image.
Scatter, Fire, and Secondary Fire 
The three possible emissive components are combined together for the final render, but they all serve different purposes.
-
Scatter is mainly used to emulate light scattering inside an explosion and it relies on a special
scattervolume that can be generated by Pyro Bake Volume.
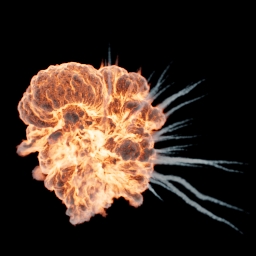
Smoke and scatter versus just smoke:
-
Fire can be used for shading fire and flames. By default, it uses
temperaturevolumes for both emission intensity and color. Masking can also be applied to this component.Smoke and fire versus just smoke:
-
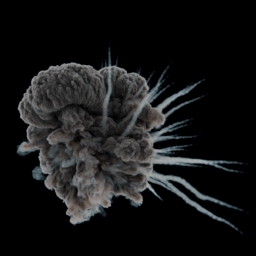
Secondary fire is mainly used for adding fiery tips for trails generated by
 Pyro Trail Source. This component cannot be masked, but is otherwise conceptually the same as fire.
Smoke and secondary fire versus smoke:
Working with the Pyro Shader 
| To... | Do this |
|---|---|
|
Change the color of the smoke based on density |
|
|
Change the color of the smoke based on how light scatters through the volume |
Change the Absorption Color. The value of |
|
Scale smoke density using an other volume |
|
Pyro Shader vs Pyro Shader - Classic 
The following are the main differences between ![]() Pyro Shader (introduced in 18.5) and
Pyro Shader (introduced in 18.5) and ![]() Pyro Shader - Classic.
Pyro Shader - Classic.
Pyro Shader |
Pyro Shader - Classic |
|---|---|
Provides up to 3 emissive elements: scatter, fire, and secondary fire. |
Provides one emissive element. |
Emission (for scatter and fire) can be masked by another field. This lets you add crunchy details to an explosion. |
Supports adding noise to the volume values at render time. To do this, |
Internal scattering can be approximated by the |
Internal scattering from emission can be brute-forced by using volume lights and lots of volume bounces. |
Note
It is technically possible to get the look of ![]() Pyro Bake Volume with
Pyro Bake Volume with
![]() Pyro Shader - Classic. To do this, turn on Bake Emission Volume on the SOP, and use
Pyro Shader - Classic. To do this, turn on Bake Emission Volume on the SOP, and use Ce as the Color Volume Name after setting Color Mode under Fire to
Color Field. The fire intensity volume needs to be remapped to 1 everywhere, since the baked emission volume premultiplies by emission intensity.
Rendering volumetric smokeless flames 
If there is a volume named density, mantra will intersect rays against it during rendering. For a smokeless pyro simulation, this volume has the value of 0 everywhere. Seeing this, mantra assumes the rays don’t hit anything visible, resulting in a render of everything besides the smoke.
To work around this, you can remove the empty density volume from the geometry that is rendered, forcing mantra to intersect against the emission field. This will result in a completely smokeless pyro render.
Alternatively, you can set its values to something small wherever there is non-zero emission using the Flame Density parameter on the Look tab of ![]() Pyro Post-Process node. This parameter basically sets the bound density field to a small positive value wherever there is emission, ensuring that the renderer won’t miss smokeless flames.
Pyro Post-Process node. This parameter basically sets the bound density field to a small positive value wherever there is emission, ensuring that the renderer won’t miss smokeless flames.