| On this page |
Note
This workflow guide uses special terms like spawn points or packed sets. If you're not familiar with this terminology, please go to the Pyro instancing definitions page for more information.
With the help of the new ![]() Pyro Spawn Sources and
Pyro Spawn Sources and ![]() Pyro Source Instance nodes you can achieve full control over the pyro instances and their attributes.
Pyro Source Instance nodes you can achieve full control over the pyro instances and their attributes.
The ![]() Pyro Spawn Sources node creates spawn points. You can connect a point source, e.g. a scatter or a curve, or let the node create a single point at the origin (which can be moved and rotated freely using the
Pyro Spawn Sources node creates spawn points. You can connect a point source, e.g. a scatter or a curve, or let the node create a single point at the origin (which can be moved and rotated freely using the ![]() Transform SOP). Spawn points identify which packed set will be used and store basic animation parameters like Start Frame and Source Speed. At each frame, a spawn point may generate a single instance point. The spawn points can be set to loop, in which case they will birth new instance points at different times during the simulation.
Transform SOP). Spawn points identify which packed set will be used and store basic animation parameters like Start Frame and Source Speed. At each frame, a spawn point may generate a single instance point. The spawn points can be set to loop, in which case they will birth new instance points at different times during the simulation.
The node’s parameter values are stored on point attributes of spawn points. These properties on attributes can be modified to control the instances, e.g. through a downstream ![]() Attribute Adjust Float node. You can see the available attribute names (
Attribute Adjust Float node. You can see the available attribute names (name, startframe, etc.) when you hover the mouse over a parameter to get its tooltip. Aside from the parameters, there are also P, pivot, and orient attributes that control placement of the instance. You can merge spawn points from multiple ![]() Pyro Spawn Sources SOPs if you want to modify them together or before conversion to instance points.
Pyro Spawn Sources SOPs if you want to modify them together or before conversion to instance points.
The spawn points are then fed to a ![]() Pyro Source Instance operator. When a spawn point activates, this node creates an instance point. The instance points, on the other hand, are fed to the
Pyro Source Instance operator. When a spawn point activates, this node creates an instance point. The instance points, on the other hand, are fed to the ![]() Pyro Solver. The
Pyro Solver. The ![]() Pyro Source Instance node can register rule overrides for the point attributes. It is, for example, possible to scale
Pyro Source Instance node can register rule overrides for the point attributes. It is, for example, possible to scale temperature within a random minimum-maximum range and create hotter and cooler sources.
Below you find a step-by-step guide for the creation of an advanced pyro instancing setup. As in the basic pyro instancing workflow, everything starts with a source library.
Creating the library 
The library contains all sources. A source can be a preconfigured tool or a custom network. The common basis is that each source has to be wired to a ![]() Pyro Source Pack. This node creates a packed source and contains the rules for the volumes, e.g.
Pyro Source Pack. This node creates a packed source and contains the rules for the volumes, e.g. density and temperature.
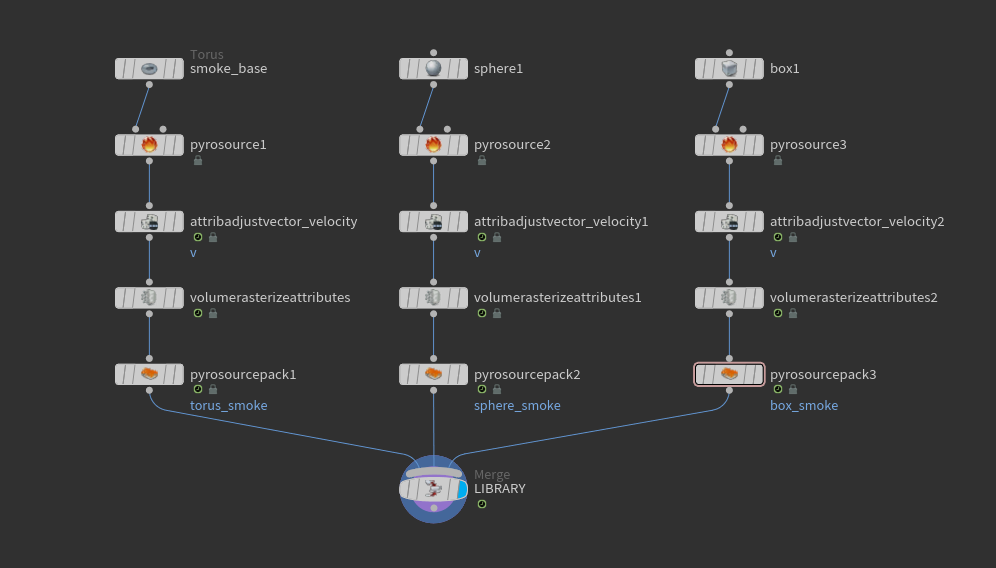
Let’s say you have three sources with different shapes (torus, box, sphere), based on the ![]() Pyro Configure Billowy Smoke tool. The network chains are connected to individual Pyro Source Packs, named
Pyro Configure Billowy Smoke tool. The network chains are connected to individual Pyro Source Packs, named torus_smoke, sphere_smoke and box_smoke. As shown below, these packed source sets are then merged into a LIBRARY with a ![]() Merge node.
Merge node.
Note
If you're not sure how to create the library’s smoke sources, please follow the steps in the Packed source sets library section of the previous chapter. The setup there can be used for this workflow.
Note
You can keep the original ![]() Pyro Solver that comes with the
Pyro Solver that comes with the ![]() Pyro Configure Billowy Smoke tool. Or you create a new solver later.
Pyro Configure Billowy Smoke tool. Or you create a new solver later.
-
Add a downstream
 Cache node to the
 LIBRARY. The Cache saves the results if a certain frame was already encountered. Instead of recooking the library, the Pyro Solver can pull the appropriate frame from the cache when it’s needed again. This will speed up the simulation, especially with expensive source setups.
Creating the Pyro Spawn Sources 
There are three packed sources inside the LIBRARY, so you need at least three ![]() Pyro Spawn Sources nodes if you want to use each element. If you want to use a packed source multiple times, e.g. with rule overrides, you need one more
Pyro Spawn Sources nodes if you want to use each element. If you want to use a packed source multiple times, e.g. with rule overrides, you need one more ![]() Pyro Spawn Sources node per changed source.
Pyro Spawn Sources node per changed source.
-
Create a
 Grid node. The grid defines the area where the sources are scattered.
 -
Add one
 Scatter node per packed source - here you need three Scatter operators.
 -
Connect the Grid’s output to the inputs of the Scatter nodes.
-
For the different Force Total Count parameters enter
5,3and4. -
Add three
 Pyro Spawn Sources nodes and wire their inputs to the outputs of the Scatter nodes.
 -
For the Source Name parameters, enter
torus_smoke,sphere_smokeandbox_smoke- names of the packed source sets. -
Add a
 Merge node, and connect it with the outputs of the Pyro Spawn Source nodes.
Creating the Pyro Source Instance 
Up to this point, the setup creates the spawn points with all attributes. When the simulation reaches the Start Frame, the source is activated. To create the associated instance points, do the following.
-
Add a downstream
 Pyro Source Instance node.
 -
Connect the Merge node’s output to the first input.
-
Wire the
LIBRARYnode’s output to the second input. -
If there’s no
 Pyro Solver, create one and customize it to your liking. Otherwise, use the existing solver operator. Connect the solver’s first input to the Pyro Source Instance node’s output.
The result so far could look similar to the video below.
Adjusting and randomizing attributes 
As shown in the video above, smoke emission stops after a few frames. This happens because each spawn point is set to advance through its packed set’s animation range at normal speed. Once this frame range is exhausted (and it’s set to frames 1-12 by default on the ![]() Pyro Source Pack SOP), the sourcing stops. For explosions or fireballs, a limited range is desirable, but for smoke you might want to have continuous emission over the entire frame range.
Pyro Source Pack SOP), the sourcing stops. For explosions or fireballs, a limited range is desirable, but for smoke you might want to have continuous emission over the entire frame range.
Another detail of the above simulation is that sources of the same type all start at once.
Providing control over a wide variety of attributes is one of the big advantages of spawn points. You can see spawn points as a recipe for instancing sources: you set the conditions in the form of attributes. With startframe and endframe you tell the solver when to apply this recipe. This doesn’t necessarily mean that sourcing happens within the given frame range, but it can not happen outside that range.
The sourcing begins on startframe using the startoffset as the offset. For each frame advanced beyond startframe, frame offset of the instance point is increased by sourcespeed. To get continuous emission, we can apply one of the following changes.
-
Select the
Pyro Spawn Sources nodes and set the Source Speed to 0. This will use the exact same geometry for sourcing on all simulation frames. -
Instead of adjusting Source Speed, enable Loop Length. This will repeat the same sequence (of the given length) for sourcing purposes. Unlike setting Source Speed to
0, this approach will still use a different frame of the packed source set for each simulation frame.
To randomize startframe follow these steps.
-
Add three
 Attribute Adjust Float nodes - one for each Pyro Spawn Source.
 -
Insert the new nodes between Pyro Spawn Sources and the Merge.
-
Select all Attribute Adjust Float nodes.
-
Under Attribute Name enter
startframe. -
From the Pattern Type dropdown, choose Random.
-
Set Range Values to Min/Max.
-
Define values for Min Value and Max Value, for example
1and25. -
Enter a different Seed value for each Attribute Adjust Float.
The new setup, but with different Frame Range and startframe values:
Rule overrides 
With rule overrides you can manipulate the packed source’s merging operations. A good example is scale of density, which affects transparency of injected smoke. The following steps will adjust the rules to make smoke added by sphere_smoke very thick, while making box_smoke barely visible.
-
Go to the
Pyro Solver’s Look tab and set Smoke ▸ Density to 1. This is not mandatory, but provides better visibility. -
On the
Pyro Spawn Sources node for sphere_smoke, click the button by Rule Overrides.
 -
Set Target Field to
density. -
Set Property to Scale. Effective smoke density during sourcing will now be scaled by the value of Multiplier.
-
Set Multiplier to
10. -
Repeat the above steps on the
Pyro Spawn Sources node for box_smoke. Set its Multiplier to0.1.
Note that we did not touch rules embedded on the packed source sets, but individually adjusted them before their transfer to the instance points. This is the intended approach to tweaking merging operations, for the library should be treated as immutable during instancing.
By interfacing with rule overrides on ![]() Pyro Spawn Sources in the example setup, we ensured that all instances of the same type are identical. You can also register overrides on the
Pyro Spawn Sources in the example setup, we ensured that all instances of the same type are identical. You can also register overrides on the ![]() Pyro Source Instance SOP that are driven by point attributes. This method allows you to quickly introduce random variations among instances.
Pyro Source Instance SOP that are driven by point attributes. This method allows you to quickly introduce random variations among instances.
-
In the Pyro Source Instance node, go to Overrides and click
to add a new rule. -
For Target Field enter
temperature. -
Set Property to Scale.
-
Under Attribute, enter
temperature_scale. -
Click the
 icon to create an upstream Attribute Adjust Float node, named
 adjust_temperature_scale. -
Select the new Attribute Adjust Float.
-
For Min Value, enter
0and for Max Value, enter4.
When you simulate, you can see that the smoke puffs rise at different rates.