| On this page |
|
Sourcing 
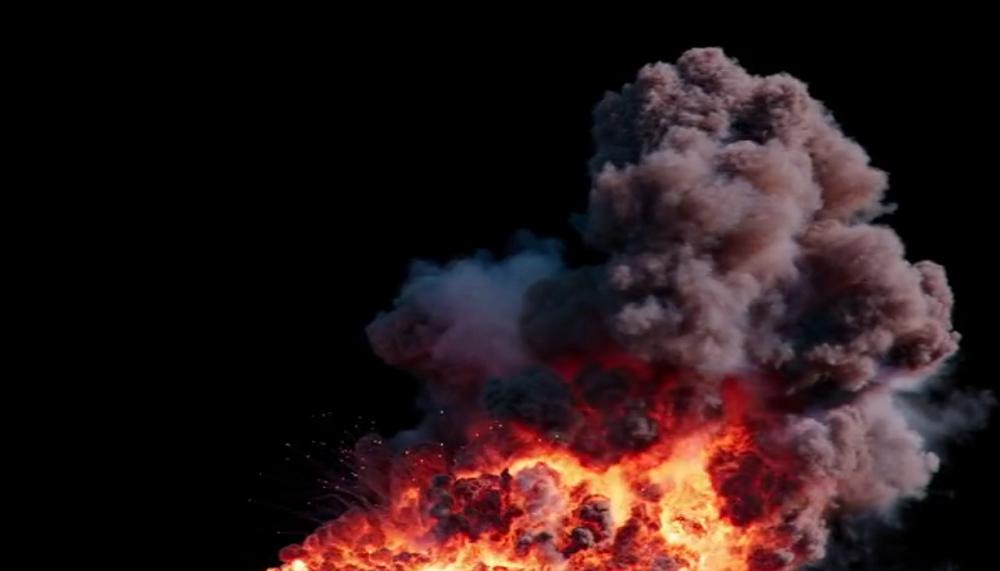
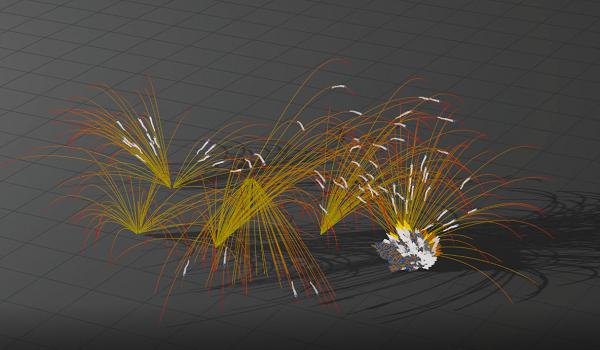
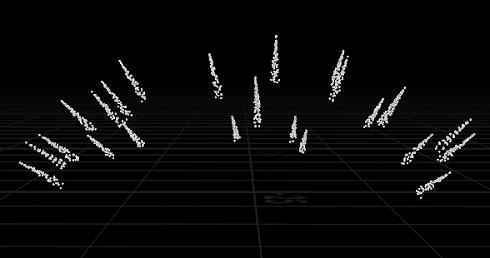
The ![]() Pyro Burst Source node creates the sourcing for the core of the explosion and lets you shape how the explosion will look. You can either choose an core point, or if no point is selected, it will create a point as the source. It will then create cone shaped trails from the center of the explosion outwards.
Pyro Burst Source node creates the sourcing for the core of the explosion and lets you shape how the explosion will look. You can either choose an core point, or if no point is selected, it will create a point as the source. It will then create cone shaped trails from the center of the explosion outwards.
Note
Pyro source parameters are controlled by attributes, so the input points should not be animated.
| To... | Do this |
|---|---|
|
Set how large to make the explosion |
Increase or decrease the Initial Size parameter on the Burst Shape tab. |
|
Change the direction of the explosion |
Modify the x/y/z Direction parameter on the Burst Shape tab. |
|
Add/Remove the amount of trails in the explosion |
Increase or decrease the Number of Trailings parameter on the Burst Shape tab. |
|
Change the particle scale |
Increase or decrease the Trailing Separation parameter on the Burst Shape tab. |
|
Postpone when a burst will occur |
Set the Start Frame on the Burst Animation tab. It will start at frame 1 by default. |
|
Create multiple bursts |
Use an
|
|
Randomize the size and shape of multiple bursts |
|
|
Control the size and shape of the bursts |
Press the Note You could alternatively use an |
|
Control the expansion and duration of the explosion |
Use the controls on the Burst Animation tab. The Expansion Over Duration Ramp controls when the explosion moves fast and slow. For example, it can start out slow and then move fast, or vice versa. |
Explosion types 
-
Single explosion:
-
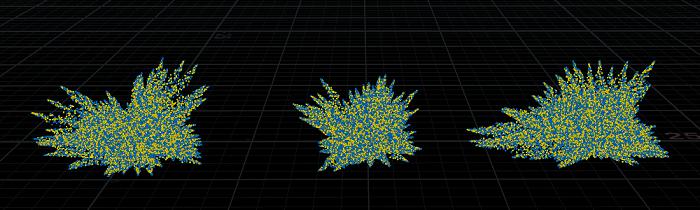
Single burst method uses a single input point to generate a burst. This can be used for a single fireball or a smaller explosion.

-
Multi burst method uses multiple input points to generate multiple bursts for a single explosion (3-4 points are recommended). The input points should be scattered in a relatively close distance to each other, and their
startframevalues should also differ by a couple of frames to prevent all of the bursts from triggering simultaneously.Compared to single burst, this method can create more interesting explosion shapes.

-
-
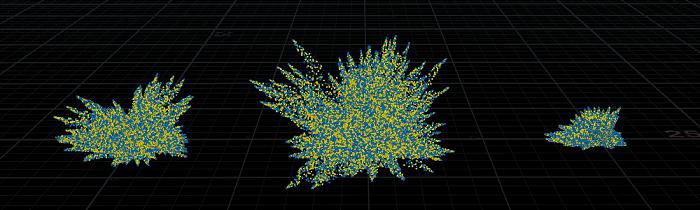
Consecutive explosions:
-
Consecutive multi burst method uses multiple clusters of points to represent each explosion. Each cluster should contain 3-4 points, same as the multi burst method. The
startframeattribute values for points inside a cluster should be very close to each other with only a couple of frame difference, while the averagestartframevalue for each cluster can vary to time the explosions. In this case, you may want to run each explosion as a separate pyro simulation.
-
Burst components 
A burst is made of replicated clusters of points or what we call burst components. Each burst component represents a source attribute for pyro simulations. For each component, one of the following source attributes can be selected, which creates the corresponding point attribute.

-
Density (
density), represented as grey color. -
Temperature (
temperature), represented as blue color. -
Divergence (
divergence), represented as orange color. -
Burn (
burn), represented as yellow color. -
Color (
Cd), which you determine. -
Alpha (
Alpha), represented by purple color.
The output of this node will be a mix of burst components, each responsible for sourcing its own specified attribute. These attributes should be rasterized into volumes using the ![]() Volume Rasterize Attributes SOP, at which point they can be sourced into a pyro simulation. The Source Attribute (
Volume Rasterize Attributes SOP, at which point they can be sourced into a pyro simulation. The Source Attribute (source_name by default) is created on points to ensure that each component only contributes to rasterization of its own attribute. For example, the temperature attribute will be set to 0 for points from the burn component, so using these burn points during temperature rasterization would lower the values in the final source volume.
The velocity (v) attribute is a special exception. By default, v is appended to the Source Attribute of each point, signaling that all points should be used when rasterizing the velocity field. You can use Cull Velocity in the Quick Setups menu if you prefer to have only one burst component contribute to velocity rasterization.
Note
Prefix Attribute Name provides a way to prefix the source attribute’s name with burst_. This is useful for differentiating between sources created by this node and the ![]() Pyro Trail Source SOP.
Pyro Trail Source SOP.
Tip
Run the Source Volume option from the Quick Setups menu to quickly create a ![]() Volume Rasterize Attributes node that is automatically appended and updated based on the parameters on this node.
Volume Rasterize Attributes node that is automatically appended and updated based on the parameters on this node.
Simple explosion workflow 
Setting up explosions is similar to setting up sparse pyro simulations.
-
Create a source using the
 Pyro Burst Source node.
 -
Use the parameters on the
Pyro Burst Source node to control the size, shape, direction, and look of your explosion. -
In the Quick Setups dropdown menu, select Source Volume. This will append a
 Volume Rasterize Attributes node, which takes the input points and creates VDBs for the float and vector attributes. You will see that the
 burn,temperature, andvattributes that were created by the source node are automatically filled in the Attributes field.Note
The Quick Setups dropdown menu is recommended over manually appending a
Volume Rasterize Attributes node, because all of the setup work is done automatically. -
Append a
 Pyro Solver to create the smoke and flames.
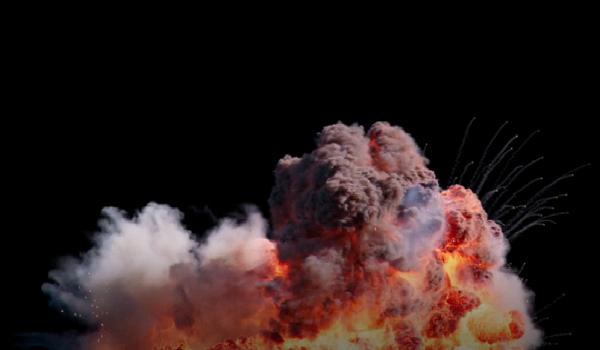
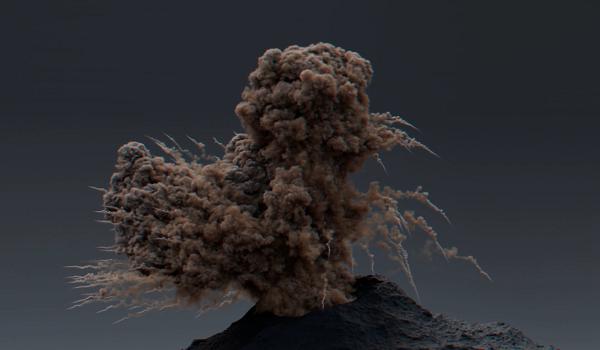
Adding debris to an explosion 
Choosing the Simulated Debris menu option from the Quick Setups dropdown on the ![]() Pyro Scatter from Burst node will automatically generate a small setup that emits debris flying out from the center of the explosion. The emitted debris are very simple geometries that can be replaced by your own, more detailed version. The pieces are then simulated using the
Pyro Scatter from Burst node will automatically generate a small setup that emits debris flying out from the center of the explosion. The emitted debris are very simple geometries that can be replaced by your own, more detailed version. The pieces are then simulated using the ![]() RBD Bullet Solver.
RBD Bullet Solver.
Adding sparks to an explosion 
Choosing the Simulated Sparks menu option from the Quick Setups dropdown on the ![]() Pyro Scatter from Burst node will generate a small setup that emits sparks flying out from the center of the explosion.
Pyro Scatter from Burst node will generate a small setup that emits sparks flying out from the center of the explosion.
Tutorial 
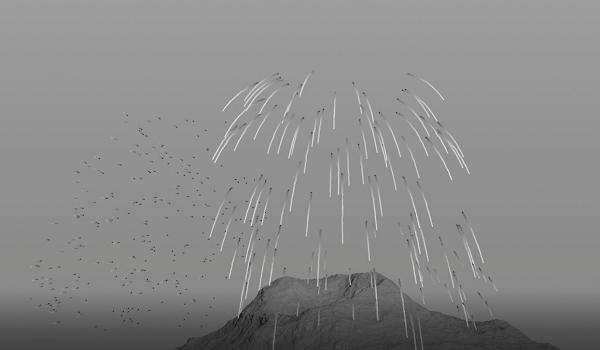
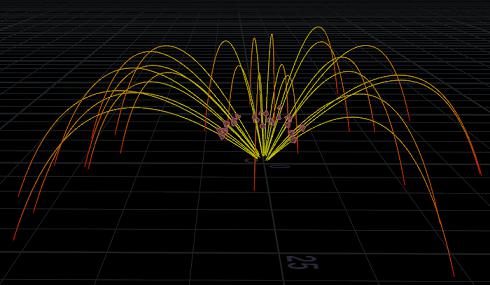
Trails 
Trail Path Shapes 
Trails can be differentiated based on the shape of their path.
-
Ballistic Trails are long lived trails that are pulled down by gravity, creating arced paths.

-
Straight Trails are short-lived trails that shoot out from the core of the explosion. These projectiles are ejected out of the blast with a force that exceeds gravity; therefore, they have no arc. Usually they are thin trails, with hundreds of particles shooting out at once.

Curl, spiral, and noise deformations can be applied on the generated paths to simulate spinning out trails. In some cases, the projectiles could shoot out on a spiral path, but as they move further away, the spiral dampens and the trail becomes a smoother arc. You can apply any deformation to the path curves following this node.

Tip
You can turn on Enable Trailing Noise to apply basic noise. This parameter is on the Trail Shape tab of the ![]() Pyro Trail Source SOP.
Pyro Trail Source SOP.
Trail Source Types 
-
The node allows you to generate trails around the input points in a spherical shape, from which the trails will be launched outward. To achieve this, set Shape to Sphere.

-
It can also generate trails along the direction of the burst (as set by Direction), which allows you to start trails from the mushroom cloud as it rises.
 Pyro Trail Path SOP will output such trails when Shape is set to Line.
Understanding trails 
There are two trail nodes that are often used together: ![]() Pyro Trail Path and
Pyro Trail Path and ![]() Pyro Trail Source.
Pyro Trail Source.
Tip
Typing Pyro Trail in the tab menu is a shortcut to put down both of these nodes, since they are often used together.
![]() Pyro Trail Path computes the ballistic trajectories of the projectiles that get thrown out of the explosion, which you can visualize by the curves. This node also lets you control the shape of the curves.
Pyro Trail Path computes the ballistic trajectories of the projectiles that get thrown out of the explosion, which you can visualize by the curves. This node also lets you control the shape of the curves.
| To... | Do this |
|---|---|
|
Set how many trails are created |
Increase or decrease the Number of Trails parameter on the Source tab. |
|
Postpone when a trails will be created |
Set the Start Frame on the Trail Generation tab. They will be created at frame 1 by default. You can also turn on the Offset per Point checkbox to vary the start times of the trails. |
|
Change the angle in which things are thrown |
Decrease the Azimuth Angle parameter on the Source tab. |
|
Make projectiles lose momentum quicker |
Increase the Drag parameter on the Trail Generation tab. This will increase wind resistance causing them not to travel as far. |
|
Add more momentum to the projectiles |
Increase the Mass parameter on the Trail Generation tab. This will make them heavier causing them to travel further. |
|
Change the length of the trails |
Increase or decrease the Trail Duration parameter on the Trail Generation tab. |
|
End trails when they hit the ground |
Turn on the Clip Below Height checkbox on the Trail Generation tab. |
![]() Pyro Trail Source uses the output of
Pyro Trail Source uses the output of ![]() Pyro Trail Path to generate the point sources that travel along the curves.
Pyro Trail Path to generate the point sources that travel along the curves.
| To... | Do this |
|---|---|
|
Control how many points are along a trajectory |
Increase or decrease the Length parameter on the Trail Shape tab. |
|
Change the thickness of the cone |
Increase or decrease the radius parameter on the Trail Shape tab. |
|
Control the profile of the cone |
Use the Radius Along Trailing ramp to manually shape the cone on the Trail Shape tab. |
Note
![]() Pyro Trail Path creates trails for every input point. Typically it’s only necessary to have one input point to generate the trails for an explosion. If you have multiple input points, you can use the Fuse Input Points dropdown to fuse all incoming points into one or fuse them by matching attribute values of a custom attribute.
Pyro Trail Path creates trails for every input point. Typically it’s only necessary to have one input point to generate the trails for an explosion. If you have multiple input points, you can use the Fuse Input Points dropdown to fuse all incoming points into one or fuse them by matching attribute values of a custom attribute.
Incorporating trails into your explosion 
There are two ways to incorporate trails into your explosion workflow. You can either merge the trail node stream before or after the ![]() Pyro Solver, depending whether or not you want them to interact with the simulation. If you merge the two streams before the solver, attributes such as velocity will be added during simulation. Merging the streams after the solver will result in more perfect looking (less distorted) trails, since any physics from the explosion won’t affect the paths.
Pyro Solver, depending whether or not you want them to interact with the simulation. If you merge the two streams before the solver, attributes such as velocity will be added during simulation. Merging the streams after the solver will result in more perfect looking (less distorted) trails, since any physics from the explosion won’t affect the paths.
Trail Components 
A trail is made of a replicated set of points or what we call trail components. Each trail component represents a source attribute for pyro simulations. For each component, one of the following source attributes can be selected, which creates the corresponding point attributes.

-
Density (
density), represented as grey color. -
Temperature (
temperature), represented as blue color. -
Divergence (
divergence), represented as orange color. -
Burn (
burn), represented as yellow color. -
Color (
Cd), which you determine. -
Alpha (
Alpha), represented by purple color.
The output of this node will be a mix of trail components, each responsible for
capturing its own specified attribute. These attributes should be rasterized
into volumes using the
![]() Volume Rasterize Attributes SOP, at which
point they can be sourced into a pyro simulation or rendered directly as
secondary effects. The Source Attribute (
Volume Rasterize Attributes SOP, at which
point they can be sourced into a pyro simulation or rendered directly as
secondary effects. The Source Attribute (source_name by default) is
created on points to ensure that each component only contributes to
rasterization of its own attribute. For example, the temperature attribute
will be set to 0 for points from the burn component, so using these burn
points during temperature rasterization would lower the values in the final
volume.
The velocity (v) attribute is a special exception. By default, v is
appended to the Source Attribute of each point, signaling that all points
should be used when rasterizing the velocity field. You can use
Cull Velocity in the Quick Setups menu if you prefer to have only one
burst component contribute to velocity rasterization.
Note
Turn on Prefix Attribute Name to prefix the source attribute’s name with
trail_. This is useful for differentiating between sources created by this
node and the ![]() Pyro Burst Source SOP.
Pyro Burst Source SOP.
Tip
Run the Source Volume option from the Quick Setups menu to quickly
create a ![]() Volume Rasterize Attributes
node that is automatically appended and updated based on the parameters on
this node.
Volume Rasterize Attributes
node that is automatically appended and updated based on the parameters on
this node.
The rasterized volumes can be sourced into a pyro simulation or rendered directly as secondary effects.
Source Volume 
If you want the trails to interact with the explosion, you need to source the generated volumes into the pyro simulation. This way, smoke sourced by the trails can be pushed by the simulated explosion, and the projectile’s motion can pull puffs of smoke from the main blast. You can alternatively run a secondary simulation, which lets you capture the effect of the main explosion on trails, without the trails affecting the explosion.
Render Volume 
In many cases, especially when the explosion is in the background, you can forego simulating the trails and render them directly. In this case, turn on Scale Over Duration and Scale Along Trailing with Scale Further Using Age (found in the Trail Components tab). These options will fade the trails in various ways and make the volume more suitable for rendering.
Explosion shelf tools 
There are several out-of-the-box explosion shelf tools that let you create explosion networks for both SOPs and DOPs. The tools on the Simple FX shelf create simple SOP networks, and tools on the Sparse Pyro FX shelf create fully configured DOP networks.
Simple FX
|
Creates an explosion that can be fully simulated on the GPU. |
|
|
Creates a large rising and expanding explosion. |
|
|
Creates an aerial explosion. |
|
|
Creates a large ground explosion. |
|
|
Creates a visible blast from the muzzle of a firearm during shooting. |
|
|
Creates a large rising and expanding explosion with a ground shockwave. |
Sparse Pyro FX
|
Creates a large rising and expanding explosion. |
|
|
Creates an aerial explosion. |
|
|
Creates a large ground explosion. |
|
|
Creates a large rising and expanding explosion with a ground shockwave. |
Downloadable explosions 
The following are fully configured, production ready explosions using the latest Pyro Burst tools. They are all available for download from the SideFX Content Library.
Basic Fireball 
Fully configured basic single burst fireball simulation, including basic shading and rendering setup. Download here.
Side Explosion 
Fully configured, complex, customized explosion. This file also includes a basic shading and rendering setup. Download here.
Multi-burst Fireball 
Fully configured basic multi-burst fireball simulation, including basic shading and rendering setup. Download here.
Ground Explosion 
Fully configured basic ground explosion simulation, including basic shading and rendering setup. Download here.
Simple Aerial Explosion 
Fully configured basic aerial explosion simulation, including basic shading and rendering setup. Download here.