| On this page |
Overview 
This pane shows the composed primitives on your stage. By default it shows output of the selected LOP node. This makes it easy to click around the network seeing how nodes affect the contents of the stage. It can also be made to follow the display flag, which is important for heavy production scenes.
Interactive changes you make in this pane (such as activating/deactivating prims, showing/hiding prims, and solo-ing) apply to the view override layer. These viewport changes are not saved to disk in USD files or rendered anywhere outside of the viewport. See below for more details.
Edits can be initiated from the scene graph tree, which will create LOP nodes to apply the changes. The viewport-only changes can also be moved to an Inline USD node, and become exportable.
Note
The Geometry Spreadsheet now shows the scene graph tree and scene graph details when looking at a LOP Network.
How to 
| To... | Do this |
|---|---|
|
Show an info window for a prim |
Hover over the prim in the tree and press ⌃ Ctrl + |
|
Show the info window for the current LOP node |
Click the |
|
View and manage collections and saved searches |
Click the stowbar at the bottom of the pane to show the Collections sub-pane. |
|
Save the currently selected prims as a saved selection |
|
|
Write a Houdini primitive selection rule and save it as a saved selection |
In the main toolbar (at the top of the pane), click |
Toolbar 
Showing |
Controls what’s shown in the tree below. The “Composed scene graph” is the most useful, showing the result of composing all layers. You can also switch to one of the sublayers in the layer stack (in the selected node’s stage). The menu lists each layer by the name of the file it came from, or the Houdini node path of the LOP that generated it. If you view an un-composed layer, the tree does not expand references and payloads, since those composition arcs are only resolved on a fully composed stage. |
|
This menu contains items for saving/restoring the expansion state of the scene graph tree below. The expansion state is saved to the LOP Network node, and so to the Please read the Expansion states workflow guide for more information. |
|
This menu contains items for saving/restoring override states. Viewport overrides are the draw mode, active, display, and solo columns of the scene graph tree, which affect the display of the stage in the viewport. Like the expansion states, the override states are saved with the LOP Network. |
|
This menu provides high level control over the USD population mask, payload loading, and layer muting features. Before using the population mask or selective payload loading, the corresponding check boxes in this menu (Populate all Primitives and Load all Payloads) must be turned off. The Mute Layers option opens a Scene Graph Layers panel, in which individual layers can be muted (i.e. stop them from contributing opinions to the composed stage). Like the expansion state and viewport overrides, the payload, population mask, and layer muting information can be saved as a named block of data on the LOP Network and loaded back later. The Reset all Viewport Load Masks menu item clears all these masks, however it does not change the state of the payload and populate all checkboxes. If any load masks are set, the final menu item, “Create Configure Stage Node from Load Masks”, is enabled. It creates a new Configure Stage LOP node pre-populated with the muted layers and stage population masks currently set on the stage. Payload loading is not supported in the Configure Stage LOP currently, so this part of the mask is not transferred to the node. Unlike changes made in the scene graph tree, setting these states in the Configure Stage node will affect the cooking of the LOP Network, and the data that gets saved to disk or rendered with the USD and USD Render ROP nodes. Tip Houdini can show bounding boxes for unloaded payloads if you store the metadata ahead of time. See the |
|
Opens the parameter dialog for the current LOP Network. This button basically exists to provide access to the parameter dialog for the /stage LOP Network, which is normally not accessible through the UI in a way that would allow opening its parameter dialog. |
|
Open a pinned info window for the current LOP node. |
|
Opens a dialog to create a new saved selection rule. See the Collections sub-pane below for more information. |
|
Controls whether or not deactivated primitives show up in the scene graph tree. Children of deactivated primitives are never shown in the tree, but with this option disabled, even the top level deactivated prim isn’t visible. This means it cannot be activated in the tree interface, and deactivating a primitive using the activation column in the tree will make that primitive disappear. But sometimes it is convenient to hide primitives that are not contributing to the scene. |
|
Like the Show Inactive Primitives toggle, but for the visible state of the primitive. Again, this means that making a primitive invisible in the viewport using the visibility column will make the primitive disappear from the tree, making it impossible to make the primitive visible again. But sometimes it is best to have the scene graph tree only show what is also being shown in the viewport. |
|
Enable this option to show primitives that are not fully defined, but only exist as overrides. Often the existence of an override primitive on a composed stage is an indication of an error in the stage authoring (such as when a primitive definition is renamed, but the overrides are not updated to match). So this option can provide useful debugging information. At other times, you may wish to ignore such primitives, as they do not contribute anything visible to the scene. |
|
Class primitives normally (by convention) exist at the root of the scene graph tree. They do not contribute to the visible scene. They exist to be composed into other parts of the scene by reference, inherit, or specialize composition arcs. It can be useful to see them in the scene graph tree to ensure there are not unused class primitives, and to know which primitives can be composed elsewhere in the scene. But turning them off when not looking for them can make the scene graph tree smaller and easier to navigate. |
|
The Houdini Layer Info primitive is a special primitive, located at |
|
Menu with items to show or hide the different columns in the tree below. |
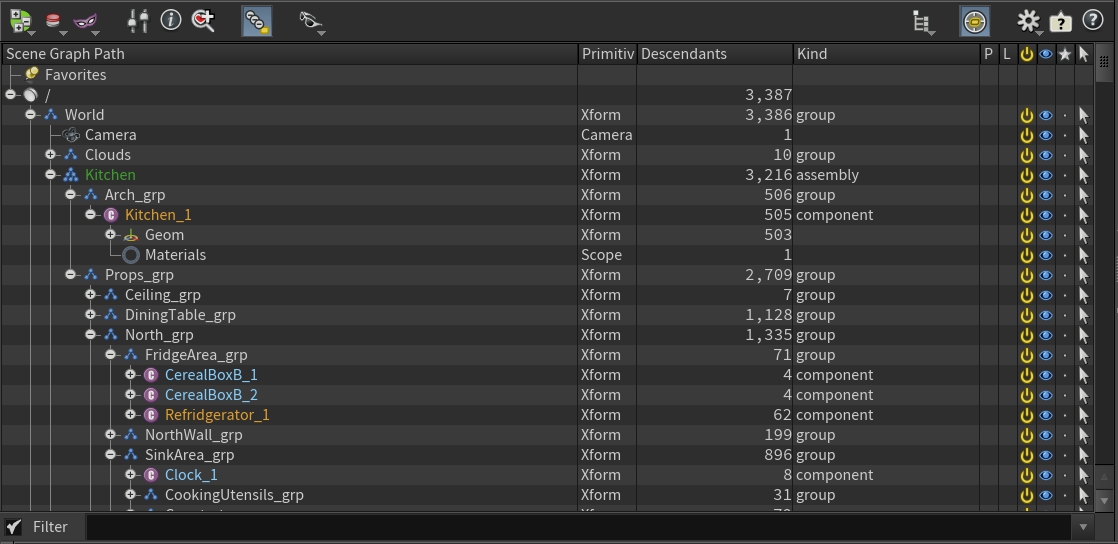
Tree 
Scene Graph Path
Each row represents a prim in the scene graph tree.

The icon shows the prim type, unless the prim has a kind, in which case the icon shows the kind.
The tree displays the prim name in different colors to indicate different states:
◼ Loaded Payload |
Loaded payloads have a bold, light orange look. |
◼ Unloaded Payload |
Unloaded payloads are dark orange, with a bold-italic style. When the viewport unloads a payload, the ◼ child prims keeps the unloaded color, but are italicized. |
◼ Instance Prims |
Instanceable prims have a light blue look. If a prim is instanceable and has payloads, it’s look will change: ◼ Instance, Loaded Payload keeps the instance color, but use the loaded text style. ◼ Instance, Unloaded Payload also keeps the instance color, but use the unloaded text style. |
◼ Instance Proxy |
Uneditable “instance proxy” prims under an Instanceable prim. When the viewport unloads an instance payload, the ◼ unloaded instance proxies are italicized.. |
◼ Other Composition Arc(s) |
When a prim has one or more non-payload composition arcs, such as inherits, reference, or specializes. |
◼ Inactive Prims |
Inactive prim essentially is a “deleted” primitive; however it can be made active, and USD will load that prim, along with any descendents. |
The tree can also display dot icons next to the names of primitives and their children, which have changes not originating from nodes:
|
Viewport-only overrides (such as a change to its visibility, draw mode or active state). |
|
Post layer overrides (see hou.LopPostLayers for details). |
|
Both viewport and post layer overrides. |
A Favorites folder can be populated either from the context menu on a primitive in the scene graph, or by dragging primitives from the scene graph into the Favorites folder. This folder provides a convenient location where commonly used primitives can always be accessed quickly. Primitives in the Favorites folder are merely shortcuts, not actually a separate scene graph, and so will also appear in the main scene graph tree. The contents of the Favorites folder are dictated by the pinnedprims parameter of the current LOP Network. The parameter must be an explicit list of primitives; patterns and wildcards are not supported.
Primitive Type
The primitive’s type name.
Variants
If the prim has any variants, this is a pop-up menu showing the list of “Variant set: selected name” items.
Kind
The kind for this prim, if any.
! Invalid Kind |
The authored kind is invalid. A common cause is invalid model kind hierarchy; which can be fixed with Configure Properties or Scene Doctor. |
Purpose
The render purpose set on this primitive. You can enable and disable various purpose tags in the viewport. Purposes are not extensible. The only possible values are default, render, proxy, and guide.
Material
The name of the material bound to this primitive. Hover the mouse over this column to see the full path.
↑ Inherited Material |
Alternative style where the material binding is a result of inheriting a direct binding on an ancestor primitive. |
Proxy Path
The path to this prim’s render proxy, if any.
(A primitive set to render purpose may have a proxyPrim relationship to a primitive with proxy purpose.)
Draw Mode
The computed draw mode for the primitive. Draw mode can only be set on primitives with a kind, and which are part of a valid Model Kind Hierarchy.
Changing the draw mode of a primitive also changes the draw mode of all descendants, unless you give them their own viewport overrides.
Changes to this column cause a red dot to appear in the menu, and on the modified primitive. This indicates that the primitive has a viewport-only override applied to it. Such overrides will not affect the USD saved to disk or rendered with a USD or USD Render ROP.
P (Populated)
Only meaningful if “Populate all primitives” is off. The population mask only affects the viewport, so all primitives are always visible in the scene graph tree even if they are not marked as “populated”.
When “populate all primitives” is off, this column will have one of four states.
|
The primitive is not populated (and therefore will not appear in the viewport). |
|
The primitive is not populated, but has a child primitive that is populated. |
|
The primitive is populated due to an ancestor being populated. |
|
This primitive has been explicitly populated. Populating a primitive implicitly populates all child primitives as well. |
You can click in this column to mark the primitive explicitly populated (![]() ), or if it’s already explicitly populated, to remove it from the list of explicitly populated prims.
), or if it’s already explicitly populated, to remove it from the list of explicitly populated prims.
L (Loaded)
Only meaningful if “Load all payloads” is off. The visual indicators are the same as the P (Populated) column, but indicate to whether payloads are loaded or not. Like the Populated column, this only affects the viewport.
As with the “populated” column, explicitly including a prim in the “loaded” set also includes all child primitives in the “loaded” set.
Active
Click the icon in this column to switch the primitive between active and inactive (in the view override layer).
|
Active |
|
Deactivated. |
A primitive that is not active will not have any effect on the scene as it appears in the viewport. A deactivated primitive does not report having any child primitives. Unlike the populated and loaded flags, changes to this column do affect the scene graph tree, hiding (or exposing) any child primitives, depending on the setting.
Changes to this column cause a red dot to appear next to the icon, and on the modified primitive. This indicates that the primitive has a viewport-only override applied to it. Such overrides will not affect the USD saved to disk or rendered with a USD or USD Render ROP.
Visible
Click the icon in this column to switch the primitive’s visibility between “inherit” and “hidden” (in the view override layer).
|
Visible |
|
Hidden. |
A primitive that is hidden will not appear in the viewport. The only two visibility states a prim can have are “inherit” and “hidden”, so all descendants of invisible primitives will also be invisible, and a child of an invisible primitive cannot be made visible.
Unlike the active state or a primitive, the visible state can be animated. The icon will indicate if the value for this primitive is animated (has more than one time sampled value). But clicking this column to change the visibility state of the primitive will override any animation as well, and the visibility will remain constant at the overridden value.
|
Visible (animated) |
|
Hidden (animated) |
Changes to this column cause a red dot to appear next to the icon, and on the modified primitive. This indicates that the primitive has a viewport-only override applied to it. Such overrides will not affect the USD saved to disk or rendered with a USD or USD Render ROP.
Solo
|
Nothing is solo |
|
Another prim is solo |
|
This prim is solo |
Soloing is applied independently to geometry and light primitives.
-
Primitives that are neither lights nor geometry will have no icon in this column.
-
Making a light solo will leave geometry primitives in the “nothing soloed” state.
-
Soloed lights are made active, while all other lights are made inactive.
-
Soloed geometry is made visible while all other geometry is made invisible.
This means that soling a single primitive may result in overrides being set on a large number of primitives, all of which will display with red dots. Also, like visibility and activation, soloing an ancestor primitive will make its children visible (for geometry) or active (for lights) as well.
When primitives are soloed, the display and active columns are blanked out, because the values of these columns are ignored when soling is applied. The display and active overrides are restored when soloing is disabled.
-
Click here to make this prim solo.
-
If you click here when the prim is already solo, nothing will be solo.
-
⌃ Ctrl-click here to add or remove the prim to/from the solo group.
Like the visible, active, and draw mode columns, soloing applies to the view override layer. Changes in this layer are not saved to disk in USD files or rendered.
Selectable
Click the icon in this column to toggle the primitive’s selectability (in the view override layer).
|
Selectable |
|
Not selectable. |
This flag affects whether the primitive can be selected in the viewport. All primitives can always be selected in the scene graph tree, which will set the viewport selection as well, regardless of this setting. This flag is useful when selecting primitives in the viewport, but where certain primitives are “background” primitives which are often picked up by a box selection, but are of no interest for the current operation.
Setting a primitive to be selectable or unselectable affects all descendant primitives, down to the next primitive in the hierarchy with an explicit setting for this flag. The selectability of a primitive can also be controlled with a Configure Primitive LOP.
Edit Selection Rule window 
-
In the main toolbar (at the top of the pane), click
 Show New Selection Rule Dialog to start a new rule.
 -
In the Edit Selection Rule window, type a primitive matching pattern in the Pattern field.
As you type, the windows shows primitives matching the pattern, and how long the search took.
If the scene (or your query) is extremely complex and the “live” search is too slow, you can turn off Refresh automatically. When the checkbox is off, you can click the
 Refresh button to update the results.
 -
Click Accept to save the search using the name in the Selection Rule field at the top.
-
As you type, the window shows a green checkmark for a valid query, or a warning icon if Houdini did not understand the query. If you finish the query and it still shows a warning icon, you can click the icon to show a message explaining why parsing the query failed.
-
The readout showing how long a search took can be very useful if you need to debug a slow selection rule in a very complex scene. For example, you can test how adding additional clauses to the search can make the rule faster or slower to run.
-
You can use this window to explore and try out primitive patterns without needing to save the pattern as a selection rule.
Collections sub-pane 
-
Click the
 menu at the top of the scene graph tree pane to show this sub-pane by itself, or with the scene graph.
 -
This sub-pane shows collections and saved selections.
Toolbar 
|
Saves the current selection in the scene graph tree as a saved selection. |
Collection Primitives |
Type a space-separated list of primitive paths to specify where to look for collection attributes to display in the tree below. |
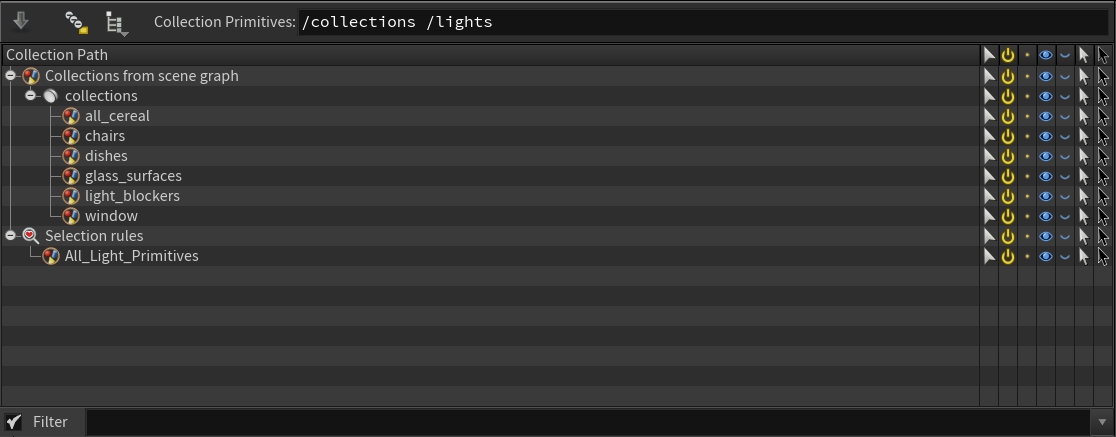
Collections from scene graph 
-
This tree lists any collections stored on the prims you specify in the Collection Primitives field on the toolbar.
-
Double-click a collection to select its contents in the scene graph tree.
Selection rules 
-
USD collections are flat lists of paths and simple patterns.
-
In Houdini you can use prim selection rule syntax which is much more powerful.
-
You can save selection rules here, and then use them in LOPs if they were a USD collection, using
%rule:‹selection_rule_name›. -
Selection rules are dynamic: they always “contain” the primitives that match the rule at this moment.
| To... | Do this |
|---|---|
|
Edit a selection rule |
Right-click the rule and choose Edit Pattern. |
|
Delete a selection rule |
|
|
Rename a selection rule |
Select the rule in the tree, then click its name to edit it. |
|
Select the prims matching a rule |
|
|
Hide/show/activate/deactivate all prims matching a rule |
|