| On this page |
Overview 
Houdini has several different methods for simulating liquids such as water, mud, lava, and so on, each with different strengths and weaknesses.
To simulate fluids such as smoke and flame, use pyro simulation.
See how to set up the viewport and desktop. We highly recommend you use the technical desktop (Windows ▸ Desktop ▸ Technical) so you have quick access to the tree view and details view.
Particle fluid simulations use particles to represent the fluid. For visualization and rendering, the particles are surfaced – that is, a surface is created based on the particles.
FLIP (particle + grid) fluids 
FLIP fluid solvers copy the particle’s velocities onto a grid, uses a project non-divergent step to calculate a new velocity field, then copies the new field back onto the particles.
Pros |
Avoids explosions and stray particle spray. The lower number of required sub-steps can make FLIP very fast. Allows new particles to be added to the system. Allows editing particles using POPs and SOPs. Unbounded, can flow freely throughout the scene. FLIP uses a container to calculate the velocities, but it is recreated at every frame. The container is mostly useful as a limit outside which stray particles will be deleted. |
Cons |
Uses a limit box. The limit box can be quite large however. It prevents a stray high-speed particle from forcing the solver to grow its fields so large that you run out of memory. |
Velocities |
Stored on the particles. |
Manipulate |
Forces. Full control using POPs and SOP point editing. |
Distribution |
Arbitrary slices. Works best with fast-flowing liquid. |
Usual sub-stepping |
1x. However, if a fast-moving liquid or a fast-moving obstacle need to collide accurately, you will still need to sub-step. |
Creating particle fluids 
-
The Particle Fluids shelf tab has several tools for creating particle fluids:
-
 FLIP Fluid From Object creates a blob of fluid in the shape of the selected geometry.
 -
 FLIP Tank creates a rectangular body of particle fluid inside an invisible box.
 -
 Sculpted Particle Fluid lets you select a piece of geometry representing a container and an intersecting piece of geometry representing the “water level”, and creates a body of particle fluid inside the container.
 -
 Emit Particle Fluid creates an emitter from selected geometry. You can choose an existing
-
-
The tools on the Populate Containers shelf tab. See [fluid sourcing|fluid_sour
-
You can mix and match creation methods, so you can create a “FLIP tank” full of liquid, and then create an emitter (selecting the tank as the fluid object to use) and have the emitted liquid mix and interact with the liquid in the tank.
-
With FLIP fluids, you can also use the particle network to add particles to the simulation with particle nodes.
Particle fluids how to 
| To... | Do this |
|---|---|
|
Create a blob of fluid from an object |
|
|
Create a particle fluid emitter |
Use the Or if you have an existing particle fluid object you want to add an emitter to, use the tools on the Populate Containers The Emit Particle Fluid tool on the Particle Fuids tab is essentially like the |
|
Add a sink |
|
|
Collide with other objects |
Any objects you merge (using the |
|
Create a quick particle fluid from a container object and a surface |
The |
|
Direct the motion of the fluid |
|
|
Render tank-style simulations seamlessly |
Turn on Distributed Pressure Solve on the Note This requires a lot of network bandwidth, and is not needed for flowing river-type simulations. |
Particle fluid networks 
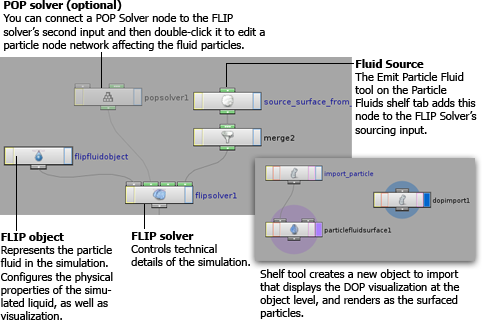
The FLIP fluid tools set up nodes in several different networks.
-
A DOP network with a FLIP fluid object and FLIP solver to simulate the fluid.
This node represents the simulated fluid. It has parameters for visualizing the liquid and changing its physical properties.
This has parameters for technical details of how to simulate the fluid.
The Emit Particle Fluid and Populate Containers tools set up SOPs to turn the source geometry into a volume. This node then imports the SOP volume and connects it to the FLIP solver’s fourth (“sourcing”) input.
See fluid sourcing for more information.
-
A new object at the Scene level for viewing and rendering the results of the simulation. One
 DOP Import node imports all fields for rendering, and another imports only fast display-related fields for display in the viewport.
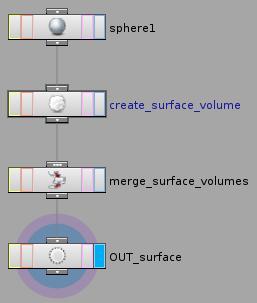
-
If you want to use particle nodes (POPs) to affect the fluid behavior, you can connect a
 POP Solver to the FLIP Solver’s second (“Particle velocity”) input. You can double-click this node to add particle nodes to the particle network inside. See directing fluids with POPs below.
Visualizing particle fluids 
Visualization
You can view the fluid particles as sprites (images that always face the camera, the default is a simple sphere), spheres (actual sphere geometry in the scene that is properly lit and shaded), or particles (drawn as points like regular particles).
Particle fluid resolution: particle separation 
To get a higher resolution fluid, decrease the Particle separation parameter on the fluid object. The default separation value is fairly high to give fast results when prototyping, but you’ll want to lower it for higher quality once you have an effect looking like what you want.
The Particle Separation is measured in Houdini scene units which correspond to meters in Houdini’s dynamics world. So a particle separation value of 0.1 is 10 cm. If you build your scene keeping in mind it is at meter scale, you will get more realistic results.
Tip
The mass of the particles is calculated as volume times density. So changing the particle separation (which controls density) will change the mass of each individual particle.
If you are using POP nodes or DOP forces to change the behavior of the fluid, you may want to turn on any Ignore mass parameters on the forces so the look doesn’t change if you change the particle separation.
To use forces without an Ignore mass, you might find it easier to just explicitly set the mass of every particle to 1 on creation.
The scale or feel of the fluid simulation is driven by the particle separation. Units help in keeping things straight and making sure your emitters and collision geometry are in meters is a terrific guide. A large scale effect with too much particle separation will look like a miniature (for example, in a waterfall, the water may shoot out off the edge as fast water would in a miniature waterfall model, not tumble down right away as it would in a giant waterfall). In that case you will need to decrease the separation to get the correct behavior and level of detail.
| See also |