| On this page |
Overview 
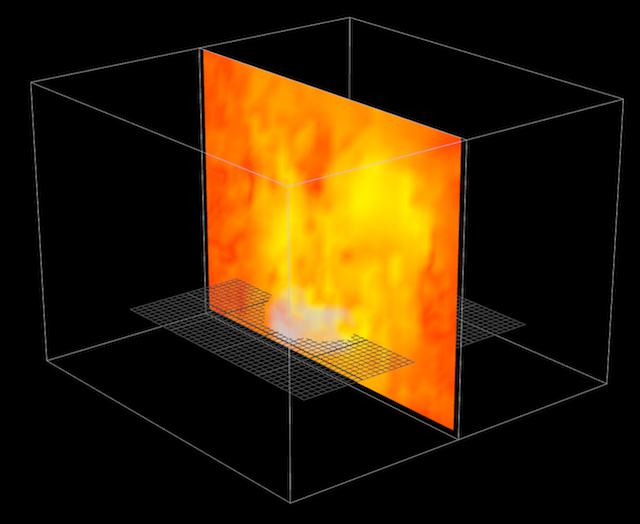
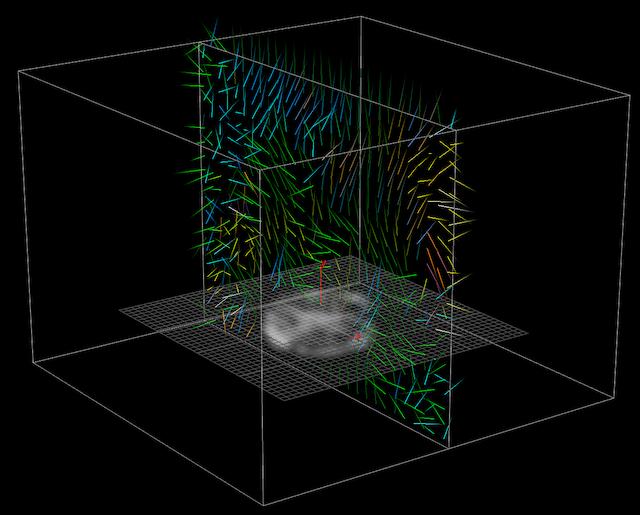
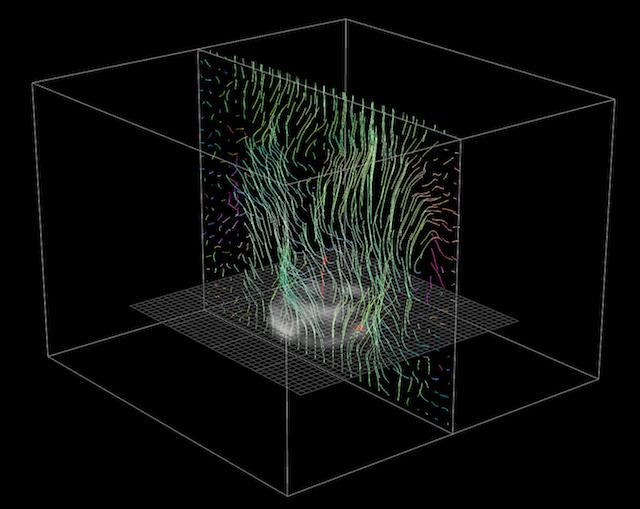
The volume visualizer lets you view the values in a cross-section of a volume, using color, vectors, or advection trails.
See visualizers for more information.
Visualizing pyro fields 
When visualizing pyro fields such as vel (velocity) and temperature, remember the following:
-
In the
pyro_importobject, put the display flag on theimport_pyrofieldsDOP I/O node.To avoid having to put all the settings back the way they were before rendering, you may prefer to duplicate the
pyro_importnode and put the display flag on the copy. -
in the
import_pyrofieldsnode’s parameters, on the Fields tab, make sure the field you want to visualize is imported, and set the Visualization for the field to something other than “Invisible”. -
You may want to turn off import of other fields.
Parameters 
Source group
You can specify up to three primitives to visualize, using group syntax. For a volume, this will usually be a field accessed using @name= syntax. (for example @name=vel or @name=temperature).
If you specify 2-3 scalar fields, you can visualize them as if they were a 2-3 component vector field. This might be useful in some cases to visualize the relationship between two scalar fields at the same time in a color map.
Orientation
Choose the orientation of the cross-section.
Offset
How far into the volume to display the cross-section. Drag the slider to move the cross-section through the volume.
Ghosting level
Controls the visibility of the volume. You can make the volume completely invisible to see only the visualiztion.
The number of levels of visibility available depend on the Antialias samples setting on the Display Options window's Effects tab. Better graphics cards can use a higher setting and get more possible visibility levels.
Style 
Visualize values as
How to display the voxel data in the cross section. Different styles have different controls.
You can visualize a scalar field using a color ramp, or a vector field as RGB, or convert a vector field to a ramp using various functions such as the magnitude of the vector.
Draws a line from the point based on a vector field’s direction and length.
Visualizes trails left by imaginary particles advected through a velocity field.
Style: Colors 
Color mapping
How to display scalar data as colors. Choose a preset color ramp, or choose “Custom” to get a ramp control.
Range
To map attribute values onto the ramp, Houdini needs to know the full range of possible values so it can scale that range onto the range of the ramp.
Auto
Looks at the actual values of the attribute in the visualized geometry and picks the minimum and maximum.
Min and Max
Allows you to manually specify min and max values. This can be useful when there’s a “natural” range of values larger than what’s currently in the geometry. You can also use a narrower range than what’s currently in the geometry as a way of highlighting values outside the range (see the Out of range values parameter).
Center and Width
Like Min and Max, except you specify a center value and the width of the range around that value.
Treat As Scalar
Convert vector attribute types (with more than one component) to a single value. This enables a menu for choosing how to convert the values.
Using
How to convert multi-component values to a single number, when Treat as scalar is on.
Component
Pick one of the components.
Component Abs.
Pick one of the components, and use its absolute value.
Component Sum
Sum up the component values.
Component Abs. Sum
Sum up the absolute values of the components.
Length
Use the length of the vector.
Length Squared
Use the square of the length of the vector.
Dot Product
Use the dot product of the vector with a given vector. This may be useful for measuring deviance from a certain direction.
Text labels 
Show values as text
Draw the sampled values as text on the cross-section. This can quickly become unreadable for dense grids, so you can use the Visibility setting to only show values around the mouse pointer.
Color
Draw the values in this color.
Font size
The relative size of the values in the viewport.
Visibility
Whether to show all values, only the value under the mouse pointer, or all values within a certain radius of the mouse pointer.
Style: Vectors 
Length Scale
Allows you to scale the lines length up or down. This lets you make long lines shorter to reduce clutter, or make short lines longer to be more visible.
Normalize vectors
Normalize the values to the 0-1 range for display.
Show Arrow Tips
Draw a small barb at the end of each line.
Coloring
How to color the lines representing the vectors.
Fixed color
All quills have the same color.
Vector values
Use raw vector values as RGB.
Vector directions
Normalize vectors, then scale and offset to the center of the color cube. This makes direction vectors visible as color regardless of magnitude and sign.
Style: Trails 
Direction
Whether to advect the imaginary particles forward or backward through the velocity field.
Duration
How many “time steps” to advect the particles for. Increase this value to get longer trails. (This value has an arbitrary unit, it is not related to playback time or simulation timesteps.)
Per trail samples
How many timesteps to take within the Duration. Increase this to get higher-resolution trails.
Coloring
How to color the trails. (This color is computed at each step along the trail, so trails may change color along their length.)
Fixed color
All trails use the same color.
Vector values
Use raw vector values as RGB.
Vector directions
Normalize vectors, then scale and offset to the center of the color cube. This makes direction vectors visible as color regardless of magnitude and sign.
Sampling 
Sampling rate
A percentage of the original volume resolution to sample at. This lets you sample at a low resolution to speed up visualization of a high-res volume, or oversample to see interpolation. For example, 1 samples at the full resolution of the volume, 0.5 samples at half the resolution of the volume.
Sampling grid shift
An offset between the sampling grid and the actual volume’s grid. Values less than 0 or greater than 1 will wrap around.
Snap slicing plane to sampling grid
When this is on, You can only move the cross-section Offset to positions on the sampling grid. When this is off, you can see interpolated sample values between grid positions.
Component order
Lets you shuffle the mapping between components in the field and RGB/XYZ in the visualization. This might be useful to change the direction of quills to make them easier to see, or change colors around to a more contrasty palette.
Display sampling grid
Draws lines on the cross-section to make the sampling grid clearer.
Extraction 
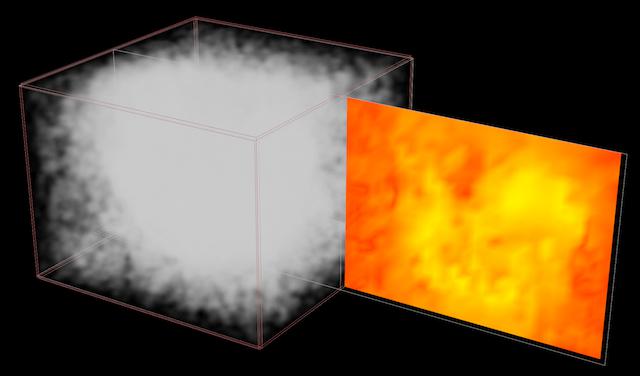
Enable extraction
Moves the cross section away from its actual position inside the volume, to make it easier to see the visualization and the volume at the same time.
Translate
Moves the cross-section. Values are multiples of the volume size in each direction, so a value of -1 or 1 will move the cross-section next to the volume.
Rotate
Rotates the cross-section.
Uniform scale
Scales the cross-section.
Transform extract relative to slicing plane
Makes the values in the Translate and Rotate fields relative to the current Orientation of the cross-section.