| On this page |

Interface improvements 
-
Lighting buttons/icons on the right side of the viewport have more functionality, e.g. for inspecting certain technical aspects of a scene. Lighting artists can now see where light might come from or why a light doesn’t appear in an AOV.
The buttons are also aware of the chosen render delegate and remembers the last state. Lets say, for example, you have chosen Karma XPU with Headlight Only. Then you switch to Karma CPU with and turn on Dome Light Only. When you toggle between both, the appropriate light will be turned on automatically.
-
 Disable Lighting lets you turn off lighting completely, e.g. for inspecting emissive materials.
 -
 Headlight Only disables any light in a scene and exclusively uses a default headlight. A submenu lets you choose which lighting components you want to show.
 -
 Dome Light Only turns off any light in the a scene and exclusively uses a default dome light. A submenu lets you choose which lighting components you want to show.
 -
 Normal Lighting shows the scene’s light situation, created by the artist.
-
-
Improved
 Disable Materials. When turned on, materials don’t even appear in the viewport render anymore.
 -
Performance monitor with improved time tracking for prim patterns.
-
The Geometry Spreadsheet is more flexible. The UI now switches between Scene Graph Tree and Geometry Spreadsheet, depending on whether you're working in LOPs or SOPs, e.g. a
 SOP Modify LOP. When you dive inside the SOP Modify and turn on Hide Other Objects, then you will be able to work in the SOP version of the USD scene without recooking.
You can still add a Scene Graph Tree pane and pin it if you want to keep it while seeing the Geometry Spreadsheet for SOPs.
-
A new
 Collection and primitive tree configuration button on the Scene Graph Tree lets you decide what UI elements to show. This avoids collapsing and UI changes when clicking UI dividers. The options are
-
Show only primitive tree
-
Show primitive and collection trees
-
Show only collection tree
-
-
Added Karma Physical Sky to the LOP Lights & Cameras shelf.
-
Improvements on the Scene Graph Tree.
-
The Filter input field is always visible at the bottom of pane.
-
You can now see different headings when a filter is applied.
-
The
Collections subpane is no longer collapsible. Now the button represents a mode that lets you display the scene graph, collections, or both. -
The Collections button can also display a collection-centric view of the scene instead of a primitive-centric view.
-
Scene Graph Layers can now display the Scene Graph PrimSpecs and VariantSpecs of each SdfLayer, as well as AttribSpecs.
-
-
Improved Render Gallery.
-
Each gallery is now associated with a network. When you right-click on a snapshot, a menu appears. From the menu, choose Revert Network to Snapshot to go back to network that was used for taking the snapshot. This convenient for tweaking lights and materials.
-
You can now rename snapshots.
-
When you take a snapshot, the Render Gallery now captures all AOVs, not just the AOV currently displayed in the viewport.
-
The Render Gallery now properly captures snapshots and generates thumbnails from viewport images with non-square pixel aspect ratios.
-
-
A new
 Show/Hide snapshot strip icon opens a limited version of the Render Gallery in the viewport with a gallery strip. You can find the button in the lower left corner of the viewport. The fully-featured Render Gallery is still available as a pane from New Pane Tab Type ▸ Solaris ▸ Render Gallery.
-
When you click the button, a
 Snap button appears. This button just takes a snapshot. When you right-click a snapshot, you have access to a menu with several options. The most interesting menu entry is Revert Network to this Snapshot. With this option you can go back to network that was used for taking the snapshot. This convenient for tweaking lights and materials.
 -
Removed the collapsible dividers between the Render Gallery and the viewport. The dividers were prone to accidental clicking when adjusting panels.
-
-
A new SolarisLookDev desktop is available from the Desktops menu.
-
Reorganized and more user-friendly Scene Graph menu. To open this menu, right-click on any entry in the Scene Graph tree. The menu is now subdivided into groups to make editing easier. For example, lookdev artists normally promote parameters to other users through interfaces. The newly structured menu helps to ease this task.
-
Edit Primitive with New Node adds and connects a new edit node automatically for the selected node.
-
Direct edits support inheriting, while indirect edits are isolated.
-
Jump to existing edits provides a list with nodes that were edited through the menu. Clicking on an entry lets you directly jump to the appropriate node.
-
-
A new Editor Nodes tab in the Geometry Spreadsheet pane contains all nodes that have been edited in the current session. Right-click on an entry and choose Jump to Node to directly go to the node and see its parameters without searching the entire network.
-
The
Show layer details as tree button is now located on the Scene Graph Layers pane. When you click the button, you can see a layer’s specs and all details for deep debugging of USD scenes.
Render stats 
Houdini now has ways to visualize render statistics for in-progress and finished renders. See render stats for more information.
-
Click the
 button in the Render Gallery or in MPlay to the render stats sidebar, containing information such as memory usage, time to first pixel, shader calls, and many more.
-
The
renderstatsreportutility generates an HTML render report that lists statistics extracted from a rendered EXR file.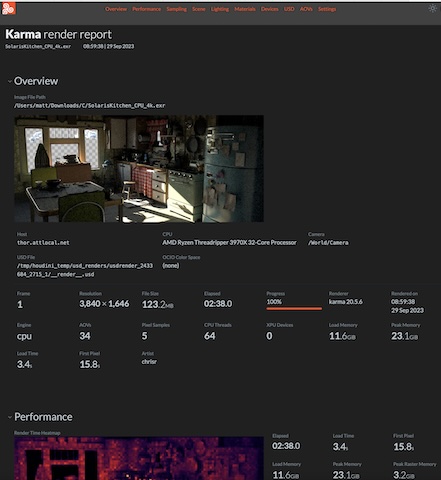
-
The
renderstatsoverlayutility generates a (possibly resized) JPG or PNG with render stats burned into it.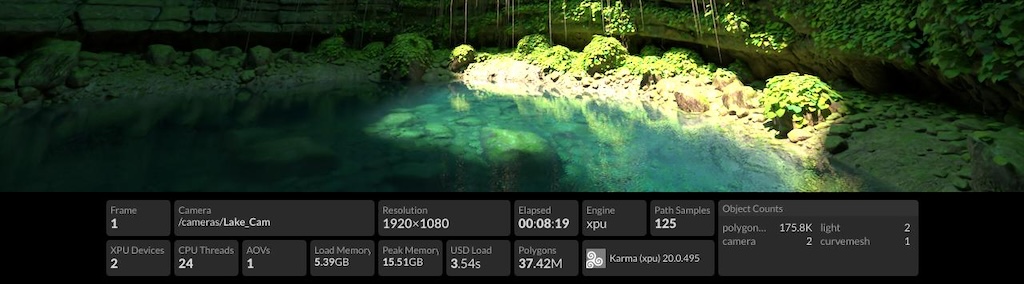
New nodes 
-
New
 Merge Point Instancers LOP. In a point instancer prim, each point in a geometry is replaced at view or render time by an instance of the geometry of one of the prims with a “prototype” relationship to the instancer. The LOP lets you efficiently merge multiple point instancers.
 -
The
 RBD Destruction LOP lets you transform pieces at render time through invoke graphs. This node basically is setting up a render-time procedural to do the Transform Pieces setup. This way it only needs to store the rest positions of the mesh and the points representing the animated transforms of the pieces. This results in a smaller footprint on disk.
 -
A new
 Geometry Clip Sequence eases and accelerates the task of storing value clips. Value clips allow you to split large data across multiple files. This node should be your first choice when working with value clips.
Node improvements 
-
The
 Material Library LOP now provides a filtered Tab menu. The filtered menu is focused on specific Material Builders/Subnets for Karma, Material X and VOPs. This makes the initial tab menu far less imposing, and makes the VOP representation more closely follow what happens in USD.
 -
The
 USD ROP node’s Files to Save parameter now affects the saving of volume files generated by a save operation as well as USD files.
 -
The
 USD Render ROP now deletes both temporary USD and VDB files post-render, rather than just USD files.
 -
When the
 Duplicate LOP creates collections with duplicate names, the node now creates a collection from all requested contents. In previous versions, contents were only created from the “last” request.
 -
The
 Attribute VOP LOP and
  Attribute Wrangle LOP now have multi-frame and subframe sampling parameters, like the
  Edit Properties LOP and
  Transform LOP. Only operations in the VEX code that set attributes actually get applied to the stage for any but the first time sample.
USD lets you author time-sampled values. Usually, Houdini cooks these when a frame-change happens, but this can severely increase performance in LOPs. The Sampling Behavior parameter addresses this performance drop: the node can cook once, but author a range of time-samples in a single cook.
-
 Merge LOP performance improvements.
 -
The
 Material Linker LOP now defaults to direct bindings, rather than collection-based binding. It also supports referencing materials from catalogs.
 -
 Value Clip LOP simplifies storing data sets in separate files (so-called value clips).
-
The
 Test Geometry: Shaderball LOP now uses the new USD shader ball by default along with some material/texture map fixes. Note that the legacy shader ball is still available.
-
The
 Sublayer LOP now has collapsible sections, a Load Payloads checkbox, the file path is visible, and rarely used parameters are hidden.
 -
The
 Configure Primitive LOP grew a lot and now has collapsible sections and a simplified UI.
 -
The [
 Camera LOP provides new viewport editing modes. With ⇧ Shift + A you can change F-Stop and ⇧ Shift + E lets you adjust Exposure. You can change both values with the
  .
. -
Support for UNC paths for foreground and background images in the
Camera LOP. -
The
 Karma Cryptomatte LOP now creates render vars as
 float3instead ofcolor3f.
Rendering 
-
Karma AOV 2.0 provides a streamlined workflow for the creation of AOVs from materials. This workflow no longer requires accessory nodes and the Karma AOV VOP is directly connected to an input of the
Material_Outputs_and_AOVs Subnet Output VOP.
By default the Karma AOV creates a RenderVar that is then added to the materials branch of the Scene Graph Tree, but also referenced to the render products branch. If the
 Karma Render Settings LOP “sees” any AOVs or RenderVars, they're added automatically. Since AOVs are now added as outputs, you can connect the Karma AOV LOP’s
 inputto any valid node and the RenderVars will be updated.Note that the old 1.0 workflow, available in Houdini 19.5 and earlier, is still available for compatibility reasons, but no longer recommended.
Miscellaneous 
-
SOP point/primitive attributes on USD Packed Prims are imported to USD as constant PrimVars.