| On this page |
Animation 
-
The animate state is a new viewer state that can display multiple characters in an animation scene and allow users to perform posing such as FK or IK for characters, interact with controls on characters, and create constraints between characters. Users can also apply functionality like physics-based motion and ragdoll to their animation within the animate state.
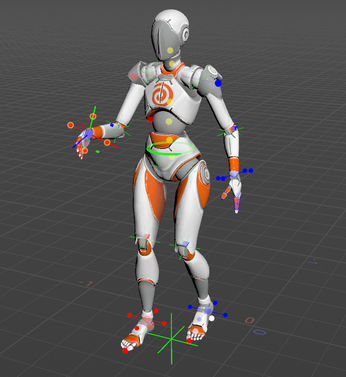
Character concept, model, rig and animation by Od Studios
-
Houdini’s new animation workflow allows users to add characters and animation to a scene, transfer animation to characters through motion retargeting, and play back scene animation.
-
Selection sets are used to organize character controls into groups, or sets, in the new animate state. These sets can then be used to select, hide, pin, and isolate groups of controls.
-
The animation toolbar is a customizable toolbar consisting of simple slider tools that help improve the animation workflow by quickly creating breakdown poses or easily applying modifications to animation controls or curves, such as key resampling and blending keys into an ease curve.
-
Animation bookmarks are markers on a single frame or range of frames on the playbar and animation editor timelines that help to organize and identify the different parts of your animation at a glance. You can create, edit, and view bookmarks on the playbar, in the bookmark editor, and in the animation editor.

-
On the playbar, there are updated keyboard shortcuts for moving between adjacent frames, keyframes, and animation bookmarks.
-
On the Attribute from Parameters SOP, the new Create Channel Primitives parameter creates channel primitives from animated parameters. Channel primitives are used by the APEX Scene Animate SOP to store animation. See the animate state for more information.
-
Control whether a channel affects the animation by using the new Mute Channel and Unmute Channel options on the channel list and parameter editor
 menus. Individual keys can also be muted on the
  dopesheet.
 -
Added support for KineFX characters to the character picker.
-
You can now move keyframes around in the animation editor graph view without having the cursor directly over the keyframe by using the
 (see the graph view for the different ways of moving keyframes around). The way the interacts with the graph can be set in the new Middle Mouse Interaction options.
 -
Curve pulling in the graph view allows you to drag Bezier and cubic segments to intuitively manipulate their shapes.
-
In the graph view,
 Show Selected Handles is now the default handle display mode (previously,
  Show All Handles was the default mode). Also, time marks (frame handles) are now undisplayed by default.
 -
In the graph view, slope and acceleration handles are now displayed on linear, ease, easein, and easeout segment functions (previously, they were only displayed for Bezier and cubic functions). See the Show Slopes and Acceleration option for more information.
-
In the graph view, the options for adding or reducing keyframes through curve resampling or refitting are now split into two selections in the graph view Edit menu - Bake Keyframes of Selected Segments and Reduce Keyframes of Selected Segments. In addition, the new Enable Preview option allows you to turn on a live preview of the changes being made to the keys.
-
When smoothing channels, keys are no longer resampled by default. The new Resample Keys option in the Smooth Keyframes on Selected Channels window (graph view Edit ▸ Smooth Selected Channels) allows you to choose whether or not keys are resampled.
-
The
 graph view performance is improved with the use of the GPU under the hood. If your video card/driver cannot support GPU acceleration, turn off the new environment variable HOUDINI_ANIM_ENABLE_GPU_ACCELERATION, which will revert to the previous method of using the CPU.
 -
In the animation editor
dopesheet, the keys that have been selected, and the keys that are currently being selected now have different colors. Other improvements have been made to the dopesheet key selection behavior.
Procedural rigging 
-
APEX (All-Purpose EXecution) is Houdini’s new graph evaluation framework, which allows users to build and run graph structures, and fetch their results. Within the KineFX rigging framework, graphs are used to represent the rig logic - the behavior of the rig. In APEX, users can procedurally build and assemble rig logic pieces, and choose to evaluate (execute) the graph at a later point in the network. This idea of delayed evaluation allows the rig logic and rig evaluation to be decoupled, resulting in significant performance improvements.
-
With the new APEX Autorig Component SOP, users can build a rig for an entire character using pre-built rig components that add functionality like an FK hierarchy, IK joints, and bone deformation. Users can also build their own components by constructing APEX graphs to represent rig logic, and using the new APEX Rigscript Component SOP to add their custom user-defined functionality to an existing character rig. This functionality can then be packaged up as a tool and be reused on multiple characters.
-
To support the new animation and rigging workflows, the packed character format is a way to define, bundle, and organize the data that is needed to create and animate one or more characters in the viewport.
-
The
 Merge Packed SOP now has an option for setting the new
 treatasfolderintrinsic, which indicates whether to treat the packed geometry primitive as a folder or element. -
The
 Joint Deform and
  Bone Deform SOPs now set the Other Attributes parameter to
 *by default, which deforms all “transforming” attributes. When the Deform Normals option is turned off, normals specified in Other Attributes are not deformed. Note that this may cause normals to no longer be deformed in pre-H20 hip files, because the Deform Normals option was previously ignored if normals were specified in Other Attributes. -
When a joint overlaps with all of its children, the new Orient Overlapping Joints parameter allows the
 Orient Joints SOP to find a descendant or ancestor joint that can be used as a reference for the orientation.
 -
Settings for the motion path handle can now be modified in the Houdini preferences.
Procedural motion & physics 
-
The use of physics-based motion simplifies and speeds up the creation of realistic-looking trajectories using the new
 Projectile Motion and
  Pendulum Motion SOPs.
 -
The new version of the ragdoll solver,
 Ragdoll Solver 2.0 SOP, offers a simpler and more flexible configuration of joint properties such as stiffness and motors, with support for matching the local or world transforms of the input animation. You can easily configure physical properties and external attachment constraints on the solver, when previously, this required additional nodes upstream (the Ragdoll Constraints SOP has been deprecated and is now part of the solver). There are significant improvements to the simulation performance, and the solver no longer cooks the input animation over its entire frame range up front, so animation changes made upstream are updated much faster on the solver.
 -
The new
 Ragdoll Collision Shapes 2.0 SOP provides a much more automated way of generating collison shapes for a skeleton. Collision shapes for an entire skeleton can be automatically generated from skin geometry or basic shapes with very few setup steps required from the user. There are also a set of new options for tweaking and manipulating the generated shapes.
-
The new
 Configure Joint Limits SOP is a dedicated node for configuring joint limits for various purposes including ragdoll RBD simulations,
  full-body inverse kinematics, and
  posing. It offers several quality-of-life improvements over the existing Configure Joints SOP, including the ability to set limits for multiple joints at once, options to visualize joints that are outside the configured limits, and copy and paste functionality of limits across multiple joints.
 -
When a MotionClip is connected as an input to the
 Smooth Motion SOP, the range parameters (Clip Range and Frame Range) are turned off, and the frame range defined by the MotionClip is used instead.
 -
On the
Smooth Motion SOP, the Custom Frame Range parameter default is now set to $FSTART/$FENDinstead of$RFSTART/$RFEND.$RFSTART/$RFENDhad caused unnecessary recooking whenever the playback range was changed. -
Box selection has been added for the
 Stabilize Joint,
  Secondary Motion, and Smooth Motion SOP viewer states.
Input/Output 
-
The new KineFX
 Dem Bones Skinning Converter SOP for rigging integrates the Smooth Skinning Decomposition algorithm into the KineFX toolset. This node allows you to generate skinning weights from a sequence of poses to ensure that your geometry is deformation-ready when it is used with the Joint Deform SOP.
 -
Added support for UsdSkel Dual Quaternion skinning for KineFX characters in the
 USD Character Import SOP and
  SOP Character Import LOP. UsdSkel Dual Quaternion skinning was added in USD 23.02. Note that a blended linear and dual quaternion skinning method (as in the Joint Deform SOP Skinning Method of Blended Dual Quaternion and Linear) is not currently supported in USD.
 -
Added an option in the
SOP Character Import LOP for importing Rest Geometry. -
On the
USD Character Import and  USD Skin Import SOPs, you can now specify the Purpose when importing UsdSkel characters, which filters the USD primitives that are imported as part of the character’s skin geometry.
 -
On the
 ROP FBX Animation Output SOP and
  ROP FBX Character Output SOP, the new Compute Smoothing Groups parameter computes smoothing group information from the normals of meshes in the scene, and the Override Scene Rate parameter allows you to use the
 clipinfoattribute’s sample rate as the frame rate for export. In addition, the Axis System, Output Unit, and Convert to Specified Axis/Unit System parameters allow you to set and convert between different axis system conventions and units of measurement.
-
The
ROP FBX Animation Output and ROP FBX Character Output SOPs now feature an Export Preset drop-down menu to set the parameters under the Compatibility tab to the ideal values for exporting to a given DCC. This includes setting the correct axis conversion, unit conversion, or compute smoothing groups options on export for applications like Unreal Engine and Maya. -
On the
ROP FBX Character Output SOP, the new Remove Scaling from Joints parameter allows you to remove scaling from joint world transforms without affecting their translation and rotation. -
On the
 Filmbox FBX ROP, the new Compute Smoothing Groups parameter computes smoothing group information from the normals of meshes in the scene.
 -
On the
 FBX Character Import SOP, the new Compute MikkT Tangents parameter pre-generates tangent attributes to improve the viewport playback performance of importing animated FBX characters that have no tangent information.
 -
On the
 FBX Skin Import SOP, the new Compute MikkT Tangents parameter pre-generates tangent attributes to improve the viewport playback performance of importing animated FBX characters that have no tangent information.
Character examples 
|
The Luchador and the Chicken were created by Od Studios in cooperation with SideFX. These files are designed to demonstrate the process of character rigging using the new APEX system - from setting up the foundation and working with autorig components to mastering procedural skinning. Download the files here. |
|---|---|
|
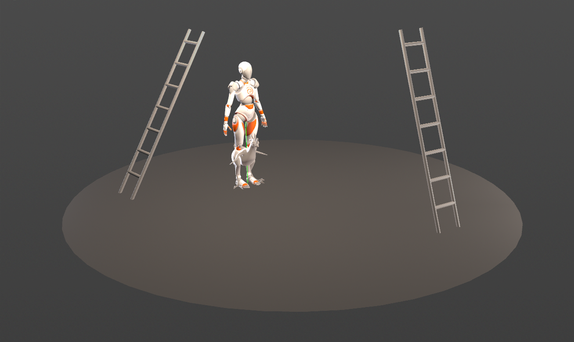
Learn how the Electra character was set up using the APEX rigging tools. This scene file shows you the basics of organizing character elements, using and creating reusable rig components, and assembling animator-friendly scenes. There are also nodes for creating Locators and a Reverse Foot Setup. |
|
Learn how to combine KineFX retargeting workflows with keyframe animation using APEX. Download the file here. |