| On this page |
In the animation workflow, you can add characters and animation to a scene, transfer animation to characters through motion retargeting, and play back scene animation. The animation scene, along with the characters and other scene elements, are organized in a character folder structure.
Basic animation scene setup 
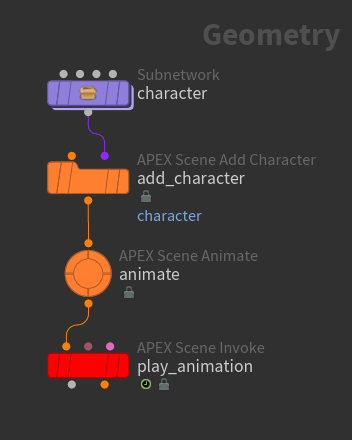
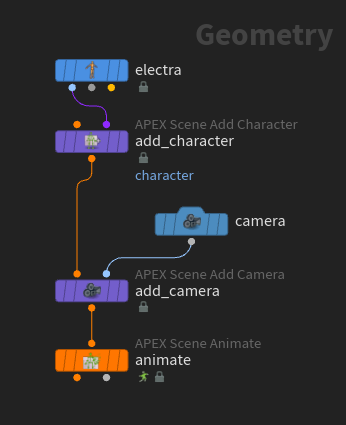
The basic workflow for adding a character to a scene and performing animation is shown below. In this example, we use the ![]() Electra Test Geometry SOP as our character (the APEX Example Scene recipe provides an example of this workflow):
Electra Test Geometry SOP as our character (the APEX Example Scene recipe provides an example of this workflow):
-
On the Electra SOP, set Output to APEX Character. This outputs Electra as a character comprised of a set of character elements (skeleton, shape, rig). You can view the contents of this node in the rig tree view:
-
Select the Electra SOP.
-
Open the rig tree view - at the top of a pane, click the
 New Tab icon, and select New Pane Tab Type ▸ Animation ▸ Rig Tree.
 -
From the Type drop-down menu, select Packed Folders. The character’s skeleton, shape, and rig are displayed in a character folder structure:
/
-- Base.rig
-- Base.shp
-- Base.skel
...
There may be other elements present in Electra’s character folder structure depending on the configurations that were turned on in the Electra SOP (ragdoll, motion mixer, full body IK).
-
-
The
 APEX Scene Add Character SOP adds the character elements to a character (.char) folder in the character folder structure. This character is then added to the animation scene.
-
Specify a name for the character in the Character Name parameter. If you rename the APEX Scene Add Character SOP, the Character Name will be updated automatically. In this example, we set Character Name to
character. -
Select the APEX Scene Add Character SOP. In the rig tree view, we now have:
/
-- character.char/
    -- Base.rig
    -- Base.shp
    -- Base.skel
    ...
-
-
The animate state on the
 APEX Scene Animate SOP allows you to display, pose, and animate the characters in a scene. To enter the animate state, select the APEX Scene Animate SOP, turn on its display flag, and click
  Animate on the left toolbar.
 -
The animation in the scene can be played back on the APEX Scene Animate SOP even when you exit the animate state. This is because the Enable APEX Character Deformation option is turned on by default in the Display Options (press D over the viewport, Optimize tab). If Enable APEX Character Deformation is turned off, you can play back the animation by connecting to the second output of the APEX Scene Animate SOP or using an
 APEX Scene Invoke SOP:
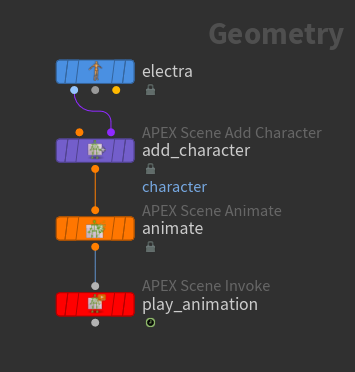
Play back animation
Add multiple characters to a scene 
You can bring multiple characters into an animation scene using an APEX Scene Add Character SOP for each character:
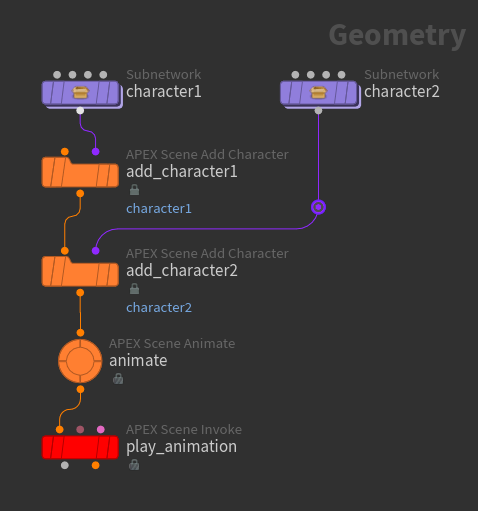
-
On each of the APEX Scene Add Character SOPs, specify a name for the character in the Character Name parameter.
-
Select the second APEX Scene Add Character SOP. The following is displayed in the rig tree view:
/
-- character1.char/
    -- Base.rig
    -- Base.shp
    -- Base.skel
    ...
-- character2.char/
    -- Base.rig
    -- Base.shp
    -- Base.skel
    ...
Add a prop to a scene 
You can add a prop to an animation scene using an ![]() APEX Scene Add Prop SOP. The prop is added as a character in the character folder structure. The APEX Example Scene recipe provides an example of this workflow.
APEX Scene Add Prop SOP. The prop is added as a character in the character folder structure. The APEX Example Scene recipe provides an example of this workflow.
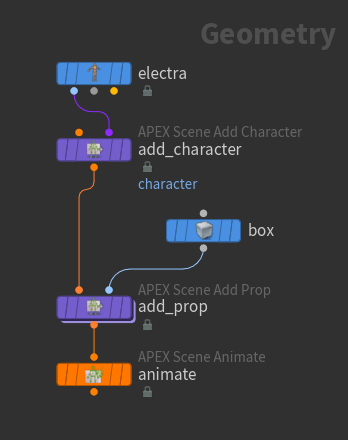
-
On the APEX Scene Add Prop SOP, specify a name for the prop in the Prop Name parameter.
-
Select the APEX Scene Add Prop SOP. In the rig tree view, a
<prop_name>.charfolder is added to the character folder structure:/ -- character.char/ -- Base.rig -- Base.shp -- Base.skel ... -- <prop_name>.char/ -- Base.rig -- Base.shp -- Base.skel ...
Add a camera to a scene 
You can add a camera to an animation scene using an ![]() APEX Scene Add Camera SOP. The camera is added as a character in the character folder structure. The APEX Example Scene recipe provides an example of this workflow.
APEX Scene Add Camera SOP. The camera is added as a character in the character folder structure. The APEX Example Scene recipe provides an example of this workflow.
Select the APEX Scene Add Camera SOP. In the rig tree view, a <camera_name>.char folder is added to the character folder structure:
/
-- character.char/
    -- Base.rig
    -- Base.shp
    -- Base.skel
    ...
-- <camera_name>.char/
    -- Base.rig
    -- Base.shp
    -- Base.skel
    ...
You can also add a camera from within the animate state:
-
In the animate state, click the camera/light menu and select New Camera. This adds an APEX Scene Add Camera SOP upstream from the current APEX Scene Animate SOP.
-
To constrain the camera to a control, select the camera, hold ⇧ Shift, select the character control, and press H over the viewport. The control now drives the camera. See animate state constraints for more information.
-
To look through the camera, click the camera/light menu, and select APEX: <camera>.
-
If the constraint’s offset control is blocking the camera view, turn off display of the offset control by clicking
 beside All Controls ▸ constraints ▸ Base ▸
 <camera>__Offsetin the selection sets.
To change the camera parameters:
-
Click the
 menu for the camera in the animate state.
 -
In the animate state parameters, Control tab, you can adjust the different camera parameters. See the
 Camera SOP for descriptions of the camera parameters.
To look through the camera outside the animate state:
-
Pipe the APEX Scene Animate SOP into an
APEX Scene Invoke SOP. -
On the APEX Scene Invoke SOP, set Output to Unpacked Geometry.
-
In the viewport, click the camera/light menu and select <SOP_network>:<camera>.
Add animation to a character 
You can add animation to a character in a scene using the following SOPs. Animation is added to the character folder structure under the /animation folder.
Adds animation to an animation scene.
Copies animation from a character folder structure to an animation scene.
![]() APEX Scene Import Animation SOP
APEX Scene Import Animation SOP
Imports animation from multiple sources, including files, animation catalogs, and SOPs. You can also use this node to create empty animation clips and make a copy of a clip in the current scene.
Merges animation and characters from SOPs or input geometry into an animation scene.
Import animation from an animation catalog 
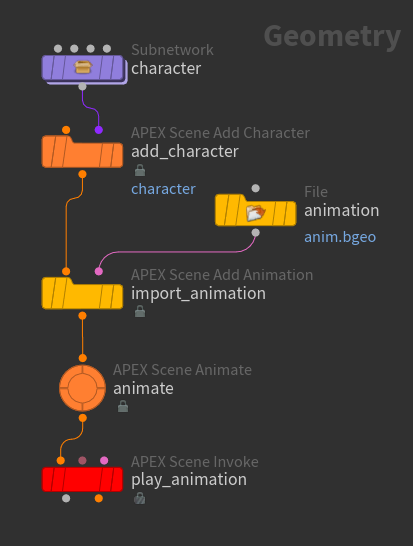
In this example, we import animation from an animation catalog (saved as a .bgeo file) into a scene:
-
On the
 Electra SOP, set Output to Character.
 -
On the
APEX Scene Add Character SOP, we set Character Name to electra. -
On the
 APEX Scene Import Animation SOP:
-
Click
 beside Imports to add a multiparm entry.
 -
Set Mode to Animation Catalog.
-
Click
 beside Files Pattern and select the animation catalog .
bgeofile. -
In the rig tree view, the imported animation is located in the
/animationdirectory of the character folder structure.
-
-
Enter the animate state - select the
APEX Scene Animate SOP, turn on its display flag, and click Animate on the left toolbar.Note
If there are multiple animation clips in the
/animationdirectory of the character folder structure, you can set the active clip in the scene using the drop-down menu on the top toolbar of the animation layers. You can access animation layers in the animation layers pane, the animate state HUD, and the APEX Scene Animate SOP’s parameter editor.
Retarget animation onto a character 
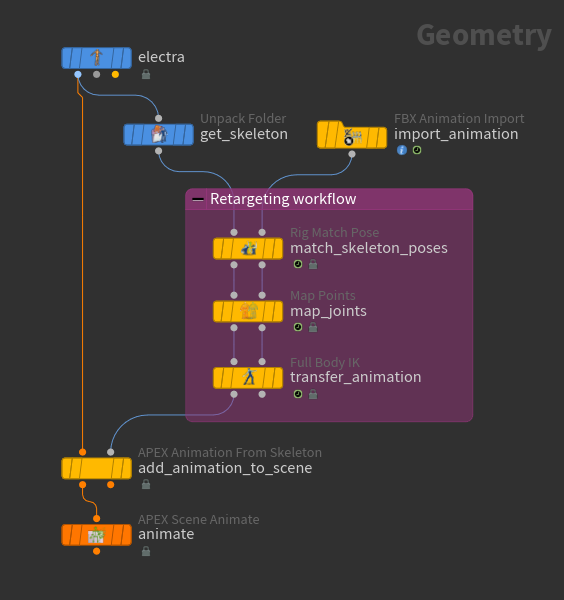
In this example, we use the APEX Biped recipe and APEX Retarget to Rig recipe to build a rig for a character, retarget animation from an FBX file onto the character, and pipe the animation scene into an ![]() APEX Scene Animate SOP and the motion mixer for further animation and motion processing.
APEX Scene Animate SOP and the motion mixer for further animation and motion processing.
-
Type “APEX Biped” in the network editor’s tab menu and put down the APEX Biped recipe.
-
Connect an
Electra test geometry to the shape and rest skeleton inputs of the recipe. -
Select the
 APEX AutoRig Builder SOP, turn on its display flag, and click Animate on the left toolbar.
 -
In the Apply Template window that pops up, select a rig template and mapping to use for the character rig. In our example, we set Template to Mocap Biped, and Mapping to sidefx. Click Apply Template.
-
Exit the Autorig Builder viewer state by clicking
 on the left toolbar.
 -
The
configure_charactersubnet sets mirroring and motion mixer configurations for the character, and adds the character to an animation scene. TheAPEX Scene Add Character SOP in the subnet sets the character name to biped. -
Put down the APEX Retarget to Rig recipe and connect the two recipes - connect the
ANIMATEnode to theAPEX_SCENEnode. -
On the
 APEX Unpack Character SOP, set Character Name to
 biped. -
The APEX Retarget to Rig recipe has the following test animation in the
 FBX Animation Import SOP:
Imported animation -
To see the animation that has been transferred to Electra’s controls, select the
 APEX Animation from Skeleton SOP, turn on its display flag, and play the animation.
 Animation retargeted onto Electra -
Connect the APEX Animation from Skeleton SOP to an APEX Scene Animate SOP or
 Motion Mixer SOP to continue editing the animation on the character.
The name of the retargeted animation clip is set in the APEX Animation from Skeleton SOP’s Clip Name parameter. On the Motion Mixer SOP, the retargeted animation appears in the Catalog tab of the parameter editor.
Retarget animation onto an FBX character 
The APEX FBX Biped recipe imports an FBX character and retargets animation onto the character. The setup is almost identical to the above example that uses the APEX Biped recipe:
-
Type “APEX FBX Biped” in the network editor’s tab menu and put down the APEX FBX Biped recipe.
-
On the
IMPORT_CHARACTERsubnet, set FBX File to the FBX file of the character you want to import, and specify a Character Name. -
Select the APEX AutoRig Builder SOP, turn on its display flag, and click
Animate on the left toolbar. -
In the Apply Template window that pops up, select a rig template and mapping to use for the character rig, for example, setting Template to Mocap Biped, and Mapping to sidefx. Click Apply Template.
-
Exit the Autorig Builder viewer state by clicking
on the left toolbar. -
Put down the APEX Retarget to Rig recipe and connect the two recipes - connect the
ANIMATEnode to theAPEX_SCENEnode. -
On the APEX Unpack Character SOP, set the Character Name to match the Character Name in the
IMPORT_CHARACTERsubnet. -
On the
FBX Animation Import SOP, set FBX File to the animation you want to retarget onto the character. -
On the
 Biped Retarget SOP, enter the viewer state and make any necessary adjustments to the source and target skeleton poses.
 -
Select the APEX Animation from Skeleton SOP, turn on its display flag, and play the animation.
-
Connect the APEX Animation from Skeleton SOP to an APEX Scene Animate SOP or Motion Mixer SOP to continue editing the animation on the character.
Recipes 
The following recipes provide example workflow setups. To put down the recipe, type the recipe name in the TAB menu of the network view, select the recipe, and press Enter in the network view.
APEX AutoRig Fuse Graph
Merges manual graph changes into an APEX rig using the the fuse graph workflow.
APEX Biped
Rigs a biped character given a geometry shape with joint capture weights and a rest skeleton.
APEX Configure Ragdoll
Sets up a character for use in the animate state’s ragdoll tool.
APEX Example Scene
Adds a character, camera, and props to an animation scene.
APEX FBX Biped
Imports and rigs a biped character given an FBX file with a captured shape and rest skeleton.
APEX FBX Character Import
Imports a character FBX with a shape and rest skeleton and bundles it into an APEX character. Downstream, you can create a custom rig for this character using any of the APEX rigging tools.
APEX Retarget to Rig
Transfers animation from a source mocap to a target APEX rig. It combines the ![]() biped retargeting workflow with the
biped retargeting workflow with the ![]() APEX Animation from Skeleton SOP. See the example above.
APEX Animation from Skeleton SOP. See the example above.
APEX SetDrivenKey
Adds an ![]() APEX Rig Pose SOP to generate rig-specific animations that can be controlled with the companion set driven keys rig component. This allows you to drive animation with dedicated driver controls. For a step-by-step walkthrough, see working with set driven keys.
APEX Rig Pose SOP to generate rig-specific animations that can be controlled with the companion set driven keys rig component. This allows you to drive animation with dedicated driver controls. For a step-by-step walkthrough, see working with set driven keys.
Render a character 
In this example, we bring Electra into Solaris (LOPs):
-
We have the following SOP network:
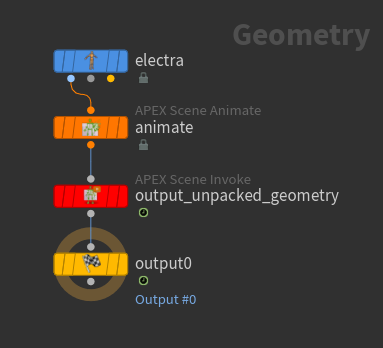
SOP network -
On the
Electra SOP, set Output to APEX Scene. -
On the
APEX Scene Invoke SOP, set Output to Unpacked Geometry so the materials are exported. -
The
 Output SOP ensures that changing the display flag doesn’t affect what is exported.
 -
Switch to the stage to import Electra into Solaris:
-
At the top of the network editor, click
 obj, which brings you to the object level.
 -
Click
obj again and select  stage.
We have the following LOP network:
LOP network -
-
On the
 Scene Import LOP, set Objects to the object-level node that contains the SOP network. Alternatively, you could set Objects to
 *, which also imports any object-level cameras and lights you have.Note
Turn on the display flag for the object-level node that contains the SOP network, otherwise the character won’t display in the viewport when importing into Solaris.
How-to 
| To... | Do this |
|---|---|
|
Save a scene to a file |
|
|
Use a scene file |
|