| On this page |
The full body IK tools in the animate state applies full body inverse kinematics to character rigs, allowing you to posing and animating characters by adjusting high-level targets rather than manipulating individual joints. This helps to streamline complex character posing and motion editing while preserving natural joint behavior.
There are two full body IK tools in the animate state:
-
The full body IK pose tool allows you to alter a character’s pose using full body IK targets.
-
The full body IK tool allows you to alter a character’s animation using full body IK targets.
Setup 
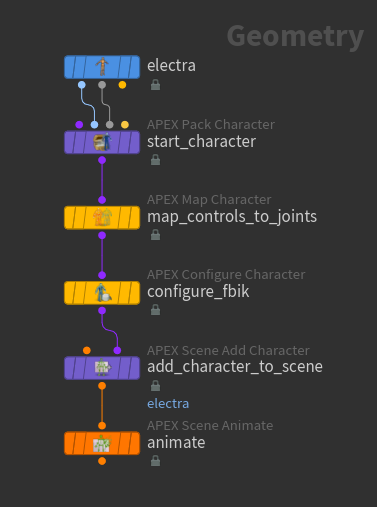
In this example, we set up the ![]() Electra test geometry to use full body IK in the animate state:
Electra test geometry to use full body IK in the animate state:
-
On the
 Electra SOP, set the Output parameter to Skin Surface. This outputs Electra’s shape as its 1st output, and Electra’s skeleton as its 2nd output.
 -
The
 APEX Pack Character SOP adds Electra’s shape and skeleton to a character folder structure.
 -
By default, Shape Path is set to
/Base.shp, and Skeleton Path is set to/Base.skel. These are the names given to Electra’s shape and skeleton once they are packed into the folder structure. -
Turn on Add FK and Bone Deform Components. This creates a rig (set to the Rig Path name,
/Base.rig) and adds it to the character folder structure. -
You can view the character folder structure in the rig tree view. In the rig tree view, set Type to Packed Folders.
-
-
The
 APEX Map Character SOP maps Electra’s rig controls to skeleton joints and creates a mapping property on the rig. This mapping property is used by the
  APEX Configure Character SOP downstream to set up the character for the full body IK tools.
-
Set Rig Path to
/Base.rig. -
Set Skeleton Path to
/Base.skel. -
If the Map By Name parameter is turned on, an automatic mapping is performed between controls and joints that have the same name.
-
To manually map the controls and joints, enter the Map Character viewer state - select the APEX Map Character SOP, turn on its display flag, and click
 Show Handle on the left toolbar or press Enter over the viewport. In the viewer state, click between the controls and skeleton joints. This automatically creates entries in the Mappings multiparm:
Map character rig controls to skeleton joints
-
-
The APEX Configure Character SOP configures the full body IK properties on the character. Turn on Full Body IK.
-
The
 APEX Scene Add Character SOP adds the character elements (shape, skeleton, rig) to a character in an animation scene. We need to do this because the full body IK tool works on packed characters in a character folder structure, not unpacked character elements like a rig. On the APEX Scene Add Character SOP, the Character Name is the name of the character that appears in the selection sets.
 -
Enter the animate state - select the
 APEX Scene Animate SOP, turn on its display flag, and click
  Animate on the left toolbar or press Enter over the viewport.
 -
Enter one of the full body IK tools:
-
Full body IK pose tool - Click
 on the top toolbar.
 -
Full body IK tool - Click
 on the top toolbar or select Full Body IK from the radial menu (press C over the viewport).
-
Full body IK posing 
When you move a character’s joints in the full body IK pose tool, its other joints are pulled along with it:
Enter the full body IK pose tool by clicking ![]() on the top toolbar.
on the top toolbar.
Target joints 
You can turn a joint into a target for the full body IK solver to try to reach. To turn a joint into a target joint, select the joint, and press H over the viewport or click ![]() on the top toolbar. When a joint becomes a target, it changes color (see the Target Type parameter). You can specify the target joint to act as a target position or orientation for the solver by setting the Target Type parameter.
on the top toolbar. When a joint becomes a target, it changes color (see the Target Type parameter). You can specify the target joint to act as a target position or orientation for the solver by setting the Target Type parameter.
In the video below, the character’s right hand and foot are target joints:
To untarget a joint, select the joint, and press ⌃ Ctrl + H over the viewport or click ![]() on the top toolbar.
on the top toolbar.
Adjust the influence of a target joint 
To adjust the amount of influence that a target joint has on the rest of the joints, change the Weight and Priority parameters.
Priority
The priority determines the joints that take precedence when posing with full body IK - the position of a higher priority joint is more strictly enforced. If you want certain joints to drive the character’s pose, set a higher priority for those joints.
In the example below, the character’s right hand is a target joint with a priority of 1, and the right foot is a target joint with a priority of 2:
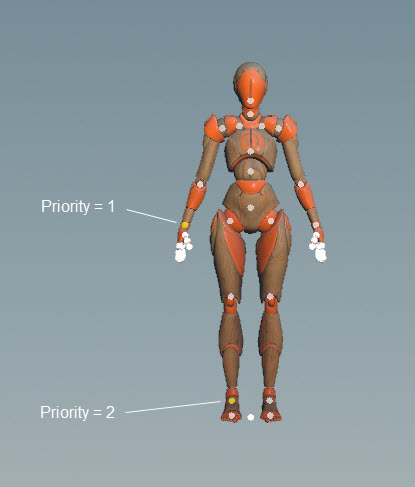
On the left video below, the hand that is pulled has a priority of 2, so it has more influence over the other hand, but not as much influence over the foot target joint. On the right video, the hand that is pulled has a priority of 3, so it has a lot more influence over the other target joints.
Note
A lower priority joint cannot move a higher priority joint.
Weight
The weight determines how strongly a joint influences the rest of the joints' movement and allows the rest of the body to partially follow the joint. A higher weight makes it harder to pull the joint away from its current position. Specify a weight when you want the joint to influence the character’s pose less rigidly than a priority.
If you want to enforce a strict order of precedence and resolve conflicts between multiple joints (for example, hand vs. foot vs. head), set a priority. If you want to fine-tune the influence of a specific joint, set a weight (for example, keeping the wrist at roughly the same position but allowing for some flexibility).
Limit the number of affected joints 
To limit the number of joints that are affected by a joint’s movement, turn on Use Depth in the full body IK parameters and set a value for Depth, which is the number of affected joints up the skeleton hierarchy, starting with the selected joint. For example, if Depth is set to 3, moving the character’s hand will affect the hand, elbow, and shoulder joints:
Save the pose 
To save the character’s new joint positions, press Enter over the viewport. This will set keys on all the character’s controls, effectively saving the character’s pose when you exit the full body IK pose tool.
Note
With multiple characters in the scene:
-
If you select a joint on a character and press Enter over the viewport, all the controls on that character will be keyed.
-
If you don’t select any joints and press Enter over the viewport, all the controls on all the characters will be keyed.
Full body IK for animation 
You can use the full body IK tool to alter the animation of a character.
Electra walks on tip toes 
In this example, we start with a walk cycle on Electra and use the full body IK tool to get Electra to walk on her tip toes.
-
Enter the full body IK tool by clicking
on the top toolbar or selecting Full Body IK from the radial menu (press C over the viewport). A bookmark is set on the playbar timeline for the Frame Range in the full body IK settings. The full body IK solver doesn’t have any effect outside the Frame Range. -
Turn Electra’s head and toe joints into target joints - targets that the full body IK solver tries to reach. Target joints follow the joints of the original animation. Select the joints, and press H over the viewport or click
 on the top toolbar. The joints turn yellow and continue to follow Electra’s animation.
 -
Pin the head target joint, which creates a control at Electra’s head that you can pose and animate independent of the original animation. Select the head joint and click
 on the top toolbar. A control,
 <head_joint>_target, is created as a wireframe box, and keys are added to the control at the start and end of the Frame Range. The control is not parented to Electra’s head joint. -
Go to the frame where you want to reposition the head. Select the head control and set a key on the control by pressing K over the viewport.
-
Move the head control. You can see that Electra is pulled along with it. The dotted lines indicate how far the target joints have moved from the original animation:
Pull up the head control -
To keep Electra’s toes on the ground, select the toe controls and increase the Weight parameter.

Increase the influence of Electra’s toe joints You can set keys on the Weight parameter by
 clicking the parameter and selecting Set Keyframe, or Alt clicking the parameter textbox. To see the weight channel in the
  animation editor, select the Weight parameter in the full body IK parameters HUD.
The video below shows the updated animation:
Updated animation Tip
If the target control starts to drift away from the original animation and you want the control to match the animation, select the control and click
 on the top toolbar. This sets a key on the target control at the current frame.
 You can also select a frame range (hold ⇧ Shift and drag along the timeline) and click
, which adds a key for the selected control on every frame in the frame range. You can then select the control, create a new animation layer from the selected control, and perform additional animation on the new layer. -
At this point, the animation is only on the character in the full body IK tool. To see the animation after exiting the full body IK tool, bake the animation back onto the character, which adds keyframes to the character controls - in the animate state settings, Bake tab, click Bake Keys.
If Bake to New Layer is turned on, the keys are added to a new animation layer. If Bake to New Layer is turned off, the keys are added to the current animation layer. See the animate state settings for descriptions of the available baking options.
Electra ducks under a pole 
In this example, we start with an animation of Electra walking under a swinging pole, and use the full body IK tool to make Electra duck under the pole.
-
Enter the full body IK tool. We want the full body IK solver to affect Electra only when the pole swings closer to her, so set a smaller Frame Range in the full body IK settings.
-
Turn Electra’s head, pelvis, and foot joints into target joints - select the joints, and press H over the viewport or click
on the top toolbar. -
Set the pelvis target to be a positional target. This sets the full body IK solver to affect the position of Electra’s pelvis, while allowing the pelvis to rotate freely. Select the pelvis target joint, and in the full body IK parameters, set Target Type to Position.
-
Pin the head target joint - select the head joint and click
on the top toolbar. -
Go to the frame where you want to reposition the head. Select the head control and set a key on the control by pressing K over the viewport.
-
Reposition the head control:
Reposition the head control The video below shows the updated animation:
Updated animation
Parameters and settings 
Full body IK parameters 
In the full body IK and full body IK pose tools, the following parameters are in the Full Body IK/Full Body IK Pose tab of the animate state parameters. These parameters are available when a target joint is selected:
Parameter |
Description |
|---|---|
Target Type |
Specifies how the full body IK solver tries to match the target joint. You can specify the solver to match the joint’s position, orientation, or both. For example, if you set Target Type to Position, the solver tries to match the target’s position while allowing the target to rotate freely. The joint changes color depending on the target type:
|
Weight |
Determines how strongly a joint influences the rest of the joints' movement. A higher weight makes it harder to pull the joint away from its current position. See adjusting the influence of a target joint for more information. A Weight of 0 removes the target’s influence on other joints. |
Priority |
Determines the joints that take precedence when posing with full body IK. Higher priority joint positions are more strictly enforced. See adjusting the influence of a target joint for more information. |
Depth |
When turned on, this is the number of joints up the hierarchy that are affected by a joint’s movement, starting with the selected joint. When turned off, all the joints in the skeleton are affected by the joint’s movement. |
Reset Target |
Resets the joint parameters to their default values. |
Full body IK settings 
In the full body IK and full body IK pose tools, the following settings are in the Full Body IK/Full Body IK Pose tab of the animate state settings:
Setting |
Description |
|---|---|
Frame Range |
The frame range of the full body IK effect. This setting is available in the full body IK tool. |
Solver |
The full body IK solver to use: FABRIK (Forward and Backward Reaching Inverse Kinematics) A fast and simple full body IK solver. This solver prefers to be densely mapped with a high number of iterations, but can be less stable than the Physical Full Body IK solver. FABRIK is widely used across many platforms, so it can be suitable for applications where compatibility is important or where more physically-based solves may be unsuitable. Physical Full Body IK A sophisticated and robust algorithm for solving full body IK. This solver supports center of mass calculations and can provide an intuitive solve with very few target transforms. This solver prefers to be sparsely mapped with far fewer iterations than FABRIK. |
Iterations |
The number of iterations of the solve to perform. Increasing this value increases the accuracy of the full body IK solve at the expense of a longer calculation time. |
Tolerance |
The margin of error allowed for the full body IK solver. Once the tolerance is reached, the solver exits early from its iterations. When Tolerance is set to 0, the solver performs the full number of iterations. |
Damping |
Larger values produce more stable results when the target joint is unreachable. A value that is too large, however, requires more iterations for convergence. A suitable initial value is 0.5. |
Reset Solver |
Resets the settings to their default values. |
How-to 
| To... | Do this |
|---|---|
|
Turn a joint into a target joint |
Select the joint, and press H over the viewport or click |
|
Untarget a joint |
Select the joint, and press ⌃ Ctrl + H over the viewport or click |
|
Match a target joint’s position or orientation |
In the full body IK parameters, set the Target Type. |
|
Change how strongly a joint influences the rest of the joints |
In the full body IK parameters, change the Weight value. or Select the target joint and use the |
|
Limit the number of affected joints |
In the full body IK parameters, turn on Depth and set its value. |
|
Save the character’s pose |
Press Enter over the viewport. See save a pose for more information. |
Full body IK 
| To... | Do this |
|---|---|
|
Create a control at a target joint |
Select a target joint and press |
|
Remove a target control |
Select a target control and press |
|
Have a target control match the original animation |
Select the control and click |