| On this page |
You can create secondary motion effects—like Overshoot/Lag, Jiggle, and Spring—for your KineFX joints and skeletons without having to create an actual simulation for your characters with the ![]()
![]() Secondary Motion SOP node and its associated workflows. This allows you to create sophisticated and subtle character motions (almost for free) based on existing animation on your character.
Secondary Motion SOP node and its associated workflows. This allows you to create sophisticated and subtle character motions (almost for free) based on existing animation on your character.
There are many different ways to set up a secondary motion for your characters in KineFX. This page lists the core workflow for setting up secondary motion effects that you would use in any secondary motion set-up regardless of what drivers or settings you use, and a series of examples that illustrate some of the most common ways you can design a secondary motion set-up.
Core workflow 
-
Import your animated joints.
Bring your animated skeleton or character into KineFX, or create an animated skeleton or character in KineFX.
For more information about these processes, see Bringing animation and character data into KineFX, Working with skeletons, and Transferring animation.
-
(Optional) Define a rest pose for your animated joints.
If you plan on using the local transform for your secondary motion set-up and your target joints (Joint Group) are oriented differently than your source joint (Source Joint Group), then make sure that your animated skeleton or character has a t-pose or rest pose (
rest_transform). With that kind of set-up, your skeleton or character needs to be in its rest position when you set up its secondary motion.Do one of the following:
-
If your skeleton or character already has a rest pose, then move on to step 3.
-
If your skeleton or character does not have a rest pose, then create a

 Rig Stash Pose SOP node, connect it to your animated skeleton or character, and then use to create a new rest pose for the animated skeleton or character.
-
-
(Optional) Set joint limits for the joints that will be affected by the secondary motion.
If your secondary motion set-up requires that you restrict the rotations or translations of the joints the motion effect will be applied to (for example, to prevent interpenetrations or other undesirable behaviors), then use a
 Configure Joints SOP node to define the joint limits for your joints.
Important
When using a Configure Joints SOP node in your secondary motion set-up, it needs to use the rest pose. Please make sure that you place a Rig Stash Pose SOP node upstream of the Configure Joints SOP to create
rest_transform, and that you also turn on the Rest Pose Attribute parameter on the Configure Joints SOP node itself.Tip
For most secondary motion set-ups, Mode ▸ Rig Pose is the ideal mode as it provides both rotation and translation limits.
-
Create the secondary motion effect for your joints.
-
Create a
 Secondary Motion SOP node.
 -
Identify what kind of secondary motion you want to create, which joint’s motion you want to drive the effect, and which target joints you want the motion effect to be propagated to.
-
Specify all the settings for the secondary motion.
The following parameters are some of the most common settings you would use in a secondary motion set-up:
Source Joint Group
The joint the Effect is applied to. Also the joint that drives the target joint(s) in Joint Group with its animation and motion effect.
Joint Group
The target joint(s) that receives the animation and motion effect from the Source Joint Group.
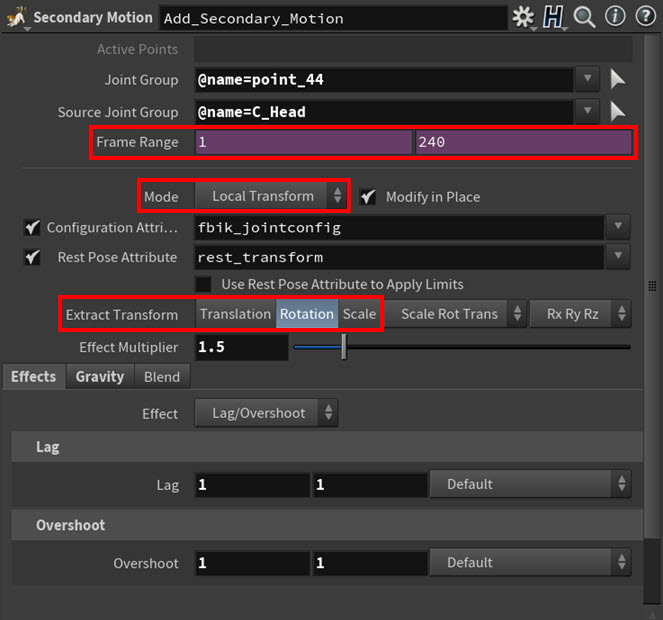
Frame Range
The time frame over which the secondary motion occurs. We recommend that this be the same time frame as your current frame range. If you want to use a subset of the current frame range instead, then use the Blend settings.
Mode ▸ Local Transform
When selected, the secondary motion affects the local transforms of the joints specified in the Joint Group.
Rest Pose Attribute
When on, specifies the point rest transform attribute (by default,
rest_transform) that is used to properly apply thelocaltransformfrom the Source Joint Group to the Joint Group. If the joints in the Joint Group have the same orientation as the Source Joint Group, you do not have to use a rest transform.(Optional) Mode ▸ Other Attribute
When selected, the secondary motion affects the custom attribute on the joints in the Joint Group.
(Optional) Attributes
Specifies the custom attribute(s) (by default,
P) that is used to properly apply thelocaltransformfrom the Source Joint Group to the Joint Group.(Optional) Configuration Attribute
When on, specifies the joint configuration attribute to use (by default,
fbik_configurejoitns) when any of the joints in the Source Joint Group and/or Joint Group have defined joint limits.Extract Transform
Specifies which transformation channels the Effect is applied to: Translation, Rotation, and/or Scale.
(Optional) Effect Multiplier
Scale factor for the Effect values.
Effects
Determines the type of effect you want to use in the secondary motion: lag/overshoot, jiggle, and spring.
(Optional) Gravity
When on, mimics gravity using a lookat constraint-type set-up.
(Optional) Blend
Specifies a subset of the Frame Range to apply the effect to as well as how to ease in/ease out of the effect’s animation.
Notes
-
You can specify only one joint for a Source Joint Group.
-
The source joint needs to be animated. Otherwise, the effect will produce no visible result as there would be no motion to modify.
-
-
(Optional) Use a kinematics solver to help propagate the motion effect and control your joints.
Sometimes the secondary motion you want to create needs a little help from a kinematics solver to propagate its motion effect to all the target joints and to control the affected joint chain. You can use the following kinematics solvers with secondary motion:
-
 Curve Solver VOP node
 -
 Two Bone IK VOP node (if the joint chain you are working with only 3 joints)
-
-
View the results of your secondary motion set-up.
Use a
 Joint Deform SOP node to view the results of your secondary motion set-up in the viewport.
Secondary motion examples 
Example 1: Secondary motion driven by local transforms 
In this example secondary motion set-up, a parent joint’s animation and motion effect drives the local transforms of its child joints.
Tip
This kind of local transform-based secondary motion set-up is the best for hierarchies as it gives you motion propagation down a joint chain essentially for free.
For this character, the first thing that is set or created for the wolf is its t-pose or rest pose (rest_transform). That is because this set-up uses the local transform and the orientations of the wolf’s target joints (Joint Group) are different from that of its source joint (Source Joint Group). The ![]()
![]() Rig Stash Pose SOP node creates the
Rig Stash Pose SOP node creates the rest_transform attribute.

On the ![]()
![]() Secondary Motion SOP node, the Source Joint Group is the joint at the base of the wolf’s tail and the members of Joint Group are the rest of the joints in the tail.
Secondary Motion SOP node, the Source Joint Group is the joint at the base of the wolf’s tail and the members of Joint Group are the rest of the joints in the tail.

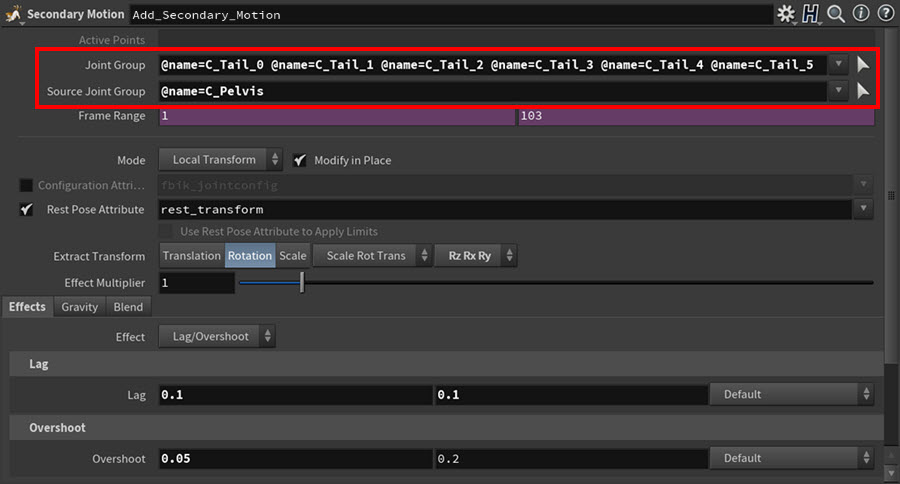
The Source Joint Group and its jump animation drive the secondary motion, and a Lag/Overshoot-type motion effect (Effect ▸ Lag/Overshoot) is applied to Source Joint Group.
Notes
-
You can specify only one joint for a Source Joint Group.
-
The source joint needs to be animated, especially when using the local transform. Otherwise, the effect will produce no visible result as there would be no motion to modify.
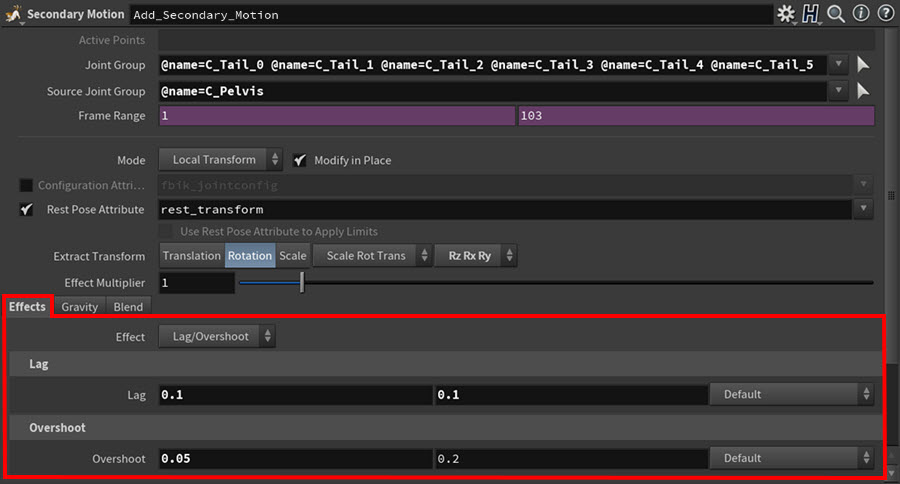
The Secondary Motion SOP node analyzes the rotation differences (Extract Transform ▸ Rotation) between the Source Joint Group's original local point transforms (Mode ▸ Local Transform)–better known as its animation–and its lag/overshoot effect over time (Frame Range) to compute the motion delta.
And then using the point rest transforms (Rest Pose Attribute) from the Joint Group and Source Joint Group, the Secondary Motion SOP node applies or propagates the motion delta to all the local transforms of all the joints in the Joint Group to produce the lag/overshoot secondary motion.

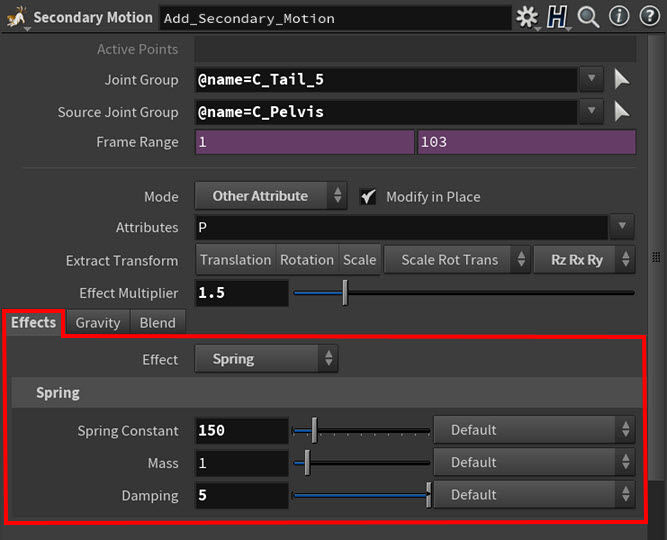
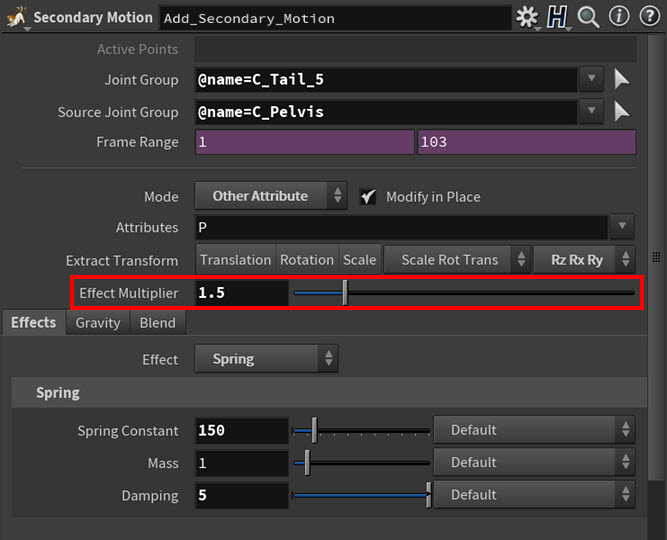
Example 2: Secondary motion driven by world point transforms and kinematics 
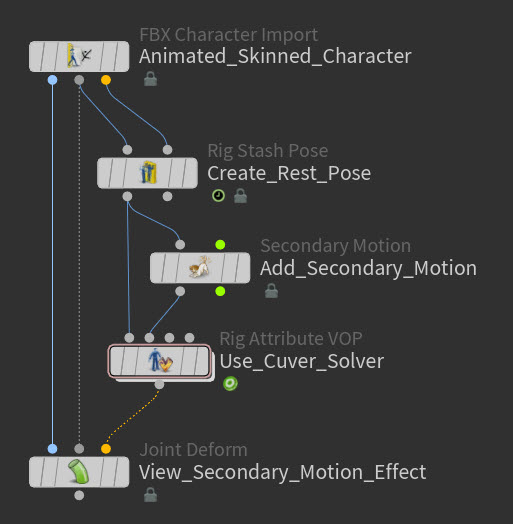
In this example secondary motion set-up, the ![]()
![]() Secondary Motion SOP node uses the P world transform position of the joint at the base of the wolf’s tail to apply a Spring effect to the joint at the end of the wolf’s tail and then it uses a
Secondary Motion SOP node uses the P world transform position of the joint at the base of the wolf’s tail to apply a Spring effect to the joint at the end of the wolf’s tail and then it uses a ![]()
![]() Solver Curve VOP node to propagate the effect to the rest of the tail and drive the tail’s motion with kinematics.
Solver Curve VOP node to propagate the effect to the rest of the tail and drive the tail’s motion with kinematics.
For this character, the Source Joint Group is the joint at the base of the wolf’s tail, and the Joint Group is the joint as the end of the wolf’s tail.
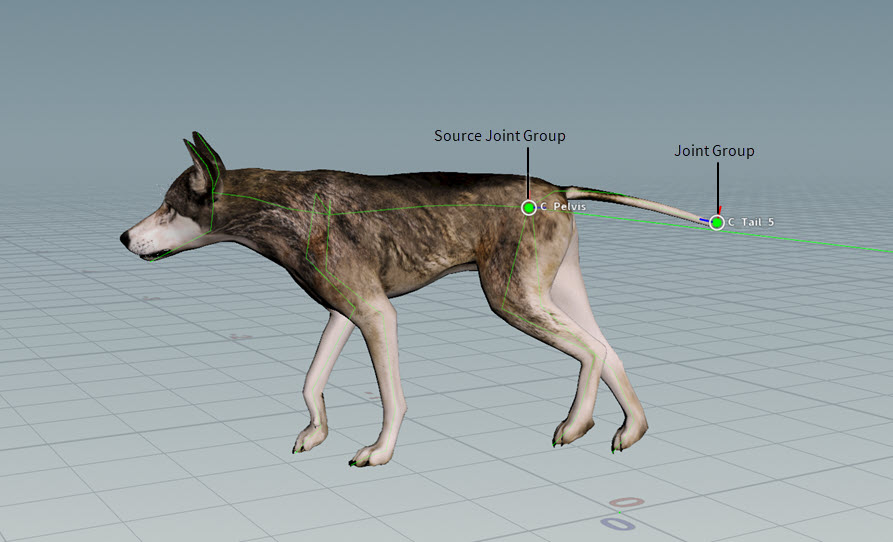

The Source Joint Group and its movement through world space drive the secondary motion, and a Spring-type motion effect (Effect ▸ Spring) is applied to Source Joint Group.
Notes
-
You can specify only one joint for a Source Joint Group.
-
The source joint needs to be animated. Otherwise, the effect will produce no visible result as there would be no motion to modify.
The Secondary Motion SOP node analyzes the transform differences (Extract Transform) between the Source Joint Group's world transform position (Mode ▸ Other Attribute ▸ Attributes ▸ P) and its spring effect over time (Frame Range) to compute the motion delta.
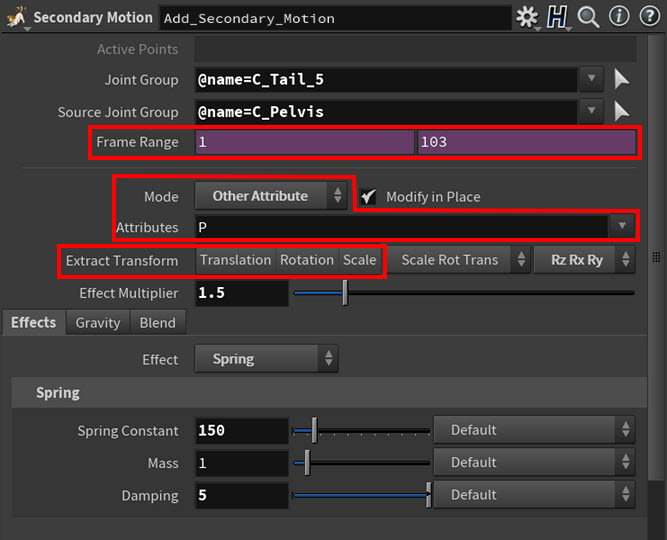
And then the Secondary Motion SOP node applies a scaled (Effect Multiplier) motion delta to the Joint Group to produce the spring secondary motion.
Applying the effect using P world transforms alone will not create the full spring motion effect for the whole tail because the effect still needs to be propagated to the rest of the joints in the wolf’s tail. This is where the ![]()
![]() Solver Curve VOP node comes in very handy.
Solver Curve VOP node comes in very handy.
The wolf’s network has a ![]()
![]() Rig Attribute VOP SOP node. This node contains three VOPs that set up the curve solver kinematics that will use the joint at the end of the tail (Joint Group) and its spring effect to drive the whole tail’s motion and maintain the length of the tail’s joint chain. The VOPs are a
Rig Attribute VOP SOP node. This node contains three VOPs that set up the curve solver kinematics that will use the joint at the end of the tail (Joint Group) and its spring effect to drive the whole tail’s motion and maintain the length of the tail’s joint chain. The VOPs are a ![]()
![]() Get Point Transforms VOP, a
Get Point Transforms VOP, a ![]()
![]() Solver Curve VOP, and a
Solver Curve VOP, and a ![]()
![]() Set Point Transforms VOP.
Set Point Transforms VOP.

The Get Point Transforms VOP gets the point transforms for all the points in the wolf’s tail. These Group points become the targets of the kinematics solve.
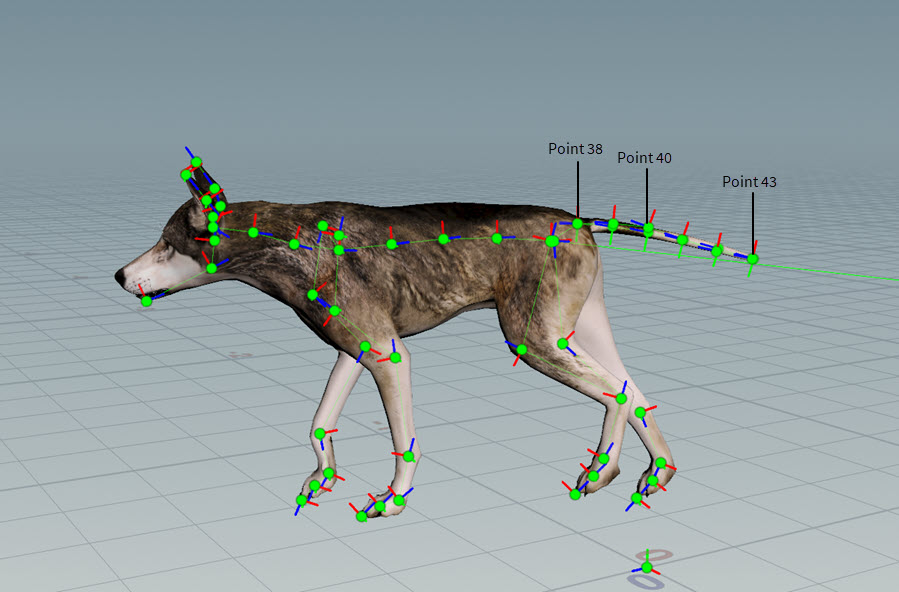
The Solver Curve VOP then connects those targets points to the solve curve’s Control Points. In this example, the control points are point 38 (first tail joint), point 40 (middle tail joint), and point 43 (end tail joint). Point 43 is important because it is the only joint that has been modified from its original transforms by the Secondary Motion SOP and that creates the motion difference to propagate. There are also three control points (instead of just one) because it provides more stability and gives more twist for the curve solve.
Tip
Alternatively, you could also use a ![]()
![]() Full Body IK SOP node to solve the kinematics for the tail set-up.
Full Body IK SOP node to solve the kinematics for the tail set-up.
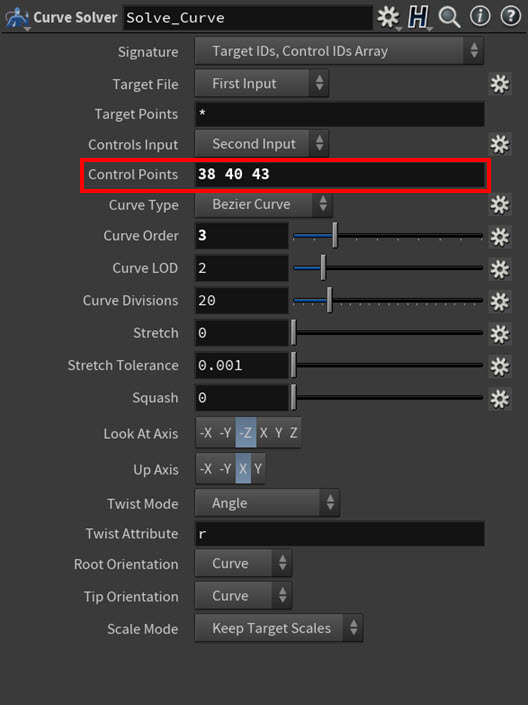
And finally, the Set Point Transforms VOP connects the Control Points from the Solver Curve VOP to the Get Point Transforms VOP's Group target points to propagate the spring motion effect to all the joints in the tail and control their motion with the curve’s kinematics solve.
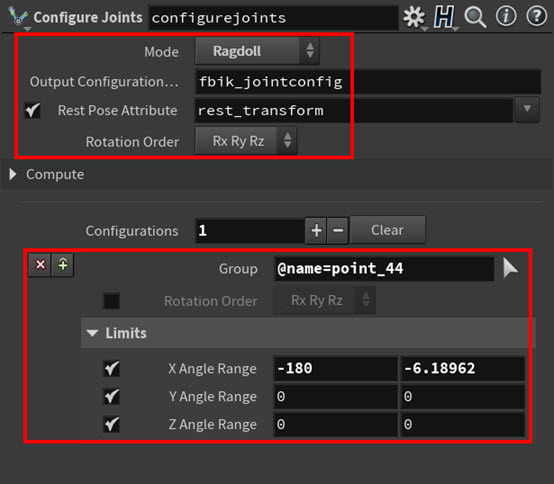
Example 3: Secondary motion that uses joint limits and gravity 

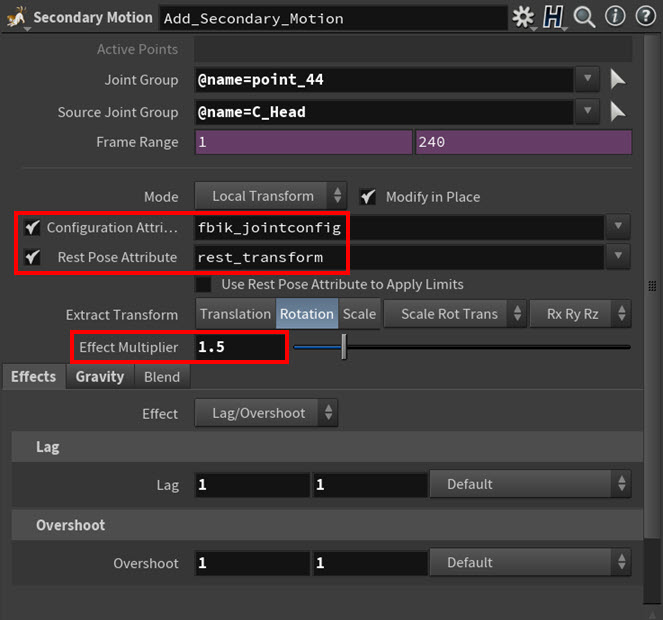
In this example secondary motion set-up, the movements of the wolf’s head and Gravity drive the secondary motion of the tag in his ear, and joint limits on the tag’s joint prevents it from rotating to far during the wolf’s head shake animation.
For this character, the first thing that is set or created for the wolf is its t-pose or rest pose (rest_transform). That is because this set-up uses the local transform and the orientation of the wolf’s target joint (Joint Group) is different from that of its source joint (Source Joint Group). The ![]()
![]() Rig Stash Pose SOP node creates the
Rig Stash Pose SOP node creates the rest_transform attribute.
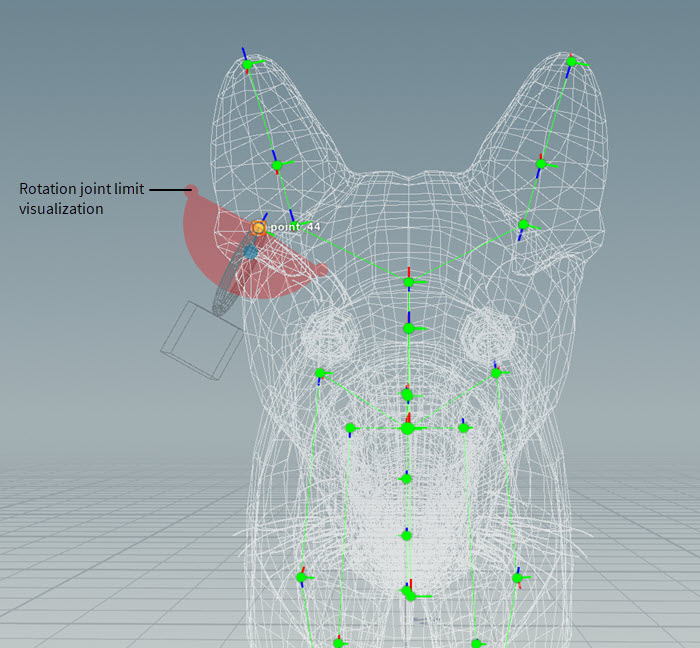
Next the ![]()
![]() Configure Joints SOP node defines rotation limits and proper rotation order (Z is the twist, the axis the tag rotates around) for the joint that the wolf’s ear tag is attached to and saves it to the
Configure Joints SOP node defines rotation limits and proper rotation order (Z is the twist, the axis the tag rotates around) for the joint that the wolf’s ear tag is attached to and saves it to the fbik_jointconfig attribute. This limits how far the ear tag can move from its rest position during its secondary motion. This rotation joint limit prevents the ear tag from rotating too far, like rotating into the wolf’s head or flipping over through the ear.
The Mode is set to Ragdoll because only joint limits for rotation are required for this set-up. In most cases though, Mode ▸ Rig Pose is the ideal mode for secondary motion joint limit set-ups.
And since the downstream Secondary Motion SOP uses localtransform, the Rest Pose Attribute parameter is also turned on.
The Secondary Motion SOP node sets up the motion effect for the wolf’s ear tag. For the secondary motion, the Source Joint Group is the wolf’s head joint and the Joint Group is the joint at the tag’s insertion point in the wolf’s ear.
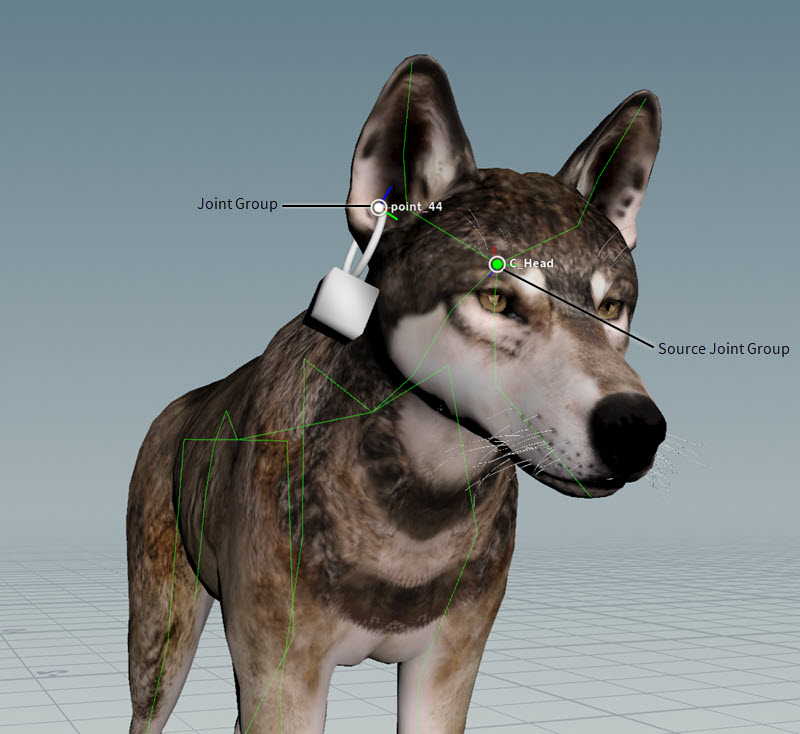
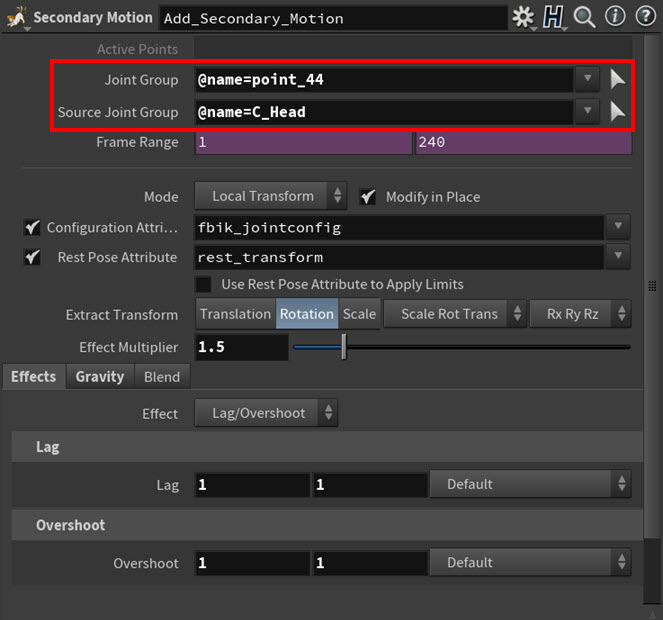
The Source Joint Group and its head shake animation drive the secondary motion, and a Lag/Overshoot-type motion effect (Effect ▸ Lag/Overshoot) is applied to the Source Joint Group.
Notes
-
You can specify only one joint for a Source Joint Group.
-
The source joint needs to be animated, especially when using the local transform. Otherwise, the effect will produce no visible result as there would be no motion to modify.
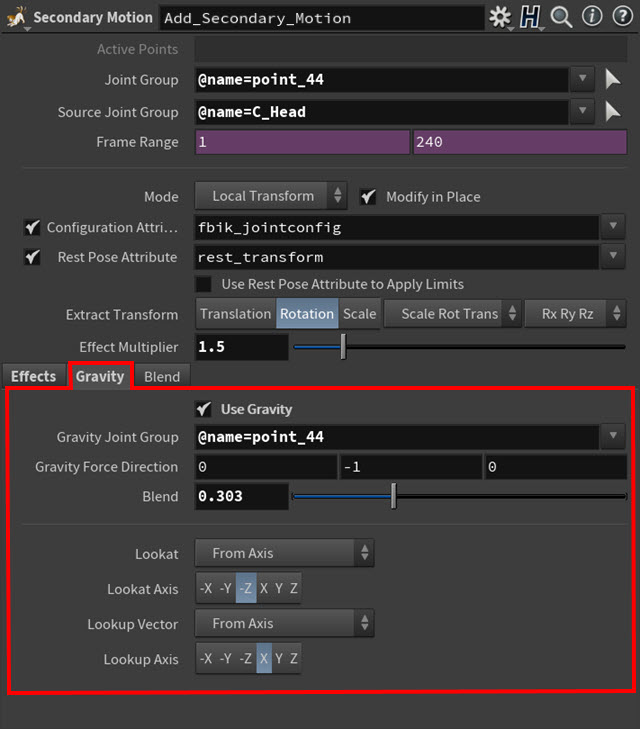
With just the secondary motion, the wolf’s ear tag will not look very realistic because there are no collisions or forces being applied to it. To help with this, the Gravity settings in the Secondary Motion SOP node use a two axis look-at constraint-type set-up to mimic gravity. For this character:
-
The Gravity Joint Group is the joint the wolf’s ear tag attaches to.
-
The Gravity Force Direction is the direction we want to orient the Gravity Joint Group joint towards. It is set to -1 degrees on the Y-axis.
-
The Lookat Axis is the axis we want to orient the same as the Gravity Force Direction, and is also the plane that the wolf’s ear tag moves through when in motion. It is set to -Z.
-
The Lookup Axis is the twist axis for the wolf’s ear tag joint, and is also the plane the wolf’s ear tag rotates around. It is set to X.
-
The Blend value determines how strongly Gravity affects the wolf’s ear tag. This value is adjusted to set the ideal rest position for the wolf’s ear tag.
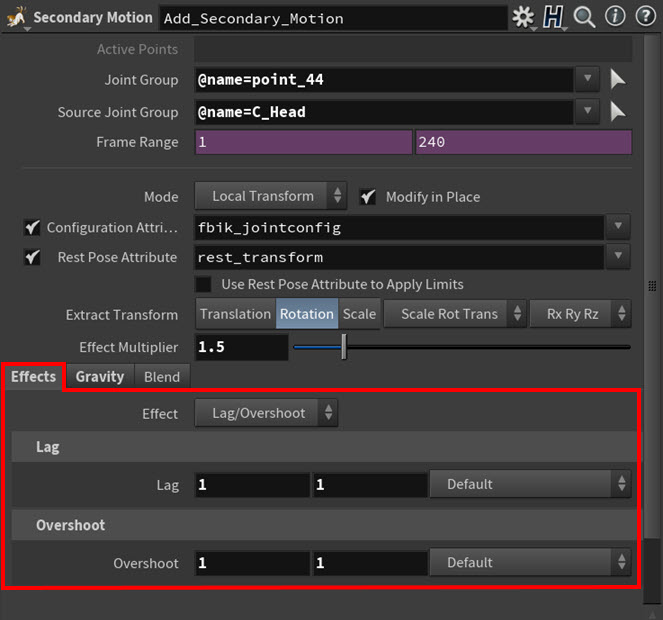
The Secondary Motion SOP node analyzes the rotation differences (Extract Transform ▸ Rotation) between the Source Joint Group's original local point transforms (Mode ▸ Local Transform)–better known as its animation–and its lag/overshoot effect over time (Frame Range) to compute the motion delta.
And then using the point rest transforms (Rest Pose Attribute) from the Joint Group and Source Joint Group, the joint limits pulled by the Configuration Attribute (fbik_jointconfig), and the current Gravity settings, the Secondary Motion SOP node applies or propagates a scaled (Effect Multiplier) motion delta to all the local transforms of all the joint in the Joint Group to produce the lag/overshoot effect with gravity secondary motion.