Blend shapes allow you to morph or blend between geometries that have the same topology. They often create and animate character deformations like facial expressions and muscle bulges.
When you import a rig into KineFX, any existing blend shape deformation data on your rig is preserved.
Also, when you combine blend shape animation with skeletal deformation, blend shapes are typically applied before the skeletal deformation.
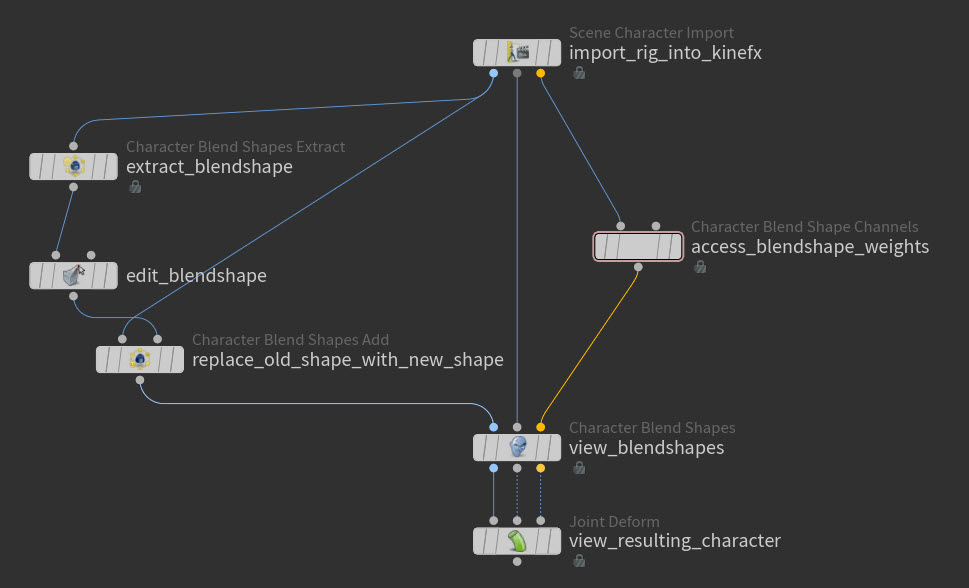
To view, tweak, add, or extract your rig’s blend shapes, you can use the following SOP nodes:
-
The
 Character Blend Shapes SOP node lets you view your blend shapes in the viewport. This is similar to how the
  Joint Deform SOP lets you view your character’s skeletal deformation in the viewport.
 -
The
 Character Blend Shapes Add SOP node lets you add single or multiple new blend shapes to your character.
 -
The
 Merge Packed SOP lets you funnel individual or multiple named packed primitive blend shapes into a Character Blend Shapes Add SOP node.
 -
The
 File Merge SOP node lets you funnel a single file or a series of files containing blend shapes into a Character Blend Shapes Add SOP node.
 -
The
 Character Blend Shapes Extract node lets you view or extract individual blend shapes from a character mesh (like those added by a Character Blend Shapes Add SOP).
 -
The blend weight values for your character’s blend shapes are driven by detail attributes on its animated skeleton. If your blend shapes are new, they do not yet have detail attributes. You can create these attributes for your blend shapes with the
 Attribute Create SOP node.
 -
To adjust or animate your blend shape’s weights, you can use the Character Blend Shapes Channels SOP node to manipulate the values of their detail attributes and animate their blend shape weights.
-
The
Joint Deform SOP node lets you append your character’s skeletal deformations to the outputs of your Character Blend Shapes SOP node.
Notes
-
The KineFX export nodes preserve all blend shape data.
-
The
Character Blend Shapes SOP removes the blend shapes from the first input after they've been applied. So its inputs should be exported, not its outputs. -
If you need to rename a blend shape after it has been added, use a
 Name SOP node and modify its blendshape_name primitive attribute.
How to 
View a character mesh’s individual blend shapes 
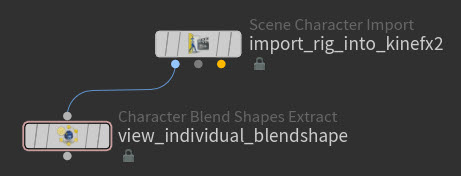
-
Create a
Character Blend Shapes Extract SOP node. -
Connect the Rest Geometry output (usually output 1) from your character’s import node to the input of the Character Blend Shapes Extract SOP node.
-
Select the Character Blend Shapes Extract SOP node, turn on its Display flag, and then open the Parameter Editor.
-
In the Parameter Editor, use the Blend Shapes parameter’s drop-down list to select the name of the blend shape you want to view.
You should now be able to see the individual blend shape target you selected with the Blend Shapes parameter on your character’s mesh in the viewport.
Add single or multiple new blend shapes to a character mesh 
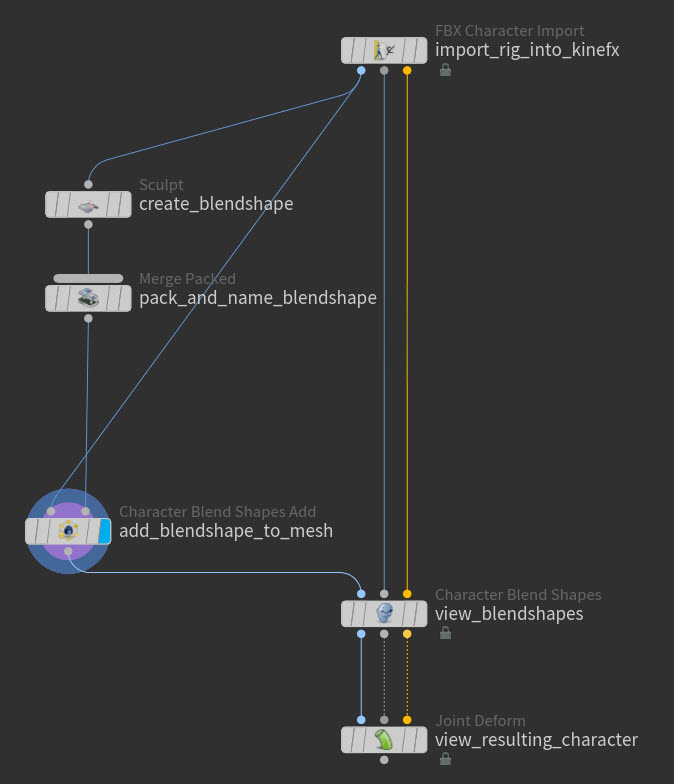
-
Create or import your blend shapes:
-
For a new blend shape you want to create in Houdini, create a geometry edit SOP like a
 Sculpt SOP or
  Edit SOP node, and then connect its input to the Rest Geometry output (usually output 1) from your character’s import node. If you want to create multiple new blend shapes, create multiple geometry edit SOP nodes.
-
Use the geometry edit node to create the blend shape from the character’s mesh.
-
Create a
Merge Packed SOP node and connect the outputs of your geometry edit node(s) to the Merge Packed SOP.
-
-
For external blend shapes you want to use that are in a file on disk, create a
File Merge SOP node.-
Use the File multiparm on the File Merge SOP to load the external geometry file that contain the blend shapes you want to add to your character’s mesh. If you want to bring in multiple external files, then use multiple File multiparms.
-
-
-
Name your blend shapes.
-
If you used the Merge Packed SOP, then specify the name of your blend shape in the Name parameter fields.
-
If you used the File Merge SOP, then turn on Attributes ▸ File Name Attribute to name the blend shapes after their file name.
-
-
Create the
Character Blend Shapes Add SOP node. -
Connect the output from the Merge Packed SOP or File Merge SOP node to the second input on the Character Blend Shapes Add SOP node, and then the Rest Geometry output (usually output 1) from your character’s import node to the first input on the Character Blend Shapes Add SOP node.
-
In the Character Blend Shapes Add SOP node’s parameters, turn on Remove Unchanged Points to remove any undeformed points from the blend shapes, and then leave the Skin Name parameter field blank to use the character mesh on input 1 as the target skin for the blend shapes.
-
Create a
Character Blend Shapes SOP node and do the following:-
Connect the outputs 2 and 3 from your character import node to the inputs 2 and 3 on the Character Blend Shapes SOP node.
-
Connect the output from the Character Blend Shapes Add SOP node to the first input on the Character Blend Shapes SOP node.
-
-
Create a
Joint Deform SOP node and connect all the outputs from the Character Blend Shapes SOP to all its inputs: output 1 to input 1, output 2 to input 2, and output 3 to input 3.
Edit an existing blend shape on a character mesh 
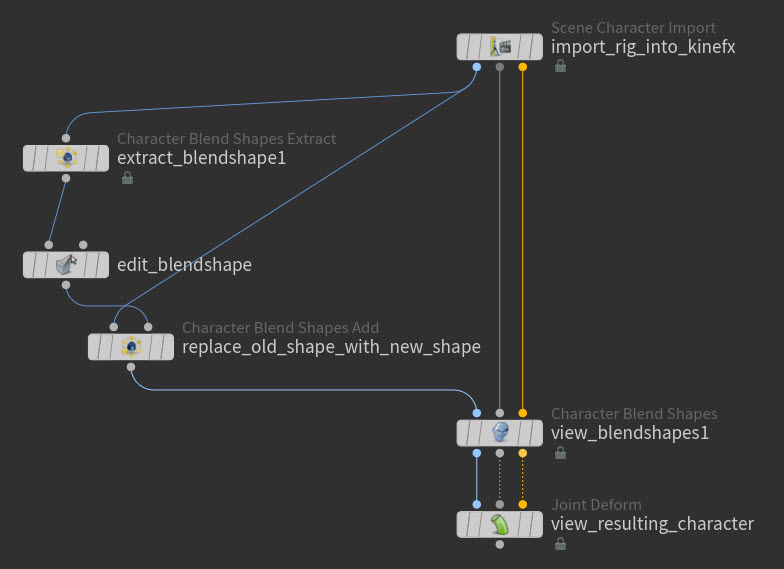
-
Create a
Character Blend Shapes Extract SOP node, and then connect its input to the Rest Geometry output (usually output 1) from your character’s import node. -
In the Character Blend Shapes Extract SOP node’s parameters, select the name of the blend shape you want to edit from the Blend Shape parameter’s drop-down list.
-
Create a geometry edit SOP like a
Sculpt SOP or Edit SOP node, and then connect its input to the output (usually output 1) of the Character Blend Shapes Extract SOP node. -
Use the geometry edit node to modify the topology of the blend shape you extracted.
-
Create a
Character Blend Shapes Add SOP node. -
Connect the output from the geometry edit node to the Character Blend Shapes Add SOP node’s second input, and then connect the Rest Geometry output (usually output 1) from your character’s import node to the first input on the Character Blend Shapes Add SOP node.
-
In the Character Blend Shapes Add SOP node’s parameters, do the following:
-
Turn on Remove Unchanged Points to remove of any undeformed points from the blend shape.
-
Leave the Skin Name parameter field blank to use the character mesh on input 1 as the target skin for the blend shape.
-
Turn on Unpacked Shape and then select the name of the shape you want to add back to the character mesh from the drop-down list.
-
-
Create a
Character Blend Shapes SOP node and do the following:-
Connect the outputs 2 and 3 from your character import node to the inputs 2 and 3 on the Character Blend Shapes SOP node.
-
Connect the output from the Character Blend Shapes Add SOP node to the first input on the Character Blend Shapes SOP node.
-
-
Create a
Joint Deform SOP node and connect all the outputs from the Character Blend Shapes SOP to all its inputs: output 1 to input 1, output 2 to input 2, and output 3 to input 3.
Adjust or key the blend weight values for your character mesh’s blend shapes 
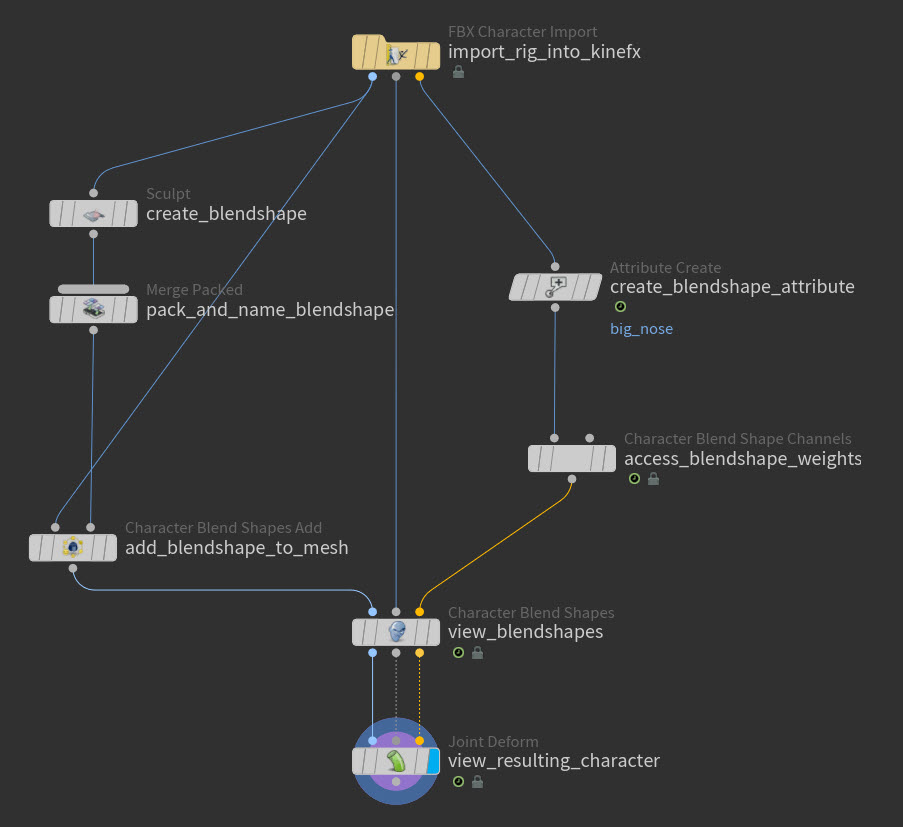
For new blend shapes, do the following:
-
Create an
Attribute Create SOP node. -
Connect the input on the Attribute Create SOP node to the third output (Animated Pose) on your character’s import node.
-
Create a detail attribute to represent the new blend shape and gain access to its weights.
-
Create a new Number of Attributes multiparm.
-
In the Name field, type the name of the new blend shape.
-
Set the Class to Detail.
-
For new blend shapes and blend shapes that are already a part of your character’s mesh, do the following:
-
Create a Character Blend Shapes Channels SOP node.
-
If your blend shape is new and you just created a detail attribute for it using an Attribute Create SOP node, then connect the output of the Attribute Create SOP node to the first input of the Character Blend Shapes Channels SOP node, and the Character Blend Shapes Channels SOP node’s output to the third input (Animated Pose) on the
Character Blend Shapes SOP node. -
If your blend shape is already a part of your character’s mesh, then connect the third output (Animated Pose) from your KineFX character import node to the Character Blend Shapes Channels SOP node’s first input, and the Character Blend Shapes Channels SOP node’s output to the third input (Animated Pose) on the Character Blend Shapes node.
-
In the Character Blend Shapes Channels SOP node’s parameters, do the following:
-
For every blend shape whose weight values you want to adjust or key, add a new Blends multiparm.
-
For each Blends multiparm, type the name of the blend shape whose weight values you want to adjust or key into its field and then press Enter.
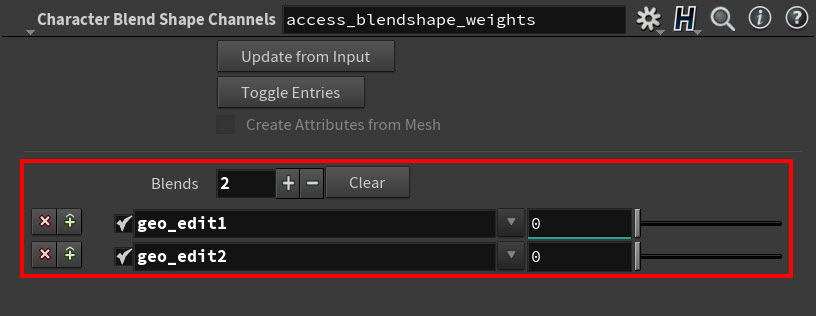
Example: Blend shape weight sliders Tip
As an alternative to using a Character Blend Shape Extract SOP, you can view the names of all the blend shapes on your character from the Geometry Spreadsheet.
-
In the Network Editor, select the Attribute Expression or Character Blend Shapes node.
-
In the Geometry Spreadsheet toolbar, select Animated Pose from the drop-down menu (if applicable) and then turn on Detail attributes.
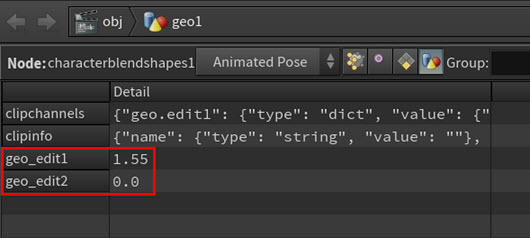
Example: Blend shape names in the Geometry Spreadsheet -
-
For each Blends multiparm, adjust and/or key the number value fields next to their sliders to achieve the deformation effects or animated deformations you desire.
Example: Adjusting the blend shape weight values
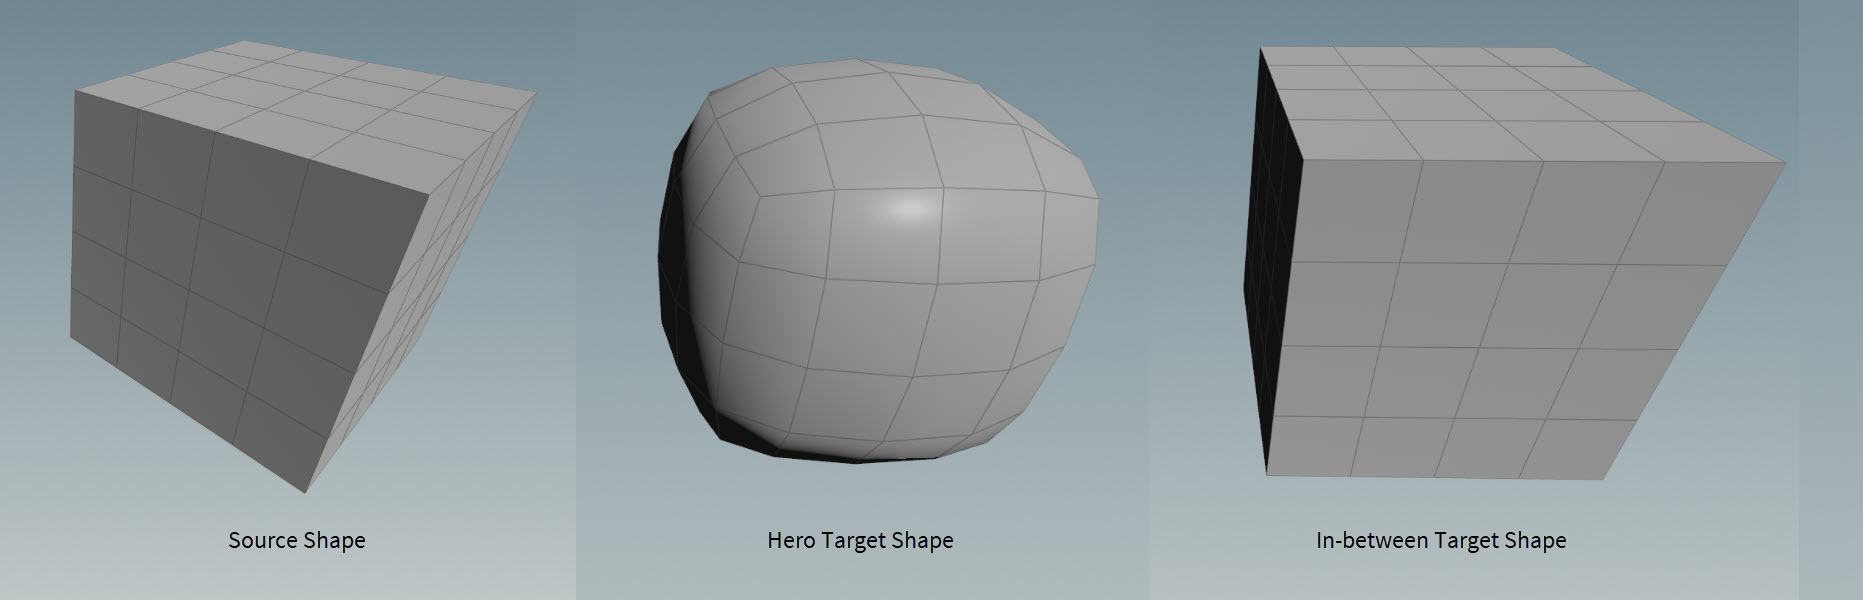
Add in-between shapes to your character blend shapes 

You can introduce intermediary target shapes to your character blend shape set-ups that your hero shapes will then transition through along their way to deforming to their main target shapes. For example, you can set-up a lip in-between for a mouth smile-no smile blend shape set-up to avoid any interpenetration between the lip and teeth geometry of a character.
The way you add in-between shapes to your characters depends on whether those shapes are packed or unpacked geometry.
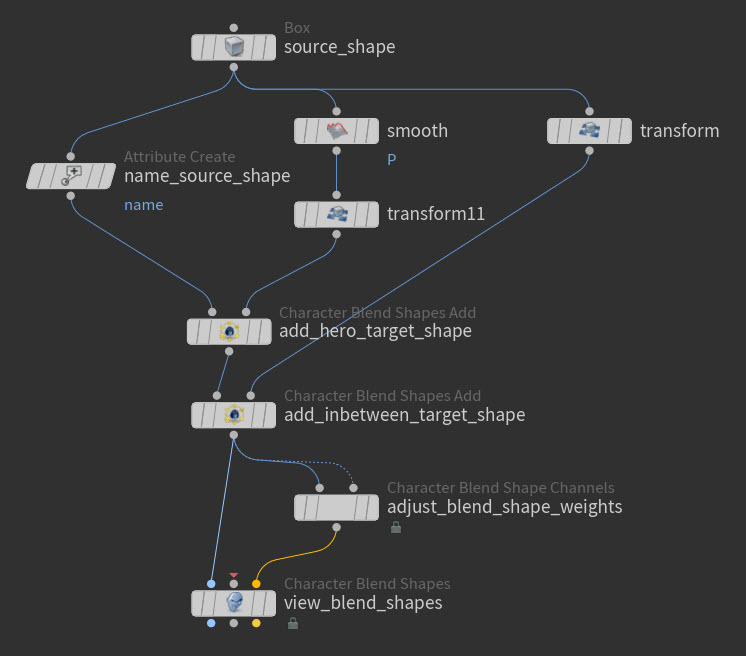
For unpacked in-between shapes, do the following:
-
Create a
Character Blend Shapes Add SOP node and then do the following:-
Connect the output of your source shape’s geometry node to the first input (input 1) of the Character Blend Shapes Add SOP node. This is the shape you want to apply blend shapes to, and when adjusting its blend shape weighting, its shape corresponds to the blend weight value of 0.
-
Connect the output of your hero target shape’s geometry node to the second input (input 2) of the Character Blend Shapes Add SOP node. When adjusting the blend shape’s weighting, this shape corresponds to the blend weight value of 1.
-
In the Character Blend Shapes Add SOP node’s parameters, turn on Unpacked Shape, type the name (
nameattribute) for the hero target shape in its field, and then press Enter.
-
-
Create another Character Blend Shapes Add SOP node and then do the following:
-
Connect the output of the first Character Blend Shapes Add SOP node to the first input (input 1) of the new Character Blend Shapes Add SOP node.
-
Connect the output of your in-between target shape’s geometry node to the second input (input 2) of the second Character Blend Shapes Add SOP node. When adjusting the blend shape’s weighting, this shape corresponds to the blend weight value specified by the Weight value on the Character Blend Shapes Add SOP node.
-
In the Character Blend Shapes Add SOP node’s parameters, do the following:
-
Turn on Unpacked Shape and then type the name (
nameattribute) for the in-between target shape in its field. -
Turn on Add as In-Between Shapes and then type the name (
nameattribute) for the hero target shape in its field. -
Select a Weight value for the in-between target shape. This determines where in the 0-1 blend weight range the source shape will try to morph into the in-between target shape.
-
-
-
Create a
 Character Blend Shape Channels SOP node, and then connect the output of the last Character Blend Shapes Add SOP in your network to both inputs on the Character Blend Shape Channels SOP node.
 -
In the Character Blend Shape Channels SOP node’s parameters, create a Blends multiparm, type the name of the hero target shape in its field and then press Enter.
-
Create a
Character Blend Shapes SOP node, and then do the following:-
Connect the output of the Character Blend Shape Channels SOP node to the third input (input 3) on the Character Blend Shapes SOP node.
-
Connect the output of the last Character Blend Shapes Add SOP in your network to the first input (input 1) of the new Character Blend Shapes SOP node.
-
-
Turn on the Display flag for the Character Blend Shapes SOP node, select the Character Blend Shape Channels SOP node, and then adjust and key the Blends multiparm to change and/or animate the blend shape’s weighting.
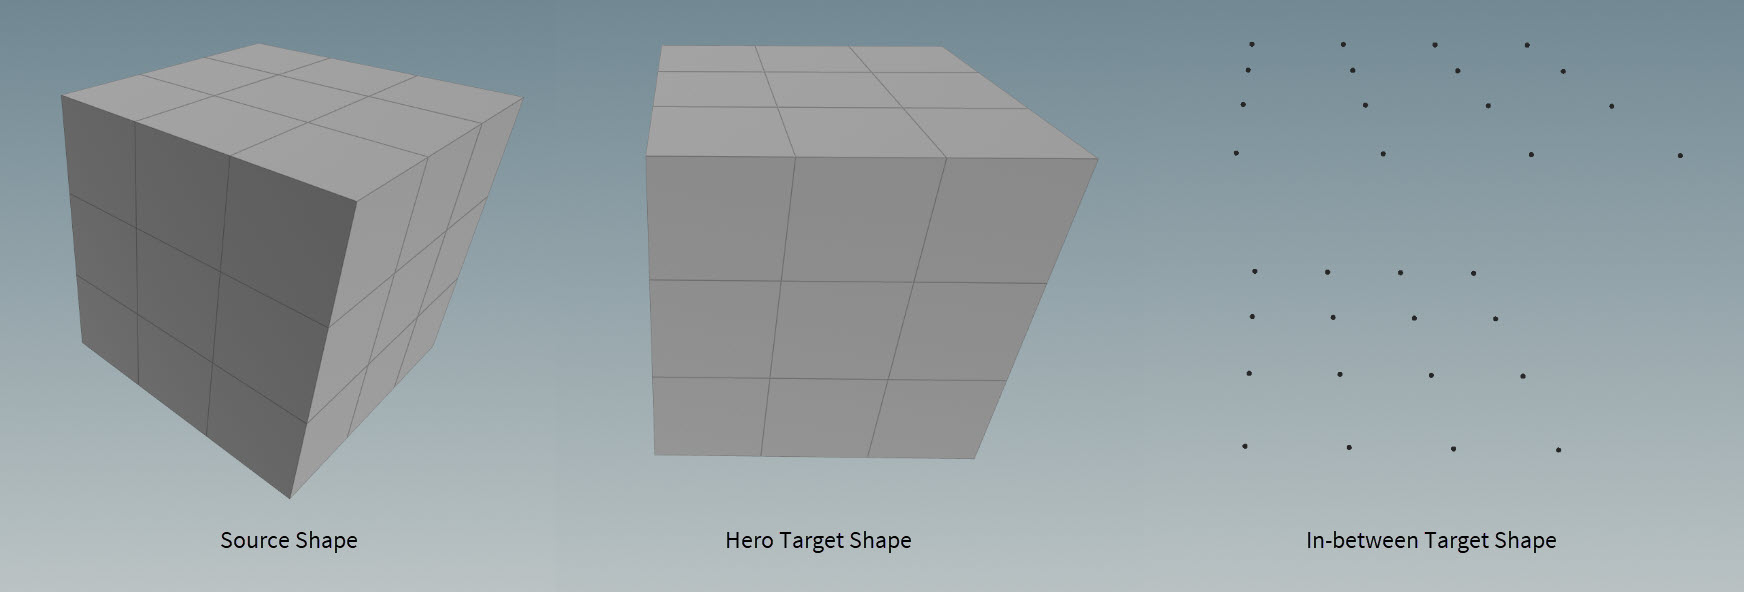
For packed in-between shapes, do the following:
-
Create an
Attribute Create SOP node for each packed primitive in-between target shape and then connect the outputs of each their geometry nodes to each of the Attribute Create SOPs. -
In the parameters of each Attribute Create SOP node, do the following:
-
Create a
nameattribute, select Primitive as its Class, select String as its Type, and then type the name of the packed primitive in the String field. -
Create a
weightattribute, select Primitive as its Class, select Float as its Type, and then use the Value field to define the weight value for each packed primitive in-between target shape. This determines where in the 0-1 blend weight range the source shape will try to morph into each in-between target shape. -
If you have multiple packed primitive in-between target shapes, then create a
Merge Packed SOP node and connect all your Attribute Create SOP nodes outputs to the merge.
-
-
Create a
Character Blend Shapes Add SOP node and then do the following:-
Connect the output of your source shape’s geometry node to the first input (input 1) of the Character Blend Shapes Add SOP node. This is the shape you want to apply blend shapes to, and when adjusting its blend shape weighting, its shape corresponds to the blend weight value of 0.
-
Connect the output of your hero target shape’s geometry node to the second input (input 2) of the Character Blend Shapes Add SOP node. When adjusting the blend shape’s weighting, this shape corresponds to the blend weight value of 1.
-
In the Character Blend Shapes Add SOP node’s parameters, turn on Unpacked Shape, type the name (
nameattribute) for the hero target shape in its field, and then press Enter.
-
-
Create a second Character Blend Shapes Add SOP node and then do the following:
-
Connect the output of the first Character Blend Shapes Add SOP node to the first input (input 1) of the new Character Blend Shapes Add SOP node.
-
Connect the output of your in-between target shape’s geometry node to the second input (input 2) of the second Character Blend Shapes Add SOP node. When adjusting the blend shape’s weighting, this shape corresponds to the blend weight value specified by the Weight Attribute value on the Character Blend Shapes Add SOP node.
-
In the Character Blend Shapes Add SOP node’s parameters, do the following:
-
Turn off Unpacked Shape.
-
Turn on Add as In-Between Shapes and then type the name (
nameattribute) for the hero target shape in its field. -
Type the name of the weight attribute you created on your in-between target shapes in the Weight Attribute field and then press Enter. This determines where in the 0-1 blend weight range the source shape will try to morph into the in-between target shapes.
-
-
-
Create a
Character Blend Shape Channels SOP node, and then do the following:-
Connect the output of the last Character Blend Shapes Add SOP in your network to the first input (input 1) on the Character Blend Shape Channels SOP node.
-
Connect the output of the Attribute Create SOP node (if single in-between) or Merge Packed SOP (if multiple in-betweens) if you have multiple to the second input (input 2) on the Character Blend Shape Channels SOP node.
-
-
In the Character Blend Shape Channels SOP node’s parameters, create a Blends multiparm, type the name of the hero target shape in its field, and then press Enter.
-
Create a
Character Blend Shapes SOP node, and then do the following:-
Connect the output of the Character Blend Shape Channels SOP node to the third input (input 3) on the Character Blend Shapes SOP node.
-
Connect the output of the last Character Blend Shapes Add SOP in your network to the first input (input 1) of the new Character Blend Shapes SOP node.
-
-
Turn on the Display flag for the Character Blend Shapes SOP node, select the Character Blend Shape Channels SOP node, and then adjust and key the Blends multiparm to change and/or animate the blend shape’s weighting.
| See also |