| On this page |
MotionClips allows you to visualize and procedurally edit an entire animation at once. You can use the set of MotionClip tools to edit the animation such as cycling, retiming, extracting the keyframes of an animation, and sequencing and blending multiple animations.
You can also use MotionClips to see how the animation moves through the scene at a glance.
Data Format 
A MotionClip is a geometry format made from packed geometry primitives that each store a pose of a skeleton animation.
The rest pose defines the skeleton’s topology for the animation. When you evaluate the MotionClip, all primitive attributes, vertex attributes, and groups on the animation are evaluated on the rest pose. If a joint is missing on all the other poses of the MotionClip, this pose defines the default local transform.
The rest of the packed poses of the MotionClip are called animated poses.
Each animated pose is given a unique time in the time primitive attribute of the MotionClip. This attribute defines when the animation of the skeleton should be at that pose. It also defines the position and orientation of each joint on the skeleton and the point and detail attributes to interpolate when you evaluate the MotionClip. When you evaluate, the point and detail attributes are evaluated from the animated poses. The attributes not evaluated are scaleinheritance, name, and path point attributes along with the clipinfo detail attribute.
You don’t need to define all joints on every animated pose of the MotionClip. If a joint is missing at the evaluation time, the joint’s position and attribtues interpolates from the nearest animated poses that contain that joint before and after it.

To edit, sequence, and blend Motionclips, you can use the following SOP nodes:
-
The
 MotionClip SOP lets you turn an animation into a MotionClip.
 -
The
 MotionClip Evaluate SOP lets you turn a MotionClip into an animation.
 -
The
 MotionClip Retime SOP lets you take a MotionClip as its sole input and adjust the timing of the MotionClip or resample it. You can use a time, frame, or speed channel to resample.
 -
The
 MotionClip Cycle SOP lets you take a MotionClip as its sole input and cycles the animation.
 -
The
 MotionClip Sequence SOP lets you take a MotionClip as each of its inputs and sequences the animations into a single MotionClip.
 -
The
 MotionClip Blend SOP lets you take a MotionClip as each of its inputs and blends from the first animation into the second.
 -
The
 MotionClip Extract Locomotion SOP lets you take a MotionClip as its input to compute and extract the locomotion of the character in the MotionClip or to apply the locomotion.
 -
The
 MotionClip Pose Insert SOP lets you take a MotionClip as its first input and a new pose as its second input. The new pose is then inserted into the MotionClip.
 -
The
 MotionClip Pose Delete SOP let you take a MotionClip as its sole input to delete patterns of poses from the MotionClip.
 -
The
 MotionClip Extract SOP lets you evaluate the MotionClip at many frames and combines all the poses into a single geometry as a series of frames or many MotionClips.
 -
The
 MotionClip Update SOP lets you take a MotionClip as its first input and takes a series of poses or motion path as its second input. The motion and attributes in the second input are then injected into the MotionClip.
 -
The
 MotionClip Extract Key Poses SOP lets you automatically identify the most important poses that defines the animation in the MotionClip. You can also use it to remove all other poses from the MotionClip.
Notes
-
The output of MotionClip Extract SOP is not a MotionClip although it may look like it in the viewport.
-
MotionClip nodes that work with multiple MotionClips such as MotionClip Blend SOP and MotionCLip Sequence SOP work best when the underlying skeleton for each MotionClip is the same.
How to 
Create a MotionClip and return to an animation 
To create a MotionClip:
-
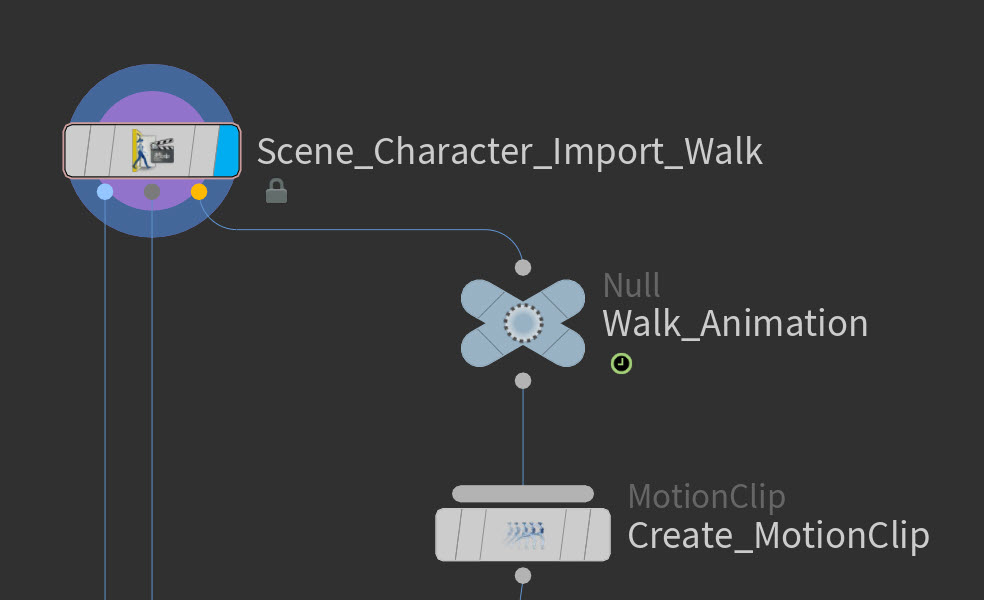
Import a Skeleton animation into SOPs.
-
Create a
MotionClip SOP node. -
Connect the output from your Skeleton animation to the input of the MotionClip SOP node.
-
If the animation has a clipinfo detail attribute, the MotionClip SOP node uses this attribute to determine the length and frame rate of the animation.
-
If not, use the Sample Rate and Frame Range parameters on the MotionClip SOP node to change the length and frame rate properties.
The MotionClip is now created.
-
To return an animation:
-
Create a
MotionClip Evaluate SOP node. -
Connect the output from your MotionClip SOP node to the input of the MotionClip Evaluate SOP node.
-
You can use the MotionClip SOP node’s tool set to manipulate the animation between these two nodes.
-
Sequence MotionClips and define locomotion 
-
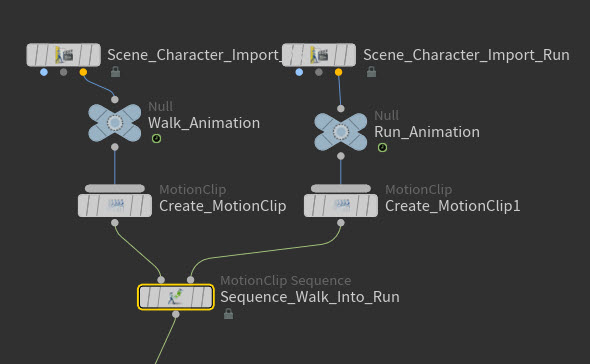
Create two MotionClips from two animations with the same underlying skeleton.
-
Create a
MotionClip Sequence SOP node. -
Connect the output from the first MotionClip to the input1 of the MotionClip Sequence SOP node.
-
Repeat the steps for the second MotionClip into input2.
-
Select the MotionClip Sequence SOP node. In the Parameter Editor, select the Locomotion Tab.
-
If you use MotionClip Evaluate SOP node now, the first animation plays followed by the second. To ensure the second MotionClip starts where the first MotionClip ends, you need to change some parameters in the Locomotion tab.
-
In Locomotion, click the dropdown menu and select Compute Locmotion.
-
In Locomotion Joint, set it to the joint that defines the motion of your character. This is usually the hips or pelvis joint.
-
In Match Translation, set it to Locomotion Joint. This defines the scene’s axes your character moves.
-
In Shift Axes, turn on the X and Z options.
-
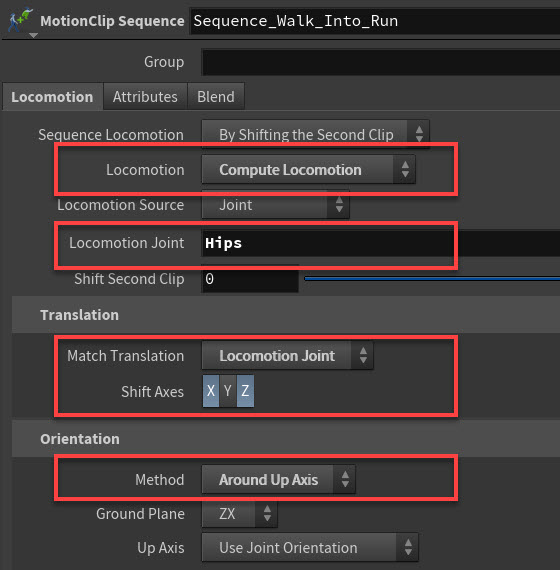
Test the MotionClip Evaluate SOP node again, the second animation should begin at the same spot the last animation ended.
-
If the characters aren’t facing the same direction, you need to change the Method parameter. In the Locomotion tab, change the Method to Around Up Axis. This should work for most situations.
Remove unwanted animation from MotionClips 
You can use ![]()
![]() MotionClip Pose Delete SOP node to remove unwanted animation from the joints of your skeleton. Then smoothly interpolate the animation from the surrounding frames. This is a useful pre-process step to prepare an animation for manual edits.
MotionClip Pose Delete SOP node to remove unwanted animation from the joints of your skeleton. Then smoothly interpolate the animation from the surrounding frames. This is a useful pre-process step to prepare an animation for manual edits.
-
Create a MotionClip.
-
Create a MotionClip Pose Delete SOP node.
-
Connect the output from the MotionClip to the input of the MotionClip Pose Delete SOP node.
-
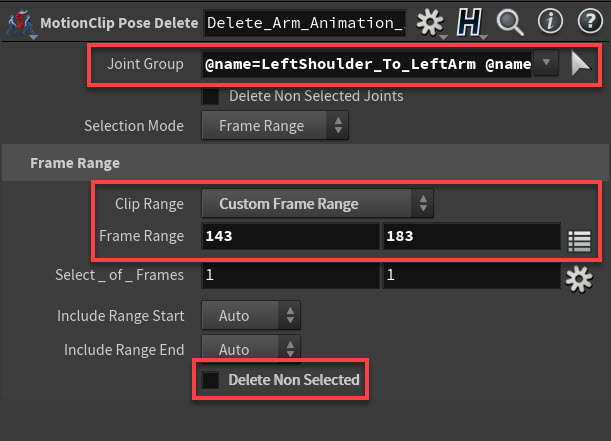
Identify the joints that contain the unwanted animation and its frame range.
-
Select the MotionClip Pose Delete SOP node.
-
In the Parameters Editor window, use the Joint Groups dropdown menu to select the group of joints for the unwanted animations.
-
In the Clip Range parameter, select Custom Frame Range from the dropdown menu.
-
In the Frame Range parameter, set the start and end frame for your unwanted animation.
-
Turn off Delete Non Selected parameter.
Extract Keys from MotionClips 
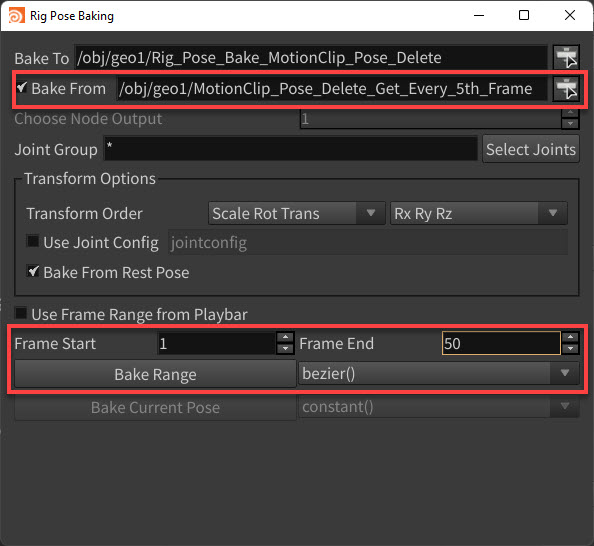
The Baking Dialog on the ![]() Rig Pose Node SOP node allows you to bake the animation from a MotionClip into channels of the Rig Pose SOP node. This creates keys at each defined pose on the MotionClip.
Rig Pose Node SOP node allows you to bake the animation from a MotionClip into channels of the Rig Pose SOP node. This creates keys at each defined pose on the MotionClip.
If you combine this with the MotionClip Pose Delete SOP or ![]()
![]() MotionClip Extract Key Poses SOP node, you can prepare dense animation such as motion capture data for hand animation.
MotionClip Extract Key Poses SOP node, you can prepare dense animation such as motion capture data for hand animation.
-
Create a MotionClip.
-
You can choose to manually select every N-th frame (e.g. to key on 3's) or allow Houdini to determine the optimset set of N keyframes for your animation.
-
-
To select your own keys, create a MotionClip Pose Delete SOP node.
-
Select your MotionClip Pose Delete SOP node.
-
In the Parameters Editor window, locate the Select_of_Frames parameter and set it to 1 and N for the second box. N is defined as selecting the first frame of every set of N frames. Example: if you set it to 3, every 3rd frame is selected.
-
In Include Range Start, set it to Always. This ensures the first and last frame of the Motionclips are always included in the selection even if they don’t match the pattern.
-
In Delete Non Selected, select the checkbox. This ensures you only keep the selected frames.
-
-
To allow Houdini to determine the optimal set of N keyframes for your animation, create a MotionClip Extract Key Poses SOP node.
-
Select your MotionClip Extract Key Poses SOP node.
-
In the Parameters Editor window, locate the Key Poses parameter and increase or decrease the value until it matches your criteria shown in the MotionClip.
-
-
You now have your set of key poses for your animation to bake into a Rig Pose SOP node so it can be hand animated.

-
Create a Rig Pose SOP node.
-
Connect the output from your skeleton animation to the input node of your Rig Pose SOP node.
-
Select your Rig Pose SOP node.
-
In the Parameters Editor window, selecet Bake... A dialog pop-up window appears.
-
In Bake From, turn on the checkbox.
-
Select the Browse icon next to the Bake From parameter and select your MotionClips Delete SOP node or MotionClip Extract Key PoseS SOP node.
-
If your skeleton animation has a rest transform attribute that defines the rest pose of your animation, leave the Bake From Rest Pose option on. Otherwise, turn it off.
-
In the Frame Start and Frame End, set your start and end frames for your entire MotionClip. This range may extend beyond the end of your MotionClip.
-
In the Bake Range parameter, select bezier() from the dropdown menu. This smoothly interpolates between frames.
-
Select Bake Range. You should notice green bars in the animation timeline to indicate the extracted keyframes.
| See also |