| On this page |
|
Overview 
Character data for Houdini’s viewport animation environment is defined, bundled, and organized in a folder structure similar to a directory structure on disk. This folder structure is sometimes referred to as the packed character format because the character data is added as nested packed primitives. Only data in the packed character format can be displayed in the animate state, a viewer state used for viewport animation.
In the packed character folder structure, there are three levels of data containers - the animation scene, the characters, and the character elements. The hierarchy of the packed folder structure can be seen in the rig tree view:
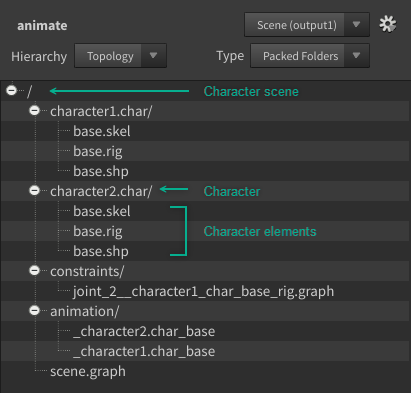
Animation scene
An animation scene is the top-level data container that contains one or more poseable characters that can interact with each other. The scene container can also contain animation and constraints that the animator interactively adds in the animate state. The scene container can be thought of as a “folder” in the packed folder structure.
Character
A character container holds a poseable KineFX character that an animator can interact with in the viewport. The character container contains all the necessary elements for animating the character. At a minimum, it contains a rig. The character container can be thought of as a “folder” in the packed folder structure.
Character element
A character element is a single packed geometry that is used when animating a character. The default types are skeleton, shape, rig, and control. You can also define your own elements with custom extensions. The character element can be thought of as a “file” in the packed folder structure.
The packed character folder structure allows you to pack different elements together, pass it around in a scene, and extract individual elements as needed.
Nodes for packing and unpacking character data 
The ![]() Pack Folder,
Pack Folder, ![]() Unpack Folder, and
Unpack Folder, and ![]() Packed Folder Split SOPs are used to organize, assemble, and extract character elements in the packed character folder structure:
Packed Folder Split SOPs are used to organize, assemble, and extract character elements in the packed character folder structure:
Pack Folder
The ![]() Pack Folder SOP packs its inputs and organizes them in a folder structure. It can either create a new folder structure or pack into an existing structure.
Pack Folder SOP packs its inputs and organizes them in a folder structure. It can either create a new folder structure or pack into an existing structure.
Unpack Folder
Once data is assembled into a packed folder structure using the Pack Folder SOP, we want to be able to pull out and manipulate the data. This is done using the ![]() Unpack Folder SOP. The Unpack Folder SOP takes as input a packed folder structure, and uses the APEX path pattern syntax to search for the data to extract. The Unpack Folder SOP has a single output that contains the extracted data.
Unpack Folder SOP. The Unpack Folder SOP takes as input a packed folder structure, and uses the APEX path pattern syntax to search for the data to extract. The Unpack Folder SOP has a single output that contains the extracted data.
Packed Folder Split
The ![]() Packed Folder Split SOP is similar to the Unpack Folder SOP, but instead of outputting only the extracted data, it splits the incoming packed folder structure into two outputs - the original folder structure with the extracted data removed (default setting), and the extracted data.
Packed Folder Split SOP is similar to the Unpack Folder SOP, but instead of outputting only the extracted data, it splits the incoming packed folder structure into two outputs - the original folder structure with the extracted data removed (default setting), and the extracted data.
In addition, the ![]() APEX Pack Character and
APEX Pack Character and ![]() APEX Unpack Character SOPs provide a convenient way to convert KineFX characters (with skin, rest pose, and animated pose) to the packed folder structure.
APEX Unpack Character SOPs provide a convenient way to convert KineFX characters (with skin, rest pose, and animated pose) to the packed folder structure.
Data containers 
Animation scene container 
The animation scene container is the top-level container that contains one or more characters that can interact with each other. The starting point of the scene is usually the characters that are piped into the scene. Other elements are then added as animation is performed in the animate state. These elements include animation clips and constraints.
Note
The elements that are added to a scene while animating (animation clips and constraints) should not be confused with the character elements that are in a character container.

Animation
When animation is performed in the animate state, a folder for the animation clip (*.clip) is added to the /animation directory in the scene container.
Constraints
Constraints are like mini rigs that evaluate the dependency between two controls. When constraints are created in the animate state, a graph for the constraint is added to the /constraints directory in the scene container.
You can have multiple animation scenes within a Houdini scene (.hip) file. This is useful, for example, if you want to work on different versions of an animation scene.
Character container 
The character container contains the rig and all the character elements that the rig needs to be evaluated properly. The character can contain more than one of any given type of character element. For example, there can be 3 shapes in a character container.
The operation of a character is “rig centric”, in that the rig’s inputs determine the character elements that are needed. If a character container contains a particular character element, but that element is not specified as an input to the rig, then the element is not used. For example, there could be 10 shapes in a character container, but if only 2 of them are input to the rig, the rig only uses the 2 shapes. The user may still wish to keep the remaining shapes in the character container for future use.
Note
The term “character container” refers to a generic container that contains a piece of rig logic and the elements referenced by the rig’s inputs. In practice, a character container could be a character, a prop, or an asset.
Houdini expects the name of the character container to have a .char extension. The .char packed primitive is automatically interpreted as a folder in the packed character folder structure. The animate state looks for the rig (.rig extension) inside the .char folder, and based on the rig’s inputs, pulls in the associated character elements (for example, the skeleton or shape) that are stored in the .char folder.
Character element container 
A character element is a single packed geometry that is used when animating a character. The default types are:
Skeleton (.skel)
A KineFX skeleton.
Shape (.shp)
A shape that can be used as a rest skin for deformations.
Rig (.rig)
A graph that modifies a skeleton and/or shape.
Control (.ctrl)
A viewport interaction tool that defines how the UI event in the viewport is being interpreted. For example, it could define a certain behavior when you, say, drag in the viewport. The control is a graph plus a set of shapes you associate with it.
You can also define your own elements with custom extensions.
Assemble data for animation 
The ![]() Pack Folder SOP is used to assemble character elements into the packed folder structure. It can either create a new folder structure or pack into an existing structure.
Pack Folder SOP is used to assemble character elements into the packed folder structure. It can either create a new folder structure or pack into an existing structure.
Add character elements to a packed folder structure 
In this example, we add character elements to a packed folder structure. We have the following character elements - a tube geometry, a skeleton for the tube, and rig logic that performs bone deformation. The ![]() Joint Capture Biharmonic SOP is used to create capture weights on the geometry:
Joint Capture Biharmonic SOP is used to create capture weights on the geometry:

The 2nd input of the ![]() Pack Folder SOP takes in multiple character elements that are added to the packed folder structure. As elements are connected to the Pack Folder SOP, Name parameters are automatically created on the SOP in the order of the input connections. The Name parameters are automatically populated with the names of the input nodes. In this example, we have:
Pack Folder SOP takes in multiple character elements that are added to the packed folder structure. As elements are connected to the Pack Folder SOP, Name parameters are automatically created on the SOP in the order of the input connections. The Name parameters are automatically populated with the names of the input nodes. In this example, we have:
-
1st input: Name:
create_capture_weights -
2nd input: Name:
create_capture_weights -
3rd input: Name:
rig
The Type parameters on the Pack Folder SOP are not populated because the input nodes are not named with extensions.
To better indicate what the inputs are, we can rename the character elements and their extensions in the packed folder structure by updating the Name and Type parameters in the Pack Folder SOP:
-
1st input: Name:
Base, Type:shp -
2nd input: Name:
Base, Type:skel -
3rd input: Name:
Base, Typerig
Note
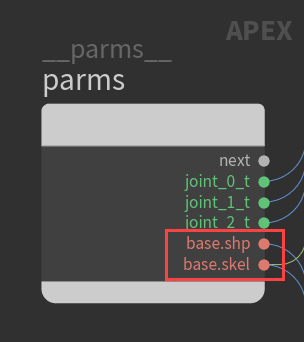
The character element names referenced by the rig graph inputs must match the character element names in the packed folder structure. This is so that the rig knows which character elements to pick up and use.
The image below shows the graph inputs of the ![]() APEX Graph SOP,
APEX Graph SOP, rig, from our example above. You can rename the graph input ports to match the element names in the packed folder structure by ![]() clicking the port names. See APEX graphs for more information on building and running graphs.
clicking the port names. See APEX graphs for more information on building and running graphs.
View the packed folder structure 
You can view the contents of the packed folder structure in two ways - using the rig tree view and the geometry spreadsheet. The rig tree view shows the entire hierarchy of the packed folder structure, whereas the geometry spreadsheet only shows the top level of the packed folder structure.
Rig tree view
-
Select the Pack Folder SOP in the network editor.
-
To open the rig tree view, click the
 New Tab icon at the top of a pane and select New Pane Tab Type ▸ Animation ▸ Rig Tree.
 -
In the rig tree view, beside the node name (in our case,
assemble_character_elements), set the drop-down box to the output. -
Set Type to Packed Folders.
-
You can view the packed folder structure in two ways:
-
Set Hierarchy to Topology to view the packed folder structure as a tree view.
-
Set Hierarchy to Flat List to view the packed folder structure as a flat list.
The following packed folder structure will be displayed:
/
-- Base.rig
-- Base.shp
-- Base.skel
-
Geometry spreadsheet
-
Select the Pack Folder SOP in the network editor.
-
To open the geometry spreadsheet, click the
New Tab icon at the top of a pane and select New Pane Tab Type ▸ Inspectors ▸ Geometry Spreadsheet. -
Click
 Primitives on the top toolbar of the geometry speadsheet. The character elements (Base.shp, Base.skel, and Base.rig) will be listed.
Assemble an animation scene 
In this example, we assemble a scene for animation using an ![]() APEX Scene Add Character SOP for each character. The APEX Scene Add Character SOP adds a character’s elements to a character (.char) folder, and adds the character to an animation scene:
APEX Scene Add Character SOP for each character. The APEX Scene Add Character SOP adds a character’s elements to a character (.char) folder, and adds the character to an animation scene:
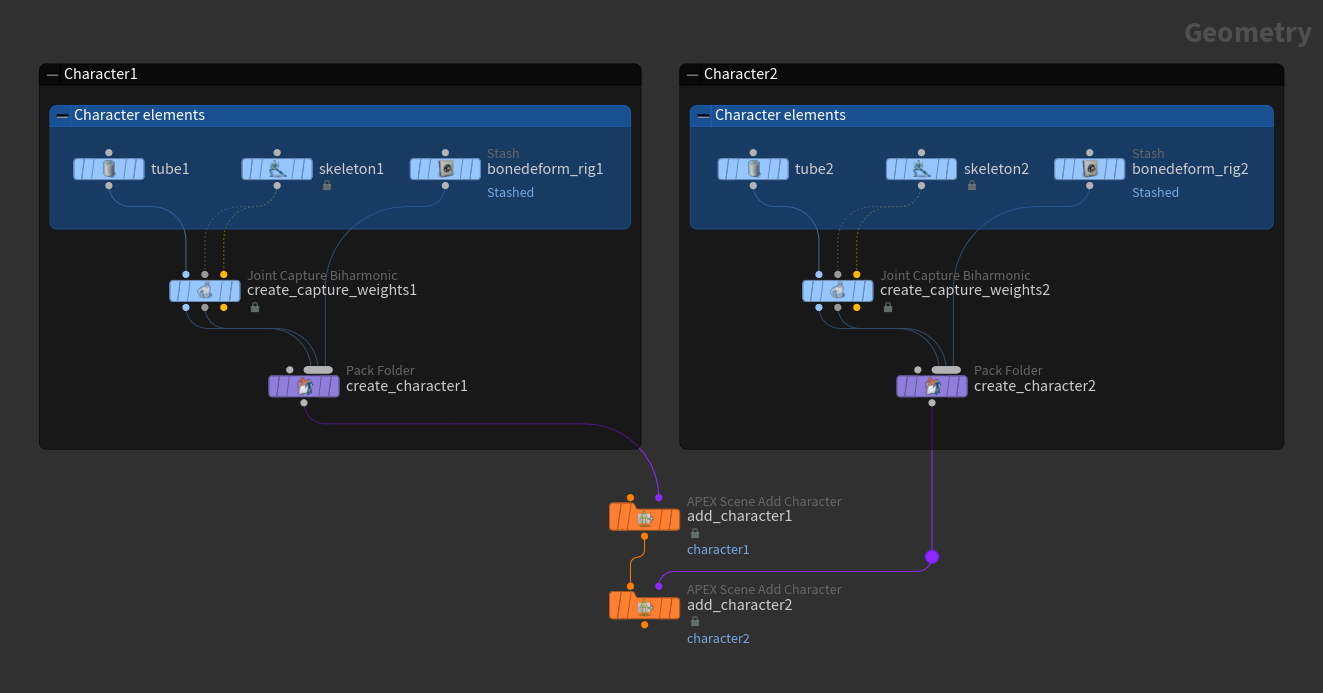
On each of the APEX Scene Add Character SOPs, specify a name for the character in the Character Name parameter. See animation workflow for more information on assembling an animation scene.
We have the following packed folder structure in the scene container (after renaming the character elements in the Pack Folder SOPs):
/
-- character1.char/
    -- Base.rig
    -- Base.shp
    -- Base.skel

-- character2.char/
    -- Base.rig
    -- Base.shp
    -- Base.skel
To pose and animate characters in the animate state:
-
Pipe the scene into an
 APEX Scene Animate SOP:
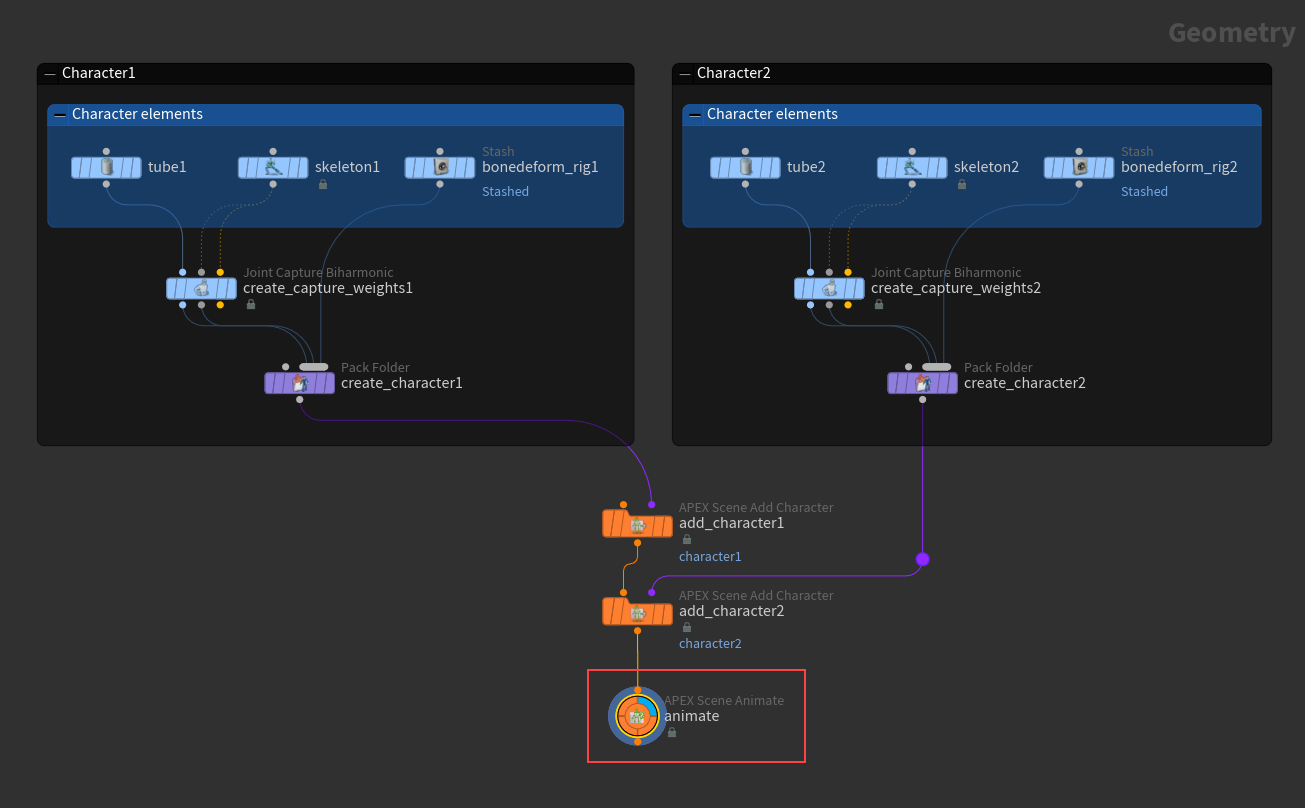
Perform animation on the APEX Scene Animate SOP -
Select and display the APEX Scene Animate SOP.
-
Click
 Animate on the left toolbar.
Extract data from a packed folder structure 
The ![]() Unpack Folder and
Unpack Folder and ![]() Packed Folder Split SOPs are used to extract character elements from a packed folder structure. Both SOPs take as input a packed folder structure, and uses the APEX path pattern syntax to search for the data to extract. The Unpack Folder SOP has a single output that contains the extracted data, whereas the Packed Folder Split SOP splits the incoming packed folder structure into two outputs - the original packed folder structure with the extracted data removed (default setting), and the extracted data.
Packed Folder Split SOPs are used to extract character elements from a packed folder structure. Both SOPs take as input a packed folder structure, and uses the APEX path pattern syntax to search for the data to extract. The Unpack Folder SOP has a single output that contains the extracted data, whereas the Packed Folder Split SOP splits the incoming packed folder structure into two outputs - the original packed folder structure with the extracted data removed (default setting), and the extracted data.
Note
If you want to analyze a single element in a character, you can use the Unpack Folder SOP to extract that one element. If you want to modify something on an existing character (for example, grab the current skeleton, add a joint, and pipe it back into the skeleton), you can use the Packed Folder Split SOP.
In this example, we use the Unpack Folder SOP to extract a rig from the scene:

In the Unpack Folder SOP, set Extract Pattern to /character1.char/Base.rig to extract the rig from the character1 container.
Warning
If the search pattern matches multiple rigs in the scene (for example, /**/*.rig), you could end up extracting multiple rigs that are then merged into one unpacked geometry. The APEX network view may display a graph that looks valid, but the graph may exhibit unexpected behavior.
Note
On the Unpack Folder SOP:
-
If Unpack Contents is turned on, the rig that is extracted is unpacked, which gives you the rig graph geometry. You can view this rig graph in the APEX network view.
-
If Unpack Contents is turned off, the rig that is extracted is a packed primitive instead of a graph geometry. The APEX network view will not display this packed primitive rig.
The rig tree view only shows data that is packed in the packed folder structure. If Unpack Contents is turned on, the extracted data is unpacked geometry, and the rig tree view will not display any data.
To view the extracted packed primitives in the rig tree view:
-
On the Unpack Folder SOP, turn off Unpack Contents.
-
In the rig tree view, beside the node name (in our case,
extract_rig), set the drop-down box to the output. -
Set Type to Packed Folders.
The data that is extracted is displayed as follows:
/
-- Base.rig
Pack KineFX characters into the packed folder structure 
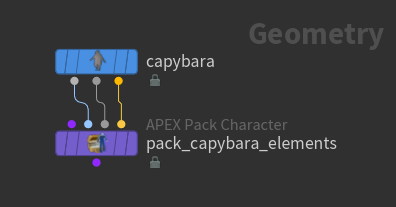
The ![]() APEX Pack Character SOP provides a convenient way to pack a KineFX character (with skin, rest pose, and animated pose) into a packed folder structure. The SOP also has an option to automatically create a rig for the character with FK and bone deform functionality.
APEX Pack Character SOP provides a convenient way to pack a KineFX character (with skin, rest pose, and animated pose) into a packed folder structure. The SOP also has an option to automatically create a rig for the character with FK and bone deform functionality.
The ![]() APEX Unpack Character SOP is the reverse operation of the APEX Pack Character SOP, unpacking a character from a packed folder structure and outputting the character’s skin, rest pose, and animated pose.
APEX Unpack Character SOP is the reverse operation of the APEX Pack Character SOP, unpacking a character from a packed folder structure and outputting the character’s skin, rest pose, and animated pose.
Add a character to the packed folder structure 
In this example, we add the skin, rest pose, and animated pose of the ![]() Capybara test geometry to a packed folder structure using the APEX Pack Character SOP:
Capybara test geometry to a packed folder structure using the APEX Pack Character SOP:
-
If an existing character or scene is not input to the APEX Pack Character SOP (the 1st input is not connected), the character elements are added to a new packed folder structure as top-level elements. See the packed folder structure in the rig tree view:
/
-- Base.shp
-- Base.skel
-
To also add a character rig to the packed folder structure, turn on Add FK and Bone Deform Components. This creates a rig that contains an FK hierarchy for all the joints as well as bone deformation functionality. See graphs for deforming geometry for more information. The packed folder structure is now:
/
-- Base.rig
-- Base.shp
-- Base.skel
-- Guides.skel
(
Guides.skelis a guide skeleton created by the fk rig component inside the APEX Pack Character SOP.) -
At this point, you can connect the APEX Pack Character SOP to an
 APEX Scene Add Character SOP to assemble an animation scene:
-
On the APEX Scene Add Character SOP, set the Character Name. In our example, we set Character Name to
capy. The packed folder structure is now:/ -- capy.char/ -- Base.rig -- Base.shp -- Base.skel -- Guides.skel
Add to an existing scene 
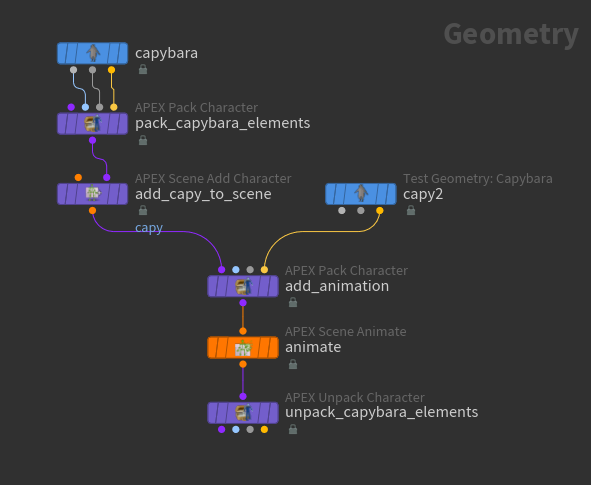
We now add the animation from a second Capybara to the Capybara from the above example:

-
Connect the existing animation scene to the 1st input of the APEX Pack Character SOP,
add_animation. -
When adding animation and not packing any other character elements, we only need to connect the 3rd output (animated pose) of the second Capybara,
capy2, to the APEX Pack Character SOP. -
On the APEX Pack Character SOP,
add_animation:-
Turn on Character Name and set it to the name of the character to add the animation to,
capy. -
Remove the value from Shape Path because we don’t want to replace the skin of the original Capybara.
Note
When adding animation, Skeleton Path and Rig Path need to be populated so that the node finds the skeleton and rig to add the animation to.
-
Turn on the Animation parameter.
-
By default, Capy’s animation is written out as keys on every frame. To change the frames on which to set keys, update the Frame Pattern using Houdini’s group syntax. For example,
1-100:2 ^10-20sets keys on every other frame from frames 1 to 100 except between frames 10 and 20.
The packed folder structure is now:
/
-- animation/
    -- default.clip/
-- capy.char/
    -- Base.rig
    -- Base.shp
    -- Base.skel
    -- Guides.skel
Animation on Capy -
-
Use the
APEX Scene Animate SOP to update the animation:-
Enter the animate state - select the APEX Scene Animate SOP, turn on its display flag, and click
Animate on the left toolbar. -
Select the controls and edit the keys.
After updating the animation - Capy on a mission -
Unpack a character from the packed folder structure 
In this example, we unpack the previous animation scene using the ![]() APEX Unpack Character SOP:
APEX Unpack Character SOP:
-
On the APEX Unpack Character SOP, set Character Name to
capy. -
Using the APEX Unpack Character SOP, you can view the unpacked character elements in the viewport:
-
Set the display flag on the APEX Unpack Character SOP.
-
Choose from the available options in the Visualize Output drop-down menu.
-
-
Capy’s skin, rest pose, and animated pose are available on the 2nd, 3rd, and 4th outputs of the APEX Unpack Character SOP. You can now use various non-APEX KineFX SOPs to perform further processing on the character data, for example, the
 Rig Pose SOP,
  Joint Deform SOP, and
  ROP FBX Character Output SOP.
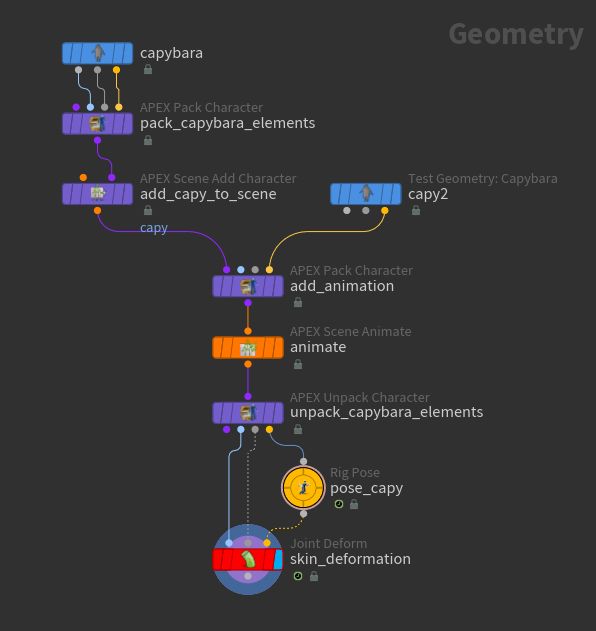
Use KineFX SOPs after unpacking Capybara
How-to 
| To... | Do this |
|---|---|
|
View the packed folder structure |
You can view the contents of the packed folder structure in two ways - using the rig tree view and the geometry spreadsheet. See viewing the packed folder structure for more information. When viewing the packed folder structure on the |
|
View the primitives in the geometry spreadsheet |
In the geometry spreadsheet, you can view:
Note The geometry spreadsheet only shows what is packed at the top level of the selected node, while the rig tree view shows the entire hierarchy of the packed folder structure. You can see whether the packed primitive in the packed folder structure is a folder or element using the
Note If you have Unpack Contents turned on in the Unpack Folder SOP or Packed Folder Split SOP, the data that is extracted is unpacked, so the |
Pack Folder SOP 
| To... | Do this |
|---|---|
|
Create a new packed folder structure |
Don’t connect anything to the 1st input of the Pack Folder SOP. Data connected to the 2nd input will be used to create a new packed folder structure. |
|
Add to an existing packed folder structure |
Connect the existing packed folder structure to the 1st input of the Pack Folder SOP. |
|
Add data to the packed folder structure |
Connect data to the 2nd input of the Pack Folder SOP. The Name and Type parameters are automatically populated with the names and extensions detected from the inputs. You can specify relative paths in the Name parameter. For example, if Parent Folder is set to |
|
Add data to a particular folder in the packed folder structure |
In the Parent Folder parameter, specify the folder path to add the input data to. If the path does not exist, it will be created. or
Note If you fill in the Parent Folder parameter with a path that does not exist, the path will be created. If you fill in the Parent Folder parameter with an element (non-folder) name, there will be an error on the Pack Folder SOP. |
|
Use the input geometry names in the packed folder structure |
Consider the example where two box geometries are connected to a 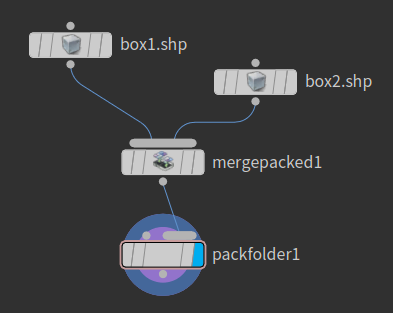
When you connect data to the 2nd input of the Pack Folder SOP, the Name and Type parameters are automatically populated with the names and extensions detected from the connected inputs. In this case, Name is set to / -- mergepacked1 If you click the / -- box1.shp -- box2.shp Note The Name From Input option can only be used if the input geometry has a When using the Name SOP, set the Class parameter to Primitive. |
|
Add data using a built-in extension |
The built-in extensions .char and .ctrl are added to the packed folder structure as folders, whereas all other built-in extensions are added as elements. When adding an input as a folder:
|
|
Add data using a custom extension |
Specify a custom extension in the Type parameter. The |
|
Specify how to handle new data that has the same name as existing data in the folder structure |
Choose between three options in the Replace Method parameter: Add and Replace New items are added, and existing items are replaced. Add and Keep Existing New items are added, and existing items are kept the same. Replace New items are not added, and existing items are replaced. |
|
Reset the names/types of the packed objects to those of the input nodes |
Click the Reload Names button. |
|
Ignore inputs with no geometry |
Turn on the Ignore Empty Inputs option. |
|
Only pack data that is unpacked (don’t pack data that is already packed) |
See the |
Unpack Folder SOP and Packed Folder Split SOP 
| To... | Do this |
|---|---|
|
View the extracted data |
The extracted data can be viewed in both the rig tree view and geometry spreadsheet. In the rig tree view:
In the geometry spreadsheet:
|
|
Extract data from a particular path |
In the Extract Pattern parameter, put the path to the file you want to extract, for example, |
|
Extract all data with a specific name |
For example, to extract all data named box2.shp, put |
|
Extract all data with a specific extension |
For example, to extract all .shp files, put |
|
Extract data based on an attribute or group name |
In the Extract Pattern parameter, enclose the search pattern in “ For example, Note Data is only extracted if all of its primitives match the search pattern. For example, if a data’s primitives have indices from 0-5, then a search pattern of You can also combine path and attribute/group search patterns. For example, See APEX path pattern for the pattern matching syntax, including the use of |
|
Unpack the extracted data |
Turn on the Unpack Contents parameter. If the data has been packed multiple times (there are multiple levels of packing), turning on Unpack Contents only unpacks the top level of the extracted data. |
|
Keep the extracted data in the Packed Folders output (for the Packed Folder Split SOP) |
Turn on the Extract Only parameter. The data is only extracted and not removed from the Packed Folders output. |
|
Output the non-extracted data (for the Unpack Folder SOP) |
Turn on Invert. |
|
Reverse the order of the outputs (for the Packed Folder Split SOP) |
Turn on Invert Selection. |