| On this page |
This page highlights some of the translations and differences between Maya™ and Houdini within the realm of character animation and rigging.
See the general Maya transition guide for some of the basic differences in the user interface concepts and hotkeys between Maya and Houdini.
Note
On the Mac, use ⌘ instead of ⌃ Ctrl.
Concepts 
Function |
Maya |
Houdini |
|---|---|---|
Choose channels to key |
Channel Box |
Channel list, animate state parameters HUD |
Edit animation curves |
Graph Editor |
|
Edit animation timing |
Dope Sheet Editor |
|
Control animation playback |
Time Slider, Range Slider, and playback controls |
|
Identify events in animation |
Time Slider Bookmarks |
|
Group character controls |
Character sets (groups controls), Display Layer Editor (controls visibility) |
|
Create layers of animation |
Animation Layer Editor |
|
Edit animation clips |
Time Editor |
|
Modify rig functionality using graphs |
Node Editor |
|
Preview animation |
Playblast |
Moving objects 
Maya’s manipulator is Houdini’s handle. Houdini’s handle preferences can be found in Edit ▸ Preferences ▸ Handles.
In the table below, the Houdini functionality can only be performed on the handle in the animate state. For an animate state handle configuration that may be more familiar for Maya users:
-
Go to the animate state handle preferences in Edit ▸ Preferences ▸ Handles, Defaults tab, APEX Animate Transform section.
-
Turn on Apply APEX Handle Settings Automatically.
-
Set Presets to Traditional and click Apply Preset.
See the general Maya transition guide for handle translations between Maya and Houdini outside of the animate state.
Function |
Maya |
Houdini |
|---|---|---|
Move |
W |
T or click |
Rotate |
E |
R or click |
Scale |
R |
E or click |
Move an object along a particular axis |
Click a transform component and |
In Houdini’s handle preferences, Defaults tab, APEX Animate Transform section, turn on Indirect Drags Apply to Selected Component. You can now select a transform component and |
Change the manipulator alignment |
Hold W/E/R (for translate/rotate/scale), hold down the |
|
Change the manipulator size |
+, - |
* (larger), & (smaller) In Houdini’s handle preferences, Defaults tab, APEX Animate Transform section, adjust the Global Scale. |
Setting keys 
|
Function |
Maya |
Houdini |
|---|---|---|
|
Set a keyframe |
S Keyed attributes are indicated in red in the channel box, time slider, and attribute editor. |
K Keyed channels are indicated in green in the channel list, timeline, and parameter editor. See how keyframes are color coded. |
|
Key translate |
⇧ Shift + W |
⇧ Shift + T |
|
Key rotate |
⇧ Shift + E |
⇧ Shift + R |
|
Key scale |
⇧ Shift + R |
⇧ Shift + E |
|
Turn on auto-key |
Auto keyframe toggle |
On the playbar keyframing controls, click the arrow beside the Note Maya users may want to turn off the auto-commit option. |
Editing channel values 
Maya’s channel box is Houdini’s channel list.
Function |
Maya |
Houdini |
|---|---|---|
Adjust channel values |
In the channel box, drag the attribute values. |
In the channel list, |
Editing animation curves in the graph editor 
Maya’s graph editor is Houdini’s animation editor graph view. The image below shows the different handles in Houdini’s graph view:
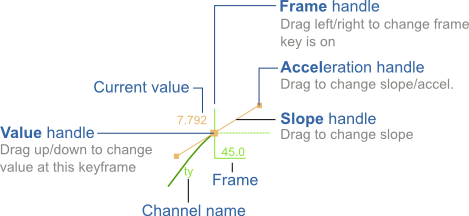
In Houdini, animation curves are often referred to as animation channels. Tangents are controlled by the slope handle, and tangent lengths are controlled by the acceleration handle.
|
Function |
Maya |
Houdini |
|---|---|---|
|
Scrub within the graph editor |
Hold K while dragging. |
Drag the time bar that indicates the current frame. |
|
Framing options |
The view option buttons on the top toolbar:
|
On the right toolbar:
To frame part of the graph data:
See navigating in the graph view for more information. |
|
Scale the graph editor view |
Alt + ⇧ Shift + |
|
|
Set the curve display options |
Absolute View - press 1 Stacked View - press 2 Normalized View - press 3 |
See the graph view display toolbar for more information. |
|
Go to the previous/next keyframe |
, to go to the previous keyframe. . to go to the next keyframe. |
Same as Maya or ⇧ Shift + ← to go to the previous keyframe. Same as Maya or ⇧ Shift + → to go to the next keyframe. |
|
Move the selected keyframe in any direction |
Drag the keyframe. or Select the keyframe and |
⌃ Ctrl drag the keyframe. or Select the keyframe and ⌃ Ctrl + |
|
Move the selected keyframe in X or Y only |
⇧ Shift drag the keyframe. or Select the keyframe and ⇧ Shift + |
Drag the keyframe. The direction is locked to the initial drag direction. or Select the keyframe and |
|
Move the selected keyframe forward or backward a specific number of frames |
In the time field:
|
In the Frame field:
|
|
Scale a group of keys |
Enter the scale tool (press R), select a group of keys, and |
Click |
|
Change the shape of the curve |
Choose from the options on the top toolbar or the Tangents menu. |
Choose from or Select from the Function field on the bottom toolbar. or Use the |
|
Weighted and non-weighted tangents |
Select Curves ▸ Weighted/Non-weighted Tangents, or |
By default, channels in Houdini are Bezier curves, where the slope and acceleration can be changed (weighted tangents in Maya). If you want non-weighted tangents, change the channel to a cubic curve:
You can change the default curve in the animation preferences, which can be accessed through Houdini’s Edit menu ▸ Preferences ▸ Animation. In the Initial Segment section, set the Default Function and Rotation Function. |
|
Lock the tangent direction |
⇧ Shift + |
⌃ Ctrl drag the acceleration handle. |
|
Change the tangent to a flat tangent |
Select a key and click the Flat tangents button. |
See the graph view for more ways to set the slope values with the Set Selected Slopes to* options. |
|
Separate or unify the left and right sides of the tangent handle |
Click the Break tangents and Unify tangents buttons. |
Click the |
|
Cycle the animation |
Click the Pre-infinity cycle and Post-infinity cycle buttons. |
Select Channels ▸ Edit Channel Properties. In the window that pops up, set the behavior of the curve under the Before and After columns, for example, Cycle and CycleOffset. See the Edit Channel Properties window for more information. |
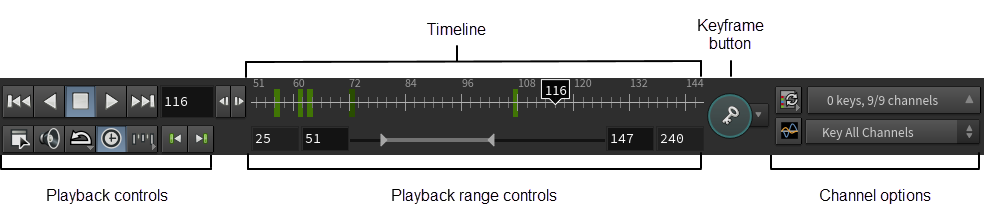
Working in the timeline 
Maya’s time slider, range slider, and playback controls are encompassed in Houdini’s playbar:
Playing back animation 
Function |
Maya |
Houdini |
|---|---|---|
Play animation |
Alt + V |
↑ |
Play animation in real time |
|
Turn on the |
Loop the animation |
Click the loop button on the time slider to cycle through the different playback options. |
On the timeline, click the |
Next frame |
Alt + . |
Same as Maya or → |
Previous frame |
Alt + , |
Same as Maya or ← |
Next keyframe |
. |
Same as Maya, ⇧ Shift + →, or |
Previous keyframe |
, |
Same as Maya, ⇧ Shift + ←, or |
Display the frame rate |
Turn on Display ▸ Heads Up Display ▸ Frame Rate |
Press D over the viewport to bring up the Display Options window. In the Guides tab, turn on Draw Time (FPS). |
Animation preferences |
The Animation and Time Slider sections in the Preferences window - Windows ▸ Settings/Preferences ▸ Preferences. |
The animation preferences can be found in Edit ▸ Preferences ▸ Animation. To open the animation playback settings, click the |
Editing keys 
|
Function |
Maya |
Houdini |
|---|---|---|
|
Move a key |
|
|
|
Move a range of keys |
|
Same as Maya. |
|
Copy a key |
|
|
|
Copy a range of keys |
|
See editing keys on the timeline for more copy and paste options. |
|
Scale a range of keys |
|
|
Animating 
The animation functionality in the table below can only be performed in Houdini’s animate state.
|
Function |
Maya |
Houdini |
|---|---|---|
|
Add a constraint |
|
|
|
Adjust the parent’s influence on the child |
|
|
|
Create an aim constraint |
Select Constraint ▸ Aim. |
Create a LookAt constraint. |
|
Create a locator |
Select Create ▸ Locator. |
See locators for more information. |
|
Create breakdown poses |
Use tweenMachine. |
The animation toolbar consists of simple slider tools that allow you to quickly create breakdown poses and apply modifications to animation curves. |
Displaying controls and geometry 
Maya’s character sets are Houdini’s selection sets. Houdini’s selection sets allow you to group controls and manage their selection and visibility. The visibility of character geometry can also be controlled using selection sets.
Selection sets can only be used in the animate state.
|
Function |
Maya |
Houdini |
|---|---|---|
|
Create a set |
|
|
|
Show/Hide controls |
Alt + 1 |
In the selection set pane or HUD, toggle the |
|
Show/Hide the geometry/character |
Alt + 2 |
In the selection set or HUD, toggle the |
|
Hide objects during playback |
In the display layer editor, turn off P for the set. |
In the animate state’s handle parameters window, there are options to Hide Controls During Playback, Hide Controls During Scrub, and Hide Controls During Drag. |
Skeletons 
In Houdini, a joint is just a point with a name attribute, so you can use any method to create a set of points, and connect the points to a ![]() Skeleton SOP or
Skeleton SOP or ![]() Rig Doctor SOP to turn the points into joints. See working with skeletons for more information on how to create a skeleton, orient and mirror its joints, and blend between different skeletons.
Rig Doctor SOP to turn the points into joints. See working with skeletons for more information on how to create a skeleton, orient and mirror its joints, and blend between different skeletons.
|
Function |
Maya |
Houdini |
|---|---|---|
|
Create joints |
In the Rigging menu set, select Skeleton ▸ Create Joints. To create joints at the center of a mesh, turn on Projected Centering. The outliner displays the joint hierarchy. |
Use the To create joints at the center of a mesh, set Joint Placement to View Based in the Skeleton viewer state. To enter the Skeleton viewer state:
The rig tree view displays the joint hierarchy. |
|
Tweak the joints |
Select a joint, select the move tool, and on the move tool settings, turn on Preserve Children and Tweak Mode. Alternatively, enter pivot mode by pressing Insert. |
In the Skeleton viewer state, set Mode to Modify, and turn on Child Compensate and Tweak Mode. See the |
|
Parent joints |
Select the child joint, ⇧ Shift select the parent joint, and press P. |
In the Skeleton viewer state, set Mode to Create. Click the parent joint, then click the child joint. |
|
Orient joints |
In the Rigging menu set, select Skeleton ▸ Orient Joint. |
See orienting joints. |
|
Mirror joints |
In the Rigging menu set, select Skeleton ▸ Mirror Joints. |
Use the |
Skinning 
Maya’s “bind skin” is Houdini’s capture method, which creates weights on geometry for skin deformation. Houdini provides different methods of creating weights on geometry through the use of several SOPs, including the ![]() Joint Capture Biharmonic SOP,
Joint Capture Biharmonic SOP, ![]() Joint Capture Proximity SOP, and
Joint Capture Proximity SOP, and ![]() Capture Packed Geometry SOP. See skin capture for more information on how to use these SOPs.
Capture Packed Geometry SOP. See skin capture for more information on how to use these SOPs.
|
Function |
Maya |
Houdini |
|---|---|---|
|
Skin joints |
Select Skin ▸ Bind Skin. |
See skin capture for information on how to use the different capture SOPs to create weights on geometry. |
|
Paint skin weights |
Select Skin ▸ Paint Skin Weights |
Use the |
Rigging 
Houdini’s pre-built rig components allow you to easily add functionality to your character rig. For example, Houdini’s multi IK rig component adds IK functionality similar to creating an IK handle in Maya.
See the rigging overview for other methods of building rigs in Houdini.
|
Function |
Maya |
Houdini |
|---|---|---|
|
Create a control for a joint |
Create a curve for the control, parent the control, constrain the control to the joint. |
The FK transform rig component takes your entire skeleton and transforms it into a rig hierarchy, where each skeleton joint is represented as a node in the rig. You can then easily turn any rig node into a control. See rigging a simple geometry for an example. |
|
Hide certain control transform components/attributes |
|
On the FK transform rig component, only specify the control transform components you want access to in the Promote T, Promote R, and/or Promote S parameters. |
|
Change the color of a control |
In the attribute editor, change the color of the control in the Display ▸ Drawing Overrides section. |
Use the |
|
Add IK functionality |
In the Rigging menu set, select Skeleton ▸ Create IK Handle. |
Use the multi IK rig component. See rigging a simple geometry and rigging a character for example uses of this component. |
|
Add IK spline functionality |
In the Rigging menu set, select Skeleton ▸ Create IK Spline Handle. |
Use the spline rig component. See rigging a character for an example use of this component. |
|
Create a basic rig |
In the Rigging menu set, select Skeleton ▸ Quick Rig. |
Use the APEX Autorig Builder SOP. |