| On this page |
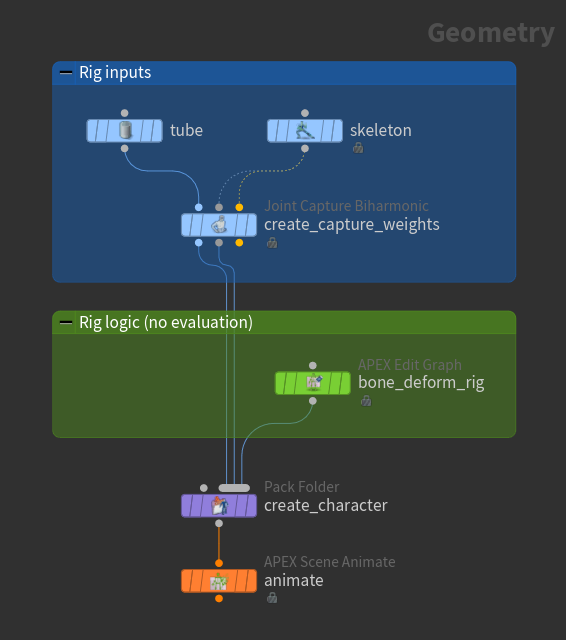
This page gives an example of a SOP network and graph rig logic for deforming a 3-joint tube geometry.
SOP network 
The SOP network below takes us from character elements to the animation environment:
-
The character elements are prepared by creating the skeleton, tube geometry, and capture weights on the geometry.
-
The rig logic lives in the
 APEX Graph SOP.
 -
The
 Pack Folder SOP assembles the character elements into a character, and the
  APEX Scene Add Character SOP adds the character to an animation scene. See assembling animation data for more information.
 -
The animation scene is input into the
 APEX Scene Animate SOP, where Houdini’s animation environment lives.
Rig logic 
The graph below displays the rig logic in the ![]() APEX Graph SOP for deforming a 3-joint tube geometry:
APEX Graph SOP for deforming a 3-joint tube geometry:
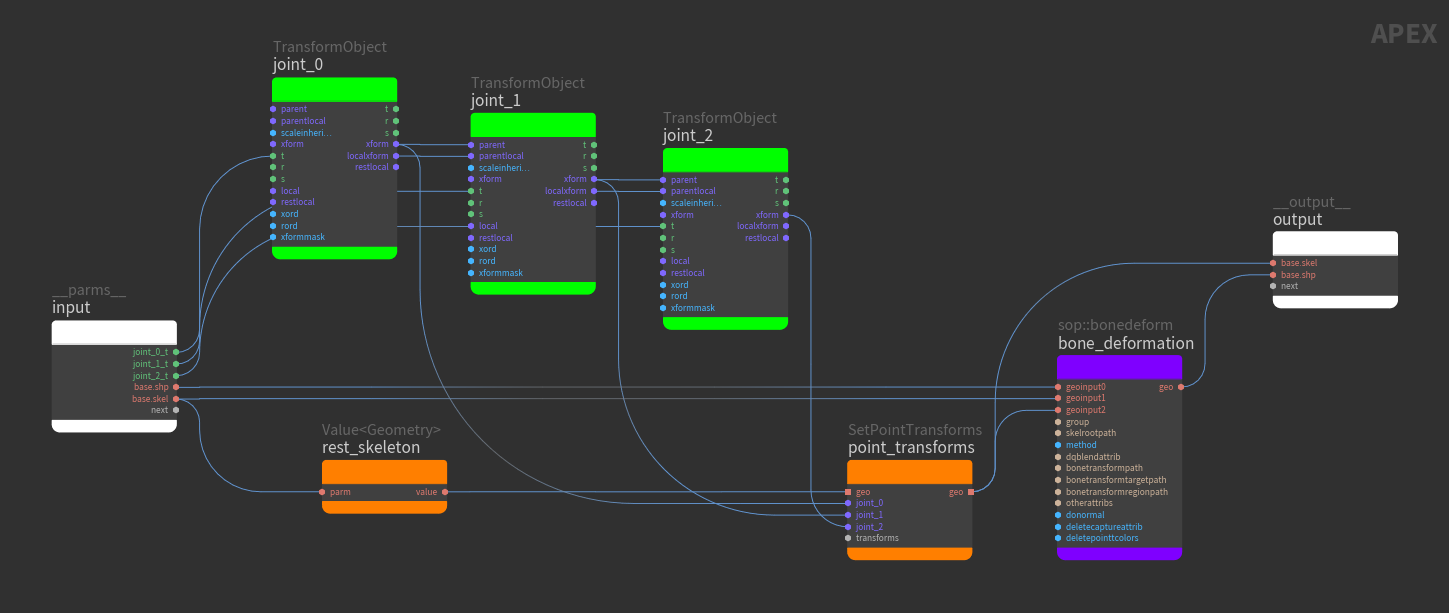
FK hierarchy
The three ![]() TransformObject (green) nodes establish a 3-joint FK hierarchy, with
TransformObject (green) nodes establish a 3-joint FK hierarchy, with joint_0 as the parent of joint_1, which is the parent of joint_2. The world transforms of the joint_0, joint_1, and joint_2 TransformObject nodes are piped into the ![]() skel::SetPointTransforms node, which updates the joints on the skeleton. The output of skel::SetPointTransforms is the animated skeleton, which goes into the
skel::SetPointTransforms node, which updates the joints on the skeleton. The output of skel::SetPointTransforms is the animated skeleton, which goes into the ![]() sop::bonedeform node.
sop::bonedeform node.
skel::SetPointTransforms is a skeleton deformer. It takes in transforms and applies them to skeleton joints. It is a special node in that the subports names of the transforms variadic input is important because they map to the joint names on the input skeleton (geo input). For example, changes to the transforms going into the joint_0 subport will update joint_0 on the skeleton.
Important
For this reason, you need to update the subport names on skel::SetPointTransforms to match the joint names on the skeleton (rename subports by ![]() clicking the subport name).
clicking the subport name).
Note
The names of the TransformObject nodes do not need to match the skeleton joint names unless you want to update the rest positions of the rig hierarchy from a skeleton using the Update Rest Transforms From Skeleton button on the ![]() APEX Graph SOP (see the how-to for information on how to do this).
APEX Graph SOP (see the how-to for information on how to do this).
In our example, the joint names on the skeleton were renamed from the default point_0, point_1, and point_2 to joint_0, joint_1, and joint_2. To rename the joints in the ![]() Skeleton SOP:
Skeleton SOP:
-
Select the Skeleton SOP and enter its viewer state (press Enter over the viewport).
-
On the viewer state toolbar, set the Mode to Modify (or press F over the viewport).
-
Click each point on the skeleton and rename the joint in the Name field on the viewer state toolbar.
![]() Value node
Value node
The rest skeleton is used as a reference for performing geometry deformation. The difference between the transforms of the rest and animated skeleton are calculated, and this difference is used to detemine how the geometry is deformed. skel::SetPointTransforms performs an in-place change of the geometry that is piped in, so we need to use a Value<Geometry> node to make a copy of the rest skeleton before it is piped into skel::SetPointTransforms. If this copy is not created, skel::SetPointTransforms will update the rest skeleton; the rest and animated skeletons will be the same, and no difference transforms will be applied to the geometry deformation.
Bone deformation
The first three inputs of the sop::bonedeform graph node correspond to the three inputs of the ![]() Bone Deform SOP.
Bone Deform SOP.
View geometry deformation 
View the geometry deformation in the animate state:
-
Select the
APEX Scene Animate SOP in the network editor and turn on its display flag. -
Click
 Animate on the left toolbar.
Note
If the geometry in the animate state looks mangled, it could be that the rest transforms in the rig graph are not set properly. To set the rest transforms based on the skeleton:
-
Make sure the names of the TransformObject nodes match the names of the skeleton joints.
-
Select the
APEX Graph SOP in the network editor. -
Click Update Rest Transforms From Skeleton in the parameter editor.
-
When the dialog comes up, select the
 Skeleton SOP in the network editor, which automatically selects the Skeleton node in the dialog.
 -
Click Accept.
-
Select the APEX Scene Animate SOP and click Reset All.
-
Enter the animate state.
How-to 
| To... | Do this |
|---|---|
|
Create a rig hierarchy that corresponds to a skeleton |
Use the Import KineFX Skeleton button on the |
|
Update the rest positions of the rig hierarchy from a skeleton |
|