| On this page |
|
Constraints create relationships between controls, where the constrained (driven) control is affected by the position or movement of the driver control. The following types of constraints are available in the animate state:
There is also a special type of constraint called a transient constraint, which is only active within a frame range. All of the above constraints can be added as transient constraints.
Offset constraint 
Offset constraints keep an offset between the driver and driven controls. In this example, we constrain a guitar (driven) to  Electra’s cog (driver). We start with a scene that contains animation only on Electra:
-
In the animate state parameters, go to the Constraint tab.
-
In the Parameters section, set Constraint to Offset.
-
Select the guitar’s control.
Note
The two parameters below the Constraint parameter show the order to select the controls. For offset constraints, select the driven control, then the driver. If you select more than two controls before creating the constraint, the last selected control is the driver, and all the other controls are driven controls.
-
Hold ⇧ Shift and select Electra’s cog control.
-
Press H over the viewport or click
 on the top toolbar. A constraint is added and the driven control turns gray. A dotted line appears with an arrow pointing from the driver to the driven control, and you will not be able to move the guitar control because it is now constrained to Electra’s cog.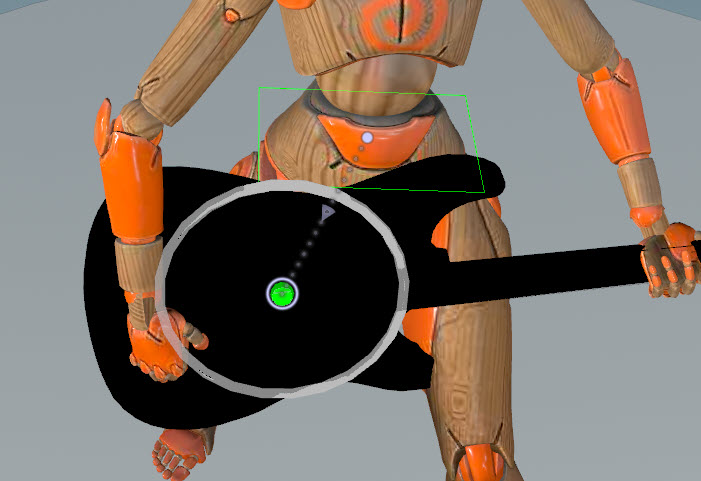
Guitar constrained to Electra’s cog -
We want to constrain Electra’s left hand to the neck of the guitar. To do this, first create a locator on the neck of the guitar:
-
Enter the locator tool.
-
To create a locator, press H over the viewport or click
on the top toolbar. -
Position the locator at the neck of the guitar.
Note
If you are working with animation layers, the locator needs to be added to the current layer before you can move it. Select the locator, go to the animation layers pane,
 click the layer, and select Add Selected Controls to Layer.
 -
Exit the locator tool.
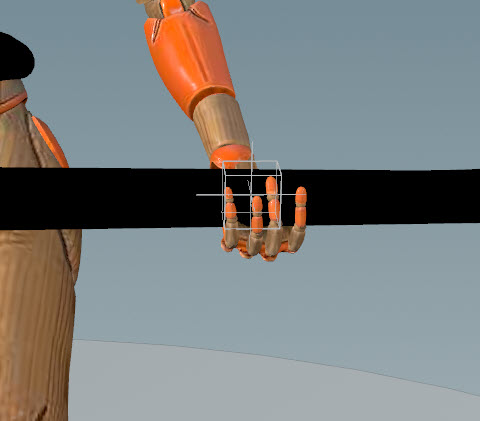
Locator on the neck of the guitar -
-
Constrain the locator to the guitar so that as the guitar moves, the locator stays at the neck of the guitar. Select the locator, hold ⇧ Shift, select the guitar control, and press H over the viewport.
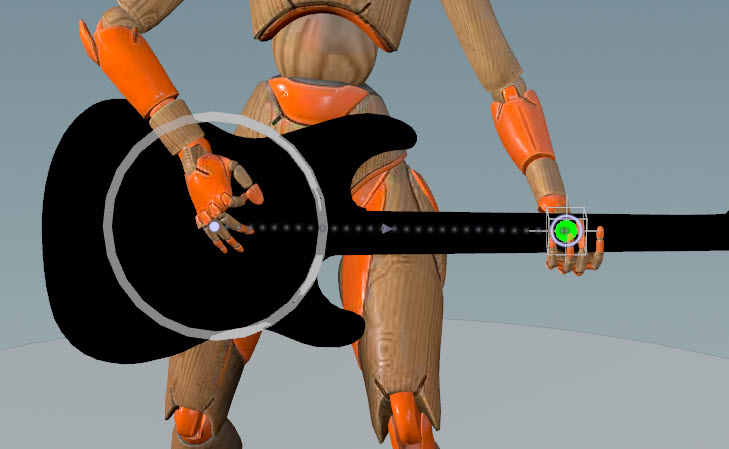
Locator constrained to the guitar -
Constrain Electra’s hand to the locator - select Electra’s hand, hold ⇧ Shift, select the locator, and press H over the viewport.
Electra’s hand constrained to the neck of the guitar -
Rotate Electra by setting keys on her cog control.
Note
If you are working with animation layers, the cog control needs to be added to the current layer before you can set keys on it.
Rotate Electra -
The strumming hand doesn’t follow the guitar after rotating Electra, so create a parent constraint between the guitar control and Electra’s hand. This way, as the guitar (driver parent) moves, Electra’s strumming hand (driven child) moves along with it:
-
Select Electra’s right hand control.
-
Hold ⇧ Shift and select the guitar control.
-
In the animate state parameters, Constraint tab, Parameters section, set Offset to Parent.
-
Press H over the viewport.
Electra’s strumming hand follows the guitar -
We now have the following constraints added to the scene:
-
The guitar is constrained to Electra’s cog.
-
The locator on the neck of the guitar is constrained to the guitar.
-
Electra’s left hand is constrained to the locator.
-
Electra’s strumming hand is constrained to the guitar.
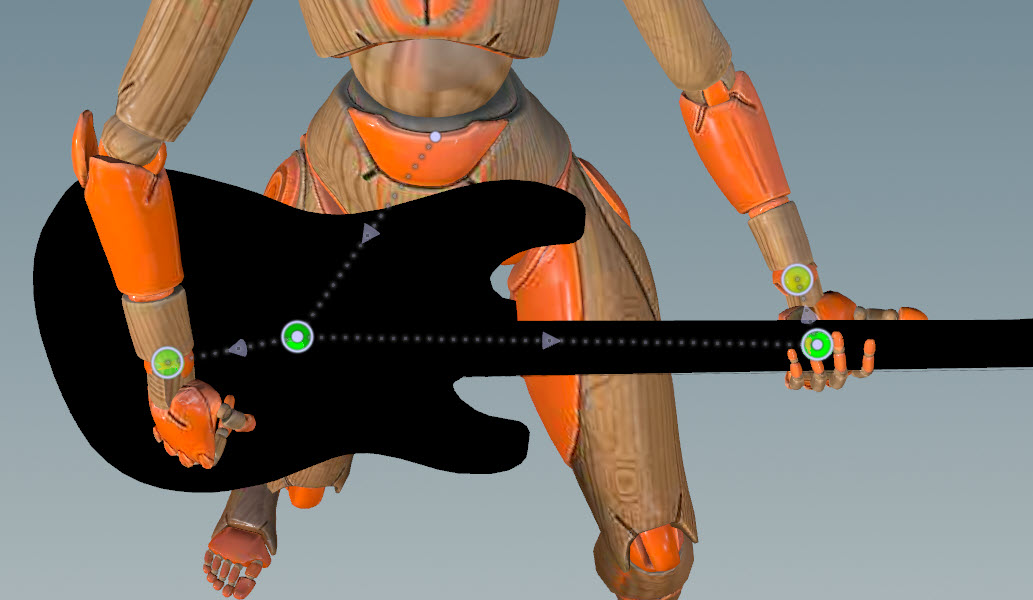
Offset constraints
Animate the offset between the driver and driven controls 
When you create an offset constraint, two controls are created and they appear in the selection sets under All Controls ▸ constraints:
-
A control named
<control>, for example,Locator_0. This is the offset constraint and is the dotted line between the driver and driven controls. -
A control named
<control>__Offset, for example,Locator_0__Offset. This offset control represents the driven control’s offset from the driver. It is positioned at the driven control and is represented as a green sphere (by default). The offset control can be animated.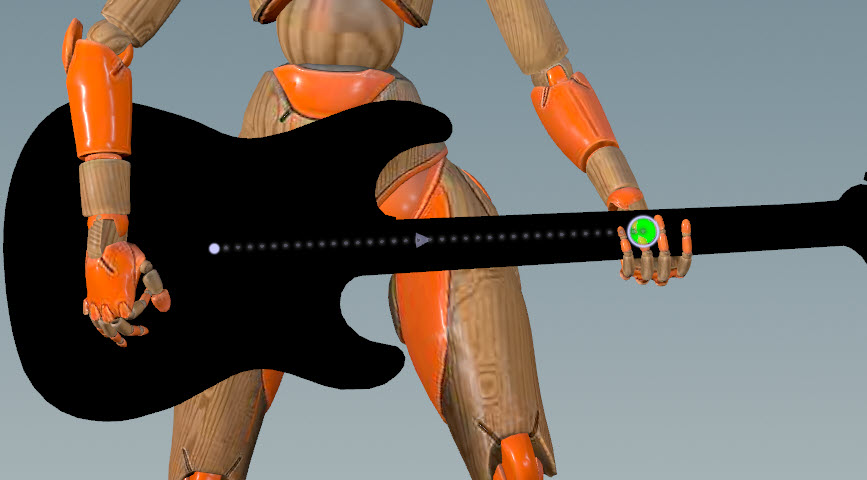
Locator offset control on the neck of the guitar
In this example, we want Electra’s hand to move along the neck of the guitar, so we set keys on the locator offset control. Electra’s hand is constrained to the locator, so moving the locator also moves Electra’s hand:
-
Select the locator offset control.
-
Set keys to move the locator offset control up and down the neck of the guitar.
The animation on the offset control lives on the constraint and not on the locator’s control. Any animation that was originally on the locator is overridden by the constraint. If you turn off the constraint, you are left with the original animation on the locator.
Note
If you are working with animation layers, the offset control needs to be added to the current layer before you can set keys on it. Select the offset control, go to the animation layers pane,
click the layer, and select Add Selected Controls to Layer.After animating the offset control -
To blend between the offset control animation and the original animation:
-
Select the locator constraint (the dotted line).
-
In the animate state parameters, Constraint tab, Parameters section, adjust the Blend value. You can also set keys on this value. See the control parameters for how to set keyframes.
Note
If Blend is set to
0, you can move the driven control. -
Add keyframes on the driven controls 
At this point, all the added motion on the guitar and Electra are driven by the constraints. If the constraints are removed, we are left with the original animation on Electra.
To keep the added motion on the guitar even if the constraint is removed, set keyframes on the guitar:
-
Select the guitar control.
-
In the animate state settings, Bake tab, click Bake Keys. If Bake to New Layer is turned on, the keys are added to a new animation layer. If Bake to New Layer is turned off, the keys are added to the current animation layer.
See the animate state settings for descriptions of the available baking options.
Lookat constraint 
A lookat constraint allows an object to follow the path of another object. In this example, we add a lookat constraint to keep Electra looking at  Flip.
Flip.
-
Aim Electra’s head toward Flip.
-
In the animate state parameters, Constraint tab, Parameters section, set Constraint to LookAt.
-
Select Electra’s head control.
Note
The two parameters below the Constraint parameter show the order to select the controls. For lookat constraints, select the driven control (Electra’s head), then the target (Flip).
-
Hold ⇧ Shift and select Flip’s control.
-
Hover over the viewport and press H. A constraint is added and the driven control turns gray. A dotted line appears with an arrow pointing from the target to the driven control.
Create a lookat constraint -
A control named
<driven_control>__Targetis created and this is the control that the driven object looks at. You can move the control away from the target object, which provides more flexibility on where Electra can look:Electra looks at the target control The
<driven_control>__Targetcontrol appears in the selection sets under All Controls ▸ constraints. The control is parented to the target object and can be animated.
Pin constraint 
A pin constraint allows you to keep a control at a certain position. A pinned control will not move, even if you move its parent control.
-
In the animate state parameters, Constraint tab, Parameters section, set Constraint to Pin.
-
Select the control(s) to pin.
-
Hover over the viewport and press H.
Create a pin constraint
Note
The pin constraint affects the character’s controls; it doesn’t direectly affect the character’s pose. Let’s say you pin the chest control, but the spine on your rig has been configured to be non-stretchy. If you move the character’s cog, the chest control will stay in place, but the character’s body won’t move with the cog because the spine can’t stretch:
Multiple constraints drive a single control 
You can add multiple constraints to drive a single control. In this example, we add the following two constraints that drive Flip:
-
An offset constraint that constrains Flip to
Electra’s hand. -
A lookat constraint where Flip looks at a ball.
Constrain Flip to Electra’s hand:
-
In the animate state parameters, Constraint tab, Parameters section, set Constraint to Offset.
-
Select Flip’s control, hold ⇧ Shift, and select Electra’s hand control.
-
Hover over the viewport and press H.
Add a lookat constraint so that Flip follows the ball:
-
In the animate state parameters, Constraint tab, Parameters section, set Constraint to LookAt.
-
Select Flip’s control, hold ⇧ Shift, and select the ball control.
-
Hover over the viewport and press H.
Multiple constraints drive Flip
Adjust the effect of multiple constraints 
You can adjust the effect that multiple constraints have on a driven control:
-
Select the driven control.
-
In the animate state parameters, go to the Constraint tab.
-
In the Blend section, you can adjust the effect that each constraint has on the driven control by changing the blend value of each constraint. A blend value of 0 means the constraint has no effect. You can also set keyframes on the blend values by
clicking the name or textbox of the constraint and selecting Set Keyframe.
You can set a single constraint to be active within a frame range. This is called soloing a constraint:
-
Select the driven control.
-
Select the frame range:
-
Hold ⇧ Shift and drag along the playbar timeline.
or
-
If you have animation bookmarks on the playbar timeline, double-click a bookmark to zoom into the bookmark’s frame range.
-
-
In the animate state parameters, Constraint tab, Blend section, click
 beside the constraint you want to solo. This adds keyframes on all the constraints on the driven control such that:
-
The soloed constraint has a blend value of 1 within the frame range.
-
All other constraints on the driven control have a blend value of 0 within the frame range.
If no frame range is selected, the constraint is soloed over the entire frame range of the playbar timeline.
-
Constraints within a frame range 
You can set a constraint to be active within a frame range:
-
Select the driven control, hold ⇧ Shift, and select the driver.
-
Select the range of frames you want the constraint to be active for - hold ⇧ Shift and drag along the timeline.
-
Press H over the viewport. Keyframes and a bookmark are created for the frame range.
-
You can use the bookmark to adjust the frame range over which the constraint is active:
-
To move a bookmark, ⌃ Ctrl +
 or ⌃ Ctrl +
  drag the bookmark.
 -
To resize a bookmark, ⌃ Ctrl +
or ⌃ Ctrl + drag the ends of the bookmark.
-
-
Select the driven control and go to the constraint parameters, Blend section:
-
The blend value for the constraint is 1 within the frame range, and 0 outside the frame range.
-
You can adjust the effect of the constraint by changing the blend value.
-
Click
 to toggle display of the constraint bookmarks.
-
Transient constraints 
A transient constraint is a type of constraint that is only active within a frame range. Transient constraints differ from regular constraints in the following ways:
-
When a transient constraint is created, keyframes are added for the driven control on every frame within the constraint frame range. A bookmark is also created on the playbar timeline to identify the frame range during which the constraint is active.
-
The driven control can be moved around freely.
-
Transient constraints only apply in the animation layer in which they are created. Regular constraints apply regardless of the layer you're on.
In this example, we transfer the ball from one hand to another. The original animation is shown below:
-
Constrain the ball to the hand:
-
Select the driven control (ball), hold SHIFT, and select the driver (hand).
-
On the timeline, select the range of frames to make the constraint active (hold SHIFT and drag along the timeline).
-
Hover over the viewport and press ⇧ Shift + H.
A constraint is created between the ball and the hand, and keyframes for the ball are added on every frame in the selected frame range.
Note
The constraint behavior is only active within the transient constraint frame range.
Constrain the ball to the hand In the animate state settings, Constraint tab, turn on Show Preview Visualizer. This displays an arrow visualizer that shows the constraint relationship between the hand and ball:

Transient constraint visualizer -
-
Fix the position of the ball.
Once the transient constraint is created, the driven object (ball) can be moved around, and the changes are automatically applied to the entire frame range the transient constraint is active. Make sure you are currently within the frame range where the transient constraint is active or the changes will not be applied to the entire frame range.
Note
If the changes are not applied to the entire transient constraint frame range, make sure that Auto Update Follow Ranges is turned on in the animate state settings, Constraint tab, Transient Constraints section.
Move the driven object (ball) -
Constrain the ball to the other hand:
Ball constrained to both hands at different frame ranges -
Fix the ball on the second hand:
Fix the ball on the second hand -
Fix the pop on the animation as the ball transitions from one hand to the other:
Animation pop -
Select the ball (driven object).
-
Click in the timeline so that the current frame is within the frame range of the first transient constraint.
-
In the animate state settings, Constraint tab, Transient Constraints section, click the
 button. This updates the offset on the ball to match the frame after the current constraint range so that there is a smooth transition between the current range and next range.
Smooth out the transition between constraint ranges -
Note
If you want to delete the keys within the transient constraint frame range, you need to either turn off Auto Update Follow Ranges, or set Bake Mode to Update in the constraint settings.
Constraint parameters and settings 
Constraint parameters 
The following groups of parameters are available in the Constraint tab of the animate state parameters:
Blend 
If you select a driven control, this section lists the constraints that affect the control. See adjusting multiple constraints and constraints within a frame range for more information.
Parameter / Button |
Description |
|---|---|
|
|
|
Toggles display of the constraint bookmarks for the driven control. A constraint has bookmarks if it was created within a frame range. |
|
|
<Constraint> |
A constraint that affects the driven control. A blend value of 0 means the constraint has no effect. Keyframing options for the blend value are available by |
|
Solos the constraint. This adds keyframes on all the constraints on the driven control such that:
If no frame range is selected, the constraint is soloed over the entire frame range of the playbar timeline. |

 /
/ 
Parameters 
Some of the parameters in this section are only available for certain constraints.
The buttons at the top of this section are available when a constraint is selected or the constraint options are  pinned (see below). You can select a constraint in the selection sets or by selecting the dotted line in the viewport.
Parameter / Button |
Description |
|---|---|
|
|
|
|
|
Toggles the visibility of the constraint. |
|
If a constraint is selected in the selection sets, the channels for its parameters are added to the animation editor. |
|
Toggles the visibility of any controls defined by the constraint, for example, the offset control. |
|
Toggles the visibility of the driven control. |
Name |
The name of the constraint. |
Constraint |
The type of constraint to create. |
Driven Control |
The driven control of the constraint. |
Driver / Target |
The driver/target of the constraint. |
Blend |
Blends between the motion of the constraint and the original animation on the driven control. If Blend is set to You can set keys on the blend value:
|
Use Tilt |
When turned on, tilting the lookat constraint’s target control tilts the driven control. This option is available for lookat constraints. Select the lookat constraint, turn on this option, and rotate the target control. |
Components |
The |
Offset |
The type of offset between the driver and driven control. This option is available for offset constraints. None The driven control matches the driver’s control. Static Maintains the offset between the driver and driven control when the constraint was created. Parent Treats the driver as the parent of the driven control. The driven control’s animation is still applied, but any change to the driver is also applied to the driven control’s animation. |
 /
/ 
 /
/ 
 /
/ 
 /
/ 
 translate,
  rotate,
  scale components of the driver that the driven control follows.
 Control Shape 
Parameter |
Description |
|---|---|
Control |
The offset or target control to adjust the shape of. This option is available when the constraint (dotted line), offset control (for an offset constraint), or target control (for a lookat constraint) is selected. |
Shape |
The shape of the offset or target control. This option is available when the constraint (dotted line), offset control (for an offset constraint), or target control (for a lookat constraint) is selected. |
Scale |
The scale of the offset or target control. This option is available when the constraint (dotted line), offset control (for an offset constraint), or target control (for a lookat constraint) is selected. |
Color |
The RGB color of the offset or target control. This option is available when the constraint (dotted line), offset control (for an offset constraint), or target control (for a lookat constraint) is selected. |
Constraint settings 
The following settings are in the Constraint tab of the animate state settings:
Setting |
Description |
|---|---|
Show Preview Visualizer |
When turned on, displays a visualizer for the constraint - a dotted line with an arrow pointing from the driver to the driven control. |
Disable After Baking |
This option applies to regular (not transient) constraints. When turned on, disables the constraint after baking. |
Transient Constraints 
The following settings are in the Transient Constraints section of the Constraint tab, and they only apply to transient constraints:
Setting / Button |
Description |
|---|---|
|
Copies all the transient constraints currently visible on the playbar timeline. Use |
|
Pastes transient constraints into the current animation layer:
|
|
Updates the offset on the selected driven control to match the frame before the current transient constraint range. This results in a smooth transition between the previous range and the current range.
|
|
Updates the offset on the selected driven control to match the frame after the current transient constraint range. This results in a smooth transition between the current range and the next range.
|
Auto Update Follow Ranges |
When turned on, applies any changes made on the driven control to the entire transient constraint frame range. |
Bake to New Layer |
When turned on, adds keyframes to a new animation layer. When turned off, adds keyframes to the base animation layer. |
Bake Mode |
Options for adding/updating keys when baking. Dense Adds keys to every frame in the constraint frame range. Update Updates the existing keys, but doesn’t add extra keys. |

 to paste the transient constraints to another animation layer.
How-to 
| To... | Do this |
|---|---|
|
Select a constraint |
Select the dotted line in the viewport or select the constraint in the selection sets. |
|
Add an offset constraint |
|
|
Add a constraint over a frame range |
|
|
Remove a constraint |
|
|
Turn a constraint on or off |
|
|
Turn off display of the constraint visualizer |
In the animate state settings, Constraint tab, turn off Show Preview Visualizer. |
|
Adjust the effect of a constraint |
|
|
Adjust the effect that different constraints have on a driven control |
See adjust the effect of multiple constraints for more information. |
|
Set only one constraint to be active within a frame range |
See adjust the effect of multiple constraints for more information. |
 on the top toolbar.
Transient constraints 
| To... | Do this |
|---|---|
|
Add a transient constraint |
|
|
Remove a transient constraint |
This removes the transient constraint bookmark, but the keys are still written out on the driven control. If you want to remove the motion generated by the transient constraint, select the keys in the timeline (hold ⇧ Shift and drag along the timeline), and press Delete over the timeline. |
|
Adjust the driver control |
Hold ⇧ Shift + H and move the driver control. |
|
Smooth out the transition between adjacent constraint frame ranges |
|
|
Add keys to every frame in the constraint frame range when adding a transient constraint |
|
|
Only update existing keys (don’t add extra keys) when adding a transient constraint |
|