| On this page |
|

Houdini provides tools that allow you to rig and animate characters and props in the context of a USD stage. If you have USD assets that already have textures and materials, you can animate directly on those characters in LOPs without having to bring them into SOPs.
The assembly of an animation scene in LOPs is different than in SOPs. In SOPs, we add character elements like the shape, skeleton, and rig to a character folder structure to build up a character. Characters and props are then added to a scene using SOPs like the  APEX Scene Add Character SOP and APEX Scene Add Prop SOP.
In LOPs, we already have the USD stage, and nodes like the  Asset Reference LOP,
  Reference LOP, and
  Sublayer LOP can bring in prebuilt USD assets and files onto the stage. Because of this, APEX-specific tools are not needed to add a character or prop to an animation scene.
Comparing SOPs and LOPs functionality 
The table below lists the tools that provide similar functionality in SOPs and LOPs:
Functionality |
SOP |
LOP |
|---|---|---|
Add animation to a scene |
||
Add a character to a scene |
||
Build a rig |
Use the Autorig Builder, rig components, or create custom rig functionality using APEX Script |
Use the SOP-equivalent tools in the |
Add a prop rig |
On the |
|
Add a camera rig |
On the |
|
Get the evaluated geometry |
Use the second output of the |
|
Import animation |
|
|
View the contents of a scene |
The rig tree view displays the contents of the character folder structure. |
The scene graph tree displays the contents of the stage, which can include primitives like cameras, lights, and geometry meshes. |
Bring prebuilt USD assets into an animation scene 
In this example, we set up a basic LOP network that brings a camera, light, and two Electra character assets onto the stage. These assets are then added to an animation scene where they can be animated:
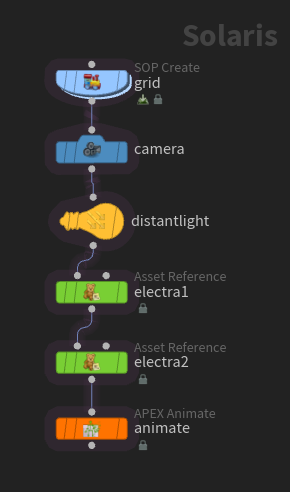
-
In LOPs, search for “Grid” in the tab menu, which puts down a
 SOP Create LOP and inserts a Grid SOP inside the subnetwork.
 -
Add a camera (
 Camera LOP) and light (
 Distant Light LOP) to the stage.
 -
Add two Electra USD assets to the stage. Search for “Electra” in the tab menu. This puts down an
Asset Reference LOP that brings in the Electra asset. -
Change the material on the second Electra asset to help distinguish between the two Electras in the animation scene. In the Asset Reference LOP for Electra, the Variants tab has several USD variants built into the asset that allow you to switch between different versions of properties like the materials (
mtlvariant) and resolution (texture_resvariant). On the Asset Reference LOP,electra2, for themtlmultiparm, set Variant Name tometallicfrom the drop-down menu. -
The
 APEX Animate LOP is equivalent to the APEX Scene Animate SOP, where you have access to all the animation tools in the animate state. The deformation in the APEX Animate LOP’s animate state is performed at render time in Hydra.
Enter the animate state by selecting the APEX Animate LOP, turning on its display flag, and clicking
 Animate on the left toolbar. In the animate state, you can see the characters' controls and set keyframes on them. The scene graph tree displays the following hierarchy on the stage:
/ -- cameras/ -- electra1/ -- electra2/ -- grid/ -- lights/ -- scene
Note
If you toggle the visibility of the character in the animate state selection sets, it will toggle the visibility of the USD prim in the scene graph tree - you are not just hiding the character in the animate state; you're hiding it on the stage.
-
To export the animation performed in the APEX Animate LOP, pipe the APEX Animate LOP into a
 Bake APEX Scene LOP, which writes out the deformed geometry over time.
 -
To save the contents of the stage to a USD file, specify the file path to save to in the APEX Animate LOP’s Animation Save Path parameter, and pipe the APEX Animate LOP into a
 USD ROP LOP.
Import a SOP character or scene into LOPs 
Import a SOP character 
If you have a character in SOPs, you can use the SOP Import APEX Character recipe to bring the character into LOPs. In this example, we bring the  Otto test geometry into LOPs.
-
In the SOP network, put down an Otto test geometry.
-
On the Otto SOP, set Output to APEX Character. This outputs Otto as an unpacked character - its character folder structure contains character elements like the shape, skeleton, and rig. We can see the character folder structure in the rig tree view - in the rig tree view, set Type to Packed Folders:
/
-- Base.rig
-- Base.shp
-- Base.skel
...
-
In LOPs, search for “SOP Import APEX Character” in the tab menu. The SOP Import APEX Character recipe is a
 SOP Import APEX Scene LOP with Import Mode set to APEX Character. The SOP Import APEX Scene LOP is a wrapper around the
  SOP Import LOP, and it allows you to import a scene or character from SOPs into LOPs. The SOP Import APEX Scene LOP only imports the character’s mesh, not the rig.
 On the SOP Import APEX Scene LOP:
-
Set SOP Path to the SOP node that contains the character geometry - click
 and select the Otto SOP.
 -
By default, Shapes to Import is set to
*.shp, so the LOP imports all the elements of the character folder structure that have a.shpextension. -
Set Import Path Prefix to the path on the stage where you want to import the geometry to. In our example, we set Import Path Prefix to
/otto. -
The parameters in the Import Geometry Data section are the same as those in the SOP Import LOP and can be used to configure how the character’s shapes are translated to USD.
-
-
To add animation to the scene, append an
APEX Animate LOP to the SOP Import APEX Scene LOP.
Import an animation scene 
In this example, we import an animation scene from SOPs into LOPs. We have the following SOP network:

-
The
APEX Scene Add Character SOP assembles Otto’s character elements into a character in the character folder structure, then adds the character to an animation scene. For more information on the SOP animation workflow, see the basic animation scene setup.On the APEX Scene Add Character SOP, we set Character Name to
otto. In the rig tree view, we have the following character folder structure:/ -- otto.char/ -- Base.rig -- Base.shp -- Base.skel ... -
Use the
APEX Scene Animate SOP to add animation to the scene. -
In the LOP network, put down a SOP Import APEX Scene LOP. By default, Import Mode is set to APEX Scene.
-
On the SOP Import APEX Scene LOP:
-
Set SOP Path to the SOP node that contains the animation (APEX Scene Animate SOP). This imports the entire animation scene.
-
In this example, we set Import Path Prefix to
/myscene. In the scene graph tree, we have the following hierarchy:/ -- myscene/ -- otto/ -- sceneIf a scene has multiple characters, each character is imported under a separate prim, for example:
/
-- myscene/
    -- otto/
    -- otto2/
-- scene
-
-
The
sceneprim (as seen in the scene graph tree) contains the animation from the APEX Scene Animate SOP. To see the animation on the SOP Import APEX Scene LOP, select the LOP, turn on its display flag, and scrub the timeline. -
To add more animation to the scene, append an APEX Animate LOP to the SOP Import APEX Scene LOP.
Build a rig for a USD asset 
If you have a USD asset that doesn’t have a rig (but has textures), you can use an  APEX SOP Rig Builder LOP to create a rig to attach to the asset. The APEX SOP Rig Builder LOP allows you to dive into SOPs and use all the available KineFX rigging tools to create the rig.
In this example, we create a rig for a tube asset:

-
In LOPs, search for the “Component Builder” recipe, which puts down a network snippet that creates a USD model from SOPs.
-
Dive into the
 Component Geometry LOP and put down a
  Tube SOP. On the Tube SOP, set Rows to
 3so that it can bend when we add animation later on. Connect the Tube SOP to the Output SOP,
 default. -
On the
 Component Output LOP, we set Root Prim to
 /tube. -
Select the USD asset (
 Null LOP,
 ASSET). In the scene graph tree, we can see that the asset has a root primitive with one mesh:/ -- tube/ -- geo/ -- shape -
On the APEX SOP Rig Builder LOP, set Character Primitive to the root primitive of the character,
/tube. This root primitive was set in the Component Output LOP’s Root Prim parameter. -
Dive into the APEX SOP Rig Builder LOP. This takes us to a SOP network where we can build the rig. The starting point of the SOP network is a character folder structure that contains the tube geometry. Select the
Null SOP, APEX_CHARACTER, and view the character folder structure in the rig tree view:/ -- geo/ -- shape.shp -
Create a SOP network that extracts the tube geometry, creates a skeleton for the tube, adds capture weights to the tube geometry, and packs the updated shape and skeleton back into the character folder structure:

SOP network to build a rig -
The
 Unpack Folder SOP extracts the tube geometry. On the Unpack Folder SOP, set Extract Pattern to
 /geo/shape.shp. -
Create a skeleton for the tube and create capture weights for the tube geometry.
-
The
 Pack Folder SOP adds the updated shape (with bone capture attributes) and skeleton back into the character folder structure. On the Pack Folder SOP:
-
Set the first input to the name of the shape - set Name to
geo/shapeand Type toshp. -
Set the second input to the name of the skeleton - set Name to
Baseand Type toskel.
-
-
We then build a basic FK rig using
 APEX AutoRig Component SOPs:
-
On the APEX AutoRig Component SOP,
fk, set Component Source to FK Transform. -
On the APEX AutoRig Component SOP,
bone_deform, set Component Source to Bone Deform. Specify the tube geometry to modify - in the Setup tab, set Rest Geometry and Output Geometry togeo/shape.shp.
You can also use any other available methods in SOPs to build a rig, like the Autorig Builder.
-
-
If you want to bring any new attributes added in the SOP network back into LOPs to add onto the original mesh, you can do this using the parameters in the APEX SOP Rig Builder LOP’s Import Geometry Data section. By default, the APEX SOP Rig Builder LOP brings the
boneCaptureattribute added in SOPs back into LOPs. -
Add animation using the APEX Animate LOP.
Rename the character folder paths 
In the previous example, the tube asset’s mesh was named geo/shape.shp in LOPs, and this name was stored in the character folder structure when the tube geometry was brought into SOPs. However, most of the prebuilt rig components in SOPs use Base.shp as the default name for a character’s mesh. To make it easier to work with the SOP rigging tools, you can rename the mesh in the APEX SOP Rig Builder LOP before the asset is brought into SOPs. On the APEX SOP Rig Builder LOP:
-
Click
 beside Edit Folder Paths.
 -
In the new multiparm, set From to
/geo/shape.shpand To toBase.shp. -
If you dive inside the APEX SOP Rig Builder LOP, the Null SOP,
APEX_CHARACTER, now has the following character folder structure:/ -- Base.shp
-
Replace all references to
/geo/shape.shpin the previous example (in the Unpack Folder SOP, Pack Folder SOP, and APEX AutoRig Component SOP,bone_deform) withBase.shp.
Working with props 
To bring a prop into an animation scene in SOPs, you need to use an APEX Scene Add Prop SOP. In LOPs, however, you can bring in props by simply loading in a USD asset using an Asset Reference LOP. In this example, we bring a rubber toy asset onto the stage and create a rig for it using a Configure APEX Rig LOP. This LOP allows you to set up a simple rig for standard USD primitive types that you want to animate using APEX.

-
In the LOP tab menu, search for “Rubber Toy” and put down the rubber toy test geometry asset. On the rubber toy LOP, the Destination Primitive parameter is set to the name of the LOP, so we have the following hierarchy in the scene graph tree:
/
-- rubbertoy/
Note
At the moment, you need to turn off Make Instanceable so that the prop can be moved around in the animate state downstream.
-
The
Configure APEX Rig LOP creates a simple rig for the rubber toy. On the Configure APEX Rig LOP:-
Set Rig to Prop.
-
Set Primitives to the primitives to add to the prop rig. In our example, we set Primitives to
/rubbertoy. -
Set the color, shape, and transform of the prop’s control in the Control section.
-
-
Enter the animate state - select the APEX Animate LOP, turn on its display flag, and click
Animate on the left toolbar. -
In the selection sets, turn on the
 visibility icon for the rubber toy’s control. Select the control and move the rubber toy around.
Add multiple props 
In this example, we bring in multiple props and create rigs for each of them:

-
In the LOP tab menu, search for “Rubber Toy” and “Pig Head”, and put down the two test geometry assets.
-
Add the rubber toy and pig head assets under a parent transform hierarchy,
/props:-
On the rubber toy LOP, set Destination Primitive to
/props/rubbertoyand turn off Make Instanceable. -
On the pig head LOP, set Destination Primitive to
/props/pigand turn off Make Instanceable.
In the scene graph tree, we have the following hierarchy:
/ -- props/ -- pig/ -- rubbertoy/ -
-
On the Configure APEX Rig LOP, we want to add controls for the rubber toy and pig head as well as a control for the parent primitive
/props. To do this, we set Primitives to/props /props/*. -
Select the APEX Animate LOP and enter the animate state:
Control hierarchy of props
Add existing animation to prop rig controls 
If you have existing animation on an asset, you can add that animation onto the controls in a prop rig. In this example, we add a simple animation to the rubber toy test geometry using a  Transform LOP. We then use a Configure APEX Rig LOP to bake out the animation onto the prop’s rig control:

-
On the Transform LOP, set keys on the Translate and/or Rotate parameters.
-
On the Configure APEX Rig LOP, turn on Bake Animation and set the Frame Range you want to write out keys for.
-
Select the APEX Animate LOP and enter the animate state. When you select the prop control, the timeline displays the keys that are written out from the existing animation.
Ragdoll props 
In this example, we prepare an asset for use in the animate state’s ragdoll tool by creating collision shapes for the asset. This can be done in the Configure APEX Rig LOP by turning on the Ragdoll option, which creates a basic convex hull collision shape. Optionally, you can use a  Simulation Proxy LOP to create collision shapes with more customizations.

-
On the rubber toy LOP, turn off Make Instanceable.
-
(Optional) The Simulation Proxy LOP allows you to customize collision shapes for the asset:
-
Set Primitives to
/rubbertoy. -
Set Traversal to No Traversal so that the node operates on the rubber toy primitive and not its child geometry primitives.
-
In the Convex Hull section, turn on Enable, and set the Granularity and Max Concavity.
-
To see the collision shape in the viewport, turn on Display Proxy.
Note
If you don’t use a Simulation Proxy LOP, the Configure APEX Rig LOP creates a convex hull for the collision shape when its Ragdoll parameter is turned on.
-
-
On the Configure APEX Rig LOP, set Primitives to
/rubbertoyand turn on Ragdoll.Note
On the Configure APEX Rig LOP, there is a recipe available that puts down a Simulation Proxy LOP upstream from the Configure APEX Rig LOP. On the Configure APEX Rig LOP, click
 on the top toolbar of the parameter editor, select Create Simulation Proxy, and place the Simulation Proxy LOP in the network.
 -
Select the APEX Animate LOP and enter the animate state. Go to the ragdoll tool by clicking
 on the top toolbar. If you play the animation, the ragdoll will fall on the ground plane, which is the default behavior of a ragdoll.
Create a camera rig 
The camera rig capabilities that are available in SOPs can be applied to USD cameras. In the example below, we create a rig for a camera:

-
On the Configure APEX Rig LOP, set Rig to Camera. The parameters in the Camera Rig section are the same as those on the
 APEX Scene Add Camera SOP.
 -
On the APEX Animate LOP, enter the animate state and use the camera control to move the camera around.
Bring LOP animation back into SOPs 
If you have animation in LOPs that you want to bring back into SOPs, you can use a  USD APEX Scene Import SOP, which brings the animation scene from LOPs into SOPs as a character folder structure.
-
In this example, we add animation to Electra in the APEX Animate LOP:

Add animation in LOPs The scene graph tree displays the following hierarchy on the stage:
/
-- electra/
-- scene
-
In SOPs, use the USD APEX Scene Import SOP to bring the LOPs animation back into SOPs. On the USD APEX Scene Import SOP:
-
Set LOP Path to the LOP node that contains the APEX scene. In our example, we set LOP Path to
/stage/animate. -
Set APEX Scene Primitive Path to the primitive on the stage that contains the APEX scene. In our example, we set APEX Scene Primitive Path to
/scene.
In the rig tree view, we can see that the character folder structure contains the character and the animation:
/ -- animation/ -- electra.char/ -- Base.rig -- Base.shp -- Base.sel ... -
-
Select the USD APEX Scene Import SOP and turn on its display flag. Scrub the timeline to see the animation.
-
To extract the deformed geometry or skeleton animation for further processing, pipe the USD APEX Scene Import SOP into an
 APEX Scene Invoke SOP.