| On this page |
|
The ragdoll tool in the animate state allows you to add a ragdoll simulation to your animation. To enter the ragdoll tool, click  on the top toolbar or select Ragdoll from the radial menu (press C over the viewport).
Setup 
Before using the ragdoll tool in the animate state, the following steps must be performed:
-
Update the character’s skeleton with a set of joint limits.
-
Create ragdoll collision shapes for the character.
-
Add the collision shapes to the character.
-
Map the controls on the character’s rig to points on the character’s skeleton.
-
Set the ragdoll configurations used by the animate state.
-
Add the character to the animation scene.
See ragdoll simulations for more information on setting joint limits and creating collision shapes.
Setup for Electra 
The  Electra and
  Otto test geometries have a Configure Ragdoll option that performs all the above setup steps automatically. To set up for Electra:
-
On the Electra SOP, set Output to APEX Scene.
-
Turn on Configure Ragdoll.
-
(Optional) Turn on Ragdoll Character Name and specify a name for the ragdoll. This is the name of the ragdoll that will appear in the selection sets in the animate state.
-
Click
 Animate on the left toolbar. This automatically connects the Electra SOP to an
  APEX Scene Animate SOP and enters the animate state.
 -
To enter the ragdoll tool, click
on the top toolbar or select Ragdoll from the radial menu (press C over the viewport).
Setup for a general character 
The APEX Configure Ragdoll recipe puts down all the nodes that are required to set up ragdoll for a character. You can then manually tweak the configurations for your character.
Note
The character that is input to the recipe must be in a packed character folder structure.
In this example, we set up ragdoll for Electra using the APEX Configure Ragdoll recipe:
-
Put down an Electra SOP in the network view.
-
On the Electra SOP, set Output to APEX Character.
-
In the network view TAB menu, search for “APEX Configure Ragdoll”. This recipe puts down a set of nodes that sets up a character for the ragdoll tool.
-
Connect the 1st output of the Electra SOP to the
 Null SOP at the top of the set of nodes.
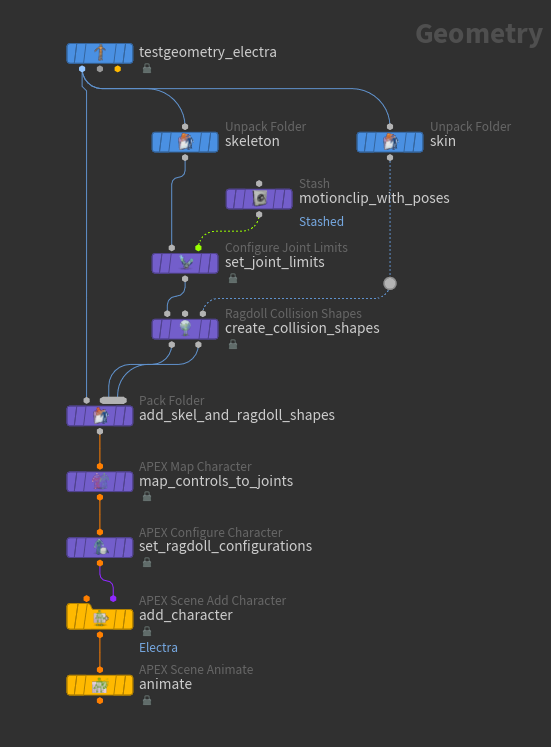
The network below shows the animate state ragdoll workflow. The APEX Configure Ragdoll recipe names and lays out the nodes differently, but the workflow is the same:
-
Set joint limits on the Electra skeleton:
-
The
 Unpack Folder SOP,
 skeleton, extracts the skeleton from Electra. -
The
 Configure Joint Limits SOP sets joint limits on the Electra skeleton. See set joint limits for more information.
-
-
Create ragdoll collision shapes:
-
The
Unpack Folder SOP, skin, extracts the skin geometry from Electra. -
The
 Ragdoll Collision Shapes SOP creates collision shapes for Electra. See create collision shapes for more information.
Note
In the SOP workflow for ragdoll simulations, the
 Rig Stash Pose SOP creates the rest pose for the character by storing the
 rest_transformattribute that is used later by the ragdoll solver. In contrast, the ragdoll solver in the animate state reads the rest transform from the rest skeleton,Base.skel. However, a warning is still displayed on the Configure Joint Limits and Ragdoll Collision Shapes SOPs stating that no rest transform is configured, but this warning can be ignored. -
-
The
 Pack Folder SOP adds the updated skeleton (with joint limits) and ragdoll collision shapes (the two inputs on its multi-input) to the set of character files. On the Pack Folder SOP, the Name and Type parameters for the two inputs are set to the following values:
-
1st input, updated skeleton: Same name as the skeleton extracted from the character in the
skeletonUnpack Folder SOP, for example, Name =Base, Type =skel. -
2nd input, ragdoll shapes: The Name and Type parameters for the ragdoll shapes can be set to anything.
See assembling character data for more information about naming character elements in the packed character folder structure.
-
-
The
 APEX Map Character SOP maps Electra’s rig controls to skeleton joints. This is so that the ragdoll motion can be baked back onto the rig controls.
 -
If the Map By Name parameter is turned on, an automatic mapping is performed between controls and joints that have the same name.
-
To manually map the controls and joints, enter the Map Character viewer state - select the APEX Map Character SOP, turn on its display flag, and click
 Show Handle on the left toolbar or press Enter over the viewport. In the viewer state, click between the controls and skeleton joints. This automatically creates entries in the Mappings multiparm:
Map character rig controls to skeleton joints
-
-
The
 APEX Configure Character SOP configures ragdoll properties on the character. The Character Name is the name of the ragdoll that will appear in the selection sets in the animate state.
 -
The
 APEX Scene Add Character SOP adds the character files to an animation scene. The Character Name is the name of the character that will appear in the selection sets in the animate state.
 -
Enter the animate state - select the
APEX Scene Animate SOP, turn on its display flag, and click Animate on the left toolbar or press Enter over the viewport. -
Enter the ragdoll tool by clicking
on the top toolbar or selecting Ragdoll from the radial menu (press C over the viewport). In the selection sets, under All Controls, there will be sets for the Electra character and Electra ragdoll.Note
The Electra ragdoll only appears in the selection sets if you are in the ragdoll tool.
-
Play the animation by pressing
 Play on the playbar. The ragdoll will fall on the ground plane, which is the default behavior of a ragdoll.
 Tip
If the ragdoll doesn’t fall on the ground plane, check the MotionClip that is input to the
Configure Joint Limits SOP. For Electra, you can use the motionclip_limitsStash SOP within the Electra HDA as the MotionClip input to the Configure Joint Limits SOP.
Adding ragdoll to existing animation 
In this example, the top character has existing animation, and we add a ragdoll simulation on top of the animation:
Create the ragdoll motion 
-
Set up the top character for the ragdoll simulation.
-
Enter the ragdoll tool in the animate state. You will see the character’s collision shapes. If you play the animation, the ragdoll will fall on the ground plane, which is the default behavior of the ragdoll.
Starting ragdoll behavior -
To get a better view of the ragdoll, move the ragdoll to the side of the original animation:
-
In the animate state settings, go to the Ragdoll tab.
-
In the Actions section, turn on Show Visualizer Offset Handle.
-
Use the handle to move the ragdoll.
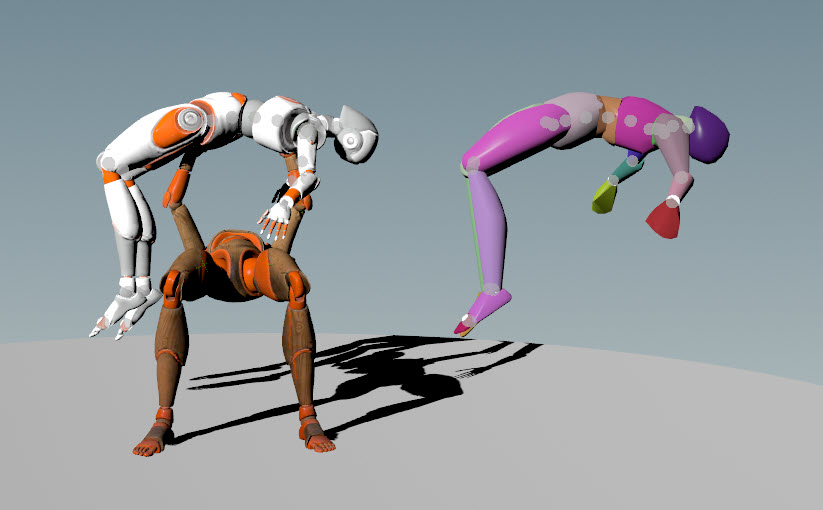
Visualize ragdoll -
-
Set the spine joints to follow the animation, while the rest of the character is simulated as ragdoll:
-
Select the collision shapes along the spine.
-
In the animate state parameters, go to the Ragdoll tab.
-
In the Animation section, turn off Active. The selected collision shapes will not be affected by the ragdoll solver.
-
Alt click the Active checkbox to set keys at the current frame for each of the selected collision shapes. Channels for the selected collision shapes will appear in the channel list appended with
_active.
Partial ragdoll -
-
Set the ragdoll simulation to take over for the entire character at the end of the throw:
-
On the playbar timeline, go to the frame where you want the ragdoll simulation to take over.
-
Make sure the collision shapes along the spine are still selected. Turn on Active.
-
Alt click the Active checkbox to set keys at the current frame for each of the selected collision shapes.
Switch to full ragdoll at the end of the throw -
Put the ragdoll motion back onto the animation 
To put the ragdoll motion back onto the top character:
-
Select all the controls on the top character (select the top character in the selection sets).
-
In the animate state settings, go to the Bake tab. See baking settings for descriptions of the available options.
If you turn on Bake to New Layer, the new keys for the ragdoll motion are added to a new animation layer that is set to be an override layer (the new layer overrides the base animation).
-
Go to the frame on the timeline to start putting the ragdoll motion back onto the animation.
-
Click Start Recording Poses.
-
Scrub the timeline to the end of the ragdoll motion.
-
Click Stop Recording Poses. The ragdoll motion is added to a new animation layer as an override layer.
-
To apply the ragdoll motion only after the throw, set weights on the new layer:
-
Select the range of frames after the throw by holding ⇧ Shift and dragging along the timeline.
-
 click the override layer and select Set Weight from Playbar Selection. Keys are added on the layer weight at the beginning and end of the frame range.
Final animation -
You can put the ragdoll motion back onto the original animation in the following ways:
-
Turn on Bake to New Layer and only bake keys within the frame range of the ragdoll motion. On the animation layer that is created, set weights on the new layer. This is the same as the previous example.
-
Turn on Bake to New Layer and bake keys over the entire frame range of the animation and ragdoll motion. The entire frame range will be written out to a new layer as an override layer.
-
Turn off Bake to New Layer and only bake keys within the frame range of the ragdoll motion. The ragdoll motion will replace the original animation within this frame range.
Working with props 
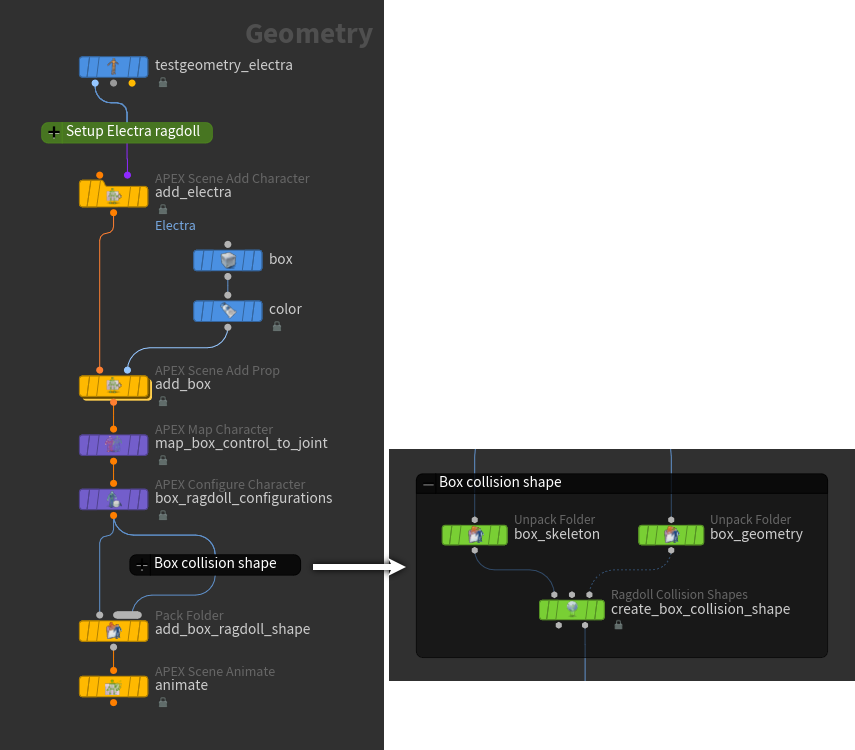
To get a prop to work with ragdoll, you need to turn the prop into a “character”. In this example, we add a thin box platform to the scene for Electra to stand on:
-
Set up
Electra for ragdoll:-
Set Output to APEX Scene.
-
Turn on Configure Ragdoll.
-
-
The
APEX Scene Add Prop SOP turns the prop into a character and adds it to the scene.-
The Prop Name parameter specifies the name of the prop character that will appear in the selection sets. The ragdoll collision shapes for the prop will appear in the selection sets as
<prop_name>_ragdoll. -
Turn on Ragdoll, which creates a collision shape for the box.
-
Turn off Active so the box isn’t affected by gravity.
-
In the rig tree view, we can see that the APEX Scene Add Prop SOP creates a box character (.char) that contains a rig, skin, skeleton, and ragdoll collision shape.
-
-
Enter the ragdoll tool in the animate state and play the simulation:
Starting ragdoll simulation -
In the selection sets, under All Controls, there are sets for the Electra character, the Electra ragdoll, the box prop, and the box ragdoll. Turn on the display of the Electra character (
 ) and Electra’s controls (
 ).
). -
Use the control handles to pose the Electra character on top of the box. The Electra ragdoll automatically updates to match Electra’s pose.
-
Increase the stiffness of Electra’s joints:
-
In the selection sets, select the Electra ragdoll. This selects all of Electra’s collision shapes.
-
In the animate state parameters, Ragdoll tab, Animation section, increase the Stiffness.
-
-
Make the box slippery:
-
Select the box collision shape.
-
In the animate state parameters, Ragdoll tab, Physical section, decrease the Friction.
Electra on the prop -
Tethering objects together 
In the ragdoll tool, you can tether objects to each other. In this example, we tether Electra’s hand to a box.
-
Use a similar network as the previous example to add a box prop to an animation scene.
-
Enter the ragdoll tool in the animate state.
-
In the selection sets, under All Controls, there are sets for the Electra character, the Electra ragdoll, the box prop, and the box ragdoll. Turn off the display of the Electra and box prop characters (
 ), and turn on the display of the ragdolls () and controls ().
 -
Move the box using its control handle.
-
Play the simulation. The box is not affected by gravity because it was set to inactive in the
APEX Scene Add Prop SOP:Ragdoll simulation without tethers -
Tether Electra’s hand to the box:
-
Select Electra’s hand control or collision shape.
-
Hold ⇧ Shift and select the box control or collision shape. The order of selecting Electra’s hand and the box doesn’t matter.
-
Press H over the viewport.
Electra’s hand tethered to the box Note
If the tether doesn’t show up when you play the simulation, turn off Hide Controls During Playback in the viewport state parameters window.
-
Parameters for tethers are available in the animate state parameters, Ragdoll tab, Tethers section. Select the tether to adjust its parameter values.
| To... | Do this |
|---|---|
|
Create a tether within a frame range |
This sets keys on the Enable parameter (animate state parameters, Ragdoll tab, Tethers section) and creates a bookmark at the frame range. To change the active frame range of an existing tether:
|
|
Remove a tether |
Select the tether and press ⌃ Ctrl + H or ⌦ Del over the viewport. |
Changing to ragdoll upon impact 
You can set an object to become a ragdoll when it’s impacted at a specific velocity. In this example, we start with a ball and table as ragdoll:
To have the table break apart only when it’s hit by the ball:
-
Enter the ragdoll tool in the animate state.
-
In the selection sets, under All Controls, select the table ragdoll.
-
In the animate state parameters, Ragdoll tab, Animation section, turn on Use Threshold and set Impact Threshold to a small value like
1. This sets the table ragdoll to be unaffected by the ragdoll simulation until it’s hit:Impact threshold turned on -
If you increase the value of Impact Threshold, a greater impact velocity will be required to turn the table into a ragdoll. If Impact Threshold is set to
500, for example, the impact is no longer great enough to turn the table into a ragdoll:Impact threshold increased -
If you raise the ball higher, its impact velocity with the table will be greater:
Ball causes greater impact at a higher height -
If you don’t want the table to break apart as easily, increase the value of the table ragdoll’s Match World so that the table attempts to keep its original transforms:
Table ragdoll tries to keep its original transforms
| To... | Do this |
|---|---|
|
Set an object to become a ragdoll upon impact |
|
Ragdoll forces 
Ragdoll forces allow you to add different effects to a ragdoll. The following types of forces are available:
-
Wind - Pushes the ragdoll in a specific direction.
-
Dampen - Adds air resistance, slowing down the effects of gravity.
-
Magnet - Attracts a ragdoll.
-
Turbulence - Adds a turbulent/noise motion to the ragdoll.
Add a force 
To add a force:
-
Enter the ragdoll tool in the animate state.
-
Press ⌃ Ctrl + E over the viewport. This opens up a selection of available forces in the viewport.
-
Select one of the force icons.
-
To change the strength of the force:
-
Select the force icon in the viewport.
-
In the animate state parameters, Controls tab, change the Strength value.
-
-
To see a visual representation of the force:
-
Select the force icon in the viewport.
-
In the animate state parameters, Controls tab, turn on Display.

Display the effect of the wind force -
-
Move the force icon to change the effect of the force. For example, the magnet force attracts the ragdoll to wherever it’s placed, and the wind force pushes the ragdoll in a specific direction.
Set a force to affect certain parts of a character 
In this example, we set the wind force to affect certain parts of a character:
-
Set the lower body to be unaffected by the ragdoll simulation:
-
Select the collision shapes for the lower body.
-
In the animate state parameters, Ragdoll tab, Animation section, turn off Active.
Wind force affects only the upper body -
-
Set the wind to have less effect on the character’s arms:
-
Select the collision shapes for the arms.
-
In the animate state parameters, Ragdoll tab, Forces section, decrease the value of the wind force.
Wind force has less effect on the arms -
| To... | Do this |
|---|---|
|
Add a force |
Press ⌃ Ctrl + E over the viewport. |
|
Delete a force |
Select the force icon in the viewport and press Delete. |
|
Turn on/off a force |
|
|
Change the strength of a force |
|
|
See a visual representation of a force |
|
|
Change how much a force affects a collision shape |
|
Ragdoll posing 
In ragdoll pose mode, you can manipulate the character’s controls to pose the character while the ragdoll simulation runs in the background.
-
We use a similar network as a previous example to add a box prop to an animation scene.
-
Enter ragdoll pose mode by clicking
 on the top toolbar.
 -
In the selection sets, under All Controls, there are sets for the Electra character, the Electra ragdoll, the box prop, and the box ragdoll. In ragdoll pose mode, we manipulate the Electra character’s controls along with the Electra and box ragdoll collision shapes. So in the selection sets:
-
Turn on the display of the Electra character’s controls (
). -
Turn on the display of the Electra and box ragdoll collision shapes (
). -
Turn off the display of the Electra character and box geometries (
). This makes it easier to see the ragdoll collision shapes.
-
-
To see the collision shapes that are active, in the animate state settings, Ragdoll Pose tab, Actions section, set Display Mode to Collision Shapes. The shapes that are light gray are active, and the dark shapes are inactive. An inactive shape does not react to other objects. In the below image, only the head is active:
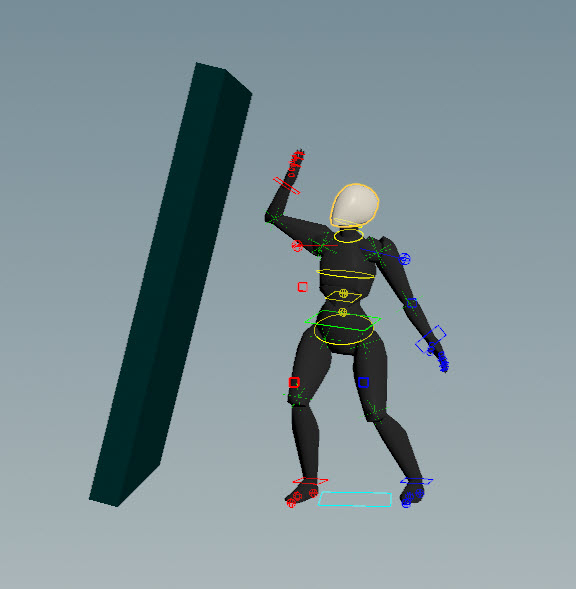
Active and inactive shapes in ragdoll pose mode -
When a control is selected, its associated collision shape becomes active. In the below video, the hand control is selected, so the hand collision shape becomes active (turns a light gray color). The hand shape reacts to the box while the fingers remain inactive and go through the box:
Selected collision shape reacts to objects Note
Keys are set on the controls that are moved in ragdoll pose mode.
-
To have the fingers also react to the box, make the fingers active:
-
Select the finger collision shapes.
-
Press ⌃ Ctrl + E to toggle the active state of the collision shapes.
Fingers react to the box Note
The character controls do not react to the collision shapes, so they appear to go through the box when the hand is moved. Once the mouse is released, the controls snap back to the position of the collision shapes.
-
Electra pushes the box 
To have Electra push the box:
-
Set the box to be active:
-
Select the box ragdoll shape.
-
Press ⌃ Ctrl + E.
-
-
Select and move the hand control:
Electra pushes the box -
Gravity can be applied to active objects in ragdoll pose mode:
-
In the selection sets, turn on the display of the box ragdoll’s control (
). -
Select the control for the box ragdoll.
-
Scroll down on the
 to apply gravity. Hold ⌃ Ctrl while scrolling to increase the gravity strength.
Apply gravity to box ragdoll shape -
Ragdoll parameters and settings 
Ragdoll parameters 
In the ragdoll tool, the following groups of parameters are available in the Ragdoll tab of the animate state parameters:
See  ragdoll::Solve for the parameters that can be animated.
The following buttons are available in each of the Ragdoll sections:
Button |
Description |
|---|---|
|
Resets all the parameters to their defaults. |
|
Copies all the parameter values in the subtab. |
|
Pastes the copied parameter values:
|


Physical 
Parameter |
Description |
|---|---|
Density |
The density of the collision shape. The mass of the shape is its volume times its density. |
Bounce |
The elasticity of the collision shape. If two shapes of bounce 1.0 collide, they rebound without losing energy. If two shapes of bounce 0.0 collide, they come to a standstill. |
Friction |
The coefficient of friction of the collision shape. A value of 0 means the collision shape is frictionless. |
Animation 
Parameter |
Description |
|---|---|
Character Active |
When turned on, sets the character to be a ragdoll. When turned off, the character is no longer a ragdoll, but other objects can still collide against it. This setting is per character. Inactive collision shapes are dark gray. 
|
Disable Collisions |
When turned on, the selected collision shape does not collide with other shapes. This setting is per collision shape. |
Active |
When turned on, the selected collision shape is affected by the ragdoll solver. When turned off, the collision shape is not affected by the ragdoll solver, but other objects can still collide against it. Inactive collision shapes are dark gray. 
|
Stiffness |
The strength of the force that tries to match the selected joint to the original skeleton. |
Damping |
The damping applied to the motion when attempting to match the selected joint to the original skeleton. A value of 0 specifies no damping, and a value of 1 provides just enough damping to prevent oscillation. Values between 0 and 1 allow oscillation (with some damping), and values greater than 1 provide increasingly damped motion with no oscillation. |
Match Local |
Increase this value to have the selected joint keep the original skeleton’s rotations. For example, this could help maintain a character’s chest upright if you have a ragdoll in a car. |
Match World |
Increase this value to have the selected joint match more closely with the original animation. If you set this to 1 and increase the Stiffness, the joint will closely follow the input animation. |
Use Threshold |
When turned on, the object becomes a ragdoll when it’s impacted at greater than the Impact Threshold. |
Impact Threshold |
When Use Threshold is turned on, this is the impact velocity beyond which the object becomes a ragdoll. |
Tethers 
Select the tether to adjust its parameter values.
Parameter |
Description |
|---|---|
Enable |
When turned on, enables the tether. A tether that is enabled is displayed in white. A tether that is disabled is displayed in red. |
Lock |
When turned on, locks the length and position of the tether so that it doesn’t change. This is similar to having a very high Stiffness. |
Stiffness |
The strength of the force that tries to keep the original tether length and position. This option is available when Lock is turned off. |
Damping |
The damping applied to the force. A value of 0 specifies no damping, and a value of 1 provides just enough damping to prevent oscillation. Values between 0 and 1 allow oscillation (with some damping), and values greater than 1 provide increasingly damped motion with no oscillation. This option is available when Lock is turned off. |
Rest Length |
The distance to enforce between the two objects. A rest length of 1 means the tether tries to keep the two objects the original distance away from each other. With a rest length of 0.5, the tether tries to keep the two objects half the original distance away from each other. The strength of the force used to maintain the rest length depends on the Stiffness. This option is available when Lock is turned off. |
Recompute Initial Conditions |
Recomputes the offset, rotation, and rest length of the tethered objects. This can be used to avoid unexpected behavior after repositioning the tethered objects. |
Disable Collisions |
When turned on, the tethered objects do not collide - when they're brought close enough, they could go through each other. |
Rotation Stiffness |
When turned on, allows you to specify a different stiffness for the rotation (in Rotation Stiffness). This option is available when Lock is turned off. |
Rotation Stiffness |
When Rotation Stiffness is turned on, this is the rotation stiffness to use. |
Forces 
Lists the forces that affect the selected collision shapes. Use the sliders to change the effect of each force.
Ragdoll settings 
In the ragdoll tool, the following groups of settings are available in the Ragdoll tab of the animate state settings:
Actions 
Setting |
Description |
|---|---|
Reload Target Animation |
Updates the ragdoll to match the character’s pose. |
Auto Reload Target Animation |
When turned on, automatically updates the ragdoll to match the character’s pose when you move the character’s controls. |
Display Mode |
Displays the ragdoll as collision shapes (Collision Shapes) or the character’s skin (Skin Geometry). 
|
Reset Visualizer Offset |
Resets the ragdoll to its original position after it has been moved using the visualizer offset handle. |
Show Visualizer Offset Handle |
When turned on, displays a transform handle that allows you to move the ragdoll away from the character. |
Visualize Match World |
When turned on, shows how far the joint moves from its original position. The joint’s corresponding collision shape must have its Match World parameter set to at least 0.5 to see this. |
Always Scope Parameters |
When turned on, all the channels associated with the selected control, including those for ragdoll parameters like stiffness and damping, are added to the channel list. This means that when you set keys on rig controls, the ragdoll parameters are also keyed. Turning this off avoids adding extra keys (like stiffness and damping) when keying a control. Note When a control is selected, the stiffness, damping, match world, and match local ragdoll parameters are added to the channel list by default. Other parameters like the active flag, bounce, and friction are not added until they are selected or keyed in the ragdoll parameters. |
Show Shape Intersections |
When turned on, shows the collision shapes that intersect. 
|
Show Shapes Outside Limits |
When turned on, shows the collision shapes whose corresponding joints are outside their configured joint limits. 
|
Solver 
See ragdoll::Solve and the  Ragdoll Solver SOP for more information about the ragdoll solver settings.
Setting |
Description |
|---|---|
|
Resets all the settings to their defaults. |
Auto Reset Simulation |
When turned on, the ragdoll solver automatically resimulates up to the current frame whenever the input data changes. |
Start Frame |
The frame at which the ragdoll solver becomes active. |
Time Step |
The length of a simulation timestep (in seconds). |
Ground Enable |
When turned on, adds a ground plane to the simulation |
Ground Display |
When turned on, displays the ground plane. This setting is available when Ground Enable is turned on. |
Reset Ground Plane Position |
When Ground Enable is turned on, this resets the position of the ground plane back to the origin. |
Ground Bounce |
When Ground Enable is turned on, this is the elasticity of the ground plane. If two objects of bounce 1.0 collide, they rebound without losing energy. If two objects of bounce 0.0 collide, they come to a standstill. |
Ground Friction |
When Ground Enable is turned on, this is the coefficient of friction of the ground plane. A value of 0 means the object is frictionless. |
Gravity |
The gravity force to apply to the simulation objects. |
Angular Stiffness |
The strength of the force that attempts to enforce rotation limits. This value is equivalent to the frequency of a spring. |
Angular Damping |
The amount of damping applied to the motion when enforcing rotation limits. This value is equivalent to the damping ratio of a spring. A value of 0 specifies no damping, and a value of 1 provides just enough damping to prevent oscillation. Values between 0 and 1 allow oscillation (with some damping), and values greater than 1 provide increasingly damped motion with no oscillation. |
How-to 
| To... | Do this |
|---|---|
|
Move the ragdoll away from the character |
|
|
Visualize the ragdoll with the character skin or collision shapes |
In the animate state settings, Ragdoll tab, Actions section, select from the Display Mode drop-down menu. |
|
Bring in props that can collide with the ragdoll |
See working with props. |
|
Toggle the active state of a collision shape |
|
|
Toggle the active state of a collision shape in ragdoll pose mode |
|
|
Set a collision shape to follow the original animation |
|
|
Set certain joints to match the joint positions of the original skeleton |
The selected joints will follow the original skeleton joints, while the rest of the character will be ragdoll. If you want to see how far the joint moves from its original position, in the animate state settings, Ragdoll tab, Actions section, turn on Visualize Match World: |
|
Set a character to be a ragdoll |
|
|
Set certain collision shapes to not collide with other shapes |
|
|
Add the ragdoll motion to a new animation layer |
In the animate state settings, Bake tab, turn on Bake to New Layer. For more information, see put the ragdoll simulation back onto the animation. |
|
Update the ragdoll to match the character’s pose |
To have the ragdoll automatically update to match the character’s pose, turn on Auto Reload Target Animation. |
|
Set keyframes on ragdoll parameters |
|
|
Change the density, bounce, and friction of the collision shapes |
|
|
Copy and paste collision shape parameter values |
|
|
Reset the collision shape parameter values |
|
|
Show the collision shapes that intersect |
|
|
Apply gravity to an active object in ragdoll pose mode |
|
|
Turn on or off the ground plane |
In the animate state settings, Ragdoll tab, Solver section, turn on or off Ground Enable. |
|
Show or hide the ground plane |
In the animate state settings, Ragdoll tab, Solver section, turn on or off Ground Display. |
 .
.