| On this page |
|

The motion mixer allows you to combine and edit the animation clips of multiple characters in a timeline-based view. Animation clips are grouped into tracks, and additional effects can be applied to tracks to change the look and behavior of your final animation.
Motion mixer pane 
Animation clips are combined and edited in the motion mixer pane, where animation and motion effects for multiple characters are displayed along a timeline. The motion mixer pane is populated with tracks and clips if you have a ![]() Motion Mixer SOP selected in the network editor. If you have another SOP selected, the motion mixer pane will be empty.
Motion Mixer SOP selected in the network editor. If you have another SOP selected, the motion mixer pane will be empty.
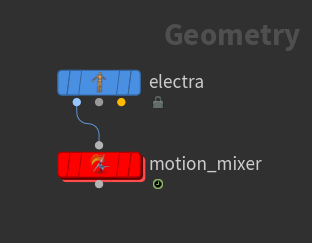
In this example, we input the ![]() Electra test geometry into the motion mixer. The input to the Motion Mixer SOP must be an animation scene in a character folder structure:
Electra test geometry into the motion mixer. The input to the Motion Mixer SOP must be an animation scene in a character folder structure:
-
On the Electra SOP, set Output to APEX Scene. This outputs Electra as a character in an animation scene.
-
Select the Motion Mixer SOP.
-
Open the motion mixer pane by clicking the
 New Tab icon at the top of a pane and selecting New Pane Tab Type ▸ Animation ▸ Motion Mixer.
 -
When you first open the motion mixer pane, it displays one track. The top left of the pane displays a hierarchy of elements (tracks and clips) that are available in the motion mixer. If you select the motion mixer (top level) element in the hierarchy, the parameter editor in the motion mixer pane displays the top-level parameters in the Motion Mixer SOP:
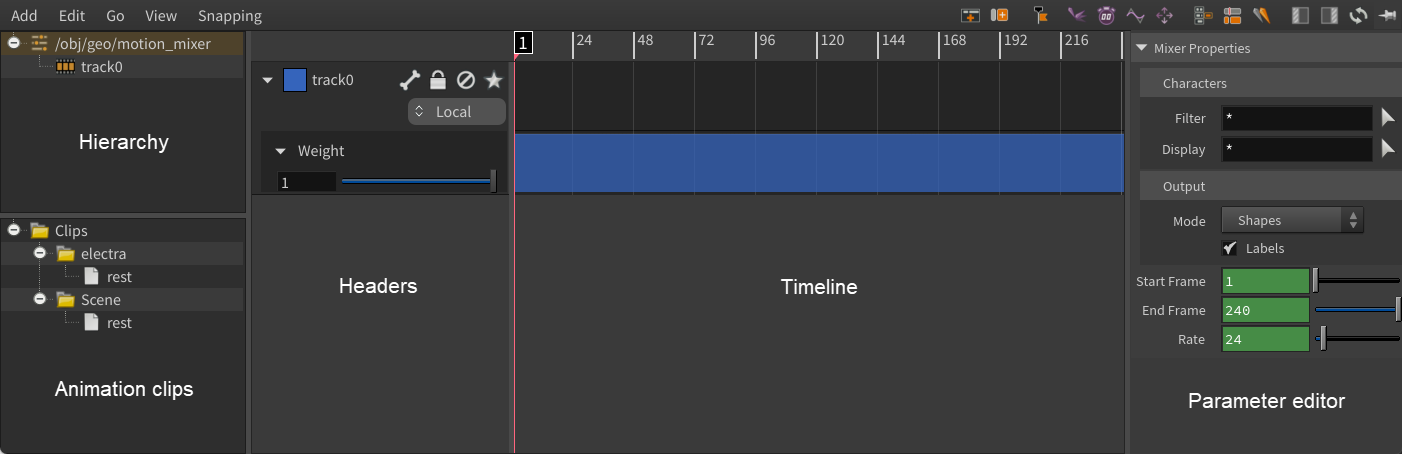
The parameter editor in the motion mixer pane is a filtered subset of the parameters in the Motion Mixer SOP. For example, if you click the track0 element in the hierarchy, the motion mixer parameter editor displays the same parameters that appear in Houdini’s regular parameter editor under the Mixer ▸ Track 0 section.
See the motion mixer pane for descriptions of the toolbar buttons.
Tracks, clips, and weights 
A track is a way to group multiple animation clips for a character, and is represented as a row on the timeline. A track can contain multiple animation clips.
Each track has an associated weight that is represented as a row below the track. The weight determines the extent to which the clips in the track contribute to the overall animation.
The headers in the motion mixer pane provide settings for configuring the tracks and weights. There is also a ![]() click menu on the track header, which includes some of the functionality provided by the track header icons.
click menu on the track header, which includes some of the functionality provided by the track header icons.
Navigating in the timeline 
| To... | Do this |
|---|---|
|
Pan |
|
|
Zoom |
⌃ Ctrl + |
|
Scrub along the timeline |
Drag the playhead. |
|
Frame the selected clip |
Press F. |
|
Display the entire timeline |
Press H. |
|
Move clips |
Drag the clip. |
|
Duplicate clips |
Alt drag the clip. |
|
Set a keyframe |
Hold Alt, and click the curve in the timeline or the textbox/slider in the header. |
|
Move a keyframe along the horizontal or vertical axis |
|
|
Resize the different motion mixer pane areas |
To adjust the height of the track/weight area, drag between the track/weight headers. To adjust the width of the headers, drag the separator between the headers and the timeline. You can fully collapse the headers with this action. |
Set up the input scene for the motion mixer 
To have access to animation clips in the motion mixer, there must be animation in the input scene to the Motion Mixer SOP. The animation clips must be added to the /animation folder in the input scene’s character folder structure.
Add animation from separate APEX Scene Animate SOPs 
If you have existing animation on multiple APEX Scene Animate SOPs, you can copy all the animation into one scene using an ![]() APEX Scene Copy Animation SOP or
APEX Scene Copy Animation SOP or ![]() Packed Folder Copy SOP, then input the scene into the Motion Mixer SOP.
Packed Folder Copy SOP, then input the scene into the Motion Mixer SOP.
APEX Scene Copy Animation SOP 
In this example, we create animation on multiple ![]() APEX Scene Animate SOPs, copy the animation into one scene, and pipe the scene into the motion mixer:
APEX Scene Animate SOPs, copy the animation into one scene, and pipe the scene into the motion mixer:

-
On the
 Electra SOP, set Output to APEX Scene. This outputs Electra as a character in an animation scene. In the rig tree view, we can see the following character folder structure:
-- electra.char/
...
-
When animation is performed in the animate state (on an APEX Scene Animate SOP), an
/animationfolder is created in the SOP’s character folder structure and the animation is stored in a clip folder nameddefault.clip. After adding animation, the two APEX Scene Animate SOPs have the following character folder structure:-- animation/ -- default.clip/ -- electra.char/ ... -
The APEX Scene Copy Animation SOP copies the animation from the second input’s scene to the first input’s scene. In the To parameter, set the new name for the second input’s animation, for example,
/animation/punch.clip. We now have the following character folder structure on the APEX Scene Copy Animation SOP:-- animation/ -- default.clip/ -- punch.clip/ -- electra.char/ ... -
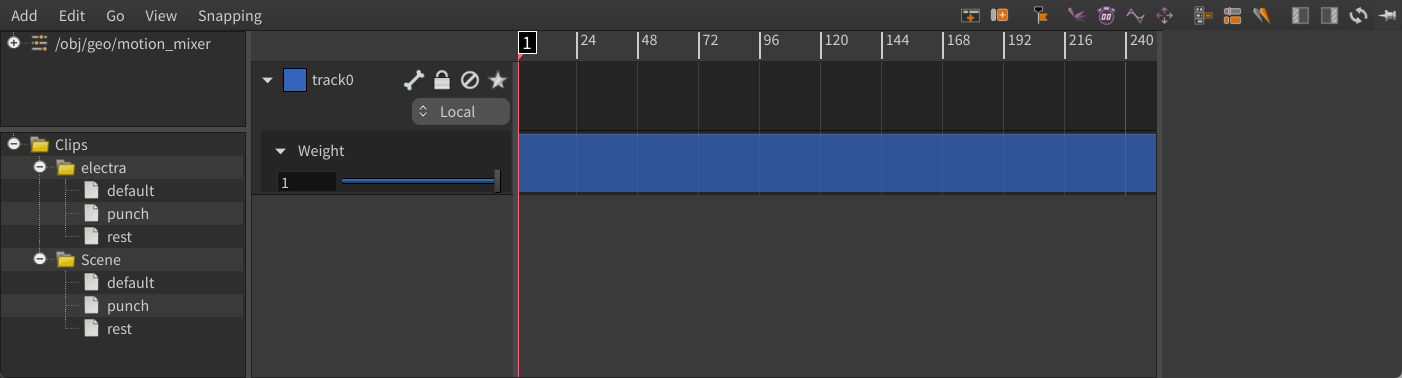
In the motion mixer pane, the default (jump) and punch animations appear in the list of available clips:
Packed Folder Copy SOP 
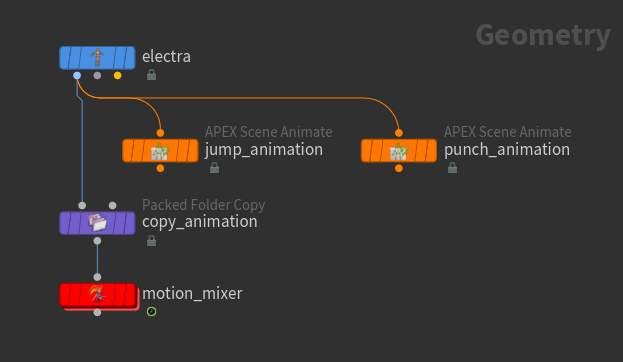
In this example, we create animation on multiple APEX Scene Animate SOPs, then bring the animation into the character folder structure and rename them using a Packed Folder Copy SOP:
-
On the Electra SOP, set Output to APEX Scene.
-
Add the jump animation clip to the character folder structure. On the Packed Folder Copy SOP:
-
Drag and drop the APEX Scene Animate SOP,
jump_animation, onto the Node parameter textbox. This automatically populates Node with the path to the jump animation,../jump_animation. -
Set the From parameter to the jump animation clip in the
jump_animationnode,/animation/default.clip. Use the rig tree view to see the character folder structure on thejump_animationnode. -
Set the To parameter to the path in the character folder structure to copy to, for example,
/animation/jump.clip.
-
-
Click
 beside Count to add another set of parameters for the punch animation. Populate the parameters.
 -
In the motion mixer pane, the jump and punch animations appear in the list of available clips.
Add multiple animation using one APEX Scene Animate SOP 
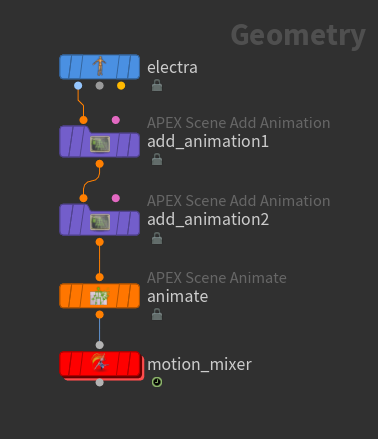
In this example, we add two empty animation clips to the character folder structure, then populate the clips with animation using an ![]() APEX Scene Animate SOP:
APEX Scene Animate SOP:
-
On the Electra SOP, set Output to APEX Scene.
-
On the first
 APEX Scene Add Animation SOP:
-
Set Character to
electra. -
Specify a name for the Animation Clip, for example,
anim1.
We now have the following character folder structure:
-- animation/ -- anim1.clip/ -- electra.char/ ... -
-
Do the same for the second APEX Scene Add Animation SOP, but set Animation Clip to
anim2:-- animation/ -- anim1.clip/ -- anim2.clip/ -- electra.char/ ... -
In the APEX Scene Animate SOP, add animation to the animation clips:
-
Enter the animate state - select the APEX Scene Animate SOP, turn on its display flag, and click
 Animate on the left toolbar.
 -
If there are multiple animation clips (
*.clip) in the character folder structure, a drop-down menu will appear on the top toolbar of the animation layers pane with a list of the available clips. Select the clip you want to add animation to.
-
-
In the motion mixer pane, the
anim1andanim2animations appear in the list of clips.
Working with animation in the motion mixer 
In this example, we have a scene that contains ![]() Electra and a jump animation. In the rig tree view, we can see that the character folder structure contains the following character and animation data:
Electra and a jump animation. In the rig tree view, we can see that the character folder structure contains the following character and animation data:
/
-- animation/
    -- jump.clip/
-- electra.char/
...-
Add Electra’s
jumpanimation to the track:-
Drag and drop Electra’s
jumpanimation onto the track:Add animation clip or
-
Move the playhead to the frame where you want to add the clip, select the
jumpclip, and click on the top toolbar.
The animation is applied to Electra:
-
-
Drag the clip to move it along the timeline. To cycle (repeat) the animation, drag out the ends of the clip:
The Cut Start and Cut End parameters define the part of the original clip that is played. This is shown by the clip’s light blue region in the timeline. The dark blue regions are the frames where the animation is cycled. The cycled frame range is specified in the Start and End parameters for the clip.
-
To cycle only a portion of the animation, resize the clip’s light blue region:
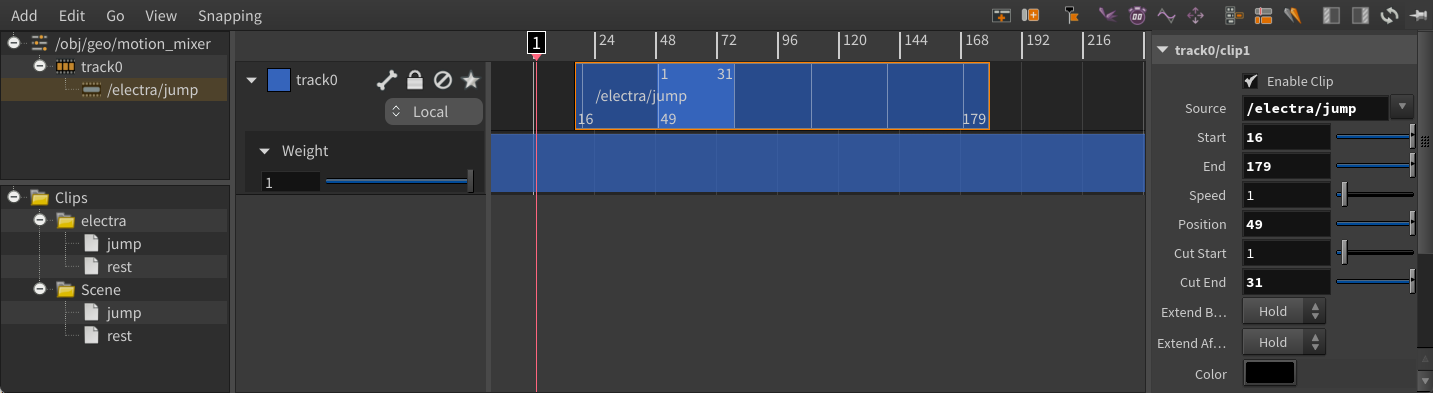
If you don’t want to cycle the animation but instead want the character to hold the first or last pose, set the clip’s Cycle Before/Cycle After parameter to Hold.
Note
The Cycle Before and Cycle After parameters specify the clip behavior within the clip boundaries. To set the behavior outside the clip boundaries, use the Extend Before and Extend After parameters.
-
To smooth out the transition between the cycled regions:
-
Increase the value of the Blend Frames parameter.
-
Click the
 button beside the Cycle Joint parameter and select a joint on Electra to match between the two cycled regions. In our example, we pick Electra’s foot joint,
 ball_r.
Tip
If your cycled animation is veering off at an angle, set Rotations to Off in the Cycle section of the clip parameters.
-
-
To reposition your animation:
-
Enter the Motion Mixer viewer state by clicking
 on the toolbar to the left of the viewport.
 -
On the top toolbar of the Motion Mixer state, turn on Handles. When you select a track or clip, a transform handle appears in the viewport. When you manipulate the handle, the Transform parameters for the track/clip are also updated. There is a separate handle for tracks and clips.
Manipulating the transform handle
-
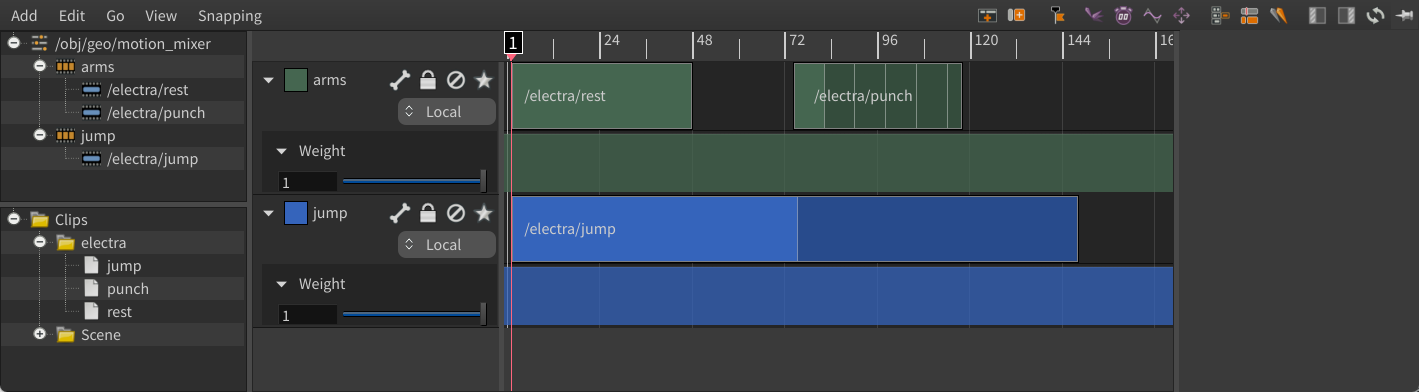
Working with multiple clips 
In this example, we add a second animation clip to Electra’s track:
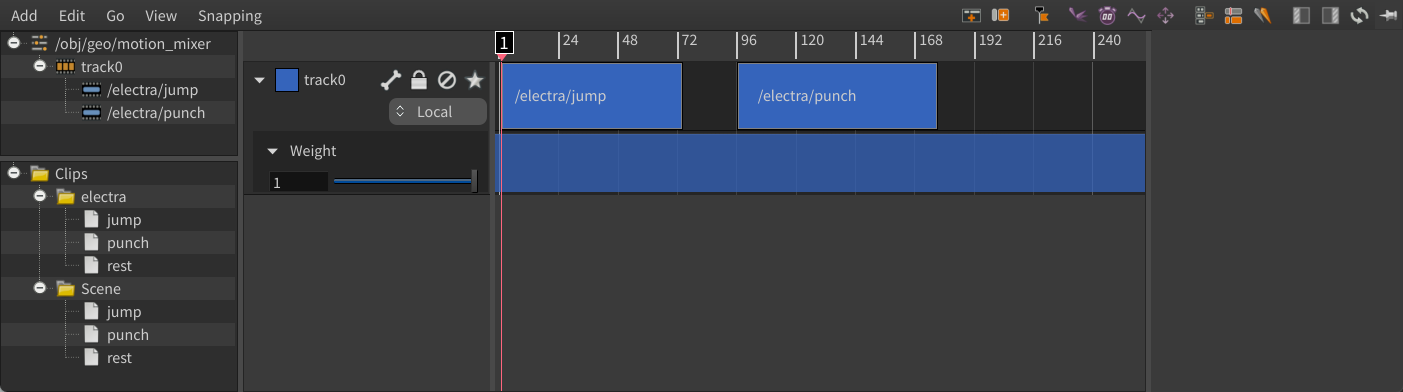
We want the punch clip to begin where the jump animation ends, so to fix the transition between the clips, we specify a joint to match between the clip transition:
-
In the motion mixer pane, select the second clip,
punch. -
Select Edit ▸ Match Joint or click
 on the top toolbar.
 -
In the Match Joint window, click
. -
Select the joint to match, in our example, we select one of Electra’s foot joints,
ball_l. -
Click Accept.
-
Back in the Match Joint window, click Match All. This updates the values in the Transform section of the punch clip’s parameters.
Updated animation with joint matching between clips -
Display the character in different ways, for example, the character’s controls, skeleton, or outline:
-
Enter the Motion Mixer viewer state by clicking
on the toolbar to the left of the viewport. -
On the top toolbar of the Motion Mixer state, choose from the Selection drop-down menu.
-
To change the character’s color:
-
Select the clip.
-
Click the Color parameter’s color chip and select a color.
-
Turn on the Display parameter.
If a clip is selected, it is displayed in yellow.
-
Different clip colors for shaded display mode -
Note
If clips overlap, the animation is blended in the overlap area.
Use partial motion from a character 
You can decide to use the motion from part of a character. In this example, we only want the upper body motion of the character from the previous example:
-
Select the track.
-
Select the joints you want to use the motion of - click the
button beside the Joints parameter and select the upper body joints. -
In the Blend Parent parameter, specify the parent joint you want to put the motion on top of. In our example, we set Blend Parent to the chest joint, so the swinging upper body of the jump animation is placed on the lower body of the character at rest:
Original motion Animation only on the upper body
Blend between different tracks 
You can take the motion from one track and blend it into the motion on another track. This is called track blending.
In this example, we start with a jump animation, then replace the animation on Electra’s arms with 2 clips - rest and punch:
-
Drag and drop the jump clip onto the track.
-
Drag out the right edge of the jump clip to cycle the animation.
-
Set the cycling parameters, Blend Frames and Cycle Joint, to smooth out the transition between the cycled regions.
-
Add another track - select Add ▸ Add Track or click
 on the top toolbar. The new track is added above the first track.
 -
Drag and drop the rest and punch clips onto the second track.
-
Adjust the punch clip to play and cycle only part of the animation.
-
Select the second track.
-
Select the joints to use the motion of - click the
button beside the Joints parameter and select the upper body joints. -
In the Blend Parent parameter, specify the parent joint to put the motion on top of, in our example, the chest joint.
The first jump uses the arms from the rest clip, and the second jump uses the arms from the punch clip:
Blend upper and lower body animation -
Adjust the extent to which the tracks and clips contribute to the overall animation:
-
To have Electra make small bunny hops, reduce the weight of the
jumptrack. -
To have Electra hold up the punch arms only after the end of the second jump, set keys on the weight of the
armstrack by holding Alt, and clicking the curve in the timeline or the textbox/slider in the weight header:
Change the weight of the tracks -
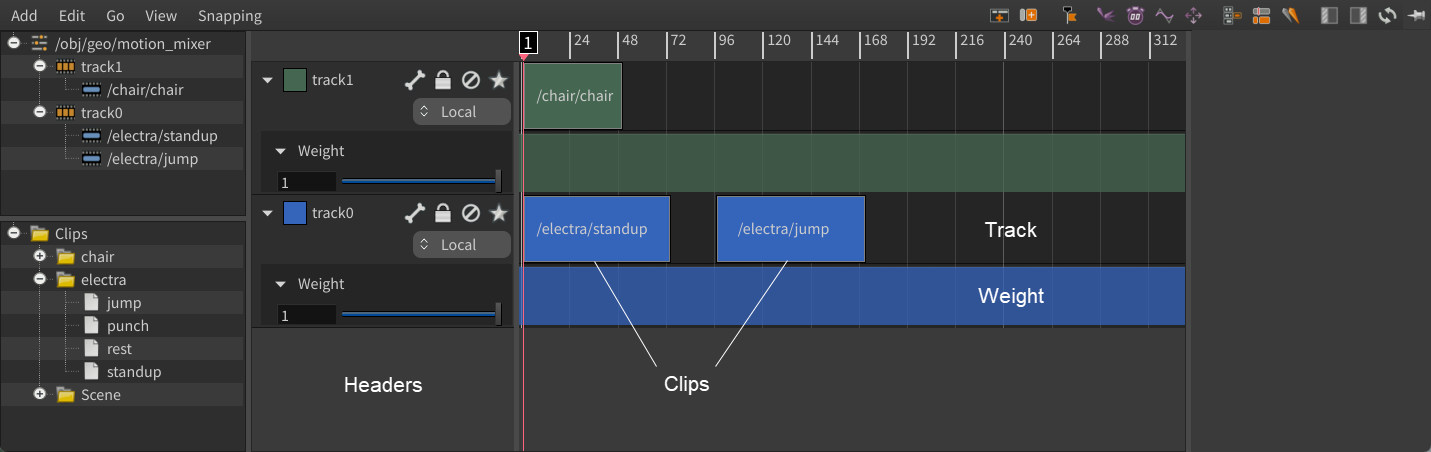
Working with multiple characters 
In this example, we have a scene that contains Electra, a chair prop, and animation clips for Electra and the chair. In the rig tree view, we have the following character folder structure:
/
-- animation/
    -- chair.clip/
    -- jump.clip/
    -- punch.clip/
    -- standup.clip/
-- chair.char/
-- electra.char/
...-
Add Electra’s
standupanimation to the track:Standup animation clip -
Apply the track to Electra:
-
Click the
 icon in the track header.
 -
In the Motion Mixer Track Filtering window, select Electra.
-
Click Accept. In the parameter editor, the track’s Characters parameter is set to
electra.
-
-
Create a track for the chair:
-
Select Add ▸ Add Track or click
on the top toolbar. -
Drag and drop the chair animation onto the new track.

Note
The Scene folder at the bottom left of the motion mixer pane contains the clips for all the characters. If multiple characters have a clip with the same name, that single clip can drive multiple characters.
-
-
If you play the animation, only the chair animation plays. We need to apply the chair animation only to the chair:
-
Click the
icon for the chair track. -
In the Motion Mixer Track Filtering window, select the chair.
-
Click Accept. The clip now applies only to the chair.
-
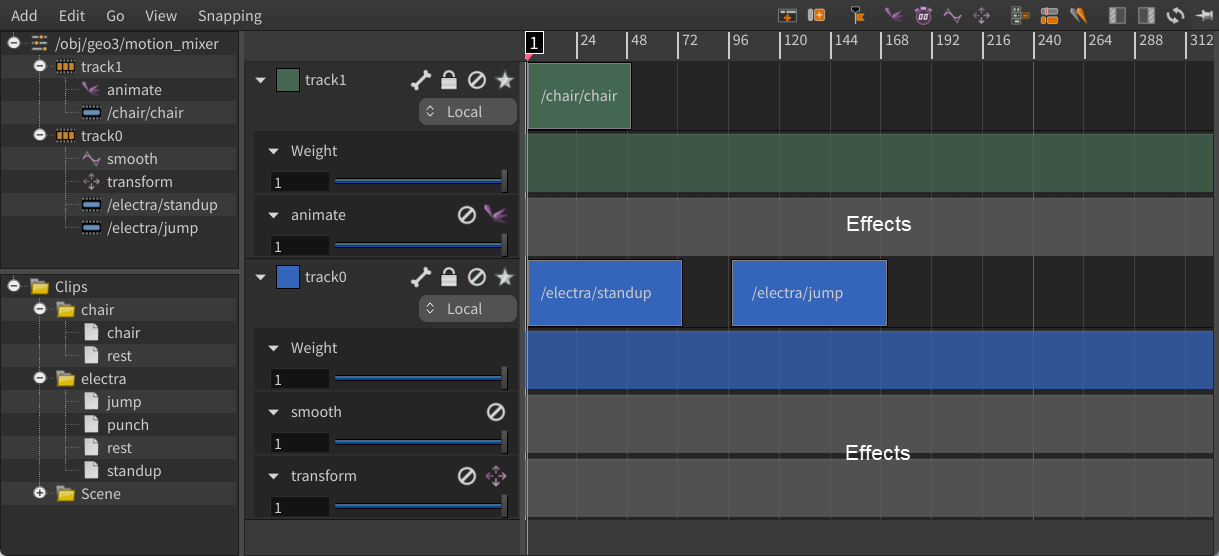
Add effects 
Effects are additional changes that can be applied to a track. When an effect is added to a track, it is placed on its own row below the track weight:
Note
The order that effects are applied go opposite from tracks. The effects within a track are applied from highest to lowest. Tracks are applied from lowest to highest, with the first track at the bottom of the list, the second track above it, and so on.
Effects can either be local or global. Local effects are applied within a track. Global effects are applied after the track is blended with the previous tracks (tracks on lower rows).
You can control the extent to which an effect contributes to the final animation by adjusting the slider in the effects header or the Blend value in the parameter editor. To set keyframes on the Blend value, hold Alt, and click the curve in the timeline or the textbox/slider in the effects header:
Animate effect 
The animate effect allows you to add animation on top of the motion from the motion mixer:
-
Select the track to add the animate effect to.
-
Select Add ▸ Animate or click
 on the top toolbar. A row for the animate effect is added below the track’s weight.
 If you select the animate effects header, the motion mixer parameter editor displays the animate effect parameters in the collapsible menu under track/animate. The parameters that cannot be collapsed belong to the
 APEX Scene Animate SOP.
 -
Enter the motion mixer animate state by clicking
in the animate effect header. You now have access to the full functionality of the animate state for adding animation to your character. -
To add keys, select a character control, move the playhead to the desired frame, and Alt click the animate effect’s textbox/slider/timeline or press K.
-
Press ⎋ Esc to exit the animate state. This puts you back into the Motion Mixer viewer state.
Transform effect 
The transform effect provides access to a transform handle that allows you to reposition an entire track:
-
Select the track to add the transform effect to.
-
Select Add ▸ Transform or click
 on the top toolbar. A row for the transform effect is added below the track’s weight.
 -
Enter the motion mixer viewer state by clicking
in the transform effect header. On the top toolbar of the Motion Mixer state, Handles is turned on.
You can stack multiple transform effects on top of each other to create different pivots for a track.
Retime effect 
The retime effect allows you to change the playback speed of the animation:
-
Select the track to add the retime effect to.
-
Select Add ▸ Retime or click
 on the top toolbar. A row for the retime effect is added below the track’s weight.
 -
If you want to double the speed of the playback, you can:
-
Set Retime to By Speed, and set Speed to
2. -
Set Retime to By Frame, and change the Frame expression (click the Frame parameter label) to
$FF*2. -
Set Retime to By Time, and change the Time expression (click the Time parameter label) to
$T*2.
-
Hold a pose 
The retime mode, By Holding, allows you to have a character hold a pose between certain frames:
-
Set Retime to By Holding.
The Hold parameter is a toggle where:
-
If Hold is set to
0, the animation is played back at the FPS speed. -
If Hold is set to
1at a certain frame, the pose on that frame is held until Hold is set to0again.
At frame 1, a key is already set on Hold =
0. -
-
Go to another frame, set Hold to
1, and press K to set a keyframe and freeze the animation at that frame. -
Go to another frame, set Hold to
0, and press K to set a keyframe and have the animation continue playing from that frame.
Smooth effect 
The smooth effect smooths out unwanted noise by applying a Butterworth filter to remove the frequencies that exceed a specified cut-off frequency, similar to the ![]() Smooth Motion SOP.
Smooth Motion SOP.
-
Select the track to add the smooth effect to.
-
Select Add ▸ Smooth or click
 on the top toolbar. A row for the smooth effect is added below the track’s weight.
Output data from the motion mixer 
To choose the data that is output by the motion mixer:
-
In the motion mixer pane, select the motion mixer (top-level) item in the hierarchy.
-
Set the output in the Mode parameter. You can use the rig tree view to see the geometry that is output in each mode.
The Animation Clip mode outputs the full animation scene, and the updated animation is saved in the file specified in the Animation Clip parameter.
You can also grab the motion mixer output using a ![]() Motion Mixer Fetch SOP or export the data using the motion mixer’s baking functionality. In this way, you can get the motion mixer data into another SOP and continue editing the animation independent of the motion mixer.
Motion Mixer Fetch SOP or export the data using the motion mixer’s baking functionality. In this way, you can get the motion mixer data into another SOP and continue editing the animation independent of the motion mixer.
Use the Motion Mixer Fetch SOP 
The Motion Mixer Fetch SOP allows you to fetch the data from a Motion Mixer SOP:
-
Drag and drop a Motion Mixer SOP from the network editor into the Motion Mixer Fetch SOP’s Mixer Path parameter textbox.
-
On the Motion Mixer Fetch SOP, set the Output Mode parameter to the data to output.
If you set Output Mode to Animation Clips, the Motion Mixer Fetch SOP outputs the full animation scene with the updated animation. You can connect an
APEX Scene Animate SOP after it and continue editing the animation in the animate state.
Export to a SOP or new track 
You can export the motion mixer animation to an APEX Scene Animate or ![]() Stash SOP, or bake the animation onto a new track:
Stash SOP, or bake the animation onto a new track:
-
Select a track to bake. If you don’t select anything, this bakes all the tracks.
-
In the motion mixer pane, go to Edit ▸ Bake.
-
In the Bake Motion Mixer window:
-
Set the baking Mode:
-
Bake to Scene Animate SOP - Creates an APEX Scene Animate SOP that contains the motion mixer animation. The APEX Scene Animate SOP is connected to the node that is input to the Motion Mixer SOP.
-
Bake to Stash SOP - Creates a Stash SOP that contains the motion mixer animation. You can connect the Stash SOP to an APEX Scene Animate SOP and continue editing the animation in the animate state.
-
Bake to Track - Creates a new track that contains the combined motion from all the tracks (or the previous tracks if a track was selected). This new track is set to Replace mode in the track header, so it overrides the tracks below it.
-
-
Set the frame range to export in the Start Frame and End Frame fields. You can also click the Mixer, Playbar, or Global buttons to automatically update the Start Frame and End Frame values.
-
Click Bake.
-
How-to 
See the motion mixer pane for ways to navigate in the timeline and descriptions of the toolbar buttons.
| To... | Do this |
|---|---|
|
Add a track |
Click or
|
|
Delete a track |
Select the track and press Delete. or
|
|
Rename a track |
Double-click the track name in the track header. or
|
|
Change the track order |
Drag and drop the track headers to reorder the tracks. or
|
|
Apply a track to a specific character or character’s joints |
|
|
Set the behavior between clips |
The selected clip drives the transition with the previous clip (the clip on its left). In the Transition section for the selected clip, set the Mode parameter:
|
|
Set the behavior before and after a clip (if there are no other clips before/after it) |
Change the Extend Before and Extend After parameters for the clip. |
|
Change the speed of a clip |
or Change the clip’s Speed parameter. Note The Speed should not be animated, as it will give unexpected results. If you want to animate the speed of a clip, use the retime effect. |
|
Split a clip |
|
|
Set keys on a track weight or effect |
Hold Alt, and click the curve in the timeline or the textbox/slider in the header. |
|
Mute (turn off) an effect |
Click |
|
Only have a specific track contribute to the overall motion |
Click |
|
Change the color of all the clips in a track |
Click the color chip in the track header. If you select the black color, the clips will go back to their default color. |
|
Change the color of a particular clip |
|
|
Turn off the character labels in the Motion Mixer viewer state |
The Labels parameter is not available when the output Mode is set to Animation Clip. |