| On this page |
|
The animation catalog lets you save, manage, and apply animations and single-frame poses to an animation scene, allowing you to reuse animation across different projects.
Animation catalog pane 
The animation catalog pane is the interface to the animation catalog. To open the animation catalog pane, click the ![]() New Tab icon at the top of a pane and select New Pane Tab Type ▸ Animation ▸ APEX Animation Catalog.
New Tab icon at the top of a pane and select New Pane Tab Type ▸ Animation ▸ APEX Animation Catalog.
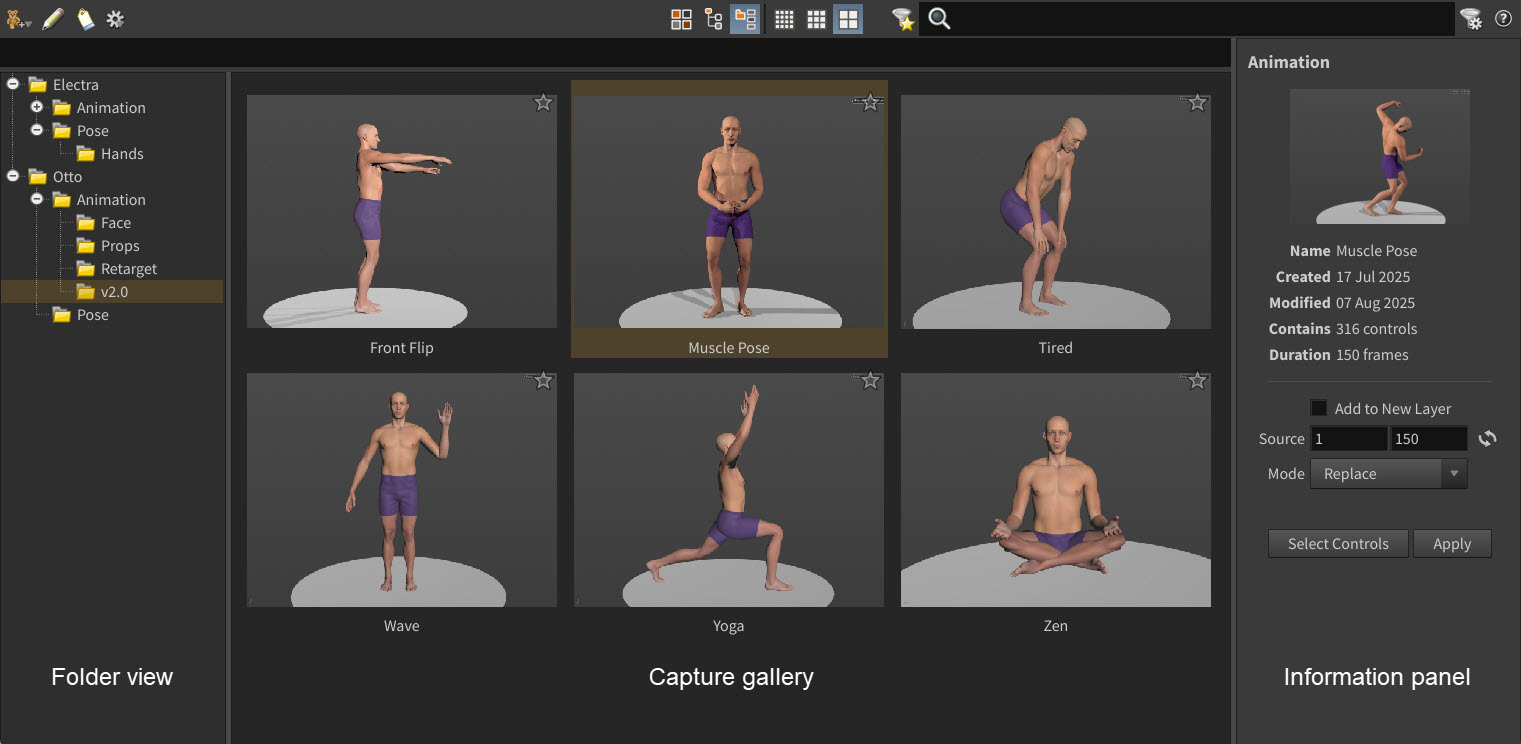
The animation catalog pane is made up of three parts - the folder view, the capture gallery, and the information panel:
-
The folder view allows you to organize all your captures (poses and animation) in a folder structure.
-
The capture gallery displays thumbnails of the captures in the current folder. To change the size of the thumbnails, click one of
 Small Grid Layout,
  Medium Grid Layout, or
  Large Grid Layout on the toolbar.
 -
The information panel provides details on the selected capture, as well as options for updating the capture and applying the capture to your scene.
To change the layout of the animation catalog pane, click one of ![]() Grid Layout,
Grid Layout, ![]() Tree Layout, or
Tree Layout, or ![]() Split Layout on the toolbar.
Split Layout on the toolbar.
If you want to add new captures to your catalog or apply existing captures to an animation scene, you must be in the animate state. You can, however, view an animation catalog outside of the animate state.
Create, open, and save a catalog 
| To... | Do this |
|---|---|
|
Create a new animation catalog |
On the toolbar, click |
|
Open an existing animation catalog |
On the toolbar, click |
|
Save an animation catalog |
On the toolbar, click |
|
Import a catalog from disk and merge it into the current catalog |
On the toolbar, click |
|
Export folders to a new catalog |
|
The animation catalog is saved as a .bgeo file that contains an animation scene with the saved poses and animation.
If you save a .hip file with a catalog open in the animation catalog pane, a reference to the catalog will be saved with the .hip file. The next time you open the .hip file, the referenced catalog will be loaded in the animation catalog pane.
You can specify a default animation catalog using the environment variable, HOUDINI_ANIMATIONCATALOG_FILE. If you open a .hip file that doesn’t already have an associated catalog, it will load the default catalog.
Organizing a catalog 
You can organize your captured poses and animation in the folder view.
| To... | Do this |
|---|---|
|
Create a folder in the catalog |
On the toolbar, click or
If you selected a folder, the new folder will be added under the selected folder. |
|
Delete a folder |
Select a folder and press Delete. or
|
|
Rearrange folders and captures |
Drag and drop folders and captures in the folder view. |
|
Rename a folder |
Double-click the folder. |
|
Rename a capture |
In the capture gallery, double-click the capture label. or
or
|
Working with poses 
Capture a pose 
To capture a single-frame pose and add it to the animation catalog:
-
Select the controls to capture the pose of.
-
Capture the pose with one of the following:
-
On the toolbar, click
 and select Capture Pose.
 -
 the empty space in the capture gallery and select Capture Pose.
 -
In the folder view,
the folder where you want to store the capture and select Capture Pose.
-
-
In the information panel, click Capture Thumbnail. If you want to redo the capture, adjust the pose in the animate state and click Capture Thumbnail again.
-
In the Name field, specify a name for the pose.
-
Click Save.
Update a captured pose’s thumbnail 
To update the thumbnail of a captured pose:
-
Repose the character in the animate state.
-
In the capture gallery, select the pose to update.
-
In the information panel,
click the thumbnail and select Update Thumbnail.
Apply a pose to a scene 
To apply a captured pose to a scene:
-
Go to the frame where you want to apply the pose.
-
In the capture gallery, select the pose.
-
In the viewport, select the controls you want to apply the pose to. This can be a subset of the controls that were used to save the pose. You could also click Select Controls in the information panel to select all the controls that were used to save the pose.
-
(Optional) If you want to add the pose to a new animation layer, turn on Add to New Layer.
-
Click Apply. This sets keys on the current frame.
-
Change the Blend value to control how much of the pose to apply.
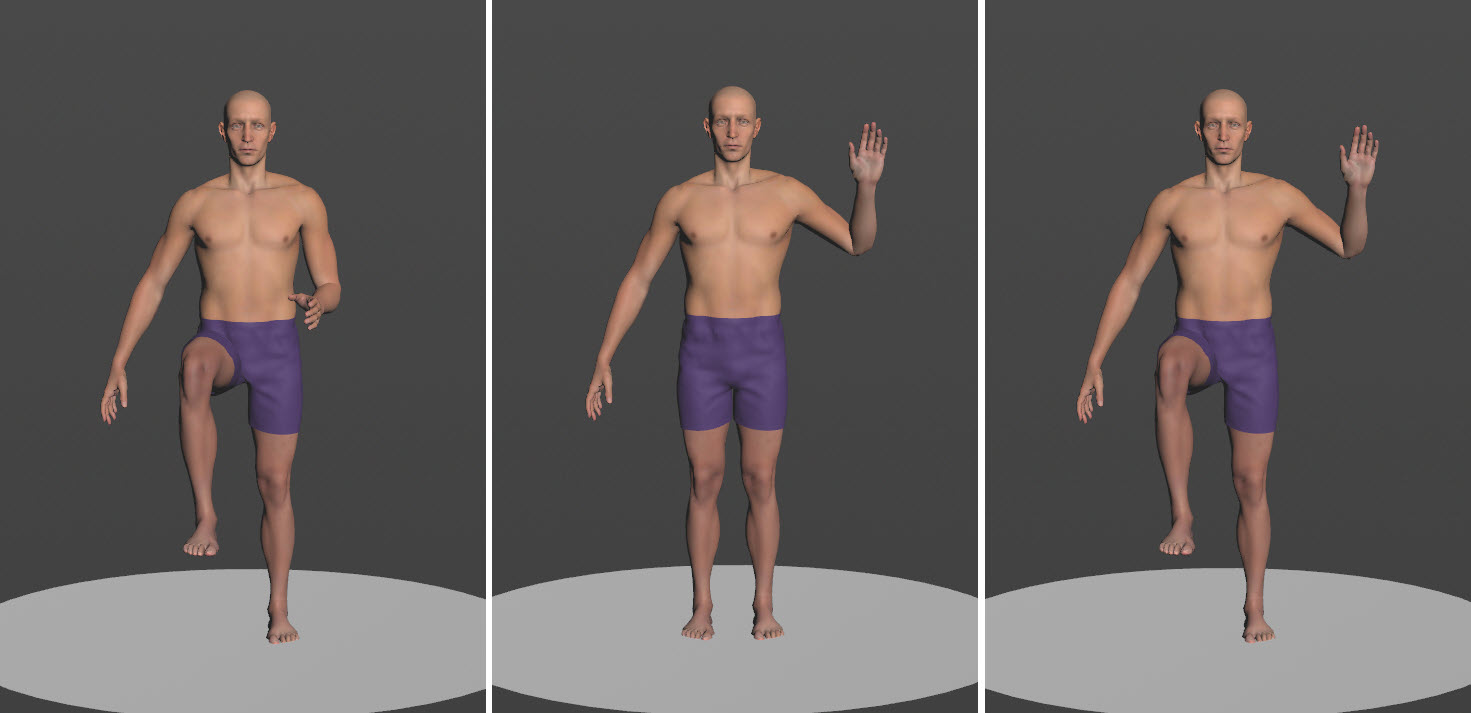
In the example below, we start with a marching pose (left). We then apply a waving pose (middle), which only has one selected control (the left hand). In the final pose (right), the left hand control is applied to the marching pose:
Working with animation 
Capture an animation 
To capture an animation and add it to the animation catalog:
-
Select the controls to capture the animation of.
-
Hold ⇧ Shift and drag along the playbar timeline to select a range of frames.
-
Capture the animation with one of the following:
-
On the toolbar, click
and select Capture Animation. -
the empty space in the capture gallery and select Capture Animation.
-
In the folder view,
the folder where you want to store the capture and select Capture Animation.
-
-
In the information panel, click Capture Preview. The preview is captured over the frame range specified by the Frames field.
-
In the Name field, specify a name for the animation.
-
By default, the Frames are set to the selected frame range. You can update the frame range or select from the
 menu.
menu. -
Click Save.
Update a captured animation’s preview 
To update the preview of a captured animation:
-
In the capture gallery, select the animation to update.
-
In the information panel,
click the animation preview and select Update Preview. This recaptures the animation within the Source frame range.Note
Currently, only animation that starts on frame 1 is updated properly.
Apply an animation to a scene 
When you apply captured animation to a scene, the animation is only applied to the controls that were used to save the animation. To apply captured animation:
-
Go to the frame where you want to start applying the animation.
-
In the capture gallery, select the animation.
-
Change the Source frame range if you want to apply only a portion of the animation.
-
Set the Mode:
-
Replace - Replaces any existing animation (keys) on the capture’s controls within the animation frame range. Any existing animation on other controls are unchanged.
-
Insert - Inserts the animation at the current frame, pushing back any existing animation.
-
-
Click Select Controls.
-
Click Apply.
In the example below, we start with a head nod animation (left). We then insert the head shake animation before the nod (right):
Search and filter for captures 
You can search for captured poses and animation using the ![]() search bar. You can also filter for captures in the capture gallery by starring captures, marking captures with colors, and adding tags to captures.
search bar. You can also filter for captures in the capture gallery by starring captures, marking captures with colors, and adding tags to captures.
Star captures 
To star a capture:
-
In the capture gallery, click the
 icon on a capture.
 -
On the toolbar, click
 . Only starred captures are displayed in the capture gallery.
Mark captures with colors 
A capture can only be associated with one color. To mark a capture with a color:
-
In the capture gallery,
a capture and select a color. -
On the toolbar, click
 and select the color. Only captures marked with that color are displayed in the capture gallery.
To filter for multiple colors, turn on Any of the following in the filter panel. This would display any captures marked with, say, red or green.
-
Click
again to close the filter panel.
Tag captures 
A tag is a single word that is associated with a capture. Tags can be used to group similar captures, for example, face. You can add multiple tags to a single capture. To tag a capture:
-
Select a capture.
-
Click
 on the toolbar, or click a capture and select Edit Metadata.
 -
In the Metadata Editor window, Tags section, add a new tag for the capture, for example,
arm. -
Click OK.
-
To filter for captures with the tag:
-
Type the tag in the
 search bar.
 or
-
Click
on the toolbar and select the tag. Click again to close the filter panel.
-
How-to 
| To... | Do this |
|---|---|
|
Create a new animation catalog |
On the toolbar, click |
|
Open an existing animation catalog |
On the toolbar, click |
|
Save an animation catalog |
On the toolbar, click |
|
Import a catalog from disk and merge it into the current catalog |
On the toolbar, click |
|
Export folders to a new catalog |
|
|
Make a copy of a capture |
|
|
Apply a pose or animation to a scene |
See apply a pose or apply an animation. |
|
Apply a pose or animation in a new animation layer |
In the information panel, turn on Add to New Layer. |
|
Recapture a pose or animation |
In the information panel, For animations, it recaptures the animation within the Source frame range. |
|
Save a new thumbnail for the pose |
|
|
Play a subset of the animation in the preview |
Update the frame range in the Source field. |
|
Reset the playback frame range |
In the information panel, click |