| On this page |
Set driven key is a technique that allows you to configure a control to drive the transforms of other  TransformObject nodes. As the driver’s value changes, the driven TransformObject nodes move through a range of poses that are authored ahead of time. This is useful for corrective and automated motion, such as curling a hand as a slider is pulled, or driving a fan of feathers with a single control.
A set driven key is built using two components that work together:
-
An
 APEX Rig Pose SOP authors the poses. In the APEX Rig Pose SOP, you can pose the driven controls and set keyframes on an animation layer. This stores the poses as an animation clip on the character.
 -
A set driven keys rig component plays back the poses. It reads the animation clip authored by the APEX Rig Pose SOP and maps the driver’s value onto the clip’s frame range, applying the interpolated pose to the driven nodes.
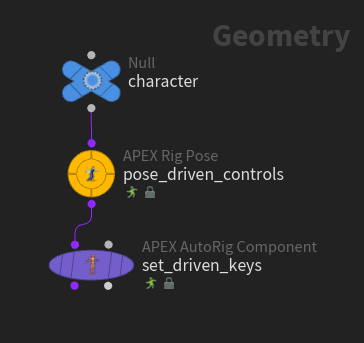
The APEX Rig Pose SOP and set driven keys rig component don’t pass pose values directly through their wires. Instead, they communicate through the animation clip stored on the character.
Tip
The APEX SetDrivenKey recipe is a ready-made setup that wires these two components together. See starting from the recipe for more information.
Drive animation using a control 
In this example, we drive the animation on the  Electra test geometry using certain controls on Electra:
Author the driven poses 
Use the APEX Rig Pose SOP to pose the driven controls and store the poses as an animation clip:
-
On the
Electra test geometry, set Output to APEX Character. This outputs Electra as a character in a character folder structure that’s comprised of a set of character elements (skeleton, shape, rig). You can view the character folder structure in the rig tree view:/ -- Base.rig -- Base.shp -- Base.skel ...
The character that is piped into the APEX Rig Pose SOP must have a rig.
-
On the APEX Rig Pose SOP:
-
Set Source Type to APEX Character.
-
Set Rig and Skeleton to Electra’s rig and skeleton in the character folder structure, in our example,
/Base.rigand/Base.skel.
-
-
Enter the animate state - select the APEX Rig Pose SOP, turn on its display flag, and click
 Animate on the left toolbar or press Enter over the viewport.
 -
Add poses on a new animation layer. Each layer becomes an animation clip that can be driven/played back by the set driven keys rig component. You can add animation layers through the APEX Rig Pose SOP parameter editor or in the standalone animation layers pane (at the top of a pane, click the
 New Tab icon and select New Pane Tab Type ▸ Animation ▸ APEX Animation Layers).
IMPORTANT
Poses must be added to an animation layer for the set driven keys component to play back the animation. Poses added on the base layer cannot be driven by the set driven keys component.
Pose the character’s controls and set keyframes at the two ends of the animation frame range.
-
Set a key at the start frame of the animation. This is the pose at the driver’s minimum value.
-
Set a key at the end frame of the animation. This is the pose at the driver’s maximum value.
-
You can key additional in-between frames to shape how the pose interpolates across the driver’s range.
The animation layer name and start/end frames are used by the set driven keys component to read back the animation clips authored on the APEX Rig Pose SOP.
Note
To have access to controls in the animate state, the controls need to be promoted. If a control (or a transform component of the control) isn’t already available in the animate state, specify the
TransformObject nodes to promote in the APEX Rig Pose SOP’s Translate, Rotate, and Scale parameters. For example, to be able to translate Electra’s head control, select the head control in the viewport and click  beside the Translate parameter.
In this example, we create animation on two animation layers,
danceandhead:Dance animation Head rotation animation A new folder for each animation layer is created in the character folder structure under
/riganimation/default.clip. We can see the following in the rig tree view:/ -- Base.rig -- Base.shp -- Base.skel ... -- riganimation/ -- default.clip/ dance/ head/The poses you author in the APEX Rig Pose SOP are not applied to the character - the APEX Rig Pose SOP simply stores them as channel primitives in the character for the set driven keys component to use later.
-
Drive the poses 
The set driven keys rig component reads the animation clips created by the APEX Rig Pose SOP and connects them to driver controls:
-
On the
APEX AutoRig Component SOP, set Component Source to Set Driven Keys. -
Enter the animate state on the APEX AutoRig Component SOP - select the APEX AutoRig Component SOP, turn on its display flag, and click
Animate on the left toolbar or press Enter over the viewport. -
Add a Setups multiparm entry for each animation clip you want to drive. Click
for add multiple setups. In our example, we create two Setups, one for the dance animation and another for the head rotation animation. -
For the dance animation multiparm entry, set the following in the Settings tab:
-
Set Animation Layer to the animation layer created in the APEX Rig Pose SOP that contains the dance animation,
dance. -
Set Start Frame and End Frame to the animation start and end frames. In our example, the dance animation goes from frames 1 to 24, so we set Start Frame to
1and End Frame to24. -
Turn on T, R, and S to specify the channels that are animated (translate, rotate, scale).
-
Set Clip Path to the
.clipin the character folder structure that contains the dance animation, in our example,riganimation/default.clip/.
-
-
In the Driven tab, set Nodes to the TransformObject nodes to drive. This field accepts APEX path patterns, so you can specify the tags on the node, for example,
#<tag>. In our example, we can leave Nodes at the default of “*”. -
We want the left foot to drive the animation. In the Driver tab:
-
Set the Driver parameter to the control that drives the animation - click
 beside Driver, select the left foot control in the viewport, and press Enter over the viewport. The Driver parameter is automatically populated with the control name.
 -
Specify the specific channel that drives the animation by appending the channel to the driver’s name with a colon. In our example, we want the vertical position of the left foot to drive the dance animation, so we set Driver to
L_footAnkle_ik:ty.Note
If the Driver parameter is not set to an existing control and channel, the set driven keys component creates a slider in the component’s
 menu that drives the animation:
-
If you don’t append a channel to the control name, a slider set to the name of the Driver is created in the component’s
menu. For example, if you set Driver to L_footAnkle_ik, a slider namedL_footAnkle_ikis created in the component’s menu. In this case, the left foot control doesn’t actually drive the animation; a slider named L_footAnkle_ikdrives the animation. -
If you set Driver to a control name that doesn’t already exist, a slider with the specified name is created in the component’s
menu. -
If you leave Driver empty, a slider with the Animation Layer name is created in the component’s
menu.
Drive animation using the gear menu slider -
-
Set Fit Min and Fit Max to the driver values that map to the Start Frame and End Frame of the clip. We set Fit Min to
0and Fit Max to0.25.Dance animation driven by the left foot
-
-
If you haven’t added a multiparm entry for the head rotation animation, click
beside Setups. -
For the head rotation animation multiparm entry, set the following in the Settings tab:
-
Set Animation Layer to
head. -
In our example, the head rotation animation goes from frames 1 to 24, so we set Start Frame to
1and End Frame to24.
-
-
We want to drive the head animation with the left hand rotation, so in the Driver tab:
-
Set Driver to the rotation channel of the left hand control,
L_armTarget_ik:rx. -
Set Fit Min to
0and Fit Max to-180.Head animation driven by the left hand rotation Note
If multiple animation layers drive the same control, the layer listed lower down in the set driven keys component takes precedence. In this example, the head rotation animation overrides the head poses from the dancing animation because the
headanimation layer is listed lower in the Setups multiparm.
-
-
To test the set driven keys functionality:
-
Enter the animate state on the APEX AutoRig Component SOP.
-
Select the driver control (or open the
menu to access the slider) and change its value. As the driver moves between Fit Min and Fit Max, the driven nodes play back the poses authored in the APEX Rig Pose SOP.
-
Start from the recipe 
The APEX SetDrivenKey recipe puts down a prewired network so you don’t have to build it from scratch:
-
In the network view, type “APEX SetDrivenKey” in the TAB menu and put down the recipe.
-
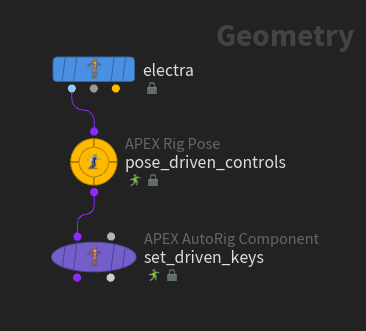
Connect a character to the input of the recipe. In the example below, we use the
Electra test geometry as the character (in the Electra SOP, set Output to APEX Character):
Pre-wired network created by the APEX SetDrivenKey recipe -
On the APEX Rig Pose SOP, author the driven poses on a new animation layer.
-
Configure the set driven keys rig component to read the animation created by the APEX Rig Pose SOP and specify a driver to drive the animation.
| See also |