| On this page |
Overview 
The render gallery makes it easy to explore different settings, materials, lighting setups, and so on, compare the different looks. When you decide on the right look, you can revert the LOP network to match how it was set up when a snapshot was taken.
The render gallery is available as a sub-pane of the Solaris Viewer, or as a separate Render Gallery pane type.
-
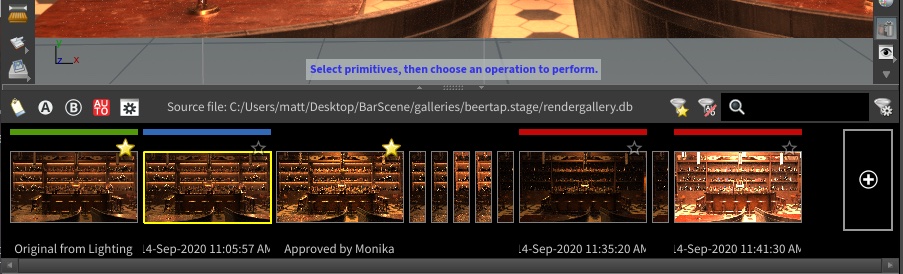
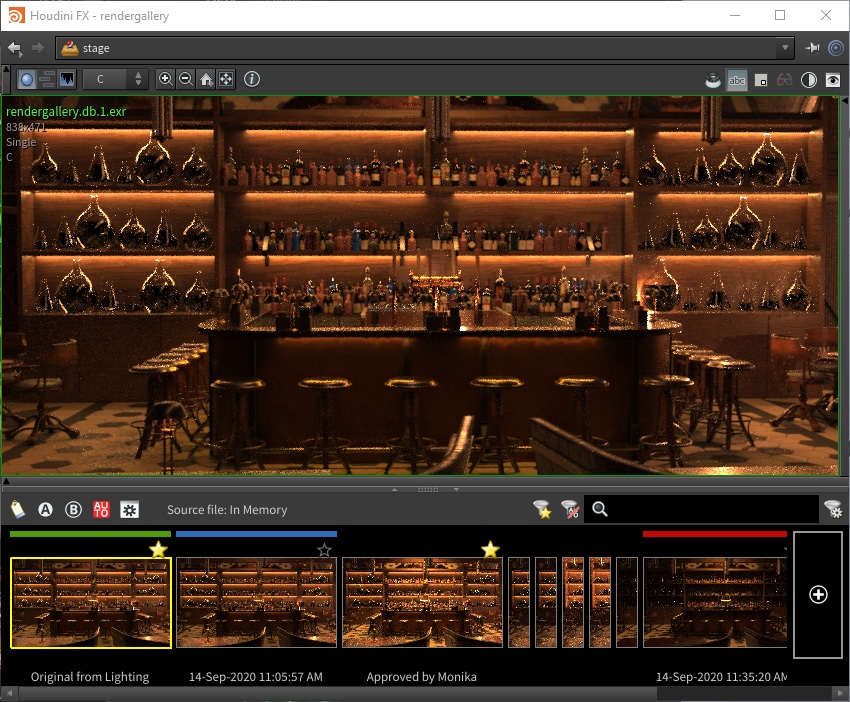
The sub-pane is a strip of snapshot images below the Solaris viewer, with controls for taking and managing snapshots. You can double-click a snapshot to open it in a full Render Gallery pane.
-
The full pane includes both the snapshot strip and an image viewer, allowing you to view or compare snapshot images.
Each render gallery is associated with a LOP network (for example /stage). See render gallery storage below for more information.
-
The
 Show/Hide Render Stats button in the icon bar opens a section with detailed statistics about the current snapshot. You can see information like memory usage, time to first pixel, pixel samples, time, spent on shadows or lighting, objects counts, and many more.
Note
The render gallery is only available in the Solaris viewer for LOP networks. It is not available in the OBJ/SOP scene viewer.
Showing the render gallery 
| To... | Do this |
|---|---|
|
Show/hide the render gallery in the Solaris viewer |
Click the |
|
Add a Render Gallery pane tab to the pane layout |
In the pane where you want to add the tab, click the |
|
Open a floating Render Gallery window |
|
Working with snapshots 
| To... | Do this |
|---|---|
|
Take a snapshot of the current view |
Click |
|
Start a background render snapshot |
Click
If necessary, an expert user can write a background render plugin that implements some other type of background render, for example using a different farm management tool, or using a proprietary studio render pipeline. |
|
Start a background render on an HQueue farm |
|
|
Select a snapshot |
|
|
View a snapshot |
|
|
Delete a snapshot |
|
|
Restore the LOP network to the state saved with a snapshot |
Right click the snapshot and choose Revert network to this snapshot. Tip You can choose Edit ▸ Undo in the main menus to undo reverting to a snapshot. |
Viewing and comparing snapshots 
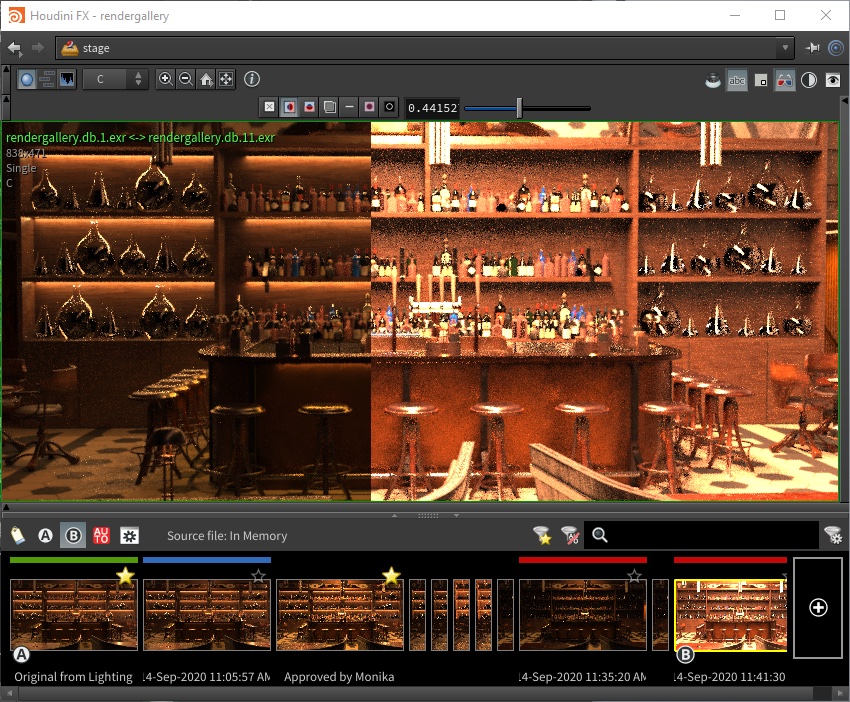
The render gallery pane interface is similar to MPlay and the Compositing View. See the toolbar reference below for an explanation of all the controls in the render gallery view.
| To... | Do this |
|---|---|
|
View a snapshot |
|
|
|
|
Compare two images in the render gallery view |
Tip You can also select two images and click See the toolbar reference below for the different comparison types. |
|
Show/hide image comparison |
|
The Live Render mode 
The Render Gallery has a Live Render mode. To start a Live Render you need a ![]() Live Render LOP. This node establishes a connection between the render delegate and the gallery.
Live Render LOP. This node establishes a connection between the render delegate and the gallery.
When you start the Live Render mode, the node “streams” the viewport to a thumbnail on the image strip. This thumbnail directly reacts to viewport changes and is updated automatically. The Live Render mode is similar to background rendering, but it’s not a clone of the running process and therefore more resource-friendly. Once you've stopped the live render, you get a fully rendered image you can inspect in the gallery’s viewer or save to disk.
The Live Render LOP provides several options and also an interface to Houdini’s Copernicus technology. For detailed information on how to set up a Live Render connection please read the Live rendering in Solaris page.
Organizing and searching snapshots 
Each snapshot includes various pieces of metadata, some of which you can edit and/or filter:
Image |
A snapshot captures the contents of the Solaris viewer as an EXR image. A thumbnail of the image is displayed in the snapshot strip. You can view the full image in a render gallery view. |
Label |
Each snapshot has an automatic label when it is created, which you can edit to be more descriptive (see below). The label is displayed below the snapshot in the snapshot strip. You can filter snapshots by text in their labels. |
Creation time |
You can filter the visible snapshots by their creation times. |
LOP network |
Each snapshot stores the LOP network as it was when the snapshot was taken, so you can choose to revert to it later. |
Star |
You can “star” a snapshot to make it easy to find later. |
Color |
You can optionally assign a color to each snapshot. This is an easy way to categorize snapshots quickly. The snapshot strip displays a snapshot’s color as a colored line above the thumbnail. |
Tags |
You can associate an arbitrary list of tags (single words) with each snapshot in the metadata editor (see below). You can then filter snapshots based on tags. (Starred status is actually stored using the |
| To... | Do this |
|---|---|
|
Edit a snapshot’s label |
|
|
Star a snapshot |
|
|
Assign a color |
Select one or more snapshots, then right-click the selection and choose a color from the context menu. |
You can edit the snapshot’s label and tags in the metadata editor window.
|
|
|
Show only starred snapshots |
Turn on the |
|
Click the This opens a sidebar showing different filters.
|
|
|
Filter by color |
|
|
|
|
Filter by text |
Type what to search for in the filter textbox in the snapshot strip toolbar. This matches label text and also tags. |
|
Filter by recently created |
|
Auto snapshots 
When Auto snapshots are on, the render gallery automatically creates a new snapshot when the view re-renders (for example, when you change a parameter). A timer controls how often the gallery should create auto snapshots.
-
Auto snapshots (except the most recent snapshot) appear “collapsed” in the snapshot strip to save space. You can select or hover over an auto snapshot to see the full thumbnail in the strip.
-
Auto snapshots are tagged
auto.
| To... | Do this |
|---|---|
|
Set up auto-snapshots |
|
|
Turn auto-snapshots on/off |
|
|
Set how long to wait to take a snapshot after a change |
Currently, the gallery takes an image of the exact contents of the viewer at the moment the snapshot is triggered. When the view is rendered, you probably want to add a delay between the time of a parameter change and the snapshot, to allow the renderer to refine the image. Otherwise the snapshot will show the initial blocky approximation.
Note Future versions of Houdini should allow “live” snapshots that continue to update as the renderer works, eliminating the need for this delay. |
|
Show/hide all auto snapshots |
Click the |
Toolbars 
Main viewer toolbar 
![]() View Image
View Image
View the render as an image.
![]() View Timeline
View Timeline
This option is disabled in the Render Gallery view.
![]() View Histogram
View Histogram
View the render is a histogram. You cannot use diff mode with histograms.
![]() Zoom In
Zoom In
Increases the magnification.
![]() Zoom Out
Zoom Out
Decreases the magnification.
![]() Home
Home
Resets to the default view (centered, 100% magnification).
![]() Fit to Window
Fit to Window
Pan and zoom so the image fills the available view space.
![]() Info Window
Info Window
Press and hold on this button to display a window containing summary data about the rendered image.
![]() Inspect
Inspect
When this is on, as you move the mouse over the image, a floating window shows data about the pixel under the mouse pointer.
![]() Show/Hide Labels
Show/Hide Labels
Draw text over the image showing image file name(s) and metadata such as pixel width/height.
![]() Show/Hide Render Stats
Show/Hide Render Stats
Get detailed information on a snapshot’s render statistics, such as memory usage, ray types, light types, time to first pixel, and many more.
![]() Show/Hide Preview
Show/Hide Preview
Shows a thumbnail of the entire image in the corner, with a rectangle representing the currently visible part. You can drag the rectangle to pan across the thumbnail.
![]() Show/Hide Diff Bar
Show/Hide Diff Bar
Enables diffing and shows the controls on the diff toolbar (see below).
![]() Show/Hide Color Correction Bar
Show/Hide Color Correction Bar
Shows an extra toolbar with controls for color correcting the displayed images.
![]() Display Options
Display Options
Shows a window with options for how to display the image, such as the background behind the image.
Diff toolbar 
![]() No diff
No diff
Only display the “A” image. This may be useful to switch back and forth between the original image and a comparison.
![]() Split Horizontal
Split Horizontal
Display a split view with A on the left and B on the right. Click in the image or use the slider at the end of the toolbar to move the split point.
![]() Split Vertical
Split Vertical
Display a split view with A on top and B on the bottom. Click in the image or use the slider at the end of the toolbar to move the split point.
![]() Compare
Compare
Displays the absolute difference between the pixel component values of the two images. This can help highlight subtle differences between two very similar images.
![]() Subtract
Subtract
Subtracts the pixel component values of the second image from the values of the first image.
![]() Blend
Blend
Fades the two images together. The slider controls the percentage of the second image blended with the first.
![]() Highlight Differences
Highlight Differences
Highlights any pixels in the first image that differ from the second image by more than a threshold set with the slider.
The threshold is measured in normalized color space (1 unit is equal to the range from black to white).
Snapshot strip toolbar 
![]() Edit Metadata
Edit Metadata
Opens a window that lets you edit the label, tags, and other metadata for the selected snapshot.
![]() A
A
Set the selected snapshot as the first image to compare.
![]() B
B
Set the selected snapshot as the second image to compare.
![]() Auto
Auto
Enable auto-snapshots.
![]() Options
Options
Open a window with options for how the render gallery works.
Source file path
Displays where on disk the current gallery database is stored.
![]() Show Only Starred
Show Only Starred
Filter the snapshots so only starred snapshots are visible.
![]() Show Only Non-Auto
Show Only Non-Auto
Filter the snapshots so auto snapshots are hidden.
![]() Search box
Search box
Type to filter by label text and/or tags.
![]() Show/Hide More Filters
Show/Hide More Filters
Opens a sidebar in the strip area with additional options for filtering.
Color correction toolbar 
The Correction toolbar contains image component and color controls.
![]()
![]()
![]()
![]()
These five buttons control which color plane(s) to show. The first icon shows all the planes (Red, Green, Blue, Alpha/Component 4). The next four turn the individual planes on or off.
The Alpha/Component 4 button will show the fourth component plane if one exists, otherwise it shows the alpha channel.
The default hotkeys for these buttons are ~, 1, 2, 3, and 4.
![]() /
/ ![]() menu button
menu button
Switches between Brightness/Contrast controls and Black/White Points.
Press R to reset all color correction controls to their default values.
![]()
Click the brightness button to reset the brightness to 1.
Enter a value in the number field for the brightness, or
click ![]() in the field to show a slider.
in the field to show a slider.
The field turns yellow when brightness is not 1.
![]()
Click the contrast button to reset the contrast to 1.
Enter a value in the number field for the contrast, or click
![]() in the field to show a slider.
in the field to show a slider.
The field turns yellow when contrast is not 1.
![]()
This value is added to all pixels, effectively shifting the brightness of the entire image up or down. This can be useful for looking through intensity “slices” of the image.
![]()
The black point of the image, normally 0. This is applied after any image-specific white and black points, so 0 is always black and 1 is always white, regardless of the image data format.
![]()
The white point of the image, normally 1. This is applied after any image-specific white and black points, so 0 is always black and 1 is always white, regardless of the image data format.
![]()
Click the gamma button to reset the contrast to the default set in the display options window .
Enter a value in the number field for the gamma, or click
![]() in the field to show a slider.
in the field to show a slider.
The field turns yellow when gamma is not at the default gamma setting.
![]()
Adjusts the black and white points to fit the minimum and maximum pixel values of the current image.
Snapshot storage 
-
The LOP network node (for example,
/stage) has a Render gallery source parameter that controls where Houdini creates and saves the render gallery database.The default is:
$HIP/galleries/$HIPNAME.$OS/rendergallery.db
…where
$HIPis the directory containing the current scene file,$HIPNAMEis the name of the current scene file, and$OSis the name of the current node (that is, the name of the LOP network).If you edit this path, you should still include the scene file name and node name in the path, to allow multiple scene files in the same directory, and multiple LOP networks in a scene file.
-
The gallery saves the captured EXR images files in the same directory as the
rendergallery.dbfile. -
The gallery displays the path of the database file in the snapshot strip toolbar.
-
If the current Houdini scene has not been saved to disk yet, it maintains the render gallery data in memory until the scene is saved.
-
Houdini does not create the database file and any intermediate directories are not until you take a snapshot.