There is a new ![]() Edge Fracture tool provides an easy way to fracture a
Edge Fracture tool provides an easy way to fracture a ![]() Planar Patch for Vellum breaking and tearing.
Planar Patch for Vellum breaking and tearing.
The follow example demonstrates how to tear a simple piece of cloth.
-
Create a
 sphere in the viewport.
 -
Raise it above the ground plane and set a keyframe at frame 0.
-
Lower it below the ground plane and set a keyframe at frame 24.
-
Create a
 Planar Patch and orient it in the ZX Build Plane.
 -
Increase the Size and lower it below the sphere.
-
Append an
 Edge Fracture SOP to Planar Patch. This will fracture the patch.
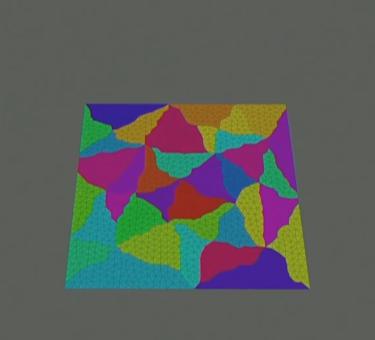
-
Append a
 Vellum Configure Cloth to the Edge Fracture node. This will turn the patch into Vellum Cloth.
 -
In the Pin to Animation selection, use the
 reselect button to interactively select points to pin in the viewport. Select 2 opposite edges by holding ⇧ Shift and press Enter.
 -
Wire the
Sphere SOP into the collision geometry input of the Vellum Configure Cloth (third input). -
Append a
 Vellum Solver after the Vellum Configure Cloth node.
If you play the simulation, the cloth will break apart at the fractures and fall since they are all cut apart.

-
Add a
Vellum Weld Points SOP between the Vellum Configure Cloth and Vellum Solver nodes. This will weld your fractures together.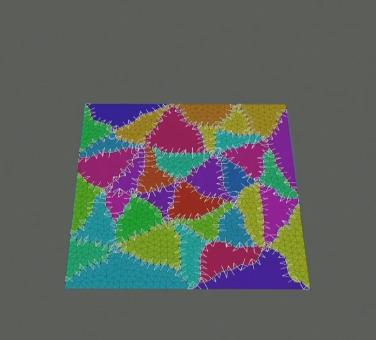
-
Turn on the Breaking checkbox and set the Threshold at which you want the welds to break on the
Vellum Weld Points node. The welds will break once the threshold is met.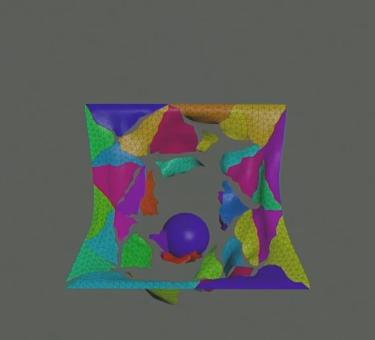
Note
You can alternatively turn off Initial Pieces on the ![]() Edge Fracture SOP and use the
Edge Fracture SOP and use the ![]() Draw Curve tool on the Create shelf to interactively draw the cuts in the
Draw Curve tool on the Create shelf to interactively draw the cuts in the ![]() Planar Patch. This gives you complete control of where the tears will occur. Wire the
Planar Patch. This gives you complete control of where the tears will occur. Wire the ![]() Draw Curve node into the second input of the
Draw Curve node into the second input of the ![]() Edge Fracture SOP node to see the effects.
Edge Fracture SOP node to see the effects.
Normalizing stress computations over time 
On the Advanced tab of the ![]() Vellum Solver, there’s a Normalize Stress checkbox which is turn on by default in Houdini 18 and later. It allows you to normalize the stress computation over time, so that the computed values are more predictable when the substep values change.
Vellum Solver, there’s a Normalize Stress checkbox which is turn on by default in Houdini 18 and later. It allows you to normalize the stress computation over time, so that the computed values are more predictable when the substep values change.
This is useful for breaking or tearing cloth based on a stress threshold, since it allows you to change the substeps without having to change the values for the thresholds very much. For example, if you introduce very fast moving collision geometry and need to increase the substeps, you may only have to tweak the thresholds slightly.
This also works well in conjunction with density-computed mass. For example, if you have cloth that has a consistent density but you change the resolution, the stress values should still be fairly consistent. This makes it easier to set up values that will work across a wide range of substeps and resolutions.
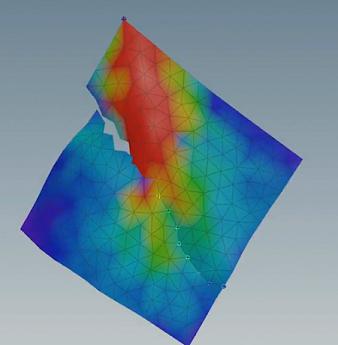
Low-res mesh with 1 substep.
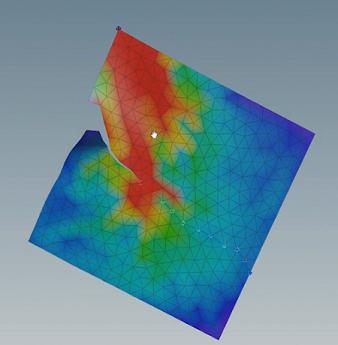
High-res mesh with 3 substeps.
The illustrations show the stress threshold of the welds on the same piece of cloth with different resolutions and substeps. Although the tear isn’t exactly the same, the results are fairly similar. Slightly tweaking the Breaking Threshold can improve your results if you aren’t happy with the look.