| On this page |
Paneling workflow 
This example explains how to create panels, stitch them together, and weld seams strictly through modeling operations. This can also be done with the Draping workflow (below).
-
Load in your character geometry.
Tip
It is ideal to have the character in the T-pose for this workflow.
-
Use the
 Draw Curve tool on the Create shelf to draw the outline of one panel of your garment. You will want to draw your panel much larger than your character, as it will need excess material to wrap around the body.
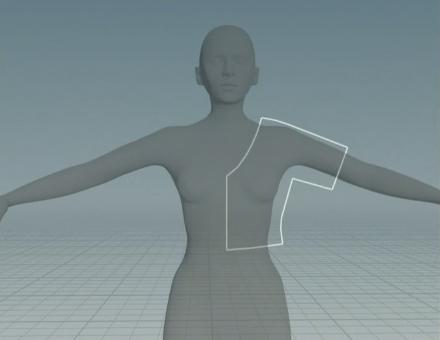
Tip
Instead of using one continuous stroke, make a separate stroke for each edge of the panel. These curves will become the seams of your garment, which you will stich and weld to form the clothing. For example, the above panel was drawn in 7 strokes.
-
Append a
 Resample SOP to the Draw Curve node to decrease the number of points per stroke and get a course outline.
 -
Add a
 Fuse SOP after the Resample node to snap the points together.
 -
Next, add a
 Planar Patch from Curve SOP after the Fuse SOP to take the 2d curves and fill it with a uniform tesselation of triangles.
Tip
The input geometry for a cloth simulation is important because it will affect how the material will behave. Using a planar polygonal patch is better than using a regular grid because a planar polygonal patch is constructed with a randomized collection of uniformly sized triangles. This will produce smoother, more organic results at a lower resolution. A regular grid will often require a greater resolution to attain similar looking smooth results.
-
Turn on the Resample Curves checkbox to make sure the curves have an edge spacing matching the interior edge length, decrease the Interior Edge Length to give your cloth a higher resolution, and choose Subdivision Curves from the Smoothing dropdown menu.
-
Append a
 Transform node to the Fuse SOP and transform the points to create the back panel.
 -
Copy and paste the
Planar Patch from Curve SOP in the network and wire it after the Transform node.Repeat these two steps for the other front and back panels.
-
Rename the
Planar Patch from Curve nodes to front_r,back_r,front_l, andback_rrespectively. This will avoid confusion when picking seam groups for stitching. -
Create a
 Merge SOP and wire in all of the Planar Patch from Curve nodes.
-
Once you have created your panels, add a
 Vellum Configure Cloth node to your chain. This will turn your planar patches into cloth.
 -
Next, append a
 Vellum Solver and attach your collision geometry (character geometry) to the third input of the Vellum Configure Cloth node.
 -
Add a
Vellum Stitch Points node between the Vellum Configure Cloth and Vellum Solver. -
On the
Vellum Stitch Points node, change the Group Type to points. -
Use the Geometry Group Type dropdown menu to select a seam group. For example,
front_r_seam0. -
Use the Target Geometry Group Type dropdown menu to select the seam group you want to stitch to. For example,
back_r_seam0.Repeat these two steps for all seams you want to connect together.

-
These will create distance constraints between the points maintaining the original distance. In order for the points to snap together, set the Rest Length Scale to
0.A common problem with only stitching points is that the seams will never come completely together. If you want them to come completely together, you have to weld them together.

-
Add a
Vellum Weld Points node between Vellum Stitch Points and the Vellum Solver. -
Use the Geometry Group Type dropdown menu to select a seam group. For example,
front_r_seam0. -
Use the Target Geometry Group Type dropdown menu to select the seam group you want to stitch to. For example,
back_r_seam0.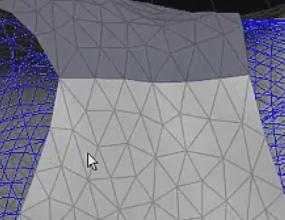
Repeat these two steps for all seams you want to connect together. This node will automatically calculate the bend and stiffness constraints across the weld, so that it acts like a single piece of fabric.
Note
It is not necessary to do a stitch before a weld. However, weld pulls the fabric together instantly, which creates a huge amount of energy. This may cause the fabric to go through the object. It is useful to perform a stitch setup first, so that the cloth has a chance to run over the surface of the character and come together more slowly.

Draping workflow 
This example explains how to create panels and use the ![]() Vellum Drape node to stitch and weld cloth together. This is similar to the Paneling workflow (above). However, this is done within a simulation rather than through modeling operations. The Vellum Drape SOP provides a sandbox simulation designed around moving stitched points together slowly before fusing them with welds.
Vellum Drape node to stitch and weld cloth together. This is similar to the Paneling workflow (above). However, this is done within a simulation rather than through modeling operations. The Vellum Drape SOP provides a sandbox simulation designed around moving stitched points together slowly before fusing them with welds.
-
Load in your character geometry.
Tip
It is ideal to have the character in the T-pose for this workflow.
-
Use the
Draw Curve tool on the Create shelf to draw the outline of one panel of your garment. You will want to draw your panel much larger than your character, as it will need excess material to wrap around the body.
Tip
Instead of using one continuous stroke, make a separate stroke for each edge of the panel. These curves will become the seams of your garment, which you will stich and weld to form the clothing. For example, the above panel was drawn in 7 strokes.
-
Append a Resample SOP to the
Draw Curve node to decrease the number of points per stroke and get a course outline. -
Add a
Fuse SOP after the Resample node to snap the points together. -
Next, add a
Planar Patch from Curve SOP after the Fuse SOP to take the 2d curves and fill it with a uniform tesselation of triangles.Tip
The input geometry for a cloth simulation is important because it will affect how the material will behave. Using a planar polygonal patch is better than using a regular grid because a planar polygonal patch is constructed with a randomized collection of uniformly sized triangles. This will produce smoother, more organic results at a lower resolution. A regular grid will often require a greater resolution to attain similar looking smooth results.
-
Turn on the Resample Curves checkbox to make sure the curves have an edge spacing matching the interior edge length, decrease the Interior Edge Length to give your cloth a higher resolution, and choose Subdivision Curves from the Smoothing dropdown menu.
-
Append a
Transform node to the Fuse SOP and transform the points to create the back panel. -
Copy and paste the
Planar Patch from Curve SOP in the network and wire it after the Transform node.Repeat these two steps for the other front and back panels.
-
Rename the
Planar Patch from Curve nodes to front_r,back_r,front_l, andback_rrespectively. This will avoid confusion when picking seam groups for stitching. -
Create a
Merge SOP and wire in all of the Planar Patch from Curve nodes.
-
Once you have created your panels, add a
Vellum Configure Cloth node to your chain. This will turn your planar patches into cloth. -
Next, add a
 Vellum Drape node. This node provides an automatic way of sewing seams together.
 -
On the Draping tab, turn on Weld Additional Seams, and select the Group and Target Group seams to connect. For example,
front_r_seam0andback_r_seam0.It is highly recommended that you click + and add each seam individually, because unlike the
Vellum Stitch Points and Vellum Weld Points nodes, Vellum Drape does not read the groups in the order you type them in. This could cause incorrect groups being matched together.Note
The Reverse checkbox is useful for correcting seams that are backwards. This often happens when using mirroring to copy panels.
The Weld Frame Delay controls how many frames before switching from a stitch constraint to a weld constraint, and the Attraction Stiffness defines how strong to make the initial stitch stiffness. This eliminates the need to manually stitch the points together before manually welding the points together, as we did in the Paneling workflow above.
Tip
If the material is having a hard time wrapping around the character, try making the panels larger so there is enough fabric to wrap around the character. You could also try appending a second
Vellum Drape node and turning on the Inflate Collisions checkbox. This will slightly deflate the collision object and inflate it over time.
-
Once you're satisfied with your draped cloth, save output. This can done in three ways.
-
Use a
 Vellum I/O node to save out the Vellum Geometry and Constraint geometry.
 -
Save only the first output. This will remove all the history, treat the output cloth as a new piece of geometry, and will give you a new piece of cloth with its own set of constraints and stiffness. This is method is advantageous because it resets all of the rest lengths, so there is no energy stored in the cloth. For example, if you have cloth that stretches a lot because it’s too small, it will always be fighting to shrink back. This method will relax the fabric. However, this method also locks in all of the curves of the underlying original geometry. So if the character’s body becomes skinnier, the original muscle curves will be locked into the fabric.
-
Use a
 Vellum Rest Blend, which lets you blend the current set of constraint values into the rest.
-