| On this page |
|
OCIO 
OpenColorIO (OCIO) is an open source library for color management with a focus on motion picture production and visual effects. Over the last years, OCIO became a standard and is supported by a wide range of applications. With OCIO it’s possible to establish a linear workflow that conforms to the ACES (Academy Color Encoding System) standard and guarantees consistent colors through the entire pipeline. For users, the centerpiece of OCIO is the ocio.config file. This file provides a large number of predefined rules for importing, converting and displaying different color spaces and can be viewed with any text editor.
Houdini ships with a pre-built version of the OCIO library, including support for the Python module. It also ships with a slightly enhanced version of the ACES 1.0 config file. This config file is shipped as a Houdini Package. You can view and edit the configuration file by using the OCIO Editor from the Edit menu.
Color spaces 
When you work with digital footage, you have to consider color spaces. With images or video, you typically work with RGB, where the pure three primary colors (red, green, blue) add to white. RGB colors are additive in contrast to the subtractive CMY (cyan, magenta, yellow), where all primaries mix to black. However, colors are interpreted differently by different devices, sensors and applications, but also by the human eye.
A color space is basically a range of colors that can be recorded or displayed. The basis for the definition of a color space is the CIE 1931 XY Chromacity Diagram. This diagram shows all colors of the visible spectrum. The shape of the colored area is also known as “horseshoe”.

Inside the CIE diagram you can often see one or more triangles.The entirety of colors inside a color space’s triangle is called gamut. Primaries determine the brightest red (R), green (G) and blue (B) tones of a color space. They represent the edge points of the gamut triangle.
One of the most common color spaces is sRGB and it’s a standard for many devices like cameras and monitors. The acronym stands for “standard Red Green Blue”. A second, very common color space is Rec.709 with the same gamut as sRGB.

OCIO can handle a large number of color spaces. For artists, one of the most important spaces is ACEScg. The gamut of the ACES color space includes significantly more colors than Rec.709 and sRGB. When you take a close look at the CIE diagram, you can see that ACEScg even includes colors outside the visible spectrum. ACEScg is a standard linear color space and supported by most DCC applications.

Gamma 
Footage with, for example, Rec.709 or sRGB color profiles always has a gamma value applied. The technical background of gamma is to compensate for lossy quantization on our widely-used and common 8-bit displays: these display types aren’t capable of accurately reproducing the encoded values of the original image. A gamma curve takes the original linear values and maps them to new values. In most cases, image formats like JPG or PNG already have a gamma curve applied for encoding purposes. Formats like EXR or HDR, however, are normally stored with a linear space (see below).
Aside from the technical aspect there’s also an artistic component. When you take a photo and save it as JPG, for example, the camera applies a gamma value and enhances the dark tones. This is the image gamma. As a side effect, the image now corresponds with our familiar perception with details in dark areas, balanced contrast and proper saturation. When you open the image on a display, it normally looks bright because the dark areas are brightened. To compensate for the file’s image gamma, the monitor is calibrated with a display gamma.
Note
When you work in Photoshop and apply a gradation curve, you basically apply a custom gamma curve, for example to brighten dark colors or adjust contrast. This is independent of how the colors are stored in an image file.
On a correctly calibrated monitor both, image gamma and display gamma, cancel each other and you get a straight line, representing the original light situation. This straight line marks a gamma of 1.0 and ensures that the original input is the same as the output on your screen. This result is called system gamma. In fact, system gamma is typically slightly greater than 1.0 to improve contrast.

Linear color spaces 
In a linear world, an input signal with a strength of 1 produces an output signal with the same strength. In a diagram, this relationship results in a straight line, shown below. The linear color space is very convenient because it makes the math, required for color manipulation, work in a sensible way.

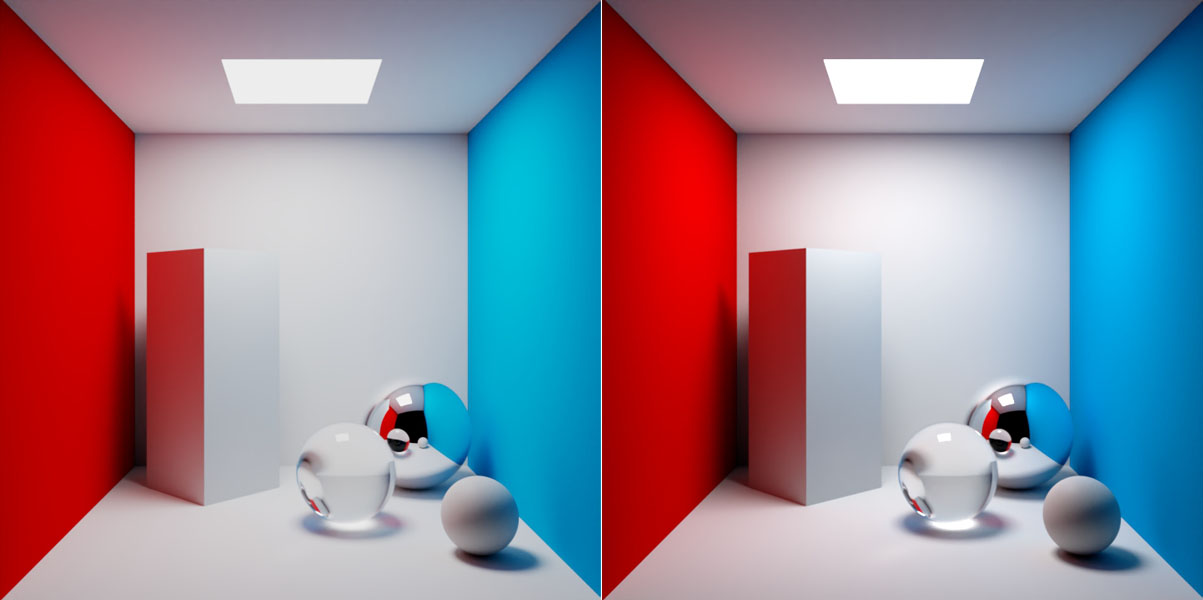
Without a display space applied, images with a linear color space don’t correspond to our perception because the human eye doesn’t perceive brightness linearly. The human eye is adaptive and able to resolve detail in shadows and balance out strong differences in brightness: if a color has an intensity of 0.5, then the human eye doesn’t see 1.0 as twice the brightness. The left image below has a gamma curved applied, while the right image shows an uncorrected linear render.

ACES 
ACES stands for Academy Color Encoding System. ACES is a color management environment with tools for conversion and several wide-gamut color spaces. The system is embedded inside the OCIO system that provides the tools and specifications for working in a particular color space. The ACES2065-1 color space covers the entire visible spectrum. The development of ACES started in 2004 and now it’s the standard for almost any digital production because of its advantages.
-
ACES-compliant applications represent colors consistently.
-
Wide gamut to represent most parts of the visible spectrum.
-
Much higher dynamic range than, for example, sRGB-encoded images.
-
White point that correlates with the standard daylight color temperature of 6000 K, also called D60.
-
Dedicated ACEScg color space for VFX works.
-
Various utility transforms are included.
All this results in much better images with more detail in dark areas, while bright areas are preserved at the same time.
Colorspace conversion 
Image-processing applications like compositing tools and render engines have to deal with a wide range of input data: video, digital images, textures, geometry data like attributes and PrimVars, and swatches. All these different types of data can have different input spaces and may have to be converted to the scene_linear color space as well. The conversion removes any existing gamma curve and restores the original linear state. In most cases, e.g. in compositing packages, Houdini’s Karma render engine and COPS, this conversion is done automatically.
When you render and save an image, you have to specify an output space or render space. Normally, the rendered image is sent to another application for post-processing. In this case, the output space is also linear, and the file is typically saved as an EXR. If the image is presented to a viewer, it’s often converted into a gamma-corrected sRGB file like JPG or PNG because all other applications expect these files to store their image data in sRGB space. Anyway, if you're using a color-managed image viewer, you can also save files in a linear format.
The common standard for color space conversion is OCIO. OCIO automatizes the various conversion tasks and maintains a consistent look through predefined rules and roles:
-
Rules describe how files are imported and converted
-
Roles describe the application’s workspace
After the conversion, the images don’t appear natural to the human eye since the gamma has been removed. Therefore, a display space is applied. The display space doesn’t transform the data, written to disk, and its only purpose is to prepare the data for correct display by adding the display gamma, so that the monitor can reproduce the original signal. As a byproduct, the resulting image is more in line with our viewing habits.
In a nutshell, the different conversion methods in a linear workflow are as follows:
-
Load the footage with an input space like sRGB, log, or linear
-
Convert the footage to a common linear workspace
-
Apply a display space without physical conversion for viewing purposes
-
Export the footage for further processing or final viewing with an appropriate output space
Houdini and Karma will do all this automatically, based on the file_rules in the OCIO config file and the artist will not have to do anything for color spaces to work as expected.
Houdini provides file_rules to OCIO to specify that JPG, PNG and TIFF files, for example, are in sRGB color space. EXR and HDR, however, are often stored in Linear Rec.709 (sRGB). The linear workspace itself is defined through the scene_linear role specified in the OCIO config file.
In Houdini’s OCIO config file, Utility - sRGB - Texture is an alias for the sRGB - Texture space and the important transform is sRGB - Texture to scene_linear (which may not be ACEScg) to make textures look correctly.
File rules tell OCIO which method it has to apply to convert the colors into the linear workspace. OCIO adds flexibility by letting you define custom file rules. This can be necessary when your footage doesn’t follow the predefined rules.
RAW footage 
There are also certain types of texture maps where color information is interpreted in a different way. In displacement maps, colors define elevations. In normal and tangent maps, colors represent directions. In roughness maps, however, colors represent intensities. These map types are considered raw and should be excluded from any conversion (see Manual conversion > MtlX Image).
Geometry properties, attributes and PrimVars 
Properties, attributes and PrimVars are always considered linear by Karma and will not be converted. Future versions of USD will have improved color space support and will allow each PrimVar to have a specified color space.
Manual conversion 
You can also manually convert footage into Karma’s workspace, for example when there’s no input rule defined. In such a case you need a node to tell Houdini what’s the input space and what’s the workspace. Karma provides an Karma OCIO Color Transform VOP node for this purpose.
MtlX Image 
To convert the input file, go to the ![]() MtlX Image VOP node’s Signature dropdown menu and make sure that it’s set to Color. If you want to prevent a file from being converted, choose a non-color entry like Vector 3. This applies to displacement, normal, or specular maps, for example.
MtlX Image VOP node’s Signature dropdown menu and make sure that it’s set to Color. If you want to prevent a file from being converted, choose a non-color entry like Vector 3. This applies to displacement, normal, or specular maps, for example.
Note
Although MaterialX allows you to specify the color space using the File Color Space parameter, this is not supported by USD at this time.
USD UV Texture VOP 
This node provides all attributes of the USD texture primitive. When you load a file, you can set the Source Color Space to one of three choices.
-
sRGB explicitly converts the incoming data from sRGB to scene_linear.
-
Raw loads the data unchanged (for example for displacement, bump or roughness)
-
Auto uses the OCIO file rules to determine the source color space (which is converted to scene_linear).
MtlX Geometry Color 
This node lets you read the geometry points’ color attribute. The Signature parameter can be of Float, Color and Color 4 type. Karma assumes that the geometry color primvar will be in scene_linear color space and performs no color transformation. If required, you can use the Karma OCIO Color Transform node.
Color Editor 
Houdini’s color editor has OCIO support. You can choose colors and view them directly in different color spaces. In the upper left area of the editor, you can find four dropdown menus.
-
View, by default, corresponds with the second menu of the Color Correction bar (Un-tone-mapped). Tone mapping works in conjunction with linear color spaces and “compresses” wide brightness ranges into what displays can show.
-
Pick shows the color space of the color picker tool. The standard space for the tool corresponds with the default Linear Rec.709 (sRGB) Render Working Space of the OCIO Editor. As long as your workspace doesn’t change, you don’t have to change Pick.
-
Input depends on the input space of your footage or textures. The Color Editor lets you load a texture and pick colors from it. If the texture is plain sRGB, for example, then Input should be set to sRGB ▸ Texture.
-
Display doesn’t perform any physical color conversion and its purpose is to show an image that matches our visual habits by adding a gamma curve.
MPlay 
You can render images directly to MPlay or render them to disk and open them later. Like the viewport, MPlay also has a Color Correction bar that lets you apply different display spaces and tone-mapping operators.
AOVs 
You can specify a specific color space for each AOV in the Husk tab of the RenderVar LOP.
Tone mapping 
Note
You can also apply a tone mapping curve to the viewport through the OCIO Editor. By default, the viewport’s tone mapping is set to Un-tone-mapped.
Tone mapping applies a curve or function that takes a luminance value (or an individual color channel) as input and converts it into a value between 0 and 1 - the range that monitors expect. Another aspect of tone mapping is to create an image that better represents reality, for example when you convert HDR (High Dynamic Range) images into SDR (Standard Dynamic Range). This process is subjective because there is no strictly correct choice since it’s impossible to reproduce reality on SDR displays.
Without tone mapping, artists tend to lower the intensities of key lights to prevent highlights from blowing out, but then, everything else becomes darker (due to lower bounce intensity). To compensate for this effect, artists add fake fill lights and often end up with much more complex lighting setups than necessary.
Filmic tone mapping is a special case, where one aspect is to simulate a particular film look. Film material is designed to have a certain “response” to light to enhance contrast and colors, represented as a characteristic S-shaped curve. A filmic tone mapping curve is subdivided into toe, shoulder and linear sections for an image’s dark, bright, and mid tones. Houdini supports filmic tone mapping (see the tip below) and provides several common operators. Each operator applies a specific S-shaped tone mapping curve. You can also choose which AOVs are affected by Houdini’s filmic tone mapping operators. The images here have Aces and Hable2 curves applied.
Tip
You can find the filmic tone mapping in the ![]() Karma Render Settings LOP. There, open the Image Output ▸ Filters tab. Go to the Image Filters section and choose an entry from Tone Map menu, e.g. Unreal. Then render the image.
Karma Render Settings LOP. There, open the Image Output ▸ Filters tab. Go to the Image Filters section and choose an entry from Tone Map menu, e.g. Unreal. Then render the image.
Color Correction viewport bar 
You can also change display color space and tone mapping for Houdini’s viewport on the Color Correction bar. By default, this bar is not visible. To turn it on, ![]() -click the
-click the ![]() Open display options… icon on the left side of the viewport. From the two options, choose Color Correction.
Open display options… icon on the left side of the viewport. From the two options, choose Color Correction.
The bar will appear directly below the viewport and provides two dropdown menus with SRGB - Display and Un-tone-mapped as default entries.
OCIO Editor 
The OCIO Editor is a convenient tool that lets you edit Houdini’s ocio_config file. There you can define your own rules how incoming footage should be converted in terms of color spaces. Additionally, you can also set your render work space and the tone mapping of the viewport.
You can open the editor with Edit ▸ OCIO Settings… from Houdini’s main menu.

-
The Render Working Space defines the default color space of the rendered image. By default this space is Linear Rec.709 (sRGB). If you want to change this default to ACEScg, for example, choose the entry from the dropdown menu.
-
When you change View Transform, you can set a default display space for the viewport. Note that you currently have to restart Houdini to apply your settings.
Houdini’s default display space is located in the Color Correction bar. To show this bar,
 -click the
  Display options icon. From the appearing menu, choose Color Correction. The new bar is directly located beneath the viewport and the second dropdown (Un-tone-mapped) contains the available display space.
The Input File Rules let you define your own rules or edit the existing rules, shown in the list. EXR files, for example, are converted to Linear Rec.709 (sRGB) by default. Let’s assume you want to convert EXRs to ACEScg instead.
-
Click the
 button to add a new entry. A floating window appears.
 -
Enter a new Name, e.g.
exr_acescg. -
Leave Rule Type unchanged.
You can also choose Regex. The abbreviation stands for “regular expression”. Regular expressions are syntax rules to search for a sequence of characters in a text. Unfortunately, it’s not possible to discuss this complex topic with just a few sentences. However, there are many online resources about how to write regular expressions.
-
Pattern is
*. The asterisk is a wildcard for any incoming file name, but you can also define your pattern. The existing entries on the Pattern column give you an idea how this feature works. Houdini searches the names of the imported files for the patterns given here. -
Now you define the Color Space. From the dropdown menu, choose ACEScg.
-
Use the handles to the left of the Name column. If you want to set your own rule as default, drag the
exr_acescgrule to a position before the existingexrrule. Now your custom rule has higher priority.
Color space metadata 
In USD, color space information is managed using metadata and API schemas. USD allows specifying color space information on layers and attributes, acting as metadata. This metadata ensures the correct interpretation of colors. One way is to author metadata through the ![]() Configure Property LOP. This node provides convenient access to color space profiles.
Configure Property LOP. This node provides convenient access to color space profiles.
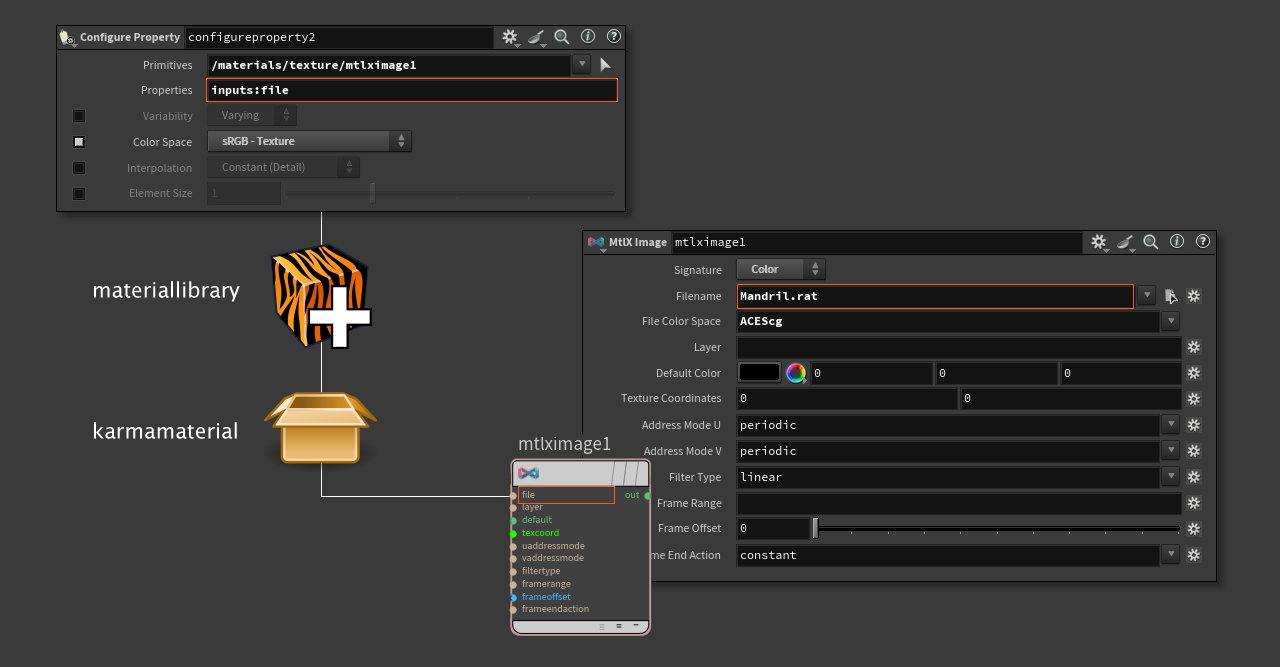
The idea of this node is to apply a profile to a shader property like emission_color or even a texture file. The latter option requires an ![]() MtlX Image VOP that’s connected to a shader input. The image vop has a File Name (
MtlX Image VOP that’s connected to a shader input. The image vop has a File Name (file) parameter that expects the path to a texture. The property configure node is able to read this path. To apply a profile to a shader’s property, you need three parameters.
-
Primitive contains the scene path to the shader VOP with the parameter/property you want to use. Examples are
-
/mat/karmamaterial/mtlximage1 -
/mat/karmamaterial/mtlxstandard_surface1
-
-
Properties expects the input you want to change, for example
-
inputs:file -
inputs:base_color
-
-
Color Space lets you choose a profile from the parameter’s dropdown menu like sRGB - Texture.
Here’s a schematic image of the parameters and how they're connected.
Stage metadata 
It’s possible to author colorManagementSystem and colorConfiguration metadata directly to a USD stage.
-
The
 Configure Layer LOP provides Color Configuration and Color Management System parameters for this purpose.
 -
You can also create the metadata on the
 Configure Stage LOP through a stage variable. Increase the Stage Variable Count parmeter to create a new set of parmeters. Then, fill in the empty fields and make sure that Stage Variable Type is set to String.