Houdini 20.0 Solaris

Karma

Houdini’s Physically Based USD Renderer.

On this page

Overview

Karma is Houdini’s physically-based path tracer, which is deeply integrated with USD (it uses USD as its scene description format and acts as a Hydra render delegate). While it shares some concepts with Mantra, Karma is a completely new renderer intended to replace Mantra for new projects.

Karma can render traditional Houdini Object-level scenes that use the Principled shader (either by rendering them directly with the Karma render node or importing them into USD with the Scene Import LOP).

Karma does not support most VEX shading functions (with the exception of certain uses of trace). It does not support VEX geometry/point cloud lookup functions. It does not support material style sheets which are now deprecated.

XPU

Karma has two render engines: Karma CPU, which runs entirely in software on the CPU, and Karma XPU, which uses CPU resources and also takes advantage of the GPU and hardware acceleration.

Because it must run in the more limited environment on the GPU, XPU drops support for even more legacy features than Karma CPU. Karma XPU will never support VEX-based shaders at all. Currently it supports the built-in USD materials (such as the USD Preview Surface), and MaterialX, which is probably the future of shading in Karma.

See Karma XPU for more information on limitations and support.

How To

To...Do this

Use Karma to render the Solaris viewer

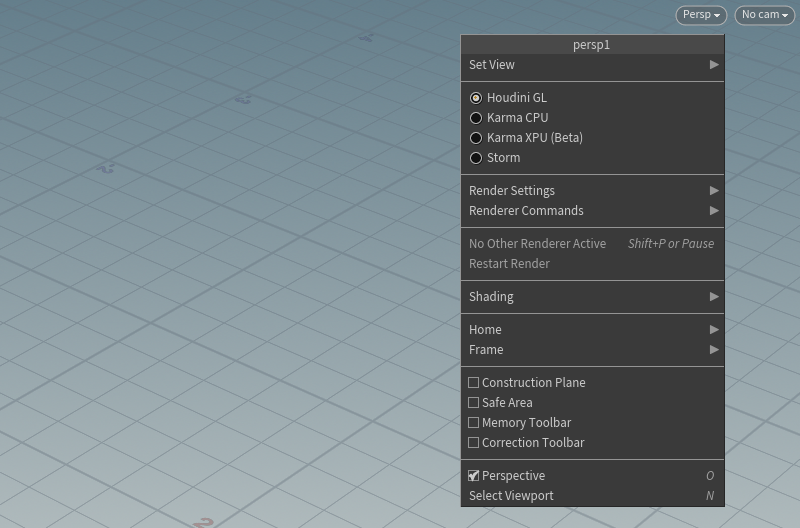
In Solaris, you can choose which Hydra delegate is used to draw the view of the scene, such as Houdini’s OpenGL renderer, Pixar’s Storm OpenGL renderer, Karma CPU, Karma XPU, or any third-party render delegate you have installed.

Click the Viewport Options menu in the viewport and choose Karma.

Save viewport images to the render gallery

(Snapshots taken this way do not capture all AOVs. You have to do a full render to get all the AOVs in the output.)

  1. Click Hide/Show Snapshots Strip in the display toolbar (to the right of the viewer).

  2. In the Render Gallery interface below the viewer, click Snap to take a screenshot of the current contents of the view.

    or

    Click Background to start a background render in the snapshot strip.

See the render gallery help for more information about creating and working with snapshots.

Edit the render settings used in the viewer

Click Display Options in the display toolbar (to the right of the viewer) or press D in the viewer.

These render settings are saved with the current .hip file.

Display render stats in the viewer

  1. Click Display Options in the display toolbar (to the right of the viewer) or press D in the viewer.

  2. In the display options window, click the Guides tab. Under Additional Information, turn on Render Stats.

    This will display information from the renderer below the view menus in the top-right corner of each viewport.

  3. Close the Display Options window.

Set up a LOP network to do a full render

  1. Make sure the scene tree has a Camera prim.

  2. In the LOP network, add a Karma LOP.

  3. In the Karma LOP parameters, set the Camera parameter to the Camera prim’s scene graph path.

  4. Click Render to MPlay at the top of the Karma LOP’s parameters to render into a MPlay preview window.

    As the render progresses in the MPlay window, you can click different areas of the image to concentrate the renderer on that area.

See the help for the Karma LOP for more information.

See also

Solaris

USD

Geometry

  • SOP Geometry I/O

    Details of how Houdini converts SOP geometry to USD, and how you can control the process.

  • Component Builder

    The Component Builder tool puts down a network snippet for creating a USD model from SOPs, with support for materials, variants, payloads, and layering.

Layout

  • Edit node

    Interactively transforms prims in the viewer. Can use physics collisions to position props realistically.

  • Layout node

    Provides tools for populating a scene with instanced USD assets. You can place individual components, paint/scatter components in different ways using customizable brushes, and edit existing instances.

  • Custom Layout Brushes

    How to create layout brush digital assets you can use to customize the behavior of the Layout LOP.

Look Development

  • MaterialX

    Houdini has VOP node equivalents of the MaterialX shader nodes. You can build a shader network using these nodes, or import an existing MaterialX-based shader, and use them with Karma (Houdini’s USD renderer).

  • UDIM Paths

    You can encode different tiles of a texture space into different texture files, each with its own resolution. You can then specify a texture filename such as kaiju.exr, and Houdini will replace the token with the specific tile address at load time.

  • Shader Translation Framework

    Describes the Solaris shading framework, including shader node translation to USD primitives.

Karma rendering

Tutorials