| On this page | |
| Since | 21.0 |
Overview 

Shot Builder Tools help facilitate a multi-shot workflow, without the support of a full production pipeline, etc.
Shot Builder uses the HPR Asset Resolver to organize and automatically version USD layers within your project.
Getting Started 
To get started in Shot Builder, you first need to create a project and some shots
| To... | Do this |
|---|---|
|
Create a new Shot Builder Project |
|
|
Create a Shot/Unit |
|
Now that you have a project and some shots created, you would probably like to start creating / viewing / modifying content for these shots.
| To... | Do this |
|---|---|
|
Load Shot Content |
|
|
Edit Shot Content |
|
|
Output Shot Content |
|
You should now have some populated layers written to disk in your project. If you view from the ![]() Shot Load, you should see your new data being read back in. If you output multiple shots, you can switch between them with the Shot Context menu.
Shot Load, you should see your new data being read back in. If you output multiple shots, you can switch between them with the Shot Context menu.
HPR Asset Resolver 
The HPR Asset Resolver, or Houdini Path Resolver, is a custom USD Asset Resolver used by Shot Builder to
-
organize Project USD Layers, and
-
automate versioning for USD Layers.
Project Organization 
The default root folder for the project is typically $HIP. It can also be set by setting the HOUDINI_SHOTBUILDER_PROJECT_PATH environment variable to the project’s project.json filepath.
Versioning 
Versions for HPR Paths are stored as separate files, under a main .usd folder. By default, HPR Paths automatically target the highest existing version, and will write out to the next available version.
Example 
The first time you write out a given HPR Path, the main .usd folder will be created, and version one of the layer will be saved there. Given a project root folder of /myProjectFolder/,
hpr:folder/layer.usd
will be initially saved as:
/myProjectFolder/folder/layer.usd/layer_v1.usd
Subsequent saves would result in
/myProjectFolder/folder/layer.usd/layer_v2.usd
/myProjectFolder/folder/layer.usd/layer_v3.usd
etc...
When reading a HPR Path, the highest version will be targeted by default, ie
hpr:folder/layer.usd
resolves to:
/myProjectFolder/folder/layer.usd/layer_v3.usd
A specific version can be targeted using a url style suffix:
hpr:folder/layer.usd?v=2
resolves to:
/myProjectFolder/folder/layer.usd/layer_v2.usd
While HPR paths are mostly intended for use within a project, it is also possible to use absolute paths to target layers outside your project, ie
hpr:/absolute/path.usd?v=3
resolves to:
/absolute/path.usd/path_v3.usd
Version Padding 
The padding on the version number of the filepaths can be set via the project.json config.
{
"project": {
    "name": "myProject",
    "version_padding": 4
}
Relative to HPR 
When a hpr path layer uses a relative filepath as a sublayer (or reference, etc), that path will be treated as a HPR Path. For example, if
hpr:folder/layer.usda
sublayers a path
./sublayer.usd
that path effectively becomes:
hpr:folder/layer/sublayer.usda
meaning it is also versioned, and would resolve to something like
/myProjectFolder/folder/layer/sublayer.usda/sublayer_v3.usda
Non-Versioned Paths 
HPR Paths can also point to non-versioned usd files. There are two ways to accomplish this.
First, the project config can be used to set a list of directories that should not contain versioned usd files. This is under the project section of project.json, using the non_versioned_folders key, ie:
{
"project": {
    "name": "myProject",
    "non_versioned_folders": [
        "relative/non_versioned_folder/",
        "*/non_versioned_folder/*",
        "/absolute/non_versioned_folder/"
    ]
}
The other way to target non-versioned USD files with HPR Paths is if they already exist on disk as non-versioned files. For example, if the following file exists on disk:
/myProjectDir/file.usda
then:
hpr:file.usda
resolves to:
/myProjectDir/file.usda
Using non_versioned_folders in the config is the only way to write non-versioned USD layers, if the file hasn’t previously been written out.
Configuration 
The project.json config file is used to customize your Shot Builder Project and define the Unit Types along with optional sublayers to be used within your project.
Example Config
{
  "project": {
    "name": "myProject",              \\ project name
    "unit_context_option": "shot",    \\ context option to drive current shot
    "default_fps": "24.0",            \\ default fps for all units in project
    "default_start_frame": "1001",    \\ default start frame for all units in project
    "default_end_frame": "1020",      \\ default end frame for all units in project
    "sublayer_format": "usda",        \\ default USD format for unit layers in project
    "version_padding": 4,             \\ version padding for versioned files (see HPR Paths)
    "unit_templates": {               \\ this is where you define various unit types
      "shot": {                       \\ defines 'shot' unit type
        "name": "s%04d",                 \\ name template for shot units (printf)
        "icon": "shotIcon",              \\ icon for the 'shot' unit type
        "fps": "24.0",                   \\ 'shot' unit override for default_fps
        "start_frame": "1001",           \\ 'shot' unit override for default_start_frame
        "end_frame": "1024",             \\ 'shot' unit override for default_end_frame
        "sublayer_format": "usd",        \\ 'shot' unit override for project sublayer_format
        "sublayers": {                   \\ list of sublayers 'shot' units should have
          "./lighting.usda": {                  \\ relative reference to lighting.usda
            "name": "Shot Lighting",                \\ display name
            "comment": "shot lighting layer",       \\ comment
            "icon": "lightingIcon"                  \\ icon
          },
          "./animation.usda": {                 \\ relative reference to lighting.usda
            "name": "Shot Animation",               \\ display name
            "comment": "shot animation layer",      \\ comment
            "icon": "animationIcon"                 \\ icon
          },
          "./layout.usda": {                    \\ relative reference to lighting.usda
            "name": "Shot Layout",                  \\ display name
            "comment": "shot layout layer",         \\ comment
            "icon": "layoutIcon"                    \\ icon
          },
          "__env__": {}                         \\ placeholder for 'env' type unit
        }
      },
      "env": {                                  \\ define 'env' unit type
        "name_template": "env",
        "sublayers": {
          "./layout.usda": {
            "name": "Env Assets",
            "comment": "environment assets layer",
            "icon": "envIcon"
          }
        }
      }
    },
    "non_versioned_folders": [                  \\ Non versioned folders (See HPR Paths)
        "/nonVersioned/"
    ]
  }
}
Shot Builder Nodes 
The ![]() Shot Load node is the starting point for Shot Builder Workflows. This node loads the currently selected shot context Unit Layer (ie hpr:shot/s0010/shot.usda) and allows you to pin specific versions for specific layers and shot contexts. (See Shot Load Panel)
Shot Load node is the starting point for Shot Builder Workflows. This node loads the currently selected shot context Unit Layer (ie hpr:shot/s0010/shot.usda) and allows you to pin specific versions for specific layers and shot contexts. (See Shot Load Panel)
The ![]() Shot Layer Edit node allows you to target edits at a specific layer, for a specific unit or group of units.
Shot Layer Edit node allows you to target edits at a specific layer, for a specific unit or group of units.
The ![]() Shot Split and
Shot Split and ![]() Shot Switch can be used together, typically inside a
Shot Switch can be used together, typically inside a ![]() Shot Layer Edit or Edit Layer Block to split the node network out into different streams per shot or group of shots, and then bring them back together.
Shot Layer Edit or Edit Layer Block to split the node network out into different streams per shot or group of shots, and then bring them back together.
The ![]() Shot Output node will output USD and\or rendered images to your project.
Shot Output node will output USD and\or rendered images to your project.
Shot Builder Project Panel 
The Shot Builder Project Panel is where you can create new units and modify existing units.
Note
If you have not yet created a project.json config file, the Shot Builder Project Panel will walk you through the process. You will need to first save your scene.
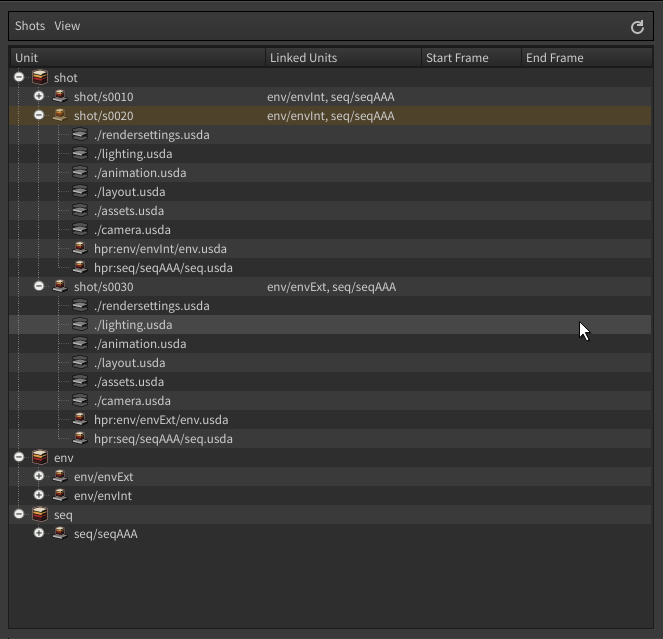
New units can be added via the Shots menu, by choosing Add….
Alternatively, right-click on unit type in the tree view and choose Add new unit…
The reload button (top right corner) will reload the project.json config file from disk, to pick up any changes that may have been made, and refresh the display.
Add Shot Dialog 
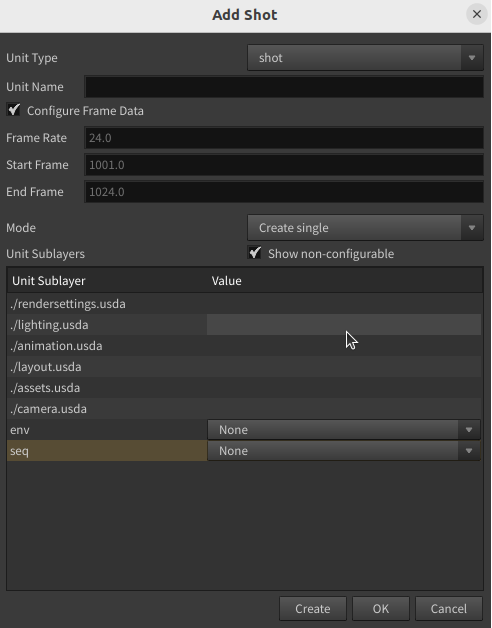
The Add Shot Dialog is where you set up an individual (or multiple at once) shot.
From the Add Shot Dialog you can select a Unit Type for the shot/unit you are defining and give it a name, which should follow the pattern described in your config (ie s%04d). You can optionally configure the frame data for your unit as well.
The Unit Sublayers table at the bottom of the window shows you the list of sublayers and placeholders as defined by your project config. Only the placeholders can be set here, and the drop-down will give you a list of all the available Units for the given Unit Type to choose from.
Tip
Using placeholders is an easy way to share data across multiple Units. For example a Sequence Unit can be used to share data across multiple Shot Unit Types.
| See also |