| On this page |
|
Texture baking is often used in conjunction with game engines, but also in scenarios with limited computer resources or critical render times. The idea is to transfer lighting, shader and geometry information from one model to another. Typically, you project details from a high-resolution object onto an identical low-resolution version to recreate surface structures and lighting information. Another, very common method is to bake out computationally expensive or very complex shading and light setups like ambient occlusion or sophisticated shader networks.
Note
Houdini’s ![]() Karma Texture Baker LOP is for Karma CPU only, but uses the GPU for the creation of certain AOVs like ambient occlusion or curvature. The texture baker also has built-in instances of the Intel OIDN and NVIDIA OptiX denoiser.
Karma Texture Baker LOP is for Karma CPU only, but uses the GPU for the creation of certain AOVs like ambient occlusion or curvature. The texture baker also has built-in instances of the Intel OIDN and NVIDIA OptiX denoiser.
AOV types 
The texture baker is capable of rendering a wide variety of AOVs and it’s important to know how the individual types differ. There are three main categories located under the Images tab.
-
The Texture Maps tab creates AOVs from the high-res mesh’s geometric surface topology. There you can find options for different types of normals, ambient occlusion or curvature. You can also find descriptions of the various texture map types at the bottom of this page.
-
The AOVs from the Shader Values tab output a shader’s channels like
base colorormetalness. -
On the Lighting tab you can find AOVs that contain the scene’s lighting situation and you can split this information into passes like
beautyorindirect_diffuse.
Tip
Please also read the Material chapter below. There you can find information on which AOV type requires a material for the baking process.
Basic workflow 
This short workflow guide describes the basic usage of the Karma Texture Baker LOP with its default settings.
Note
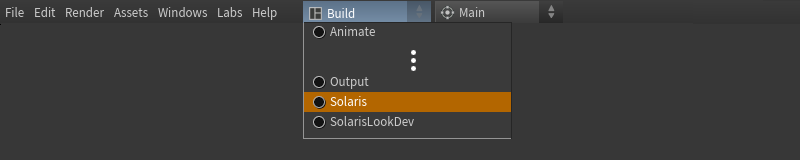
All references to UI elements are based on Houdini’s Solaris desktop. To apply this desktop, go to the main menu bar, open the first dropdown menu (set to Build by default) and choose Solaris or Solaris LookDev.
What you need is a low-resolution mesh and a high-resolution mesh. The texture baker requires a camera, and you can add a custom ![]() Camera LOP. However, that’s not mandatory because the texture baker creates a
Camera LOP. However, that’s not mandatory because the texture baker creates a __HoudiniTextureBakerCamera internally. To get correct results. the low-res mesh should also contain normals. On the Baking tab you can find a Low Res Normals dropdown menu with several options how to deal with missing normals.
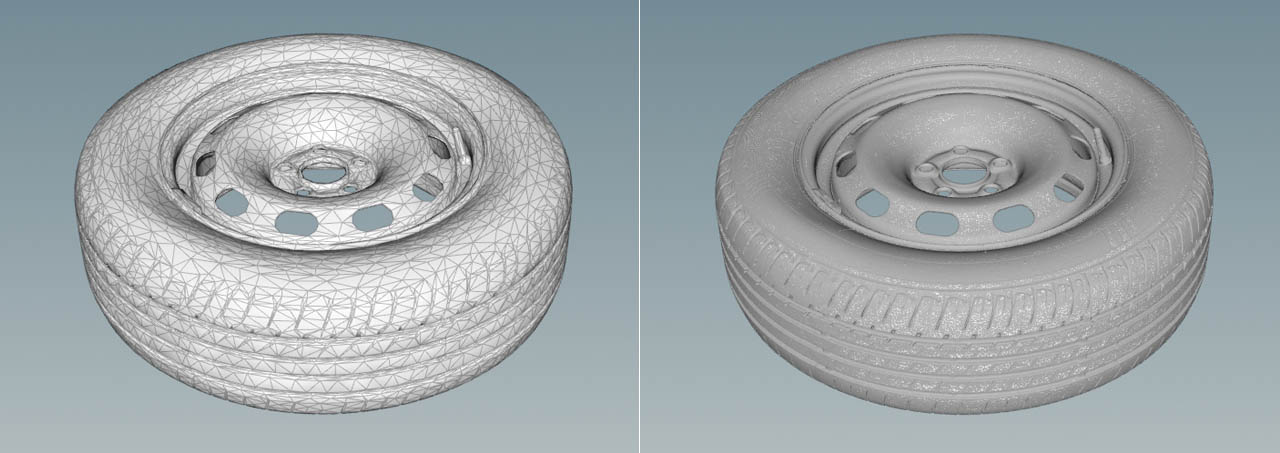
The meshes show the free 'Rusty Wheel' asset from Quixel available on fab.com.
With the default settings, the texture baker uses a ray tracing method to sample the geometry from the high-res mesh and projects it onto the low-res mesh. You can create a wide range of AOV outputs such as ambient occlusion, different types of normal maps, or curvature. You don’t need a shader to bake a texture because you’ll sample the details directly from the surface structure of the high-res mesh. To improve the quality of the AOVs, you can use various sampling parameters or Houdini’s built-in denoiser.
If the high-res mesh has a shader applied, it’s possible to export shader values like base color, roughness or specularity. You can also bake a scene’s lighting situation to AOVs like beauty and diffuse; custom AOVs are supported as well.
LOP network 
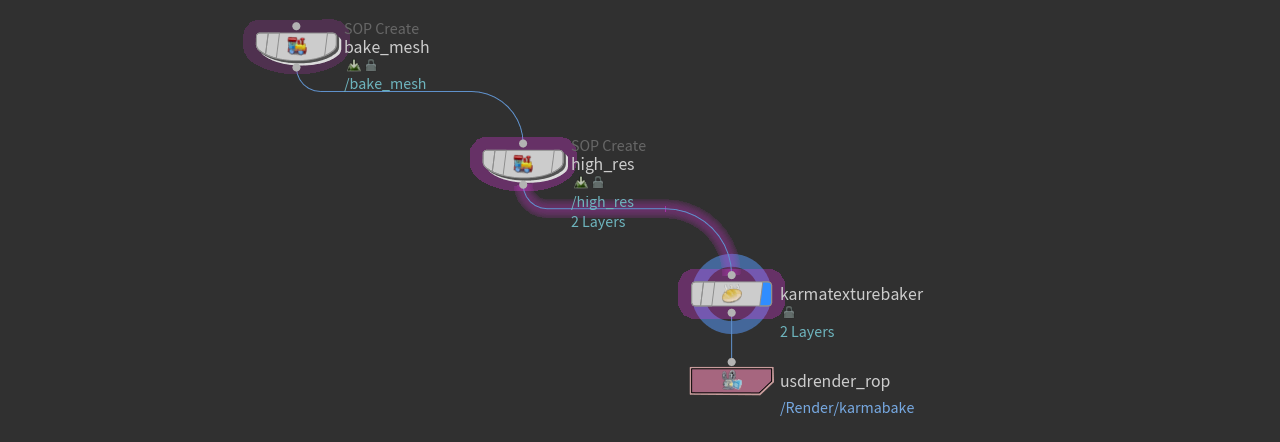
When you add the baker node from the tab menu, you’ll see that it’s connected to a ![]() USD Render ROP. The ROP node is preconfigured and writes the texture baker’s output to disk on demand.
USD Render ROP. The ROP node is preconfigured and writes the texture baker’s output to disk on demand.
You also need at least two upstream nodes for the low-res mesh and high-res mesh. This can be a ![]() File LOP, a
File LOP, a ![]() SOP Import LOP, a
SOP Import LOP, a ![]() SOP Create LOP, or a combination of these nodes.
SOP Create LOP, or a combination of these nodes.
If you want to use a material, place a ![]() Material Library LOP between the baker and the high-res mesh. Inside the library, you can then create a shader with the Karma Material Builder from the tab menu. Camera and light LOPs you want to use for the map creation process also have to be placed upstream of the texture baker.
Material Library LOP between the baker and the high-res mesh. Inside the library, you can then create a shader with the Karma Material Builder from the tab menu. Camera and light LOPs you want to use for the map creation process also have to be placed upstream of the texture baker.
Quick setup 
To make things work, add the USD path of the low mesh to the baker node’s Low Res Mesh parameter, for example /lowres_mesh. If you want to use your own camera, add its path to the Dicing Camera parameter.
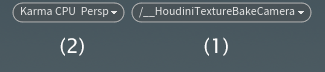
In the viewport, select a camera (1) and start the Karma CPU render engine (2). After a few moments the result appears in the viewport. If you want to inspect the various AOVs, click the ![]() Viewing output button on the Display toolbar. The button’s dropdown menu contains a dynamic list of all active AOVs.
Viewing output button on the Display toolbar. The button’s dropdown menu contains a dynamic list of all active AOVs.
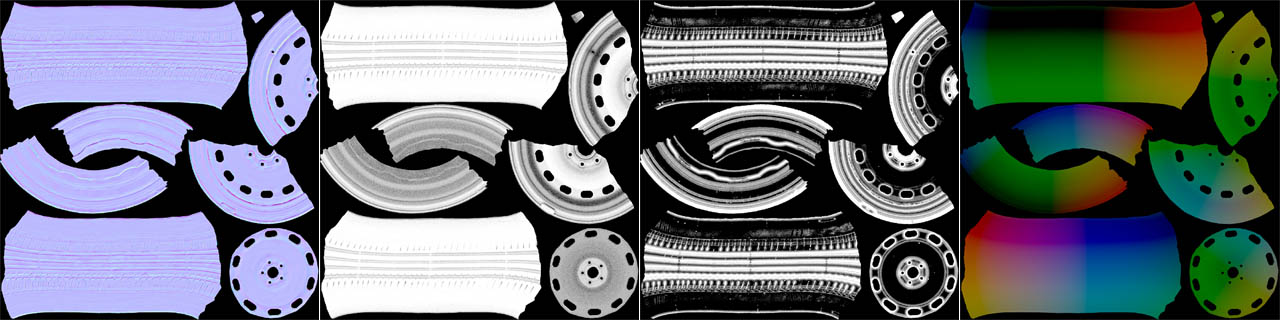
Now, select the Karma Texture Bake LOP in the Network Editor and take a look at the Scene Graph Tree. If the tree is collapsed, expand its /Render/karmabake/Products path. There you can see all the outputs you’ll be creating from the descendants of the /Vars branch. The content of Vars corresponds with your choice of AOVs on the baker’s Outputs, Shader Values and Lighting tabs.
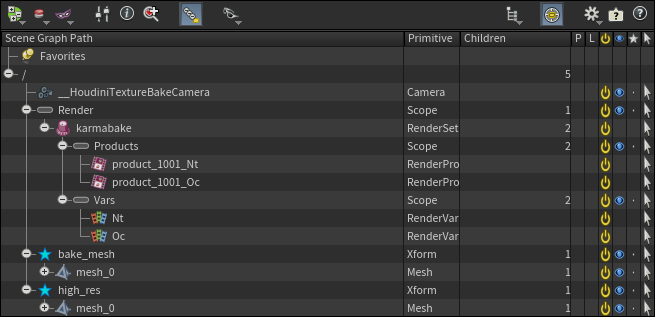
The names under Products are a combination of
-
a
productprefix -
the Name Separator parameter - the underscore
_ -
the UDIM index
-
and the entries of the
Varbranch.
By default, the baker writes out one file per AOV in PNG format. On the Images tab you can change the format or pack everything into a single EXR file. When you turn on Save as Mipmapped Texture, you can write out a tiled texture for efficient rendering. Note that this option is only available with TIFF, EXR, and RAT file formats.
In the path node’s general section, define the Output Picture path. The <UDIM> variable in the filename adds the UDIM index. Resolution lets you define the output images' horizontal and vertical texture size.
You're ready to write out the maps. Select the USD Render ROP and click one of the Render to… buttons. Depending on factors like system specs, resolution, complexity of the meshes, and the number of AOVS, the baking process can take a while. Once done, you can find the map(s) in the specified output directory.
Mesh types 
There are three different mesh types that are relevant for the baking process.
-
The low-res mesh receives the baked maps and requires proper UVs.
-
The high-res mesh is the high-detail version of the low-res mesh. The maps will be created from the high-res mesh. This type only requires UVs if you're working with texture maps.
-
A cage mesh can help to improve the texture maps if their quality doesn’t meet your expectations. Low-res mesh and cage mesh can have different topology. The usage of a cage mesh is a more sophisticated process and explained separately below.
Materials 
For the AOVs of the Images ▸ Texture Maps tab a material is not required. The AOVs are the result of the ray tracing process that projects surface details onto the base mesh. It’s the high-res mesh’s topology that creates the structures and shading effects on the baked map.
For the AOVs of the Images ▸ Shader Values tab a material is required. The baker supports ![]() MtlX Standard Surface VOP and
MtlX Standard Surface VOP and ![]() MtlX OpenPBR Surface VOP shaders. Another important requirement is that the high-res mesh carries the material. If you forgot to add a material, the node will auto-assign an internal MaterialX shader to prevent you from seeing black renders.
MtlX OpenPBR Surface VOP shaders. Another important requirement is that the high-res mesh carries the material. If you forgot to add a material, the node will auto-assign an internal MaterialX shader to prevent you from seeing black renders.
Shader Values lets you bake any (connected) input of the MtlX Standard Surface VOP shader. For example, if you want to bake the metalness input of a shader, you typically connect a map. Then you go to the texture baker’s Images ▸ Shader Values tab and turn on Metalness to establish a connection between both nodes. The texture baker takes what it gets from the shader inputs. So, the idea behind this feature is to bake more complex shader setups with noise or other procedural effects, combined maps, or expensive calculations.
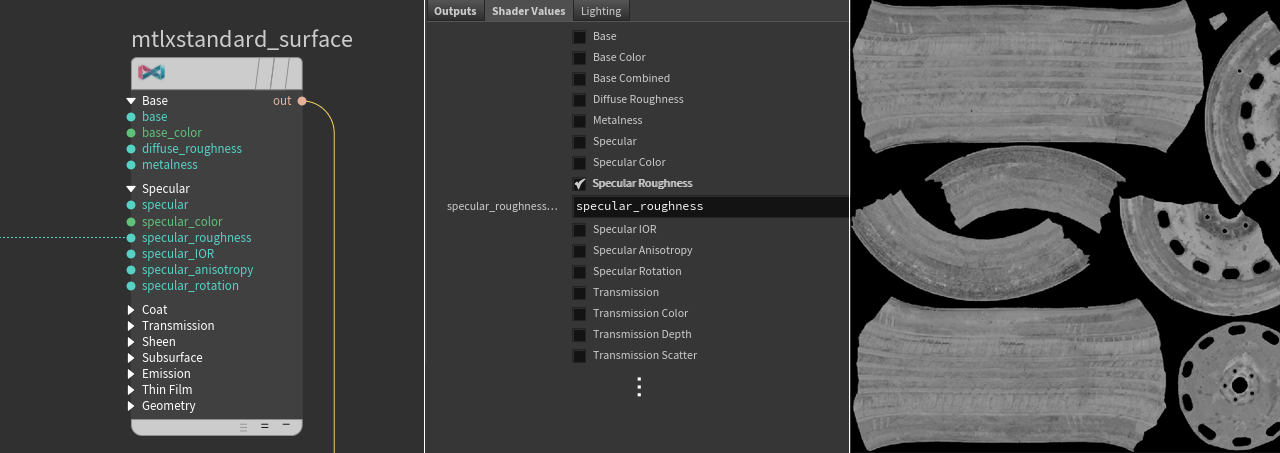
On the left you can see the shader’s parameter. The image in the middle shows the associated shader value on the texture baker. The right image is the result in the viewport.
For the AOVs of the Images ▸ Lighting tab, a shader is also not required. The maps contain the scene’s current light situation and you can output properties like beauty or different diffuse passes.
Camera 
A ![]() Camera LOP is mandatory for dicing. Dicing is the process of subdividing geometry directly at render time to enhance resolution and is always performed by the texture baker when you bake a map. If you don’t specify a custom camera, the texture baker will create an internal camera automatically.
Camera LOP is mandatory for dicing. Dicing is the process of subdividing geometry directly at render time to enhance resolution and is always performed by the texture baker when you bake a map. If you don’t specify a custom camera, the texture baker will create an internal camera automatically.
-
If there’s a camera on the stage, you can add it to the baker node’s Dicing Camera parameter.
-
To see the maps with a correct aspect ratio and perspective, choose the camera from the second dropdown menu of the viewport.
Lights 
The Karma Texture Baker LOP also considers a scene’s lighting situation and can bake it to AOVs such as beauty or combined_diffuse. It’s also possible to define custom AOVS. The relevant parameters are grouped under the node’s Lighting tab. The AOVs from this tab react to any changes of the scene’s light setup.
Please note that light sources do not influence the maps from the Outputs and Shader Values tabs. However, light sources can increase render times of the map creation process. We therefore recommend to turn off light sources if you don’t want to bake lighting. For example, let’s say you want to bake an object’s ambient occlusion. With a light source turned on, render times can increase by 500% or more, but without any visible effect.
Baking modes 
The Karma Texture Baker LOP provides three methods for the creation of maps. You can find them in the node’s Baking Mode dropdown menu. Here’s a short overview.
The default method is Trace. Houdini sends out rays from the low-res mesh in direction of the high-res mesh. When there’s a hit, the geometry information is projected onto the low-res mesh. To make this mode work you have to define the Low Res Mesh parameter.
With UV Match, both low-res mesh and high-res mesh must have UVs. The texture baker compares the mesh’s UVs and looks for matching coordinates. You should use this mode if the two meshes don’t align properly. To make UV Match work, define the Low Res Mesh and High Res Mesh parameters. For more information, please read the UV Match chapter below.
To bake out a Single Mesh, add a mesh path to the Bake Mesh parameter. For the bake mesh, resolution is not relevant.
Refinement 
The Karma Texture Baker also provides several settings to improve the quality of your maps. Yo can find the parameters on the node’s Baking tab. AOV-specific parameters like Occlusion Samples or Thickness Samples are only available when the appropriate AOV is turned on.
Higher Primary Samples can improve the quality of the rendering, but at the cost of longer calculation times. Generally we can say that AOVs will always profit from higher sampling values - Primary Samples and AOV-specific samples. The AOV-specific sampling parameters are available for specific texture maps, for example (ambient) occlusion. You can access the samples when you expand the appropriate section on the Texture Maps tab.
Dicing Quality controls the level of detail when you bake displaced meshes or subdivision surfaces.
Some displacement maps can flip the object’s geometry. To avoid that, open the True Displacement menu and choose Displacement as Bump or Disable Displacement Shaders.
On the Baking tab, there’s a Flip Normals toggle. The texture maps of the Tangent Space and World Space sections also let you choose normal directions and normal handedness. You can choose a mode from the dropdown menus of the Alignment sections.
Tracing parameters 
On the Baking tab you can find several parameters for adjusting the tracing rays. Basically, you can subdivide the parameters into two groups: bias and distance.
The bias is an offset that shifts the starting point of a ray outside the low-res mesh. You can choose from various Trace Bias Mode options to adjust this value:
-
The default Global option lets you adjust a Trace Bias parameter that’s valid for the entire mesh
-
With Attribute, you can define a custom Trace Bias Attribute on the mesh points to adjust the bias locally
-
When you choose Texture, you can create a Trace Bis Texture based on the UVs of the mesh
The maximum distance, on the other hand, is the farthest distance a ray can travel to hit an object. Hits beyond this limit will be ignored. The Trace Max Distance Mode provides the same options as with its bias counterpart:
-
The Global method uses the Trace Max parameter to limit how far a ray can travel
-
With Attribute, you can author a Trace Max Attribute on the mesh points to define local values
-
The Texture option uses a map from Trace Max Texture to set local distance values
Advanced workflows 
The Karma Texture Baker provides a wide variety of extra functions that help to improve the textures, fix not matching geometry, accelerate the baking process, or bake custom AOVs.
Cage mesh 
A cage mesh is an extra mesh that helps you to improve the baked texture maps. Sometimes it’s problematic to determine the direction of trace rays from the low-res mesh to the scene. When you specify a cage mesh, rays are sent from the position on the cage mesh through the corresponding position on the low-res mesh. This leads to finer control when determining the shading position. A cage mesh:
-
only works with Baking Mode set to Trace
-
needs to enclose the high-res mesh completely
On the Karma Texture Baker LOP, turn on Use Cage. This will add a Cage Mesh parameter and a Cage Mode dropdown menu. The first parameter expects the scene path to the cage mesh primitive. The Cage Mode dropdown menu lets you choose from three options.
-
UV Match requires geometry and uses the same UVs as the low-res mesh to find the corresponding hit point on the cage. To determine the hit point on the high-resolution mesh, a ray is cast from the cage intersection towards the low-resolution mesh.
-
Topology Match requires that low-res and cage mesh have the same topology. When a ray hits the low-res mesh, the texture baker will directly “see” the corresponding polygon of the cage. Since both meshes share the same polygon structure, this exact same point is mapped to the corresponding polygon of the cage by interpolating the cage vertices.
-
Cage Offset does not require geometry. This method offsets the current surface position along the low-res normal by the Trace Bias value, effectively pushing the ray origin out to the cage. The ray is then traced inward, in the opposite direction of the normal, to hit the high-res mesh.
Note
UV Match and Topology Match, ignore the Baking tab’s Trace Bias parameter because the cage already defines it.
Cage mesh creation 
A convenient way to set up a cage mesh is to use the ![]() Bake Pre-Process SOP. The node has two inputs for the low-res and high-res meshes, and adds relevant attributes to the cage mesh on the node’s third output.
Bake Pre-Process SOP. The node has two inputs for the low-res and high-res meshes, and adds relevant attributes to the cage mesh on the node’s third output.
The raylength point attribute is of particular importance for cage meshes and you can create it on the the pre-process node. The attribute’s value is calculated from the Ray Start Offset and Ray End Offset parameters. Ray Start Offset inflates the cage and must be large enough to completely enclose the high-res mesh.
To find working values, you can use an interactive mode. Select the pre-process node, hover the mouse over the viewport and press Enter. A HUD with shortcuts and mouse actions appears in the viewport’s upper left corner. Now, increase Ray Start Offset until the orange helper mesh encloses the entire object.
From the Ray End Offset parameter’s dropdown menu, choose Uniform and adjust the value. The blue helper mesh must be larger than the orange offset mesh.
When you press K in the viewport, you can see a cross-section of the various meshes. Use the ![]() to shift the circular clipping plane. To leave the mode, press
⎋ Esc. The image shows the visual representation of the offset parameters and the clipped view.
to shift the circular clipping plane. To leave the mode, press
⎋ Esc. The image shows the visual representation of the offset parameters and the clipped view.

To read raylength on the Karma Texture Baker LOP, select the node and set:
-
Cage Mode to UV Match
-
Trace Max Distance Mode to Attribute
Skew textures 
The texture baker sends out rays to catch the details of the high-res mesh. However, it can happen that the rays hit the wrong side of a polygon or miss it entirely. This can result in reverted surface features or self-intersections.
When you load a map to Bake ▸ Trace Skew Map, you can fix this off-axis projection. A skew map provides a per-pixel correction for the rays to preserve high-resolution details. The map requires the UV layout of the low-res mesh and must have pixel values between 0 (= computed ray direction) and 1 (= surface normal).
Tip
You can paint skew textures directly onto the mesh in Copernicus with the ![]() Paint 3D COP.
Paint 3D COP.
UV Match 
The baker’s Baking Mode also offers a UV Match entry. The idea behind this mode is to synchronize low-res mesh and high-res mesh when they don’t share equal positions. Imagine the following situation:
-
Your low-res mesh is a basic
 Grid SOP with a downstream
  UV Texture SOP that creates the required UVs
 -
The high-res mesh is another grid with UVs, but displaced with hills and valleys. The mesh is also shifted along and rotated around the Y axis
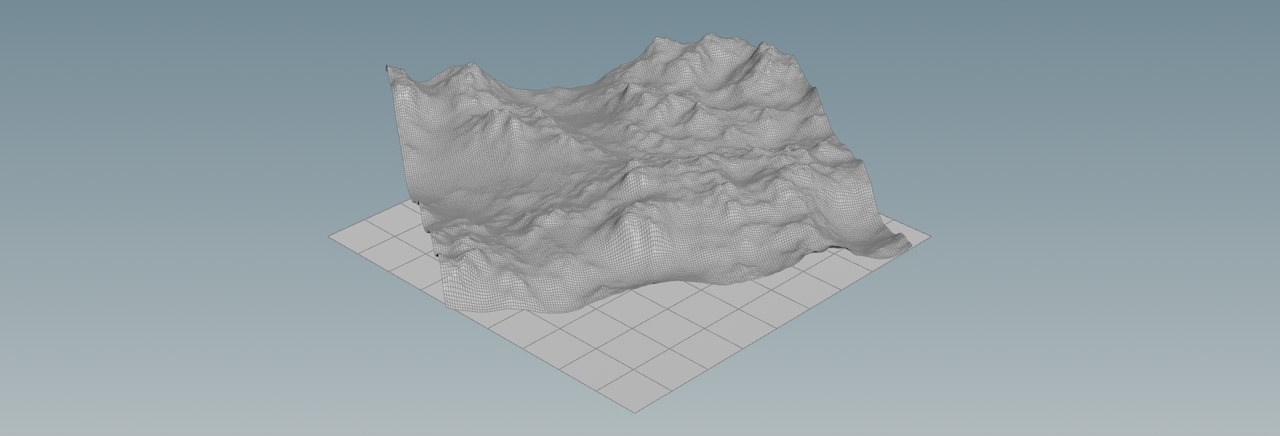
Such a scenario will produce distorted maps because in Trace mode, the baker sends rays from the low-res mesh to the high-res mesh. Since both meshes aren’t aligned you’ll get missing areas or extra parts.
When you change Baking Mode to UV Match, the UVs from both meshes are synchronized and you get a distortion-free texture map again. To make the mode work correctly, you must also point the baker’s High Res Mesh parameter to the appropriate mesh.
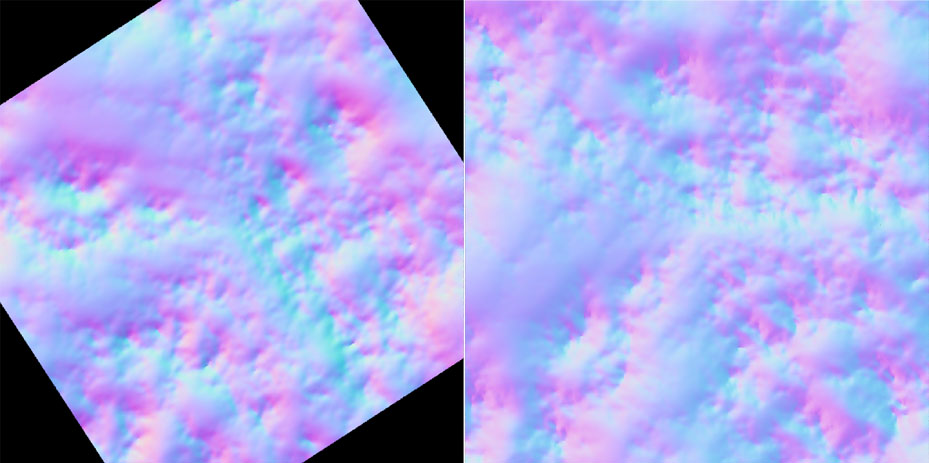
The left image shows the result from the Trace mode. On the right, UV Match was applied to create an undistorted map.
Custom AOVs 
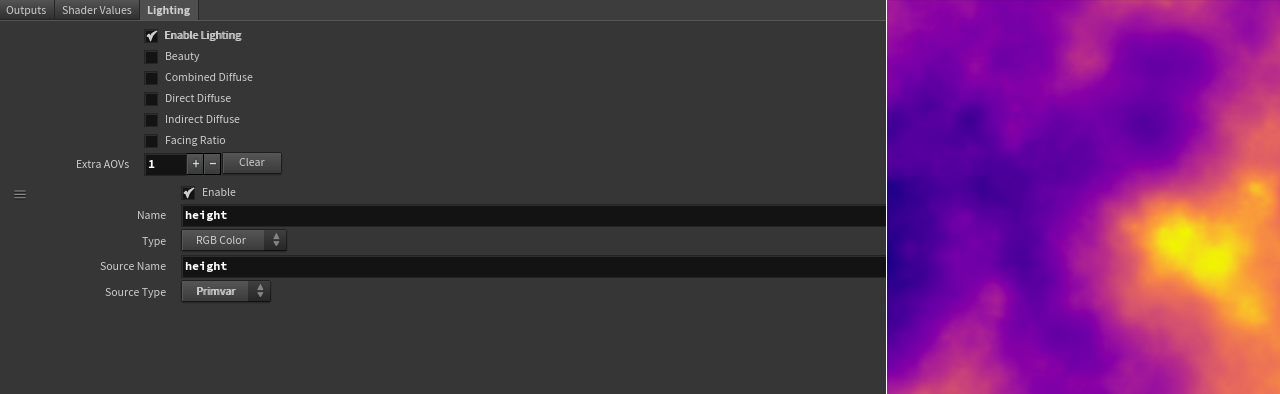
The Karma Texture Baker lets you define and write custom AOVs. For example, if you want to bake out a custom height primitive attribute that comes with the geometry of the high-res mesh, you can do that on the Images ▸ Lighting tab.
-
Turn on Enable Lighting to tell the baker that you want to export custom AOVs. To avoid misunderstandings: a light source is not required for custom AOVs.
-
To create a parameter set for your AOV, go to Extra AOVs and enter
1. -
On the Name input field, enter the name of the AOV, e.g.
height. -
Type defines the attribute’s signature and here, the
heightvalues are color-coded. Open the dropdown menu and choose RGB Color. -
For Source Name, delete the default Light Path Expression, and enter
heightinstead. -
From the Source Type menu, choose Primvar because the source is an attribute (in USD, attributes are called “primvars”).
With Light Path Expressions it’s also possible to bake out the influence of a particular light source on the AOV.
Trace sets 
Trace sets are very similar to geometry subsets and define a certain part of an object. For your convenience, here’s the description of the texture baker’s node help:
Trace sets are used to control which primitives are visible when computing ray tracing effects like occlusion or curvature. There are two sides to trace sets when baking, identifying which trace set a primitive belongs to, and which primitives are visible to the trace set.
Each primitive can only belong to a single trace set, but each trace set can set their visibility to multiple trace sets.
For example, consider four trace sets named face, body, hands and feet. By setting the visibility on the face set to self (or face), only primitives in the face trace set will be used to compute Ambient Occlusion. Setting the visibility on the body set to body feet hands means that the feet, hands and body will cast occlusion shadows when computing Ambient Occlusion on the body primitives.
A string bake_traceset primvar defines the trace sets on the low-res mesh. This is a single name and should match the identifying trace set defined on the high-res mesh. If a trace set is defined on a low-res mesh primitive, the tracing rays are tested against a set of high resolution geometries that are “grouped” under the same trace set name.
If a ray hits an object which doesn’t belong to this trace set, it’ll be ignored.
Texture map types 
On the baker’s Output tab you can find a wide variety of standard AOVs, but maybe you're not sure what they actually do?
Tangent-Space Normal (Nt) 
This map type is what you most probably know from assets or game engines. The colors represent the normal directions. With tangent-space normal maps it’s possible to fake bumps and dents to create surface structures that are otherwise represented as true geometry.
Rounded Normal (Rn) 
Instead of modelling round edges, you can also simulate them by using a special type of normal map. With rounded normal maps it’s possible to create smooth transitions between surfaces without additional geometry.
Position (P) 
This map type uses the UV space and a color gradient to indicate where parts of the high-res mesh are located in world space. The gradient is a visual representation of an object element’s distance from the world’s origin. You can, for example, use this map to create dust or weathering effects that depend on an object’s position.
Normal (N) 
The normal map contains the interpolated normals of the surface, also known as Phong shading . Shading Normals are often used for relighting purposes, but can create noise. In this case you might want to use the Geometric Normal AOV instead.
Geometric Normal (Ng) 
The Geometric Normal map contains the faceted normal of the polygon without interpolation. You can use this type for relighting, for example when you blur the map to smooth the faceting before using it.
Occlusion (Oc) 
An occlusion map represents the amount of ambient light a 3D model receives. Ambient occlusion is what you get when you put an object inside an evenly lit room. Corners and less exposed areas receive a smaller amount of light and appear darker. Occlusion is one of the most important map types because it can greatly enhance realism. However, the creation of occlusion maps is computationally expensive. Baking occlusion maps is very effective method to cut down render times.
Curvature (Cu) 
You can measure the “roundness” of an object and bake this information to a curvature map. Technically, the map stores the convexity and concavity of a surface. Curvature maps are often used as masks for worn edges or damages. Curvature maps are similar to cavity maps, but the latter type mainly focuses on detail, while curvature emphasizes the overall shape of a surface.
Cavity (Cv) 
Cavity maps are similar to occlusion maps, but cover more details. In conjunction with organic tissues you can, for example, enhance pores or other high-frequency structures. In contrast to occlusion maps, with cavity maps there’s no interaction between mesh parts that are close by.
Thickness (Th) 
With thickness maps you can mimic light passing through a surface when lit from behind. Light penetrates an object to certain depth and is then diffusely scattered. A good example is candle wax or skin. The effect is similar to SSS (subsurface scattering). The map encodes thick and thin areas as greyscales.
Edge (Eg) 
This map type is often used as a mask to create worn edges or enhance an object’s shape by colorizing its edges. You can choose whether you want to calculate the edges from the object’s convex or concave polygons - or both.
Height (Ds) 
The height map contains the distance between the low-res mesh and the high-res mesh.
Vector Displacement (Vd) 
Vector displacement maps are used to represent surface structures that are otherwise modeled or sculpted as real geometry. One difference to “standard” displacement maps is that they can contain an objects full high-resolution detail, but vector displacement maps don’t displace the underlying geometry physically. The map’s vectors define the directions of the displacement. With this map type, a higher mesh resolution reveals more details.
Tangent-Space Vector Displacement (Vdt) 
Here, the displacement information is relative to the surface’s tangent space. This allows for even more details, especially in conjunction with deforming or animated meshes.
Alpha (Af) 
The alpha map represents the area of an object without any surface structures. Black areas are treated as invisible to any rays, white areas are fully opaque. The map’s greyscales represent semi-opaque (or semi-transparent) values.