| On this page |
You can turn any primitive into a light source. This makes it possible to create believable renderings of neon tubes, glowing objects, filaments in a light bulb, glowing fog, or fancy lamps. The possibilities are endless.
You can use the ![]() Geometry Light LOP to conveniently convert meshes, points, curves or volumes into light sources. When you create the node, you’ll come across the abbreviation
Geometry Light LOP to conveniently convert meshes, points, curves or volumes into light sources. When you create the node, you’ll come across the abbreviation API. The good news is that you don’t have to care about the technical aspects, but if you're interested, just read the note below.
Note
A schema in general is an extension to the basic USD data model for defining new types of primitives. An API schema provides a programming interface to manipulate the properties of the primitive.
The API Schema tells Solaris/USD which type of light it has to expect and there are three variants.
-
LightAPI. This schema is the most versatile option and turns any geometry into a light source, for example meshes, points, and curves.
-
MeshLightAPI creates the same results as the LightAPI, but is strictly limited to meshes.
-
VolumeLightAPI is, similar to the MeshLightAPI, restricted to volumes.
Once you've chosen a schema/type, you can start to adjust the light’s properties. The parameters of the three tabs are the same as with “traditional” light sources. You can define strength and color of the light source, customize the shadow color, or extract your lights through LPEs for compositing. If you're already familiar with lights in Solaris, you’ll immediately recognize how to adjust a geometry light.
If you're not familiar with lighting in Solaris, we recommend reading the geometry light node’s help card to get an idea of the parameters' function.
Conversion 
The fundamental setup requires only two nodes:
-
a node that carries the geometry
-
the downstream Geometry Light LOP
When you convert a primitive into a light source, make sure to use the appropriate primitive type. To understand this rule take a look at the Scene Graph Tree below. There you can find a Primitive Type column. For example, the actual geometry primitive (“Gprim”) is grouped under the houdini_curve branch and its type is BasicCurves. If you choose the component, nothing will happen and your rendering remains dark. Note that the Geometry Light LOP doesn’t do any plausibility checks whether your selection creates a working light or not.
Other examples for primitive types are Points, Mesh and Volume. The screenshot also shows that the available API types have different icons.
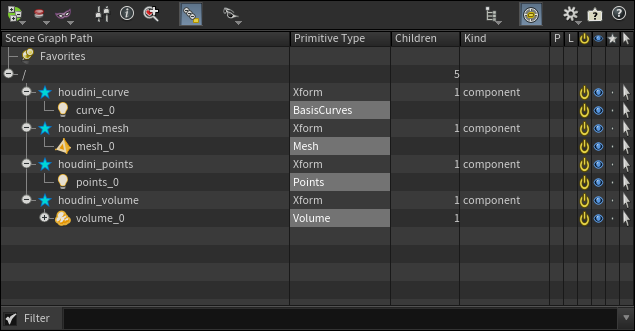
To connect primitive(s) and light node, go to the node’s Primitives parameter, and enter the Scene Graph Tree path(s). For the curve example above, the path would be /houdini_curve/curve_0. Alternatively, you can also drag a primitive from the tree to the parameter.
Width and scale 
With curves and points you can customize width and pscale attributes to get strokes and light dots of different size. If you load the geometry via a ![]() SOP Import LOP or a
SOP Import LOP or a ![]() SOP Create LOP, you can adjust a fixed scale that is valid for all elements:
SOP Create LOP, you can adjust a fixed scale that is valid for all elements:
-
On the import/create node, expand the Geometry Handling section and enter a value for Set Missing Widths.
Alternatively, you can also create appropriate attributes directly on the SOP geometry. A convenient method is to place an ![]() Attribute Randomize SOP downstream of the geometry node:
Attribute Randomize SOP downstream of the geometry node:
-
For Attribute Name enter
widthorpscale. Both names are valid and in Solaris,pscalewill be converted into awidthprimvar automatically. -
On the Distribution tab, set Dimensions to
1, becausewidthis a scalar. -
Define the Min Value and Max Value parameters. We recommend to start with rather small values like
0.01and0.1.
The variable width creates the impression of a hand drawn object:

Volumes 
For volumes, the mode of operation is the same as for points or meshes, and you need the Gprim. There’s a VolumeLightAPI schema available for this type. You can use Houdini’s own volume SOPs or VDBs. The Geometry Light LOP supports density-based volumes, but also volumes made from distance fields.
Emission materials 
The object you want to turn into a light source might already carry an emissive material and the question is how the Geometry Light SOP handles this additional source?
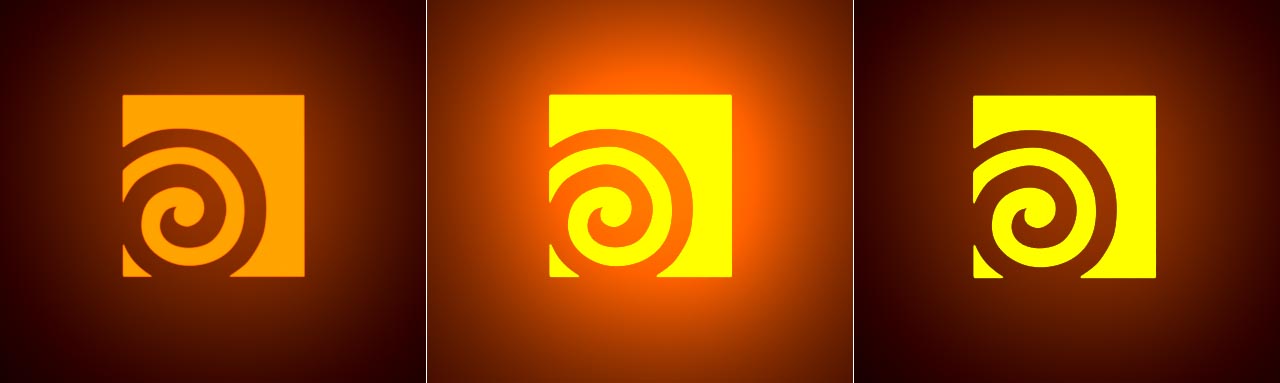
In this example, the Houdini logo has a strong emissive material with a yellow color. The Geometry Light LOP, however, applies the standard orange color. The light node’s Standard tab provides a Material Sync Mode with three options. Here you can choose how the material should contribute to the final light situation.
-
The default No Material Response mode ignores the material and will only take the geometry light’s Intensity and Color into account. The result is what you would expect without an emissive material.
-
With Material Glow Tints Light, logo and illuminated area are a mixture of the material’s yellow and the geometry light’s orange color.
-
With Independent, the logo has the emissive material’s yellow color, while the illuminated area has the light’s orange color.
Limitations 
Although geometry lights are fully qualified light sources, there are a few restrictions:
-
There’s a parameter for light filters, but they're currently not supported on geometry lights.
-
It’s not possible to instance geometry lights.
-
You can’t define individual colors for point or curve primitives. For example, if you create a random
Cdattribute for a point cloud, it’ll be overridden by the Geometry Light LOP’s Color parameter.
LPEs 
Technically, geometry lights are light sources even if they have an emission shader applied. Therefore, geometry lights will be considered by LPEs with a terminating L event. You can read more about this topic on the Light Path Expressions page.